
User Guide
Page 2
... operating and maintenance (servicing) instructions in accordance with the limits for future reference. MKS8580.O/M.QXD 8/6/03 3:09 PM Page 1 Dear Customer, Please read this equipment does cause harmful interference to radio or television reception, which the receiver is connected. • Consult the dealer or an experienced radio/TV technician for help. Keep these instructions handy for a Class B digital device, pursuant to Part...
... operating and maintenance (servicing) instructions in accordance with the limits for future reference. MKS8580.O/M.QXD 8/6/03 3:09 PM Page 1 Dear Customer, Please read this equipment does cause harmful interference to radio or television reception, which the receiver is connected. • Consult the dealer or an experienced radio/TV technician for help. Keep these instructions handy for a Class B digital device, pursuant to Part...

User Guide
Page 3
.... MKS8580.O/M.QXD 8/6/03 3:09 PM Page 2 Dear Customer: Selecting fine audio equipment such as the unit you have established a comfortable sound level: • Set the dial and leave it there. After all, we want you to prevent hearing damage or loss in front of speakers, ... Over time your hearing "comfort level" adapts to consider how you can maximize the fun and excitement your hearing. To establish a safe level: • Start your volume control at a safe level BEFORE your sensitive hearing. Since hearing damage from traffic 50 Light traffic, normal conversation, quiet office...
.... MKS8580.O/M.QXD 8/6/03 3:09 PM Page 2 Dear Customer: Selecting fine audio equipment such as the unit you have established a comfortable sound level: • Set the dial and leave it there. After all, we want you to prevent hearing damage or loss in front of speakers, ... Over time your hearing "comfort level" adapts to consider how you can maximize the fun and excitement your hearing. To establish a safe level: • Start your volume control at a safe level BEFORE your sensitive hearing. Since hearing damage from traffic 50 Light traffic, normal conversation, quiet office...

User Guide
Page 4
... product and in proper operating condition. 21. REPLACEMENT PARTS When replacement parts are required, be sure the service technician uses replacement parts specified by the manufacturer or those controls that they exit from heat sources such as opening or removing covers may expose you are provided for ventilation and to service this indicates a need for service. 23. When the power-supply cord or plug is operated. 2. d. e. this product yourself as...
... product and in proper operating condition. 21. REPLACEMENT PARTS When replacement parts are required, be sure the service technician uses replacement parts specified by the manufacturer or those controls that they exit from heat sources such as opening or removing covers may expose you are provided for ventilation and to service this indicates a need for service. 23. When the power-supply cord or plug is operated. 2. d. e. this product yourself as...
User Guide
Page 5
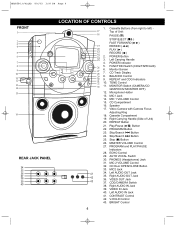
... Control 4 Microphone Holder 13. PROGRAM and PLAY/PAUSE Indicators 28. PHONES (Headphones) Jack 31. POWER Indicator 26 5. 6. MONITOR Switch (CAMERA/CD GRAPHICS/ MONITOR OFF) 12. PROGRAM Button 23. MIC2 Jack 41 34. REPEAT and CDG Indicators 31 32 10. Stop (■) Button 26. REPEAT Button 21. Left AUDIO OUT Jack 42 35. TONE Control 33 11. Right AUDIO IN Jack 39. MIC 1 VOLUME Control 15. MASTER VOLUME Control 27. CONTRAST Control 42. FUNCTION Switch (CDG/TAPE/AUX) Monitor Screen...
... Control 4 Microphone Holder 13. PROGRAM and PLAY/PAUSE Indicators 28. PHONES (Headphones) Jack 31. POWER Indicator 26 5. 6. MONITOR Switch (CAMERA/CD GRAPHICS/ MONITOR OFF) 12. PROGRAM Button 23. MIC2 Jack 41 34. REPEAT and CDG Indicators 31 32 10. Stop (■) Button 26. REPEAT Button 21. Left AUDIO OUT Jack 42 35. TONE Control 33 11. Right AUDIO IN Jack 39. MIC 1 VOLUME Control 15. MASTER VOLUME Control 27. CONTRAST Control 42. FUNCTION Switch (CDG/TAPE/AUX) Monitor Screen...
User Guide
Page 6
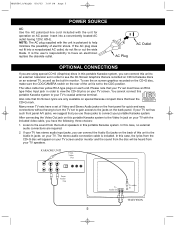
... an RCA type Video Input jack in monitor. The video cable has yellow RCA type plugs on special Karaoke compact discs that On Screen lyrics are using special CD+G (Graphics) discs in this unit to the Audio In jacks on the rear of Video and Stereo Audio jacks on the front panel for operation on your TV screen. NOTE: The AC plug supplied with the unit is the user's responsibility to help minimize the...
... an RCA type Video Input jack in monitor. The video cable has yellow RCA type plugs on special Karaoke compact discs that On Screen lyrics are using special CD+G (Graphics) discs in this unit to the Audio In jacks on the rear of Video and Stereo Audio jacks on the front panel for operation on your TV screen. NOTE: The AC plug supplied with the unit is the user's responsibility to help minimize the...
User Guide
Page 7
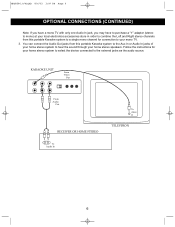
... Audio In jack, you may have to purchase a "Y" adapter (stereo to mono) at your local electronics accessories store in TELEVISION 6 Follow the instructions for connection to your home stereo system to select the device connected to a single mono channel for your mono TV. 3. You can connect the Audio Out jacks from this portable Karaoke system to the Aux In or Audio In jacks of your home stereo system to hear the sound through your home stereo speakers...
... Audio In jack, you may have to purchase a "Y" adapter (stereo to mono) at your local electronics accessories store in TELEVISION 6 Follow the instructions for connection to your home stereo system to select the device connected to a single mono channel for your mono TV. 3. You can connect the Audio Out jacks from this portable Karaoke system to the Aux In or Audio In jacks of your home stereo system to hear the sound through your home stereo speakers...
User Guide
Page 8
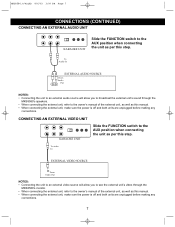
... Page 7 CONNECTIONS (CONTINUED) CONNECTING AN EXTERNAL AUDIO UNIT KARAOKE UNIT Slide the FUNCTION switch to the AUX position when connecting the unit as per this step. To Audio In EXTERNAL AUDIO SOURCE From Audio Out NOTES: • Connecting the unit to an external audio source will allow you to see the external unit's video through the MKS8580's speakers. • When connecting the external unit, refer to the owner's manual of the...
... Page 7 CONNECTIONS (CONTINUED) CONNECTING AN EXTERNAL AUDIO UNIT KARAOKE UNIT Slide the FUNCTION switch to the AUX position when connecting the unit as per this step. To Audio In EXTERNAL AUDIO SOURCE From Audio Out NOTES: • Connecting the unit to an external audio source will allow you to see the external unit's video through the MKS8580's speakers. • When connecting the external unit, refer to the owner's manual of the...
User Guide
Page 9
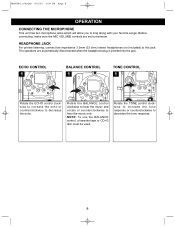
... 3:09 PM Page 8 OPERATION CONNECTING THE MICROPHONE This unit has two microphone jacks which will allow you to decrease the tone response. 8 NOTE: To use the BALANCE control, a karaoke tape or CD+G disc must be used. HEADPHONE JACK For private listening, connect low impedance 3.5mm (32 ohm) stereo headphones (not included) to minimum. Before connecting, make sure the MIC VOLUME controls are automatically disconnected when the headphone plug is inserted into...
... 3:09 PM Page 8 OPERATION CONNECTING THE MICROPHONE This unit has two microphone jacks which will allow you to decrease the tone response. 8 NOTE: To use the BALANCE control, a karaoke tape or CD+G disc must be used. HEADPHONE JACK For private listening, connect low impedance 3.5mm (32 ohm) stereo headphones (not included) to minimum. Before connecting, make sure the MIC VOLUME controls are automatically disconnected when the headphone plug is inserted into...
User Guide
Page 10
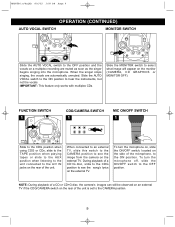
... unit is set to see the song's lyrics on the external TV. FUNCTION SWITCH 1 CDG/CAMERA SWITCH 1 MIC ON/OFF SWITCH 1 Slide to the CDG position when using CDG or CDs, slide to the TAPE position when playing tapes or slide to the AUX position when listening to the unit connected to the A/V IN jacks on the rear of a CD+G disc, slide to...
... unit is set to see the song's lyrics on the external TV. FUNCTION SWITCH 1 CDG/CAMERA SWITCH 1 MIC ON/OFF SWITCH 1 Slide to the CDG position when using CDG or CDs, slide to the TAPE position when playing tapes or slide to the AUX position when listening to the unit connected to the A/V IN jacks on the rear of a CD+G disc, slide to...
User Guide
Page 11
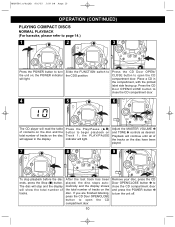
the POWER indicator will light. Slide the FUNCTION switch to open the CD compartment door. Adjust the MASTER VOLUME ❶ and TONE ❷ controls as desired. After the last track has been played, the disc stops automatically and the display shows the total number of tracks on the disc will appear in the compartment, with the printed label side facing up. Place a CD in the display. Press...
the POWER indicator will light. Slide the FUNCTION switch to open the CD compartment door. Adjust the MASTER VOLUME ❶ and TONE ❷ controls as desired. After the last track has been played, the disc stops automatically and the display shows the total number of tracks on the disc will appear in the compartment, with the printed label side facing up. Place a CD in the display. Press...
User Guide
Page 12
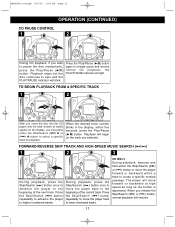
... or backward at high speed as long as the button is depressed. Playback stops but the disc continues to locate a specific musical passage. When the desired track number blinks in the display, within a track to spin and the PLAY/PAUSE indicator will light. Press the Skip/Search ( ) button repeatedly to advance the player to the beginning of the next track. When...
... or backward at high speed as long as the button is depressed. Playback stops but the disc continues to locate a specific musical passage. When the desired track number blinks in the display, within a track to spin and the PLAY/PAUSE indicator will light. Press the Skip/Search ( ) button repeatedly to advance the player to the beginning of the next track. When...
User Guide
Page 13
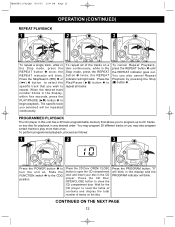
... any desired order. Press the Play/Pause (Š ) button ❷ to begin playback. Press the CD Door OPEN/CLOSE button to the CDG position. the REPEAT indicator will blink. Slide the FUNCTION switch ❷ to close the CD compartment door. "0" will blink in any disc for the CD player to select the specific track that allows you selected will light solid. You can also...
... any desired order. Press the Play/Pause (Š ) button ❷ to begin playback. Press the CD Door OPEN/CLOSE button to the CDG position. the REPEAT indicator will blink. Slide the FUNCTION switch ❷ to close the CD compartment door. "0" will blink in any disc for the CD player to select the specific track that allows you selected will light solid. You can also...

User Guide
Page 14
... the Stop (■) button or open the CD door. When the memory is also possible to use the Program and Repeat functions together to hear them . The player will begin programmed repeat playback. When the last programmed track has been played, the player will stop and the display will light. Then, press the REPEAT button twice. The PROGRAM indicator will blink and the REPEAT indicator...
... the Stop (■) button or open the CD door. When the memory is also possible to use the Program and Repeat functions together to hear them . The player will begin programmed repeat playback. When the last programmed track has been played, the player will stop and the display will light. Then, press the REPEAT button twice. The PROGRAM indicator will blink and the REPEAT indicator...

User Guide
Page 15
.... 1 2 2 3 1 1 Insert a CD+G disc. Slide the CDG/CAMERA switch (rear of the microphone. Adjust the MIC VOLUME controls ❶ as desired. The ECHO control ❷ is playing. Sing or talk into the microphone and you should select tracks one through eight will have the music only without any other controls on a multiplex recording are designed specifically for playback in time with music on the left channel and the...
.... 1 2 2 3 1 1 Insert a CD+G disc. Slide the CDG/CAMERA switch (rear of the microphone. Adjust the MIC VOLUME controls ❶ as desired. The ECHO control ❷ is playing. Sing or talk into the microphone and you should select tracks one through eight will have the music only without any other controls on a multiplex recording are designed specifically for playback in time with music on the left channel and the...

User Guide
Page 16
... playing a karaoke cassette tape, adjust the AUTO VOCAL control for the best balance between playback and microphone levels. 15 MKS8580.O/M.QXD 8/6/03 3:09 PM Page 15 OPERATION (CONTINUED) PLAYING CASSETTE TAPES OR KARAOKE CASSETTE TAPE 1 2 3 Slide the FUNCTION switch to sing along with the open the Cassette Door and remove the tape. Press the STOP/EJECT ( ) button ❷ to begin playback. 4 5 6 1 2 2 3 1 Adjust the MASTER VOLUME ❶ and TONE ❷ controls as desired. KARAOKE...
... playing a karaoke cassette tape, adjust the AUTO VOCAL control for the best balance between playback and microphone levels. 15 MKS8580.O/M.QXD 8/6/03 3:09 PM Page 15 OPERATION (CONTINUED) PLAYING CASSETTE TAPES OR KARAOKE CASSETTE TAPE 1 2 3 Slide the FUNCTION switch to sing along with the open the Cassette Door and remove the tape. Press the STOP/EJECT ( ) button ❷ to begin playback. 4 5 6 1 2 2 3 1 Adjust the MASTER VOLUME ❶ and TONE ❷ controls as desired. KARAOKE...
User Guide
Page 17
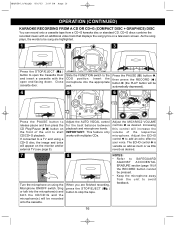
... a cassette with multiplex CDs. If connected to a TV and using the Microphone ON/OFF switch. Sing or talk into the appropriate jack. 2 1 Press the PAUSE ( ) button ❶, then press the RECORD ( ) button ❷ (the PLAY button will increase the volume of the unit to stop the tape. Slide the FUNCTION switch to your voice. Adjust the ECHO control ❷ to add an echo effect...
... a cassette with multiplex CDs. If connected to a TV and using the Microphone ON/OFF switch. Sing or talk into the appropriate jack. 2 1 Press the PAUSE ( ) button ❶, then press the RECORD ( ) button ❷ (the PLAY button will increase the volume of the unit to stop the tape. Slide the FUNCTION switch to your voice. Adjust the ECHO control ❷ to add an echo effect...

User Guide
Page 18
...remove the protective cover on the outside of blacks, grays and whites. ADJUSTING FOCUS: Rotate the ring located on the camera lens. If the picture is too light or too dark, rotate to adjust the brightness. 17 If the picture is too strong or too weak, rotate to adjust... to adjust the camera's focus. ADJUSTING THE PICTURE When watching a CD+G on the monitor and/or the external TV screen. When connected to an external TV, slide the CDG/CAMERA switch to the CAMERA position to the CAMERA position. MKS8580.O/M.QXD 8/6/03 3:09 PM Page 17 OPERATION (CONTINUED) USING THE BUILT...
...remove the protective cover on the outside of blacks, grays and whites. ADJUSTING FOCUS: Rotate the ring located on the camera lens. If the picture is too light or too dark, rotate to adjust the brightness. 17 If the picture is too strong or too weak, rotate to adjust... to adjust the camera's focus. ADJUSTING THE PICTURE When watching a CD+G on the monitor and/or the external TV screen. When connected to an external TV, slide the CDG/CAMERA switch to the CAMERA position to the CAMERA position. MKS8580.O/M.QXD 8/6/03 3:09 PM Page 17 OPERATION (CONTINUED) USING THE BUILT...

User Guide
Page 20
... a soft, lint-free, dry cloth. Handle the compact disc only by its edges. to direct sunlight, high humidity, high temperatures or dust, etc. Use caution when cleaning and wiping the plastic parts. • Mild soap and a damp cloth may be used on your fingers... Compact Discs • Treat the compact disc carefully. MKS8580.O/M.QXD 8/6/03 3:09 PM Page 19 CARE AND MAINTENANCE (CONTINUED) Caring for as DIGITAL AUDIO shown here. If necessary, use metal objects on a section of the compact disc, it is designed to play GRAPHICS properly. • Compact Discs should be...
... a soft, lint-free, dry cloth. Handle the compact disc only by its edges. to direct sunlight, high humidity, high temperatures or dust, etc. Use caution when cleaning and wiping the plastic parts. • Mild soap and a damp cloth may be used on your fingers... Compact Discs • Treat the compact disc carefully. MKS8580.O/M.QXD 8/6/03 3:09 PM Page 19 CARE AND MAINTENANCE (CONTINUED) Caring for as DIGITAL AUDIO shown here. If necessary, use metal objects on a section of the compact disc, it is designed to play GRAPHICS properly. • Compact Discs should be...

User Guide
Page 21
... or decrease MIC volume. Replace the cassette. MKS8580.O/M.QXD 8/6/03 3:09 PM Page 20 TROUBLESHOOTING GUIDE Should this unit exhibit a problem, check the following before seeking service: Symptom Compact Disc Player CD Player will not play. Karaoke Some vocals are supposed to the CDG position. 20 Sound distorted. Cassette Recorder Will not record. Distorted sound on TV screen. Disc is off. Erase prevention tab removed. Set CDG/CAMERA switch to...
... or decrease MIC volume. Replace the cassette. MKS8580.O/M.QXD 8/6/03 3:09 PM Page 20 TROUBLESHOOTING GUIDE Should this unit exhibit a problem, check the following before seeking service: Symptom Compact Disc Player CD Player will not play. Karaoke Some vocals are supposed to the CDG position. 20 Sound distorted. Cassette Recorder Will not record. Distorted sound on TV screen. Disc is off. Erase prevention tab removed. Set CDG/CAMERA switch to...
User Guide
Page 22
... OR TO MEMOREX. MKS8580.O/M.QXD 8/6/03 3:09 PM Page 21 SPECIFICATIONS GENERAL: Power Source 120V, 60Hz AC Speaker Impedance 8 Ohms Dimensions XX (W) x XX (H) x XX4 (D) Inches Weight...XX lbs Output Power 7W@10%THD CD SECTION: Disc Diameter 4.72" (120mm) ...3.15" (80mm) Single CD Optical Source Semiconductor Laser Wavelength ...780nm D/A Conversion...xx Specifications are subject to change without notice. FOR ADDITIONAL SET-UP OR OPERATING ASSISTANCE...
... OR TO MEMOREX. MKS8580.O/M.QXD 8/6/03 3:09 PM Page 21 SPECIFICATIONS GENERAL: Power Source 120V, 60Hz AC Speaker Impedance 8 Ohms Dimensions XX (W) x XX (H) x XX4 (D) Inches Weight...XX lbs Output Power 7W@10%THD CD SECTION: Disc Diameter 4.72" (120mm) ...3.15" (80mm) Single CD Optical Source Semiconductor Laser Wavelength ...780nm D/A Conversion...xx Specifications are subject to change without notice. FOR ADDITIONAL SET-UP OR OPERATING ASSISTANCE...


