
User Guide
Page 1
... maintenance (servicing) instructions in the literature accompanying the appliance. Operation is intended to alert the user to persons. DANGEROUS VOLTAGE: The lightning flash with Part 15 of uninsulated dangerous voltage within an equilateral triangle is subject to the following two conditions: (1) this device may not cause harmful interference, and (2) this device must accept any interference received...
... maintenance (servicing) instructions in the literature accompanying the appliance. Operation is intended to alert the user to persons. DANGEROUS VOLTAGE: The lightning flash with Part 15 of uninsulated dangerous voltage within an equilateral triangle is subject to the following two conditions: (1) this device may not cause harmful interference, and (2) this device must accept any interference received...
User Guide
Page 2
...installation. Lightning and power surges ARE NOT covered under warranty for this equipment does cause harmful interference to radio or television reception, which can radiate radio frequency energy and, if not installed and used in accordance with the instructions, may cause harmful interference to Part... installation. SAFETY PRECAUTIONS INFORMATION This equipment has been tested and found to comply with the limits for a Class B digital device, pursuant to radio communications. This equipment generates, uses and can be determined by turning the equipment off and on, the user ...
...installation. Lightning and power surges ARE NOT covered under warranty for this equipment does cause harmful interference to radio or television reception, which can radiate radio frequency energy and, if not installed and used in accordance with the instructions, may cause harmful interference to Part... installation. SAFETY PRECAUTIONS INFORMATION This equipment has been tested and found to comply with the limits for a Class B digital device, pursuant to radio communications. This equipment generates, uses and can be determined by turning the equipment off and on, the user ...
User Guide
Page 3
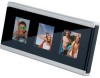
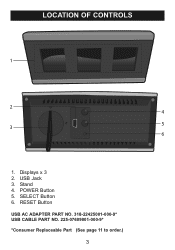
RESET Button USB AC ADAPTER PART NO. 318-22425001-000-9* USB CABLE PART NO. 225-07609001-000-9* *Consumer Replaceable Part (See page 11 to order.) 3 Stand 4. USB Jack 3. Displays x 3 2. SELECT Button 6. POWER Button 5. LOCATION OF CONTROLS 1 2 4 5 3 6 1.
RESET Button USB AC ADAPTER PART NO. 318-22425001-000-9* USB CABLE PART NO. 225-07609001-000-9* *Consumer Replaceable Part (See page 11 to order.) 3 Stand 4. USB Jack 3. Displays x 3 2. SELECT Button 6. POWER Button 5. LOCATION OF CONTROLS 1 2 4 5 3 6 1.
User Guide
Page 4
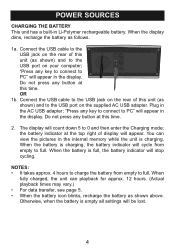
... transfer, see page 5. • When the battery icon blinks, recharge the battery as follows. 1a. Connect the USB cable to full. Do not press any button at this unit (as shown) and to the USB jack on the supplied AC USB adapter. Connect the USB cable to the USB port on the rear of display will be lost. 4 When fully charged, the unit can view the pictures in the display...
... transfer, see page 5. • When the battery icon blinks, recharge the battery as follows. 1a. Connect the USB cable to full. Do not press any button at this unit (as shown) and to the USB jack on the supplied AC USB adapter. Connect the USB cable to the USB port on the rear of display will be lost. 4 When fully charged, the unit can view the pictures in the display...
User Guide
Page 5
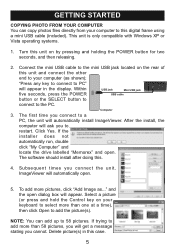
... compatible with Windows XP or Vista operating systems. 1. The software should install after doing this unit on your keyboard to select more than 58 pictures, you will ask you cannot. Delete picture(s) in the display. Within five seconds, press the POWER USB jack Mini USB jack USB cable button or the SELECT button to connect to PC" will automatically install ImageViewer. To add more than one at a time), then click Open to add...
... compatible with Windows XP or Vista operating systems. 1. The software should install after doing this unit on your keyboard to select more than 58 pictures, you will ask you cannot. Delete picture(s) in the display. Within five seconds, press the POWER USB jack Mini USB jack USB cable button or the SELECT button to connect to PC" will automatically install ImageViewer. To add more than one at a time), then click Open to add...
User Guide
Page 6
... saving the pictures, the pictures and settings will stay on until turned off if no button is selected before turning off using the POWER button. Note: Auto Power Off function will not work during playback of the picture and make it and then click Edit. NOTE: When the photos are loaded into this frame's screen. To rotate a picture, select it and then click Delete. 7. To edit a picture (only pictures added can follow the "Safely Remove...
... saving the pictures, the pictures and settings will stay on until turned off if no button is selected before turning off using the POWER button. Note: Auto Power Off function will not work during playback of the picture and make it and then click Edit. NOTE: When the photos are loaded into this frame's screen. To rotate a picture, select it and then click Delete. 7. To edit a picture (only pictures added can follow the "Safely Remove...
User Guide
Page 7
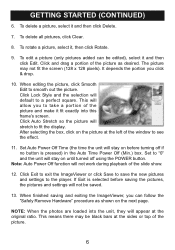
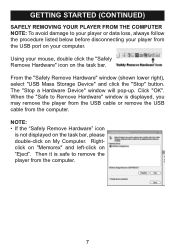
... is displayed, you may remove the player from the USB cable or remove the USB cable from the computer. The "Stop a Hardware Device" window will pop-up. Then it is safe to remove the player from the USB port on My Computer. From the "Safely Remove Hardware" window (shown lower right), select "USB Mass Storage Device" and click the "Stop" button. Rightclick on "Memorex" and left-click on the task bar. GETTING STARTED...
... is displayed, you may remove the player from the USB cable or remove the USB cable from the computer. The "Stop a Hardware Device" window will pop-up. Then it is safe to remove the player from the USB port on My Computer. From the "Safely Remove Hardware" window (shown lower right), select "USB Mass Storage Device" and click the "Stop" button. Rightclick on "Memorex" and left-click on the task bar. GETTING STARTED...
User Guide
Page 8
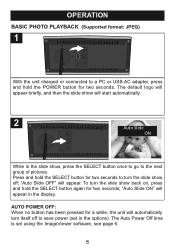
.... The Auto Power Off time is set in the slide show, press the SELECT button once to go to the next group of pictures. "Auto Slide ON" will appear. OPERATION BASIC PHOTO PLAYBACK (Supported format: JPEG) 1 With the unit charged or connected to a PC or USB AC adapter, press and hold the POWER button for two seconds; Press and hold the SELECT button for a while, the unit will start automatically. 2 Auto Slide...
.... The Auto Power Off time is set in the slide show, press the SELECT button once to go to the next group of pictures. "Auto Slide ON" will appear. OPERATION BASIC PHOTO PLAYBACK (Supported format: JPEG) 1 With the unit charged or connected to a PC or USB AC adapter, press and hold the POWER button for two seconds; Press and hold the SELECT button for a while, the unit will start automatically. 2 Auto Slide...
User Guide
Page 9
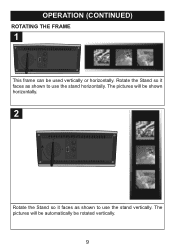
The pictures will be shown horizontally. 2 Rotate the Stand so it faces as shown to use the stand vertically. The pictures will be automatically be used vertically or horizontally. Rotate the Stand so it faces as shown to use the stand horizontally. OPERATION (CONTINUED) ROTATING THE FRAME 1 This frame can be rotated vertically. 9
The pictures will be shown horizontally. 2 Rotate the Stand so it faces as shown to use the stand vertically. The pictures will be automatically be used vertically or horizontally. Rotate the Stand so it faces as shown to use the stand horizontally. OPERATION (CONTINUED) ROTATING THE FRAME 1 This frame can be rotated vertically. 9
User Guide
Page 10
Battery is not connected; Problem: Solution1: Solution2: No slide show has been turned off; TROUBLESHOOTING GUIDE If you are using Windows XP or Vista operating systems. Restart the computer and try to connect the unit again. 10 USB or AC USB Adapter is not charged; No photos installed in unit; Slide show playback. Problem: Solution1: Solution2: No Power. connect. turn it back on, see page 5. Problem: Solution1: Solution2: Solution3: USB is not recognized...
Battery is not connected; Problem: Solution1: Solution2: No slide show has been turned off; TROUBLESHOOTING GUIDE If you are using Windows XP or Vista operating systems. Restart the computer and try to connect the unit again. 10 USB or AC USB Adapter is not charged; No photos installed in unit; Slide show playback. Problem: Solution1: Solution2: No Power. connect. turn it back on, see page 5. Problem: Solution1: Solution2: Solution3: USB is not recognized...
User Guide
Page 11
SPECIFICATIONS GENERAL: Power Source (AC AC USB Adapter, DC 5V Power Source (DC) .Lithium polymer rechargeable battery (600mAh) Weight 0.22 Lb Dimensions (Horizontally 5.2" (W) x 1.7 (D) x 2.25 (H) Inches Weight and dimensions are subject to change without notice. For customers calling within Mexico, call 001-866-580-8316. FOR CONSUMER REPLACEABLE PART(S), SEE PART NUMBER(S) ON PAGE 3 AND THEN CONTACT FOX INTERNATIONAL AT 1-800-321-6993. 11 LCD Display Size 1.5" x 3 (measured...
SPECIFICATIONS GENERAL: Power Source (AC AC USB Adapter, DC 5V Power Source (DC) .Lithium polymer rechargeable battery (600mAh) Weight 0.22 Lb Dimensions (Horizontally 5.2" (W) x 1.7 (D) x 2.25 (H) Inches Weight and dimensions are subject to change without notice. For customers calling within Mexico, call 001-866-580-8316. FOR CONSUMER REPLACEABLE PART(S), SEE PART NUMBER(S) ON PAGE 3 AND THEN CONTACT FOX INTERNATIONAL AT 1-800-321-6993. 11 LCD Display Size 1.5" x 3 (measured...


