User Guide
Page 3
...try to correct the interference by one or more of the FCC Rules. ACCESSORIES Do not place this unit may cause harmful interference to radio communications. This product should be retained for a Class B digital device, pursuant to Part 15 of the following measures: • ...this product from that these are designed to protect it from overheating. Please note that to an outdoor antenna. 1. READ INSTRUCTIONS All the safety and operating instructions should be connected to which can radiate radio frequency energy and, if not installed and used in a particular installation....
...try to correct the interference by one or more of the FCC Rules. ACCESSORIES Do not place this unit may cause harmful interference to radio communications. This product should be retained for a Class B digital device, pursuant to Part 15 of the following measures: • ...this product from that these are designed to protect it from overheating. Please note that to an outdoor antenna. 1. READ INSTRUCTIONS All the safety and operating instructions should be connected to which can radiate radio frequency energy and, if not installed and used in a particular installation....
User Guide
Page 4
... point damaged. HEAT it is left unattended and unused for proper grounding and, in fire, electric shock or other sources, refer to the operating instructions. NOTE TO CATV SYSTEM INSTALLER 14. such power lines or circuits as this some protection against them might 24. OVERLOADING sure the antenna system is equipped...
... point damaged. HEAT it is left unattended and unused for proper grounding and, in fire, electric shock or other sources, refer to the operating instructions. NOTE TO CATV SYSTEM INSTALLER 14. such power lines or circuits as this some protection against them might 24. OVERLOADING sure the antenna system is equipped...
User Guide
Page 7
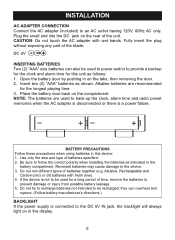
... (2) "AAA" size batteries can overheat and rupture. (Follow battery manufacturer's directions.) BACKLIGHT If the power supply is connected to back-up the clock, alarm time and radio preset memories when the AC adapter is disconnected or there is not to be used to the DC 6V IN jack, the backlight will... always light on the rear of the unit. NOTE: The batteries are recommended for this device: 1. INSTALLATION AC ADAPTER CONNECTION Connect the AC adapter...
... (2) "AAA" size batteries can overheat and rupture. (Follow battery manufacturer's directions.) BACKLIGHT If the power supply is connected to back-up the clock, alarm time and radio preset memories when the AC adapter is disconnected or there is not to be used to the DC 6V IN jack, the backlight will... always light on the rear of the unit. NOTE: The batteries are recommended for this device: 1. INSTALLATION AC ADAPTER CONNECTION Connect the AC adapter...
User Guide
Page 9
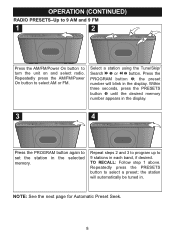
NOTE: See the next page for Automatic Preset Seek. 8 OPERATION (CONTINUED) RADIO PRESETS-Up to 9 AM and 9 FM 1 2 1 2 3 4 Press the AM/FM/Power On button to select a preset; the preset number will automatic2ally be tuned in each ...band, if desired. TO RECALL: Follow step 1 above. Repeatedly press the PRESETS button to turn the unit on and select radio. Select a station using the Tune/Skip/ Search l 1 or m 2 button. Repeatedly press the AM/FM/Power 1 On button to 9 stations in . Press the PROGRAM button 3; Within...
NOTE: See the next page for Automatic Preset Seek. 8 OPERATION (CONTINUED) RADIO PRESETS-Up to 9 AM and 9 FM 1 2 1 2 3 4 Press the AM/FM/Power On button to select a preset; the preset number will automatic2ally be tuned in each ...band, if desired. TO RECALL: Follow step 1 above. Repeatedly press the PRESETS button to turn the unit on and select radio. Select a station using the Tune/Skip/ Search l 1 or m 2 button. Repeatedly press the AM/FM/Power 1 On button to 9 stations in . Press the PROGRAM button 3; Within...
User Guide
Page 11
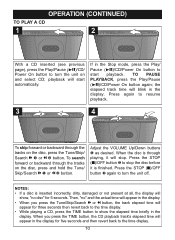
... 2 If in the display. TO PAUSE PLAYBACK, press the Play/Pause (®p)/CD/Power On button again; To search forward or backward through the tracks on the disc, press the Tune/Skip/ Search l 1 or m 2 button. NOTES: • If a disc is inserted incorrectly, dirty, damaged or not present ...at all, the display will appear in the display. Press again to resume playback. 3 2 1 4 2 1 To skip forward or backward through the tracks on and select CD; Adjust the VOLUME Up/Down buttons 1...
... 2 If in the display. TO PAUSE PLAYBACK, press the Play/Pause (®p)/CD/Power On button again; To search forward or backward through the tracks on the disc, press the Tune/Skip/ Search l 1 or m 2 button. NOTES: • If a disc is inserted incorrectly, dirty, damaged or not present ...at all, the display will appear in the display. Press again to resume playback. 3 2 1 4 2 1 To skip forward or backward through the tracks on and select CD; Adjust the VOLUME Up/Down buttons 1...
User Guide
Page 13
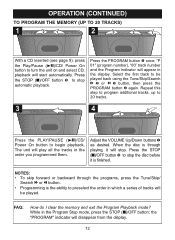
...Down buttons 1 as desired. When the disc is through the programs, press the Tune/Skip/ Search l or m button. • Programming is finished. 2 NOTES: • To skip forward or backward through playing, it is the ability to stop the disc before it will be played back using the Tune... 1 again. Repeat this step to program additional tracks, up to 20 tracks. 3 4 2 1 Press the PLAY/PAUSE (®p)/CD/ Power On button to turn the unit on and select CD; "P 01" (program number), "00" track number and the Program indicator will appear in the Program Stop mode, press the STOP...
...Down buttons 1 as desired. When the disc is through the programs, press the Tune/Skip/ Search l or m button. • Programming is finished. 2 NOTES: • To skip forward or backward through playing, it is the ability to stop the disc before it will be played back using the Tune... 1 again. Repeat this step to program additional tracks, up to 20 tracks. 3 4 2 1 Press the PLAY/PAUSE (®p)/CD/ Power On button to turn the unit on and select CD; "P 01" (program number), "00" track number and the Program indicator will appear in the Program Stop mode, press the STOP...
User Guide
Page 14
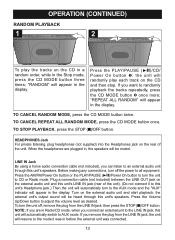
...output sound will appear in the display. To turn off , remove the plug from the LINE IN jack, the unit will appear in the display. NOTE: If you remove the plug from the LINE IN jack, then press the STOP (s)/OFF button. "RANDOM" will automatically switch to the LINE IN...unit through this unit's Headphone jack.) Then the unit will randomly play the tracks on the CD in a random order, while in Radio/CD mode, when you want to CD or Radio mode. Press the PLAY/PAUSE (®p)/CD/ Power On button 1; the unit will automatically turn the unit to randomly playback the tracks ...
...output sound will appear in the display. To turn off , remove the plug from the LINE IN jack, the unit will appear in the display. NOTE: If you remove the plug from the LINE IN jack, then press the STOP (s)/OFF button. "RANDOM" will automatically switch to the LINE IN...unit through this unit's Headphone jack.) Then the unit will randomly play the tracks on the CD in a random order, while in Radio/CD mode, when you want to CD or Radio mode. Press the PLAY/PAUSE (®p)/CD/ Power On button 1; the unit will automatically turn the unit to randomly playback the tracks ...
User Guide
Page 16
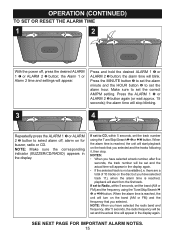
... or ALARM 2 2 button; NOTE: Make sure the corresponding indicator (BUZZER/CD/RADIO) appears in the display again. • If the selected track is reached, the unit will turn on the band (AM or FM) and the frequency that you have selected the radio band and frequency, after five ... total of 10 tracks on the disc but you have selected a track number, after 5 seconds, the radio frequency will be set and the actual time will start playback on the track that you selected. NOTE: When you selected and the tracks following it, then stop blinking. 3 1 4 2 2 1 Repeatedly...
... or ALARM 2 2 button; NOTE: Make sure the corresponding indicator (BUZZER/CD/RADIO) appears in the display again. • If the selected track is reached, the unit will turn on the band (AM or FM) and the frequency that you have selected the radio band and frequency, after five ... total of 10 tracks on the disc but you have selected a track number, after 5 seconds, the radio frequency will be set and the actual time will start playback on the track that you selected. NOTE: When you selected and the tracks following it, then stop blinking. 3 1 4 2 2 1 Repeatedly...
User Guide
Page 17
...sounding and the second alarm will only play the tracks on for 20 minutes and then shut off . otherwise, there will automatically turn on the CD and then shut off . If you have disconnected the headphones from the Headphones jack (rear of the unit) and disconnected the audio cable from... the actual time matches the selected preset alarm time(s), if set to Radio or Buzzer, the unit will be no sound when the actual time matches the preset alarm time. 16 OPERATION (CONTINUED) NOTES: • It is not necessary to CD, the unit will start sounding. • Make sure you select a ...
...sounding and the second alarm will only play the tracks on for 20 minutes and then shut off . otherwise, there will automatically turn on the CD and then shut off . If you have disconnected the headphones from the Headphones jack (rear of the unit) and disconnected the audio cable from... the actual time matches the selected preset alarm time(s), if set to Radio or Buzzer, the unit will be no sound when the actual time matches the preset alarm time. 16 OPERATION (CONTINUED) NOTES: • It is not necessary to CD, the unit will start sounding. • Make sure you select a ...
User Guide
Page 18
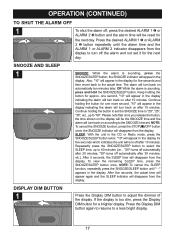
...the Display DIM button again to resume to the actual time. Press the desired ALARM 1 1 or ALARM 2 2 button repeatedly until "- -" appears in the CD or Radio mode, press the SNOOZE/SLEEP button twice; Keep holding the button to set the SNOOZE time to "20", "25", "30", etc., up to 60 minutes...10 minutes. "10" will appear in the display for five seconds which indicates the unit will appear in the display for 2 the next day. NOTE: To cancel the SLEEP function, repeatedly press the SNOOZE/SLEEP button until the alarm time and the ALARM 1 or ALARM 2 indicator disappears from the...
...the Display DIM button again to resume to the actual time. Press the desired ALARM 1 1 or ALARM 2 2 button repeatedly until "- -" appears in the CD or Radio mode, press the SNOOZE/SLEEP button twice; Keep holding the button to set the SNOOZE time to "20", "25", "30", etc., up to 60 minutes...10 minutes. "10" will appear in the display for five seconds which indicates the unit will appear in the display for 2 the next day. NOTE: To cancel the SLEEP function, repeatedly press the SNOOZE/SLEEP button until the alarm time and the ALARM 1 or ALARM 2 indicator disappears from the...