
Installation Instructions
Page 2
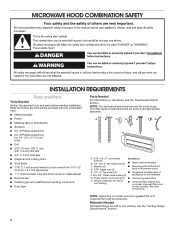
... (or box wrench) for wall or roof venting) ■■ Charcoal filters (Depending on reordering, see the "Replacement Parts" section. Washers (2) D. 3/16" toggle nuts (2) ■■ Mounting plate (attached to back of microwave oven) E. 1/4" x 2" lag ...screws (2) ■■ Cardboard template (part of wall structures, be sure to use appropriate fasteners. For other types of F. #6 x 3/8" Sheet metal screws (2) packaging) or wall template G. Damper...
... (or box wrench) for wall or roof venting) ■■ Charcoal filters (Depending on reordering, see the "Replacement Parts" section. Washers (2) D. 3/16" toggle nuts (2) ■■ Mounting plate (attached to back of microwave oven) E. 1/4" x 2" lag ...screws (2) ■■ Cardboard template (part of wall structures, be sure to use appropriate fasteners. For other types of F. #6 x 3/8" Sheet metal screws (2) packaging) or wall template G. Damper...
Installation Instructions
Page 3
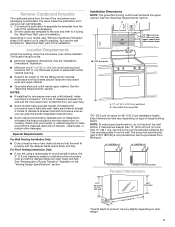
... grab the handle integrated inside the door. ■■ Some cabinet and building materials are not designed to it during the "Mark Rear Wall" part of installation. Installation Dimensions NOTE: The grounded 3 prong outlet must be installed. Grounded 3 prong outlet *30" (76.2 cm) is perforated. ... can open fully. ■■ Some models have a pocket handle. Depending on door design. 3 The bump out mounting kit (part # W11185746) is used will vary slightly depending on your builder or cabinet supplier to separate the template from the rest of any obstructions...
... grab the handle integrated inside the door. ■■ Some cabinet and building materials are not designed to it during the "Mark Rear Wall" part of installation. Installation Dimensions NOTE: The grounded 3 prong outlet must be installed. Grounded 3 prong outlet *30" (76.2 cm) is perforated. ... can open fully. ■■ Some models have a pocket handle. Depending on door design. 3 The bump out mounting kit (part # W11185746) is used will vary slightly depending on your builder or cabinet supplier to separate the template from the rest of any obstructions...
Installation Instructions
Page 10
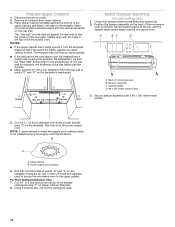
... or thumbtacks. Remove all contents from the rear wall to points "D" and "E" on the template is metal, the supply cord bushing needs to the thickest part of t he rear wall (for example, the thickness of the microwave oven so that damper blade moves freely and opens fully. 2. Make sure the 10...
... or thumbtacks. Remove all contents from the rear wall to points "D" and "E" on the template is metal, the supply cord bushing needs to the thickest part of t he rear wall (for example, the thickness of the microwave oven so that damper blade moves freely and opens fully. 2. Make sure the 10...
Installation Instructions
Page 14
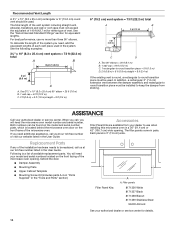
...door. ■■ Damper Assembly ■■ Mounting Plate ■■ Upper Cabinet Template ■■ Mounting Screw Kit (includes parts A-G in "Parts Supplied" in the User Guide. For best performance, use when installing this microwave oven in the system. Two 90° elbows =... 25.4 cm) vent system = 73 ft (22.2 m) total A B 6 pi (1.8 m) 2 pi (0.6 m) C A. Each panel is a list of available replacement parts. Accessories Filler Panel Kits are available from sticking. When you call us at our toll-free number or visit our website listed in pairs. Recommended...
...door. ■■ Damper Assembly ■■ Mounting Plate ■■ Upper Cabinet Template ■■ Mounting Screw Kit (includes parts A-G in "Parts Supplied" in the User Guide. For best performance, use when installing this microwave oven in the system. Two 90° elbows =... 25.4 cm) vent system = 73 ft (22.2 m) total A B 6 pi (1.8 m) 2 pi (0.6 m) C A. Each panel is a list of available replacement parts. Accessories Filler Panel Kits are available from sticking. When you call us at our toll-free number or visit our website listed in pairs. Recommended...


