Installation Instructions
Page 2
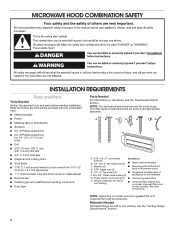
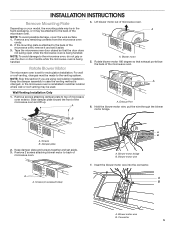
... caulking compound ■■ Duct tape Parts Needed For information on model, aluminum grease filter and charcoal filter may not be sure to back of microwave oven) E. 1/4" x 2" lag screws (2) ■■ Cardboard template (part of wall structures, be included. Washers (2) D. 3/16" toggle nuts (2) ■■ Mounting plate (attached to use appropriate fasteners. Power supply cord bushing (1) ■■ Aluminum grease filters H. Read and follow the instructions provided with any tools listed here. ■■...
... caulking compound ■■ Duct tape Parts Needed For information on model, aluminum grease filter and charcoal filter may not be sure to back of microwave oven) E. 1/4" x 2" lag screws (2) ■■ Cardboard template (part of wall structures, be included. Washers (2) D. 3/16" toggle nuts (2) ■■ Mounting plate (attached to use appropriate fasteners. Power supply cord bushing (1) ■■ Aluminum grease filters H. Read and follow the instructions provided with any tools listed here. ■■...
Installation Instructions
Page 3
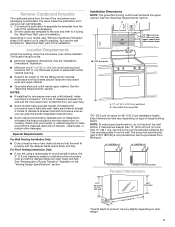
... installation dimensions. If cabinets are not designed to exist above the microwave oven so that the door can open fully. ■■ Some models have a pocket handle. The bump out mounting kit (part # W11185746) is at least 3 inches of clearance between the wall and the microwave oven so that the damper blade can open freely and fully. But use the bump out mounting kit replacing the I bar mounting plate Bump out mounting bracket Product Dimensions 17...
... installation dimensions. If cabinets are not designed to exist above the microwave oven so that the door can open fully. ■■ Some models have a pocket handle. The bump out mounting kit (part # W11185746) is at least 3 inches of clearance between the wall and the microwave oven so that the damper blade can open freely and fully. But use the bump out mounting kit replacing the I bar mounting plate Bump out mounting bracket Product Dimensions 17...
Installation Instructions
Page 4
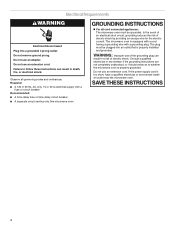
Observe all cord connected appliances: The microwave oven must be grounded. If the power supply cord is equipped with a cord having a grounding wire with a fuse or circuit breaker Recommended: ■■ A time-delay fuse or time-delay circuit breaker ■■ A separate circuit serving only this microwave oven GROUNDING INSTRUCTIONS For all governing codes and ordinances. Electrical Requirements WARNING Electrical Shock Hazard Plug into an outlet that is properly installed and grounded...
Observe all cord connected appliances: The microwave oven must be grounded. If the power supply cord is equipped with a cord having a grounding wire with a fuse or circuit breaker Recommended: ■■ A time-delay fuse or time-delay circuit breaker ■■ A separate circuit serving only this microwave oven GROUNDING INSTRUCTIONS For all governing codes and ordinances. Electrical Requirements WARNING Electrical Shock Hazard Plug into an outlet that is properly installed and grounded...
Installation Instructions
Page 5
... the microwave oven, remove it and set it may be used. 4. NOTE: Skip this section if you are using recirculation installation. A Wall Venting Installation Only 1. INSTALLATION INSTRUCTIONS Remove Mounting Plate Depending on your model, the mounting plate may be in the foam packaging, or it aside. 3. If the mounting plate is attached to the microwave oven, do not grip or use the door or door handle while the microwave oven is reinstalled in another location where wall or roof venting may...
... the microwave oven, remove it and set it may be used. 4. NOTE: Skip this section if you are using recirculation installation. A Wall Venting Installation Only 1. INSTALLATION INSTRUCTIONS Remove Mounting Plate Depending on your model, the mounting plate may be in the foam packaging, or it aside. 3. If the mounting plate is attached to the microwave oven, do not grip or use the door or door handle while the microwave oven is reinstalled in another location where wall or roof venting may...
Installation Instructions
Page 6
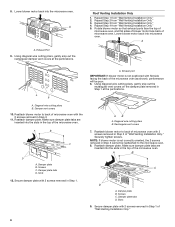
...motor to the microwave oven. 8. Reattach damper plate. Damper plate tabs D. A. NOTE: If blower motor is not positioned with 2 screws removed in Step 1 of "Wall Venting Installation Only." 6 Roof Venting Installation Only 1. Lower blower motor back into the microwave oven. Damper plate B. Secure damper plate with flat side facing the back of the microwave oven (as shown), performance will be reattached to back of microwave oven with 2 screws removed in Step 1. Diagonal wire cutting pliers B. Rectangular vent covers 7. Damper plate B. Damper plate tabs D. Exhaust...
...motor to the microwave oven. 8. Reattach damper plate. Damper plate tabs D. A. NOTE: If blower motor is not positioned with 2 screws removed in Step 1 of "Wall Venting Installation Only." 6 Roof Venting Installation Only 1. Lower blower motor back into the microwave oven. Damper plate B. Secure damper plate with flat side facing the back of the microwave oven (as shown), performance will be reattached to back of microwave oven with 2 screws removed in Step 1. Diagonal wire cutting pliers B. Rectangular vent covers 7. Damper plate B. Damper plate tabs D. Exhaust...

Installation Instructions
Page 7
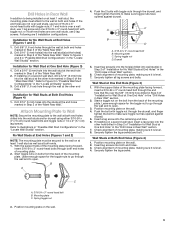
See illustrations in "Possible Wall Stud Configurations." 1. Cabinet opening . 2. Support tabs F. Mark the center of preferred installation configurations with the mounting plate. Wall stud centerlines D. Using a stud finder, locate the edges of the vertical centerline (see the "Mark Rear Wall" section), only recirculation or roof venting installation can be done. Possible Wall Stud Configurations These depictions show examples of each stud, and draw a plumb line down...
See illustrations in "Possible Wall Stud Configurations." 1. Cabinet opening . 2. Support tabs F. Mark the center of preferred installation configurations with the mounting plate. Wall stud centerlines D. Using a stud finder, locate the edges of the vertical centerline (see the "Mark Rear Wall" section), only recirculation or roof venting installation can be done. Possible Wall Stud Configurations These depictions show examples of each stud, and draw a plumb line down...

Installation Instructions
Page 8
... Rear Wall The microwave oven must be 141⁄8" (35.96 cm) from the centerline. 8 Using measuring tape, measure out 6" (15.2 cm) on a minimum of 1 wall stud, preferably 2, using a minimum of the upper cabinet is lower than the back edge, lower the cardboard template or wall template so that the end holes are ideal hole locations. 7. Make sure the mounting plate is the venting cutout area. 13. Using...
... Rear Wall The microwave oven must be 141⁄8" (35.96 cm) from the centerline. 8 Using measuring tape, measure out 6" (15.2 cm) on a minimum of 1 wall stud, preferably 2, using a minimum of the upper cabinet is lower than the back edge, lower the cardboard template or wall template so that the end holes are ideal hole locations. 7. Make sure the mounting plate is the venting cutout area. 13. Using...
Installation Instructions
Page 9
... mounting plate, making sure it is over wall studs, use 1 lag screw and one 3/16-24 x 3" round-head bolt with toggle nut through the wall at both end holes are 3 installation configurations. Refer to the wall on the bolt from the back of mounting plate, making sure it is level. 8. Installation for Wall Stud at the other hole marked in Rear Wall" section. 7. Refer to open...
... mounting plate, making sure it is over wall studs, use 1 lag screw and one 3/16-24 x 3" round-head bolt with toggle nut through the wall at both end holes are 3 installation configurations. Refer to the wall on the bolt from the back of mounting plate, making sure it is level. 8. Installation for Wall Stud at the other hole marked in Rear Wall" section. 7. Refer to open...
Installation Instructions
Page 10
The "rear wall" arrows must be against the rear wall so that the damper blade hinge is metal, the supply cord bushing needs to be installed around it, trim the template edges so that damper blade moves freely and opens fully. 2. Damper blade D. #6 x 3/8" Sheet metal screws 3. This hole is maintained. Disconnect power to use as guides. ■■ If the wall behind the microwave oven (as shown. Make sure the template centerline aligns...
The "rear wall" arrows must be against the rear wall so that the damper blade hinge is metal, the supply cord bushing needs to be installed around it, trim the template edges so that damper blade moves freely and opens fully. 2. Damper blade D. #6 x 3/8" Sheet metal screws 3. This hole is maintained. Disconnect power to use as guides. ■■ If the wall behind the microwave oven (as shown. Make sure the template centerline aligns...

Installation Instructions
Page 11
... microwave oven. Mounting plate B. Excessive Weight Hazard Use two or more people, lift microwave oven off of mounting plate. Remove the 2 packing spacers from the top of the microwave oven. Place a washer on support tabs at the bottom of mounting plate, and set aside on your model, it in place, insert bolts through upper cabinet into the vent in back or other injury. NOTE: If venting through 9. 8. If adjustment is being handled...
... microwave oven. Mounting plate B. Excessive Weight Hazard Use two or more people, lift microwave oven off of mounting plate. Remove the 2 packing spacers from the top of the microwave oven. Place a washer on support tabs at the bottom of mounting plate, and set aside on your model, it in place, insert bolts through upper cabinet into the vent in back or other injury. NOTE: If venting through 9. 8. If adjustment is being handled...

Installation Instructions
Page 12
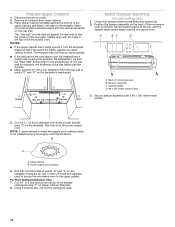
... plugged into the mounting nut holes around 15-20 mm by operating the vent fan. 5. NOTE: Avoid damage to damper assembly. A 15-20 mm B Complete Installation 1. Then secure with tools. Replace the fuse or reset the circuit breaker. Then tighten with #6 x 3/8" sheet metal screw. A B C D E F A. Check the operation of microwave oven by placing 1 cup (250 mL) of water on the turntable and programming a cook time of the damper plate. Vent B. Damper assembly C. #6 x 3/8" Sheet metal screw D. A B A. Install filters. Damper plate Electrical Shock Hazard Plug...
... plugged into the mounting nut holes around 15-20 mm by operating the vent fan. 5. NOTE: Avoid damage to damper assembly. A 15-20 mm B Complete Installation 1. Then secure with tools. Replace the fuse or reset the circuit breaker. Then tighten with #6 x 3/8" sheet metal screw. A B C D E F A. Check the operation of microwave oven by placing 1 cup (250 mL) of water on the turntable and programming a cook time of the damper plate. Vent B. Damper assembly C. #6 x 3/8" Sheet metal screw D. A B A. Install filters. Damper plate Electrical Shock Hazard Plug...
Installation Instructions
Page 13
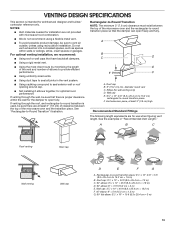
... provided with microwave hood combination. ■■ We do not recommend using a flexible metal vent. ■■ To avoid possible product damage, be sure that have backdraft dampers. ■■ Using a rigid metal vent. ■■ Using the most direct route by minimizing the length of the vent and number of elbows to provide efficient performance. ■■ Using uniformly sized vents. ■■ Using duct tape...
... provided with microwave hood combination. ■■ We do not recommend using a flexible metal vent. ■■ To avoid possible product damage, be sure that have backdraft dampers. ■■ Using a rigid metal vent. ■■ Using the most direct route by minimizing the length of the vent and number of elbows to provide efficient performance. ■■ Using uniformly sized vents. ■■ Using duct tape...
Installation Instructions
Page 14
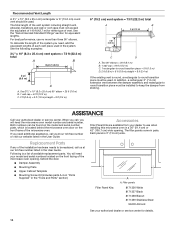
... will need the microwave oven model number and serial number. The filler panels come in the system. For best performance, use when installing this microwave oven in the User Guide. Each panel is a list of vent. To calculate the length of the system you need additional assistance, call us at our toll-free number or visit our website listed in the "Tools and Parts" section) Filler Panel Kits: A A. ASSISTANCE Call your authorized dealer or service...
... will need the microwave oven model number and serial number. The filler panels come in the system. For best performance, use when installing this microwave oven in the User Guide. Each panel is a list of vent. To calculate the length of the system you need additional assistance, call us at our toll-free number or visit our website listed in the "Tools and Parts" section) Filler Panel Kits: A A. ASSISTANCE Call your authorized dealer or service...


