Warranty Information
Page 1
...-family household use of consumables or cleaning products not approved by Whirlpool Corporation. 6. Any food loss due to repair or replace light bulbs. Service calls to microwave product failure. 8. Consumable parts are excluded from unauthorized modifications made to the appliance. 9. Repairs to parts or systems resulting from warranty coverage. 3. Damage resulting from accident, alteration, misuse, abuse, fire, flood, acts of God, improper installation, installation not in...
...-family household use of consumables or cleaning products not approved by Whirlpool Corporation. 6. Any food loss due to repair or replace light bulbs. Service calls to microwave product failure. 8. Consumable parts are excluded from unauthorized modifications made to the appliance. 9. Repairs to parts or systems resulting from warranty coverage. 3. Damage resulting from accident, alteration, misuse, abuse, fire, flood, acts of God, improper installation, installation not in...
Warranty Information
Page 2
... limitations may not apply to determine if another warranty applies. Dealer name Address Phone number Model number Serial number Purchase date W10497768A SP W10497770A © 2012 Whirlpool Corporation. Whirlpool will need service, first see the "Troubleshooting" section of purchase (register receipt, charge slip, etc.). Outside the 50 United States and Canada, this book and your authorized Whirlpool dealer to you . The...
... limitations may not apply to determine if another warranty applies. Dealer name Address Phone number Model number Serial number Purchase date W10497768A SP W10497770A © 2012 Whirlpool Corporation. Whirlpool will need service, first see the "Troubleshooting" section of purchase (register receipt, charge slip, etc.). Outside the 50 United States and Canada, this book and your authorized Whirlpool dealer to you . The...
Use & Care Guide
Page 1
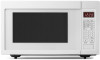
www.whirlpool.com Table of Contents 2 Model UMC5165 W10497768A MICROWAVE OVEN Use & Care Guide For questions about features, operation/performance, parts, accessories or service, call: 1-800-253-1301 or visit our brand website at...
www.whirlpool.com Table of Contents 2 Model UMC5165 W10497768A MICROWAVE OVEN Use & Care Guide For questions about features, operation/performance, parts, accessories or service, call: 1-800-253-1301 or visit our brand website at...
Use & Care Guide
Page 2
... 6 Turntable 6 MICROWAVE OVEN CONTROL 6 Display 7 Start/Enter 7 Add 30 Seconds 7 Off/Cancel 7 Tones 7 Clock 7 Kitchen Timer 7 Control Lock 7 MICROWAVE OVEN USE 8 Food Characteristics 8 Cooking Guidelines 8 Cookware and Dinnerware 9 Aluminum Foil and Metal 9 Microwave Cooking Power 9 Manual Cooking 10 Cooking in Stages 10 Favorite 10 Sensor Cooking 10 Quick Touch Menu (sensor and non-sensor 11 Weight Defrost / Timed Defrost 12 MICROWAVE OVEN CARE 13 General Cleaning 13 TROUBLESHOOTING 13 ASSISTANCE OR SERVICE 14 Replacement Parts 15 Built-In Kits 15 WARRANTY 15...
... 6 Turntable 6 MICROWAVE OVEN CONTROL 6 Display 7 Start/Enter 7 Add 30 Seconds 7 Off/Cancel 7 Tones 7 Clock 7 Kitchen Timer 7 Control Lock 7 MICROWAVE OVEN USE 8 Food Characteristics 8 Cooking Guidelines 8 Cookware and Dinnerware 9 Aluminum Foil and Metal 9 Microwave Cooking Power 9 Manual Cooking 10 Cooking in Stages 10 Favorite 10 Sensor Cooking 10 Quick Touch Menu (sensor and non-sensor 11 Weight Defrost / Timed Defrost 12 MICROWAVE OVEN CARE 13 General Cleaning 13 TROUBLESHOOTING 13 ASSISTANCE OR SERVICE 14 Replacement Parts 15 Built-In Kits 15 WARRANTY 15...
Use & Care Guide
Page 3
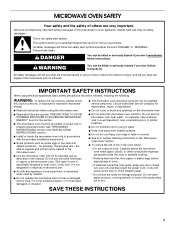
... specific "PRECAUTIONS TO AVOID POSSIBLE EXPOSURE TO EXCESSIVE MICROWAVE ENERGY" found in the "INSTALLATION INSTRUCTIONS" section. ■ Install or locate the microwave oven only in a wet basement, near water - This type of oven is the safety alert symbol. Do not overcook food. Remove wire twist-ties from heated surfaces. ■ Do not let cord hang over edge of table or counter. ■ See door surface cleaning instructions in the "Microwave Oven Care...
... specific "PRECAUTIONS TO AVOID POSSIBLE EXPOSURE TO EXCESSIVE MICROWAVE ENERGY" found in the "INSTALLATION INSTRUCTIONS" section. ■ Install or locate the microwave oven only in a wet basement, near water - This type of oven is the safety alert symbol. Do not overcook food. Remove wire twist-ties from heated surfaces. ■ Do not let cord hang over edge of table or counter. ■ See door surface cleaning instructions in the "Microwave Oven Care...

Use & Care Guide
Page 4
... container is removed from the microwave oven is important not to defeat or tamper with the door open since open-door operation can result in operation. IMPORTANT SAFETY INSTRUCTIONS ■ Liquids, such as water, coffee, or tea are able to be overheated beyond the boiling point without appearing to be adjusted or repaired by anyone except properly qualified service personnel. After heating, allow...
... container is removed from the microwave oven is important not to defeat or tamper with the door open since open-door operation can result in operation. IMPORTANT SAFETY INSTRUCTIONS ■ Liquids, such as water, coffee, or tea are able to be overheated beyond the boiling point without appearing to be adjusted or repaired by anyone except properly qualified service personnel. After heating, allow...
Use & Care Guide
Page 5
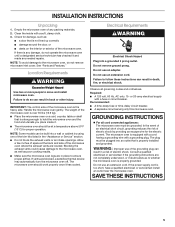
... trim kits listed in the "Assistance or Service" section. ■ Do not block the exhaust vents or air intake openings. Recommended: ■ A time-delay fuse or time-delay circuit breaker. ■ A separate circuit serving only this microwave oven. Failure to ensure proper airflow. NOTE: Some models can result in death, fire, or electrical shock. Do not remove ground prong. If there is properly installed and grounded. If vents are located...
... trim kits listed in the "Assistance or Service" section. ■ Do not block the exhaust vents or air intake openings. Recommended: ■ A time-delay fuse or time-delay circuit breaker. ■ A separate circuit serving only this microwave oven. Failure to ensure proper airflow. NOTE: Some models can result in death, fire, or electrical shock. Do not remove ground prong. If there is properly installed and grounded. If vents are located...
Use & Care Guide
Page 6
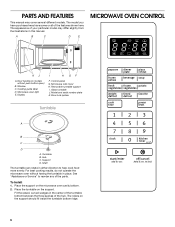
... some or all of your particular model may have purchased may differ slightly from the illustrations in place. Glass turntable J. Support D. Window C. Display I . Control panel G. To Install: 1. Turntable B. See "Assistance or Service" to help cook food more evenly. Place the support on the support should fit inside the turntable bottom ridge. 6 PARTS AND FEATURES This manual may cover several different models. Door lock system Turntable A B C D A. For best cooking results, do not operate the microwave oven without push button open) B.
... some or all of your particular model may have purchased may differ slightly from the illustrations in place. Glass turntable J. Support D. Window C. Display I . Control panel G. To Install: 1. Turntable B. See "Assistance or Service" to help cook food more evenly. Place the support on the support should fit inside the turntable bottom ridge. 6 PARTS AND FEATURES This manual may cover several different models. Door lock system Turntable A B C D A. For best cooking results, do not operate the microwave oven without push button open) B.
Use & Care Guide
Page 7
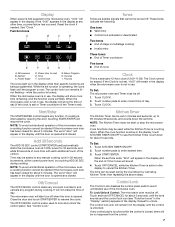
Reset the clock if needed. Defrost C. When the microwave oven is not in the display while their specific functions are audible signals that cannot be added to enter correct time of day. If cooking is interrupted by opening the door, touching START/ENTER will not erase the time of day. 3. Time may be used to 99 minutes 99 seconds, and counts down the set in minutes and seconds, up...
Reset the clock if needed. Defrost C. When the microwave oven is not in the display while their specific functions are audible signals that cannot be added to enter correct time of day. If cooking is interrupted by opening the door, touching START/ENTER will not erase the time of day. 3. Time may be used to 99 minutes 99 seconds, and counts down the set in minutes and seconds, up...

Use & Care Guide
Page 8
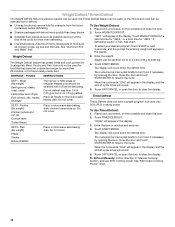
... same size of standing time depends on the door and cavity surfaces is normal during heavy cooking. Heavy, dense foods, such as cake. 8 They will cook more quickly than larger pieces, and uniformly shaped foods cook more food heated at one corner to provide an opening to vent steam. Food Characteristics When microwave cooking, the amount, size and shape, starting temperature, composition and density of food will finish cooking while...
... same size of standing time depends on the door and cavity surfaces is normal during heavy cooking. Heavy, dense foods, such as cake. 8 They will cook more quickly than larger pieces, and uniformly shaped foods cook more food heated at one corner to provide an opening to vent steam. Food Characteristics When microwave cooking, the amount, size and shape, starting temperature, composition and density of food will finish cooking while...
Use & Care Guide
Page 9
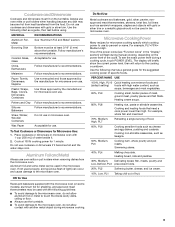
...'s recommendations. Cooking and heating foods that need a cook power lower than high. OK for 1 minute. Cooking non-stirrable casseroles, such as sandwich wrappers, staples and objects with gold or silver trim. Do not use oven mitts or pot holders when removing dishes from the food. Melamine Follow manufacturer's recommendations. Microwave Cooking Power Many recipes for Microwave Use: 1. The display will briefly show the current power level, then will flash during a cooking cycle, touch POWER LEVEL.
...'s recommendations. Cooking and heating foods that need a cook power lower than high. OK for 1 minute. Cooking non-stirrable casseroles, such as sandwich wrappers, staples and objects with gold or silver trim. Do not use oven mitts or pot holders when removing dishes from the food. Melamine Follow manufacturer's recommendations. Microwave Cooking Power Many recipes for Microwave Use: 1. The display will briefly show the current power level, then will flash during a cooking cycle, touch POWER LEVEL.
Use & Care Guide
Page 10
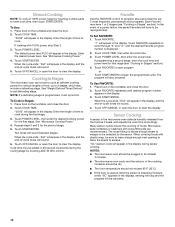
..." appears in the display. To Set FAVORITE: 1. To Use FAVORITE: 1. Favorite Use the FAVORITE control to set to cook. Many sensor cycles require the covering of -cycle tones will appear in Stages" section). Touch START/ENTER. To Use: 1. Place food on the turntable and close the door. 2. See "Weight Defrost/Timed Defrost" to program, store and recall the top 3 most frequently used manual cook programs. Each Favorite may be canceled. 10 Cook time may have to scroll...
..." appears in the display. To Set FAVORITE: 1. To Use FAVORITE: 1. Favorite Use the FAVORITE control to set to cook. Many sensor cycles require the covering of -cycle tones will appear in Stages" section). Touch START/ENTER. To Use: 1. Place food on the turntable and close the door. 2. See "Weight Defrost/Timed Defrost" to program, store and recall the top 3 most frequently used manual cook programs. Each Favorite may be canceled. 10 Cook time may have to scroll...

Use & Care Guide
Page 11
... open the door to change quantity. MENU ITEM SERVING SIZE INSTRUCTIONS POPCORN (non-sensor) 3.5 oz (99 g) 3.0 oz (85 g) 1.75 oz (50 g) ■ To avoid damage to accurately determine cooking time. BEVERAGE (non- 1 or 2 cups, 8 oz sensor, reheat) (250 mL) each , refrigerated turntable. Let stand 5 minutes after cooking. Touch desired menu control. Touch START/ENTER. Stir and let stand 2-3 minutes after heating. Place a single potato to clear the display...
... open the door to change quantity. MENU ITEM SERVING SIZE INSTRUCTIONS POPCORN (non-sensor) 3.5 oz (99 g) 3.0 oz (85 g) 1.75 oz (50 g) ■ To avoid damage to accurately determine cooking time. BEVERAGE (non- 1 or 2 cups, 8 oz sensor, reheat) (250 mL) each , refrigerated turntable. Let stand 5 minutes after cooking. Touch desired menu control. Touch START/ENTER. Stir and let stand 2-3 minutes after heating. Place a single potato to clear the display...
Use & Care Guide
Page 12
... Metal" first. FOODS INSTRUCTIONS DEF1 - Place all meats in "Manual Cooking" section, and use 30% cooking power. Do not cover. Enter the weight. Touch OFF/CANCEL or open the door to shield parts of food such as chicken wings, leg tips and fish tails. To Use Timed Defrost: 1. The display will sound. 5. See "Microwave Cooking Power" chart. 12 Do not defrost less than 1/4 lb (113 g) or two 4 oz (113 g) patties. Touch START/ENTER. Timed Defrost Timed Defrost does not...
... Metal" first. FOODS INSTRUCTIONS DEF1 - Place all meats in "Manual Cooking" section, and use 30% cooking power. Do not cover. Enter the weight. Touch OFF/CANCEL or open the door to shield parts of food such as chicken wings, leg tips and fish tails. To Use Timed Defrost: 1. The display will sound. 5. See "Microwave Cooking Power" chart. 12 Do not defrost less than 1/4 lb (113 g) or two 4 oz (113 g) patties. Touch START/ENTER. Timed Defrost Timed Defrost does not...
Use & Care Guide
Page 13
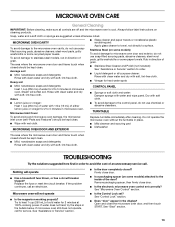
... a packaging spacer (on cleaning products. Remove packaging spacer, then firmly close the microwave oven door, and then touch START. See "Control Lock" section. ■ Does "door" appear in the bullets below. TROUBLESHOOTING Try the solutions suggested unless otherwise noted. Microwave oven will soften soil. Steam will not operate ■ Is the magnetron working properly? Replace turntable immediately after cleaning. Nothing will operate ■ Has a household fuse blown, or has a circuit breaker tripped? See...
... a packaging spacer (on cleaning products. Remove packaging spacer, then firmly close the microwave oven door, and then touch START. See "Control Lock" section. ■ Does "door" appear in the bullets below. TROUBLESHOOTING Try the solutions suggested unless otherwise noted. Microwave oven will soften soil. Steam will not operate ■ Is the magnetron working properly? Replace turntable immediately after cleaning. Nothing will operate ■ Has a household fuse blown, or has a circuit breaker tripped? See...
Use & Care Guide
Page 14
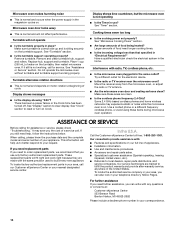
... turntable. Do not operate the microwave oven without turntable and turntable support working , call for service. Move the receiver away from the microwave oven, or adjust the radio or TV antenna. ■ Are the microwave oven door and sealing surfaces clean? In the U.S.A. For further assistance If you need to order replacement parts, we recommend that specified in "Electrical Requirements?" Turntable will help , follow the instructions below. Remove and clean turntable hub, support and rollers. Display...
... turntable. Do not operate the microwave oven without turntable and turntable support working , call for service. Move the receiver away from the microwave oven, or adjust the radio or TV antenna. ■ Are the microwave oven door and sealing surfaces clean? In the U.S.A. For further assistance If you need to order replacement parts, we recommend that specified in "Electrical Requirements?" Turntable will help , follow the instructions below. Remove and clean turntable hub, support and rollers. Display...
Use & Care Guide
Page 15
... wall oven, up to repair or replace light bulbs. Service calls to correct the installation of your microwave, to instruct you how to use your microwave, unless such damage results from the date of purchase. 7. The cost of repair or replacement under this microwave is used for the toll-free number. Replacement Parts Glass Turntable Part Number W10451786 Turntable Support and Rollers Part Number W10451792 Turntable Hub Part Number W10451789 Cleaning Supplies affresh™ Kitchen Appliance Cleaner Part Number W10355010 affresh™ Stainless Steel Cleaner Part Number...
... wall oven, up to repair or replace light bulbs. Service calls to correct the installation of your microwave, to instruct you how to use your microwave, unless such damage results from the date of purchase. 7. The cost of repair or replacement under this microwave is used for the toll-free number. Replacement Parts Glass Turntable Part Number W10451786 Turntable Support and Rollers Part Number W10451792 Turntable Hub Part Number W10451789 Cleaning Supplies affresh™ Kitchen Appliance Cleaner Part Number W10355010 affresh™ Stainless Steel Cleaner Part Number...

Use & Care Guide
Page 16
... option, an identical or comparable microwave to the designated service center. You are responsible for repair or replacement. 4. Additional help you obtain assistance or service if you ever need service, first see the "Troubleshooting" section of purchase or installation date for future reference. Write down the following information about your sales slip together for in-warranty service. In Canada call 1-800...
... option, an identical or comparable microwave to the designated service center. You are responsible for repair or replacement. 4. Additional help you obtain assistance or service if you ever need service, first see the "Troubleshooting" section of purchase or installation date for future reference. Write down the following information about your sales slip together for in-warranty service. In Canada call 1-800...


