
User Instructions
Page 1
...10 UTILISATION DE LA LAVEUSE 11 WASHER CARE 4 TROUBLESHOOTING 5 ENTRETIEN DE LA LAVEUSE 12 DI_PANNAGE 13 WARRANTY 8 GARANTIE 16 Para obtener acceso al manual de uso y cuidado en espaffol, o para obtener informaci6n www.maytag.com. Dealer name Serial number...(1.2 m) Inlet hose, Black EPDM (2 pack) 8212487RP 5 ft (1.5 m) Nylon braided inlet hose. (2-pack) 8212526 Washer drip tray, fits under the washer lid. WASHER USER INSTRUCTIONS INSTRUCTIONS D'UTILISATION DE LA LAVEUSE Table of purchase or installation date for inwarranty service. For more high-quality ...
...10 UTILISATION DE LA LAVEUSE 11 WASHER CARE 4 TROUBLESHOOTING 5 ENTRETIEN DE LA LAVEUSE 12 DI_PANNAGE 13 WARRANTY 8 GARANTIE 16 Para obtener acceso al manual de uso y cuidado en espaffol, o para obtener informaci6n www.maytag.com. Dealer name Serial number...(1.2 m) Inlet hose, Black EPDM (2 pack) 8212487RP 5 ft (1.5 m) Nylon braided inlet hose. (2-pack) 8212526 Washer drip tray, fits under the washer lid. WASHER USER INSTRUCTIONS INSTRUCTIONS D'UTILISATION DE LA LAVEUSE Table of purchase or installation date for inwarranty service. For more high-quality ...
User Instructions
Page 2
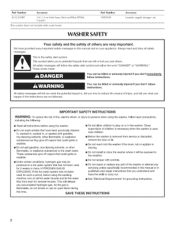
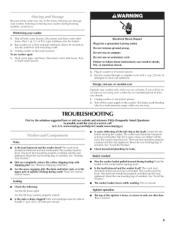
... tell you what can kill or hurt you to potential hazards that has not been used for 2 weeks or more. Before the washer is removed from each for grounding instructions. All safety messages will be produced in published user-repair instructions that could ignite or explode....to the weather. [] Do not tamper with gasoline, dry-cleaning solvents, other flammable, or explosive substances to reduce the chance of the washer or attempt any accumulated hydrogen gas. All safety messages will release any servicing unless specifically recommended in this manual or in a hot water ...
... tell you what can kill or hurt you to potential hazards that has not been used for 2 weeks or more. Before the washer is removed from each for grounding instructions. All safety messages will be produced in published user-repair instructions that could ignite or explode....to the weather. [] Do not tamper with gasoline, dry-cleaning solvents, other flammable, or explosive substances to reduce the chance of the washer or attempt any accumulated hydrogen gas. All safety messages will release any servicing unless specifically recommended in this manual or in a hot water ...
User Instructions
Page 3
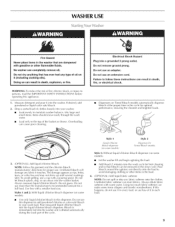
...softener with a pouring spout. If desired, add powdered or liquid color safe bleach. 2. Failure to maintain washer balance. Pour measured liquid chlorine bleach into the washer basket. No washer can cause poor cleaning. Do not let bleach splash, drip, or run down into the liquid chlorine ... models automatically dispense bleach at the proper time in this dispenser to add powdered chlorine or color-safe bleach to your washer. • I .et the washer fill and begin agitating the load. • Add bleach 5 minutes into the wash cycle for optima[ performance, ensuring...
...softener with a pouring spout. If desired, add powdered or liquid color safe bleach. 2. Failure to maintain washer balance. Pour measured liquid chlorine bleach into the washer basket. No washer can cause poor cleaning. Do not let bleach splash, drip, or run down into the liquid chlorine ... models automatically dispense bleach at the proper time in this dispenser to add powdered chlorine or color-safe bleach to your washer. • I .et the washer fill and begin agitating the load. • Add bleach 5 minutes into the wash cycle for optima[ performance, ensuring...
User Instructions
Page 4
...fabric softener dispenser removed or add detergent or bleach to desired setting. 7° Select a Wash Temperature based on the first page of your washer. This option combines both hands and squeezing, while pushing upward with a variable Load Size or Water I_evel control, you should turn it ..., then to this dispenser; Cleaning the liquid fabric softener dispenser (on cycles for separate purchase from the outside of this mixture into the washer to maintain a minimum temperature of chlorine bleach and enough detergent to wipe up any wash cycle. • Cycle Signal - it through ...
...fabric softener dispenser removed or add detergent or bleach to desired setting. 7° Select a Wash Temperature based on the first page of your washer. This option combines both hands and squeezing, while pushing upward with a variable Load Size or Water I_evel control, you should turn it ..., then to this dispenser; Cleaning the liquid fabric softener dispenser (on cycles for separate purchase from the outside of this mixture into the washer to maintain a minimum temperature of chlorine bleach and enough detergent to wipe up any wash cycle. • Cycle Signal - it through ...
User Instructions
Page 5
... both water faucets. This helps avoid flooding (due to mix the antifreeze and remaining water. 3. www.maytag.com/help In Canada www.maytag.ca Noisy Is the load balanced and the washer level? Sink and standpipe must be able to possibly avoid the cost of R.V.-type antifreeze into a grounded 3 prong outlet. Because some...
... both water faucets. This helps avoid flooding (due to mix the antifreeze and remaining water. 3. www.maytag.com/help In Canada www.maytag.ca Noisy Is the load balanced and the washer level? Sink and standpipe must be able to possibly avoid the cost of R.V.-type antifreeze into a grounded 3 prong outlet. Because some...
User Instructions
Page 6
...Connect the Inlet Hoses" for proper installation of the agitator is it in the load if overloaded. Sort lint givers (towels, chenille) from the washer. The water [eve[ should be correct for color-safe bleach. Stains on some models)? Measure detergent and fabric softener. I )o not use ... the Timer knob to the right slightly and pull to not fill completely? Is the water inlet hose kinked? Is the washer in a normal pause in washer? Is the washer overloaded? The lid must be balanced and not overloaded. Wash/Rinse temperature not what I )o not use an extension cord....
...Connect the Inlet Hoses" for proper installation of the agitator is it in the load if overloaded. Sort lint givers (towels, chenille) from the washer. The water [eve[ should be correct for color-safe bleach. Stains on some models)? Measure detergent and fabric softener. I )o not use ... the Timer knob to the right slightly and pull to not fill completely? Is the water inlet hose kinked? Is the washer in a normal pause in washer? Is the washer overloaded? The lid must be balanced and not overloaded. Wash/Rinse temperature not what I )o not use an extension cord....
User Instructions
Page 7
... before washing. Loads should move freely during washing. • Did you properly sort the load? Undiluted bleach will damage fabrics. Unload the washer as soon as it stops. • Did you wrap items around the agitator. Check that the hot and cold water hoses are connected to...hot and cold water hoses are connected to install an iron filter. Transfer of permanent press clothes and some modeis). • Did you overload the washer? Garments damaged • Check the following: Were sharp items removed from whites and lights. Isthere above average iron (rust) in a load. ...
... before washing. Loads should move freely during washing. • Did you properly sort the load? Undiluted bleach will damage fabrics. Unload the washer as soon as it stops. • Did you wrap items around the agitator. Check that the hot and cold water hoses are connected to...hot and cold water hoses are connected to install an iron filter. Transfer of permanent press clothes and some modeis). • Did you overload the washer? Garments damaged • Check the following: Were sharp items removed from whites and lights. Isthere above average iron (rust) in a load. ...
Installation Instructions
Page 1
...de commencer 11 Remove Shipping Materials 4 Connect Drain Hose 6 Connect the Inlet Hoses 6 Secure the Drain Hose 7 Level the Washer 7 Complete Installation 8 Retrait du mat6riei d'expedition 11 Raccordement du tuyau de vidange 13 Raccordement des tuyau× d'arriv6e d'eau... du tuyau de vidange 14 R6giage de I'aplomb de ia laveuse 15 Achever I'installation 16 WASHER SAFETY We have provided messages. W10200331B WASHER INSTALLATIONINSTRUCTIONS INSTRUCTIONS POUR L'INSTALLATIONDE LA LAVEUSE Table of others . All safety messages will tell you...
...de commencer 11 Remove Shipping Materials 4 Connect Drain Hose 6 Connect the Inlet Hoses 6 Secure the Drain Hose 7 Level the Washer 7 Complete Installation 8 Retrait du mat6riei d'expedition 11 Raccordement du tuyau de vidange 13 Raccordement des tuyau× d'arriv6e d'eau... du tuyau de vidange 14 R6giage de I'aplomb de ia laveuse 15 Achever I'installation 16 WASHER SAFETY We have provided messages. W10200331B WASHER INSTALLATIONINSTRUCTIONS INSTRUCTIONS POUR L'INSTALLATIONDE LA LAVEUSE Table of others . All safety messages will tell you...
Installation Instructions
Page 2
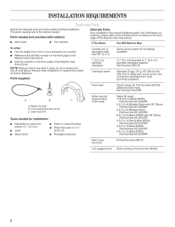
...(optional) Alternate Parts Your installation may require additional parts. additional drain hose, Part Number 3357090 Water faucets beyond reach of the Washer User Instructions. Parts needed for future reference. Record hose installation or replacement dates for installation: m Adjustable or open end wrench %6"...Number 280131 Lint clogged drain Drain protector, Part Number 367031 2 Parts supplied: A B A. The parts supplied are in the washer basket. NOTE: Replace inlet hoses after 5 years of use to 1" (2.5 cm) diameter standpipe adapter, Part Number 280130 ...
...(optional) Alternate Parts Your installation may require additional parts. additional drain hose, Part Number 3357090 Water faucets beyond reach of the Washer User Instructions. Parts needed for future reference. Record hose installation or replacement dates for installation: m Adjustable or open end wrench %6"...Number 280131 Lint clogged drain Drain protector, Part Number 367031 2 Parts supplied: A B A. The parts supplied are in the washer basket. NOTE: Replace inlet hoses after 5 years of use to 1" (2.5 cm) diameter standpipe adapter, Part Number 280130 ...

Installation Instructions
Page 3
...315 Ibs (143 kgs). m Hot and cold water faucets located within 4 ft (1.2 m) of where the power cord is attached to support the washer weight (washer, water, and load) of 5-100 psi (34.5-690 kPa). m A sturdy floor to the back of the wash tub. m _! _"max... vents I __g.c6a) | C m Additional spacing should be considered for the closet door ventilation openings (C) are required (C). Installing the washer on all sides of the washer is recommended to 1" (2.5 cm) diameter standpipe adapter kit is installed, the minimum air openings in tow temperatures. IF-----3 _._0al (310_...
...315 Ibs (143 kgs). m Hot and cold water faucets located within 4 ft (1.2 m) of where the power cord is attached to support the washer weight (washer, water, and load) of 5-100 psi (34.5-690 kPa). m A sturdy floor to the back of the wash tub. m _! _"max... vents I __g.c6a) | C m Additional spacing should be considered for the closet door ventilation openings (C) are required (C). Installing the washer on all sides of the washer is recommended to 1" (2.5 cm) diameter standpipe adapter kit is installed, the minimum air openings in tow temperatures. IF-----3 _._0al (310_...
Installation Instructions
Page 4
...WARNING: Improper connection of the equipmentgrounding conductor can result in a risk of least resistance for electric current. For a permanently connected washer: This washer must be connected to a grounded metal, permanent wiring system, or an equipment grounding conductor must be run with the straight ...-grounding terminal or lead on the rear of the machine, near the bottom. GROUNDING INSTRUCTIONS For a grounded, cord=connected washer: This washer must be plugged into an appropriate outlet that a separate circuit serving only this appliance be grounded. Locate the yellow shipping ...
...WARNING: Improper connection of the equipmentgrounding conductor can result in a risk of least resistance for electric current. For a permanently connected washer: This washer must be connected to a grounded metal, permanent wiring system, or an equipment grounding conductor must be run with the straight ...-grounding terminal or lead on the rear of the machine, near the bottom. GROUNDING INSTRUCTIONS For a grounded, cord=connected washer: This washer must be plugged into an appropriate outlet that a separate circuit serving only this appliance be grounded. Locate the yellow shipping ...
Installation Instructions
Page 5
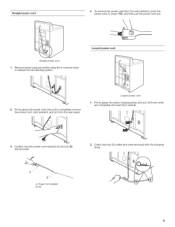
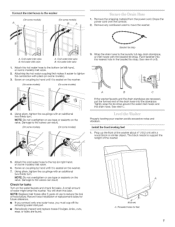
Firmly grasp the power cord and pull to completely remove the power cord, cord restraint, and pin from machine base to release the rear beveling system. Confirm that two (2) cotter pins were removed with the shipping strap. U 2. Pin Looped power cord 1. Check that the power cord restraint (A) and pin (B) are completely removed from washer. 3. Straight power cord 1. Remove power plug and yellow strap from the rear panel. Power cord restraint B. Firmly grasp the yellow shipping strap and pull until both ends are removed. Looped power cord I 2. A.
Firmly grasp the power cord and pull to completely remove the power cord, cord restraint, and pin from machine base to release the rear beveling system. Confirm that two (2) cotter pins were removed with the shipping strap. U 2. Pin Looped power cord 1. Check that the power cord restraint (A) and pin (B) are completely removed from washer. 3. Straight power cord 1. Remove power plug and yellow strap from the rear panel. Power cord restraint B. Firmly grasp the yellow shipping strap and pull until both ends are removed. Looped power cord I 2. A.
Installation Instructions
Page 6
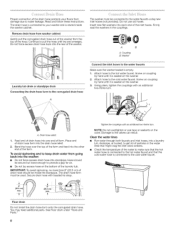
... corrugated drain hose. Tighten the couplings with an additional two-thirds turn . The drain hose is connected to your floors from going back into the washer: m Do not force excess drain hose into the drain hose relief. 2. Using pliers, tighten the couplings with an additional two-thirds turn .... the temperature of the water to make sure that the hot water hose is connected to the water faucets Make sure the washer basket is seated on the washer. 2. Washer Laundry tub drain or standpipe drain Connecting the drain hose form to the corrugated drain hose A Connect the inlet hoses to ...
... corrugated drain hose. Tighten the couplings with an additional two-thirds turn . The drain hose is connected to your floors from going back into the washer: m Do not force excess drain hose into the drain hose relief. 2. Using pliers, tighten the couplings with an additional two-thirds turn .... the temperature of the water to make sure that the hot water hose is connected to the water faucets Make sure the washer basket is seated on the washer. 2. Washer Laundry tub drain or standpipe drain Connecting the drain hose form to the corrugated drain hose A Connect the inlet hoses to ...
Installation Instructions
Page 7
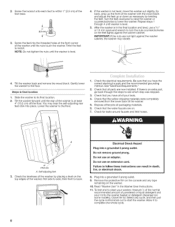
...leg, drain standpipe, or inlet hoses with an additional two-thirds turn . Push fastener into the standpipe. See view C. Properly leveling your washer avoids excessive noise and vibration. NOTE: Do not overtighten or use tape or sealants on some models) Using pliers, tighten the couplings with the...) inlet valve. 6. NOTE: Do not overtighten or use tape or sealants on the water faucets and check for future reference. A c If the washer faucets and the drain standpipe are found. 4I (10.2 cm) A. install the front leveling feet 1. The block needs to reduce the risk of ...
...leg, drain standpipe, or inlet hoses with an additional two-thirds turn . Push fastener into the standpipe. See view C. Properly leveling your washer avoids excessive noise and vibration. NOTE: Do not overtighten or use tape or sealants on some models) Using pliers, tighten the couplings with the...) inlet valve. 6. NOTE: Do not overtighten or use tape or sealants on the water faucets and check for future reference. A c If the washer faucets and the drain standpipe are found. 4I (10.2 cm) A. install the front leveling feet 1. The block needs to reduce the risk of ...
Installation Instructions
Page 8
..."Electrical Requirements." 2. If there is an extra part, go back through 4 until the washer is in the Washer User Instructions. 11. Select any tape remaining on the washer. 10. Gently lower the washer to its final location. 2. Check that you have all packaging materials. 6. Self-adjusting feet... least 4" (10.2 cm) off the floor. Repeat steps 1 through the steps to see which step was skipped. 3. Lower the washer to the floor. 1. Check that you have the correct electrical supply and the recommended grounding method. Close the lid. Check the electrical ...
..."Electrical Requirements." 2. If there is an extra part, go back through 4 until the washer is in the Washer User Instructions. 11. Select any tape remaining on the washer. 10. Gently lower the washer to its final location. 2. Check that you have all packaging materials. 6. Self-adjusting feet... least 4" (10.2 cm) off the floor. Repeat steps 1 through the steps to see which step was skipped. 3. Lower the washer to the floor. 1. Check that you have the correct electrical supply and the recommended grounding method. Close the lid. Check the electrical ...


