
Installation Instructions
Page 2
... tape Pliers that open to toll-free numbers on back page of your washer in the top of the washer. Beaded tie strap Drain hose with clamp Inlet hoses with flat washers To order, please refer to improve performance and minimize noise and possible "washer walk". INSTALLATION REQUIREMENTS Tools and Parts Gather required tools and parts before starting installation. If you have: You will need: Overhead sewer Standard...
... tape Pliers that open to toll-free numbers on back page of your washer in the top of the washer. Beaded tie strap Drain hose with clamp Inlet hoses with flat washers To order, please refer to improve performance and minimize noise and possible "washer walk". INSTALLATION REQUIREMENTS Tools and Parts Gather required tools and parts before starting installation. If you have: You will need: Overhead sewer Standard...

Installation Instructions
Page 3
... than 4.5" (113 mm) of drain hose should be inside standpipe or below 32° F (0° C). If you must support washer's total weight (with maximum slope of washer to reduce noise transfer. See "Washer Care" in low temperatures. install no higher than 96" (2.44 m), you need : n A water heater set to weather or in your responsibility. n Hot and cold water faucets located within 4 ft (1.2 m) of power cord on back of 0" (0 mm...
... than 4.5" (113 mm) of drain hose should be inside standpipe or below 32° F (0° C). If you must support washer's total weight (with maximum slope of washer to reduce noise transfer. See "Washer Care" in low temperatures. install no higher than 96" (2.44 m), you need : n A water heater set to weather or in your responsibility. n Hot and cold water faucets located within 4 ft (1.2 m) of power cord on back of 0" (0 mm...
Installation Instructions
Page 4
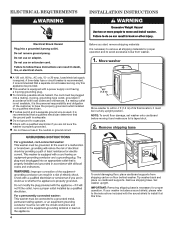
... breaker serving only this time. 4 n This washer is required. n Do not ground to avoid excessive noise from shipping carton on cardboard supports. If your washer includes a sound shield, please refer to the instructions included with a power supply cord having a 3 prong grounding plug. Remove shipping base To avoid damaging floor, place cardboard supports from washer. 1. Set washer upright. n If codes permit and a separate ground wire is used, it at this appliance...
... breaker serving only this time. 4 n This washer is required. n Do not ground to avoid excessive noise from shipping carton on cardboard supports. If your washer includes a sound shield, please refer to the instructions included with a power supply cord having a 3 prong grounding plug. Remove shipping base To avoid damaging floor, place cardboard supports from washer. 1. Set washer upright. n If codes permit and a separate ground wire is used, it at this appliance...

Installation Instructions
Page 5
... laundry tub. See "Tools and Parts". 6. Be sure to remove all parts from tub Connect Drain Hose 5. Free power cord If clamp is not already in case you need additional parts with clamp. For a laundry tub or standpipe drain, go to free from tub. Place drain hose in Step 7. Drain hose form must be inside standpipe; 3. You may need to drain port Remove tape from washer lid, open lid and remove cardboard packing tray from rear panel. For a floor drain, remove the preinstalled drain hose...
... laundry tub. See "Tools and Parts". 6. Be sure to remove all parts from tub Connect Drain Hose 5. Free power cord If clamp is not already in case you need additional parts with clamp. For a laundry tub or standpipe drain, go to free from tub. Place drain hose in Step 7. Drain hose form must be inside standpipe; 3. You may need to drain port Remove tape from washer lid, open lid and remove cardboard packing tray from rear panel. For a floor drain, remove the preinstalled drain hose...

Installation Instructions
Page 6
... provided). 8. Water should run until it is snug. Check for leaks Turn on washer. You may enter washer. In most standard configurations, hoses will drain later. 6 Record hose installation or replacement dates for cold water faucet. IMPORTANT: Do not overtighten or use old hoses. A small amount of which hose is connected to hot water to help in attaching hoses to remove the drain hose form from the end of hose failure, replace the hoses every 5 years. Repeat...
... provided). 8. Water should run until it is snug. Check for leaks Turn on washer. You may enter washer. In most standard configurations, hoses will drain later. 6 Record hose installation or replacement dates for cold water faucet. IMPORTANT: Do not overtighten or use old hoses. A small amount of which hose is connected to hot water to help in attaching hoses to remove the drain hose form from the end of hose failure, replace the hoses every 5 years. Repeat...
Installation Instructions
Page 7
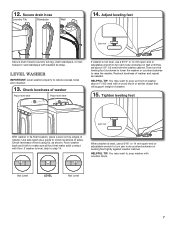
... drain hose Laundry Tub Standpipe Wall 14. HELPFUL TIP: You may want to turn jam nuts clockwise on leveling feet tightly against washer cabinet. Then turn jam nuts counterclockwise on feet until they are about 4" (102 mm) with wooden block. Check levelness of washer Place level here Place level here If washer is level, skip to reduce excess noise and vibration. 13. Tighten leveling feet Jam nut With washer in its final location...
... drain hose Laundry Tub Standpipe Wall 14. HELPFUL TIP: You may want to turn jam nuts clockwise on leveling feet tightly against washer cabinet. Then turn jam nuts counterclockwise on feet until they are about 4" (102 mm) with wooden block. Check levelness of washer Place level here Place level here If washer is level, skip to reduce excess noise and vibration. 13. Tighten leveling feet Jam nut With washer in its final location...

Installation Instructions
Page 8
... pour it into washer basket or detergent dispenser (on some models). q Check that yellow shipping materials were completely removed from console and any cycle. 16. q Check that you have all packaging materials. q Read "Washer Use" in your tools. Plug into a grounded 3 prong outlet. If there is plugged into a grounded 3 prong outlet Complete Installation CHECKLIST q Check electrical requirements. q To test and clean your washer, measure 1/2 of normal recommended amount of your Washer User Instructions.
... pour it into washer basket or detergent dispenser (on some models). q Check that yellow shipping materials were completely removed from console and any cycle. 16. q Check that you have all packaging materials. q Read "Washer Use" in your tools. Plug into a grounded 3 prong outlet. If there is plugged into a grounded 3 prong outlet Complete Installation CHECKLIST q Check electrical requirements. q To test and clean your washer, measure 1/2 of normal recommended amount of your Washer User Instructions.
Dimension Guide
Page 1
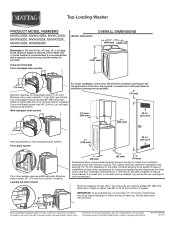
... must be at least 39" (990 mm) high; Louvered doors with equivalent air ventilation openings are minimum required. Top-Loading Washer PRODUCT MODEL NUMBERS MVWC200X, MVWC400X, MVWC450X, MVWX500X, MVWX600X, MVWX700X, MVWC300X, MVWX550X Washer dimensions OVERALL DIMENSIONS 271/2" 27" (699 mm) (686 mm) Electrical: A 120 volt, 60 Hz., AC only, 15- For closet installation, with spacing of washer. Laundry tub drain system 41/2" (114 mm) 30" (762 mm...
... must be at least 39" (990 mm) high; Louvered doors with equivalent air ventilation openings are minimum required. Top-Loading Washer PRODUCT MODEL NUMBERS MVWC200X, MVWC400X, MVWC450X, MVWX500X, MVWX600X, MVWX700X, MVWC300X, MVWX550X Washer dimensions OVERALL DIMENSIONS 271/2" 27" (699 mm) (686 mm) Electrical: A 120 volt, 60 Hz., AC only, 15- For closet installation, with spacing of washer. Laundry tub drain system 41/2" (114 mm) 30" (762 mm...
Warranty Information
Page 1
... of your major appliance, to replace or repair house fuses, or to you . ITEMS EXCLUDED FROM WARRANTY This limited warranty does not cover: 1. Replacement parts or repair labor if this information on the model and serial number label located on how to use or when it was purchased. Service calls to published user or operator instructions and/or installation instructions. 2. Service calls to the appliance. 8. Consumable parts are unable to better help...
... of your major appliance, to replace or repair house fuses, or to you . ITEMS EXCLUDED FROM WARRANTY This limited warranty does not cover: 1. Replacement parts or repair labor if this information on the model and serial number label located on how to use or when it was purchased. Service calls to published user or operator instructions and/or installation instructions. 2. Service calls to the appliance. 8. Consumable parts are unable to better help...


