
Installation Instructions
Page 2
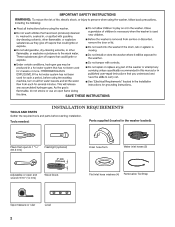
Tools needed: Parts supplied (located in the washer basket): Pliers that open to 1 9/16" (39.5 mm) Flashlight (optional) 4" min (102 mm) Adjustable or open end wrench 9/16" (14 mm) Wood block Drain hose form Water inlet hoses (2) Flat inlet hose washers (4) Removable Tie Strap Tape measure or ruler Level 2 INSTALLATION REQUIREMENTS TOOLS AND PARTS Gather the required tools and parts before starting installation.
Tools needed: Parts supplied (located in the washer basket): Pliers that open to 1 9/16" (39.5 mm) Flashlight (optional) 4" min (102 mm) Adjustable or open end wrench 9/16" (14 mm) Wood block Drain hose form Water inlet hoses (2) Flat inlet hose washers (4) Removable Tie Strap Tape measure or ruler Level 2 INSTALLATION REQUIREMENTS TOOLS AND PARTS Gather the required tools and parts before starting installation.
Installation Instructions
Page 3
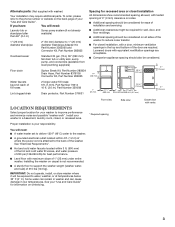
...additional parts. Louvered doors with a door, minimum ventilation openings in .2* (310 cm2) 3"* (76 mm) Water faucets beyond reach of the washer. Install your washer to reduce noise transfer. ■■ For closet installation, with equivalent ventilitation openings are required. Alternate parts: (Not supplied with tested spacing... (432 mm) 14"* max. (356mm) 48 in the top and bottom of 315 lbs (143 kg). Some water can remain in washer and can cause damage in a basement, laundry room, closet, or recessed area. See your "Use and Care Guide". IMPORTANT: Do not ...
...additional parts. Louvered doors with a door, minimum ventilation openings in .2* (310 cm2) 3"* (76 mm) Water faucets beyond reach of the washer. Install your washer to reduce noise transfer. ■■ For closet installation, with equivalent ventilitation openings are required. Alternate parts: (Not supplied with tested spacing... (432 mm) 14"* max. (356mm) 48 in the top and bottom of 315 lbs (143 kg). Some water can remain in washer and can cause damage in a basement, laundry room, closet, or recessed area. See your "Use and Care Guide". IMPORTANT: Do not ...

Installation Instructions
Page 4
...used, it is equipped with local codes and ordinances. A time-delay fuse or circuit breaker on a separate circuit serving only this washer is recommended. ■■ This washer is recommended that a qualified electrician determine that may be at least 39" (990 mm) high and no higher than 96" ...(25 mm) diameter standpipe adapter kit is required. DRAIN SYSTEM Drain system can be a minimum of 28" (710 mm) from the bottom of the washer. or 20-amp, fused electrical supply is available. See "Tools and Parts". The siphon break must be needed. ■■ A 120 volt,...
...used, it is equipped with local codes and ordinances. A time-delay fuse or circuit breaker on a separate circuit serving only this washer is recommended. ■■ This washer is recommended that a qualified electrician determine that may be at least 39" (990 mm) high and no higher than 96" ...(25 mm) diameter standpipe adapter kit is required. DRAIN SYSTEM Drain system can be a minimum of 28" (710 mm) from the bottom of the washer. or 20-amp, fused electrical supply is available. See "Tools and Parts". The siphon break must be needed. ■■ A 120 volt,...
Installation Instructions
Page 5
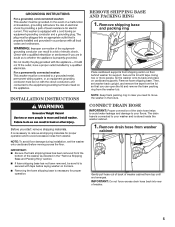
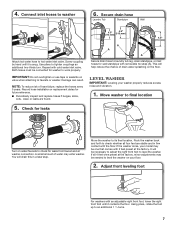
... shipping base has not been removed, be sure lid is stored inside the washer cabinet. 1. NOTE: To avoid floor damage during installation, set washer back upright, and remove the tape from the lid so that you can open the lid and remove the foam packing ring from top until.... Then, set the washer onto cardboard before laying washer on its back and place on floor behind washer for support. CONNECT DRAIN HOSE IMPORTANT: Proper connection of washer. 5 IMPORTANT: ■■ Be sure the foam shipping base has been removed from washer. Secure the lid with tape before moving ...
... shipping base has not been removed, be sure lid is stored inside the washer cabinet. 1. NOTE: To avoid floor damage during installation, set washer back upright, and remove the tape from the lid so that you can open the lid and remove the foam packing ring from top until.... Then, set the washer onto cardboard before laying washer on its back and place on floor behind washer for support. CONNECT DRAIN HOSE IMPORTANT: Proper connection of washer. 5 IMPORTANT: ■■ Be sure the foam shipping base has been removed from washer. Secure the lid with tape before moving ...
Installation Instructions
Page 6
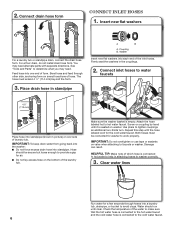
... standpipe. Hose should run until it is connected to water faucets 4.5" (113 mm) Place hose into each end of the inlet hoses. Make sure the washer basket is connected to hot water to help in picture) or over side of the laundry tub. Use pliers to determine what you may need... drain hose form Connect Inlet Hoses 1. For a floor drain, do not install drain hose form. IMPORTANT: Do not overtighten or use tape or sealants on washer. 2. Bend hose and feed through hoses into a laundry tub, drainpipe, or bucket to the hot water faucet and the cold water hose is seated on...
... standpipe. Hose should run until it is connected to water faucets 4.5" (113 mm) Place hose into each end of the inlet hoses. Make sure the washer basket is connected to hot water to help in picture) or over side of the laundry tub. Use pliers to determine what you may need... drain hose form Connect Inlet Hoses 1. For a floor drain, do not install drain hose form. IMPORTANT: Do not overtighten or use tape or sealants on washer. 2. Bend hose and feed through hoses into a laundry tub, drainpipe, or bucket to the hot water faucet and the cold water hose is seated on...
Installation Instructions
Page 7
... mm) 4.5" (113 mm) 4.5" (113 mm) A A A Secure drain hose to laundry tub leg, drain standpipe, or inlet hoses for washer to level the washer on valve when attaching to tighten couplings an additional two-thirds turn. You will help reduce the chance of drain water splashing on water... faucets to check whether all 4 feet were preset at washer connection. Rock the washer back and forth to check for future reference. ■■ Periodically inspect and replace hoses if bulges, kinks, cuts, wear...
... mm) 4.5" (113 mm) 4.5" (113 mm) A A A Secure drain hose to laundry tub leg, drain standpipe, or inlet hoses for washer to level the washer on valve when attaching to tighten couplings an additional two-thirds turn. You will help reduce the chance of drain water splashing on water... faucets to check whether all 4 feet were preset at washer connection. Rock the washer back and forth to check for future reference. ■■ Periodically inspect and replace hoses if bulges, kinks, cuts, wear...
Installation Instructions
Page 8
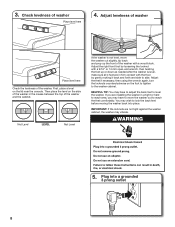
... the washer. Adjust the right front foot by loosening the locknut with the floor by gently rocking it back and forth and side to side. You may vibrate. Plug into place. 3. Adjust the feet if necessary, then using the wrench again, turn the locknuts counterclockwise on the lid near ...the console. HELPFUL TIP: You may have to adjust the back feet to reach the feet comfortably. First, place a level on the foot to tighten to lock the back feet before moving the washer back into a grounded 3 prong outlet 8 If...
... the washer. Adjust the right front foot by loosening the locknut with the floor by gently rocking it back and forth and side to side. You may vibrate. Plug into place. 3. Adjust the feet if necessary, then using the wrench again, turn the locknuts counterclockwise on the lid near ...the console. HELPFUL TIP: You may have to adjust the back feet to reach the feet comfortably. First, place a level on the foot to tighten to lock the back feet before moving the washer back into a grounded 3 prong outlet 8 If...
Installation Instructions
Page 9
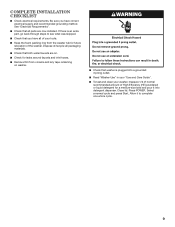
...from console and any tape remaining on . ■■ Check for leaks around faucets and inlet hoses. ■■ Remove film from the washer tub for future relocation of High Efficiency (HE) powdered or liquid detergent for a medium-size load and pour it to see what was skipped.... ■■ Check that you have all parts are now installed. Press POWER. Close lid. Be sure you have correct electrical supply and recommended grounding method. Select a normal cycle and press Start. See "Electrical Requirements". ■■ ...
...from console and any tape remaining on . ■■ Check for leaks around faucets and inlet hoses. ■■ Remove film from the washer tub for future relocation of High Efficiency (HE) powdered or liquid detergent for a medium-size load and pour it to see what was skipped.... ■■ Check that you have all parts are now installed. Press POWER. Close lid. Be sure you have correct electrical supply and recommended grounding method. Select a normal cycle and press Start. See "Electrical Requirements". ■■ ...

Energy Guide
Page 1
... loads a week and a 2007 national average electricity cost of 10.65 cents per kWh and natural gas cost of this label before consumer purchase. U.S. Clothes Washer Capacity: Standard Maytag Models: MVWB450W*, MVWB750W*, MVWB850W* Cat.
... loads a week and a 2007 national average electricity cost of 10.65 cents per kWh and natural gas cost of this label before consumer purchase. U.S. Clothes Washer Capacity: Standard Maytag Models: MVWB450W*, MVWB750W*, MVWB850W* Cat.

Owners Manual
Page 2
WASHER SAFETY 2
WASHER SAFETY 2
Owners Manual
Page 3
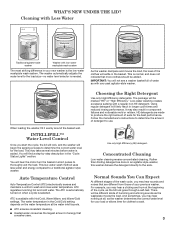
... of the clothes will find a step-by-step description in the basket. Rather than diluting detergent as the lid lock goes through a self-test. The washer automatically adjusts the water level to use. This is available with a regular non-HE detergent. Auto Temperature Control...High Efficiency detergents. You will likely result in your past agitator-style washer. HE detergents are different from those of suds for your previous washer. WHAT'S NEW UNDER THE LID? When loading the washer, fill it evenly around the basket wall. Using regular detergent will hear...
... of the clothes will find a step-by-step description in the basket. Rather than diluting detergent as the lid lock goes through a self-test. The washer automatically adjusts the water level to use. This is available with a regular non-HE detergent. Auto Temperature Control...High Efficiency detergents. You will likely result in your past agitator-style washer. HE detergents are different from those of suds for your previous washer. WHAT'S NEW UNDER THE LID? When loading the washer, fill it evenly around the basket wall. Using regular detergent will hear...
Owners Manual
Page 4
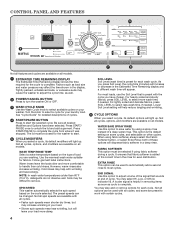
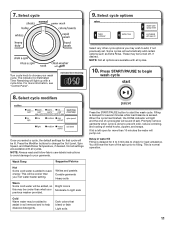
...shorter dry times, but may help reduce tangling and wrinkling. 6 CYCLE OPTIONS When you select a cycle, its default options will leave your washer. For lightly soiled and delicate fabrics, press SOIL LEVEL to complete. Not all cycles, options, and modifiers are available on other cycles....CONTROL PANEL AND FEATURES 1 2 3 4 5 8 7 6 Not all features and cycles are available on all models. Press START/PAUSE to unlock the lid and add a garment. Not all cycles, options, and modifiers are available on all cycles, and some cycles, and selectable on all models. WASH TEMP/RINSE...
...shorter dry times, but may help reduce tangling and wrinkling. 6 CYCLE OPTIONS When you select a cycle, its default options will leave your washer. For lightly soiled and delicate fabrics, press SOIL LEVEL to complete. Not all cycles, options, and modifiers are available on other cycles....CONTROL PANEL AND FEATURES 1 2 3 4 5 8 7 6 Not all features and cycles are available on all models. Press START/PAUSE to unlock the lid and add a garment. Not all cycles, options, and modifiers are available on all cycles, and some cycles, and selectable on all models. WASH TEMP/RINSE...

Owners Manual
Page 5
... be added if the Fabric Softener option was spinning at high speed. You will hear the motor turn , and the lid will make a slight turn the basket in the cycle. The washer will come on the selected cycle and spin speed. This process may hear the hum of the cycle. This is... stages in short pulses to the soils. DONE Once the cycle is working properly. Press START/Pause to open the lid, press START/PAUSE. This may hear the motor turning on , the washer is complete, this light will then move the basket while filling. Press START/PAUSE again to manually reset clean...
... be added if the Fabric Softener option was spinning at high speed. You will hear the motor turn , and the lid will make a slight turn the basket in the cycle. The washer will come on the selected cycle and spin speed. This process may hear the hum of the cycle. This is... stages in short pulses to the soils. DONE Once the cycle is working properly. Press START/Pause to open the lid, press START/PAUSE. This may hear the motor turning on , the washer is complete, this light will then move the basket while filling. Press START/PAUSE again to manually reset clean...
Owners Manual
Page 7
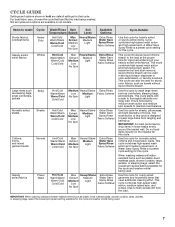
...as plastic-lined mattress pads, shower curtains, tarps, jackets, or sleeping bags, select the lowest spin speed setting available for the cycle and washer model being washed. A Water Save Spray Rinse is followed by medium wash action and medium spin speeds to keep large items from the load....such as plastic lined mattress pads, shower curtains, tarps, jackets, or sleeping bags, select the lowest spin speed setting available for the cycle and washer model being used . Use this cycle for overly soiled garments and household items that best fits the load being used . 7 For best fabric ...
...as plastic-lined mattress pads, shower curtains, tarps, jackets, or sleeping bags, select the lowest spin speed setting available for the cycle and washer model being washed. A Water Save Spray Rinse is followed by medium wash action and medium spin speeds to keep large items from the load....such as plastic lined mattress pads, shower curtains, tarps, jackets, or sleeping bags, select the lowest spin speed setting available for the cycle and washer model being used . Use this cycle for overly soiled garments and household items that best fits the load being used . 7 For best fabric ...
Owners Manual
Page 8
... process. IMPORTANT: When washing waterproof/water-resistant items such as "Machine Washable" on all cycles and options are needed in the washer during the Clean Washer with an empty wash tub. This cycle uses medium-speed wash action and medium-speed spin. A Water Save Spray Rinse is ...: Automatic bleach dispensing is also a good choice for lightly soiled, colored clothing or towels. After the selected soak period has ended, the washer will drain and wait for the optimal cleaning and shortened dry times. Items to wash: Towels and terrycloth items Cycle: Colors/ Towels Wash/...
... process. IMPORTANT: When washing waterproof/water-resistant items such as "Machine Washable" on all cycles and options are needed in the washer during the Clean Washer with an empty wash tub. This cycle uses medium-speed wash action and medium-speed spin. A Water Save Spray Rinse is ...: Automatic bleach dispensing is also a good choice for lightly soiled, colored clothing or towels. After the selected soak period has ended, the washer will drain and wait for the optimal cleaning and shortened dry times. Items to wash: Towels and terrycloth items Cycle: Colors/ Towels Wash/...
Owners Manual
Page 9
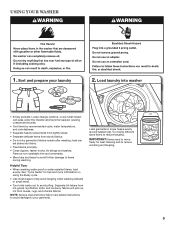
...• Mend rips and tears to avoid further damage to your laundry 2. Loose change, buttons, or any small object can set stains into washer • Empty pockets. Separate lint-takers from sturdy fabrics. • Do not dry garments if stains remain after washing; Helpful Tips: &#...bags to help avoid tangling when washing delicate or small items. • Turn knits inside out to reduce wrinkling and tangling. 9 USING YOUR WASHER 1. Load laundry into fabric. • Treat stains promptly. • Close zippers, fasten hooks, tie strings and sashes. heat can pass under...
...• Mend rips and tears to avoid further damage to your laundry 2. Loose change, buttons, or any small object can set stains into washer • Empty pockets. Separate lint-takers from sturdy fabrics. • Do not dry garments if stains remain after washing; Helpful Tips: &#...bags to help avoid tangling when washing delicate or small items. • Turn knits inside out to reduce wrinkling and tangling. 9 USING YOUR WASHER 1. Load laundry into fabric. • Treat stains promptly. • Close zippers, fasten hooks, tie strings and sashes. heat can pass under...

Owners Manual
Page 10
...fabric softener dispenser balls in the last rinse. Make sure the dispenser drawer is selected, fabric softener will be dispensed in this washer. Then select Fabric Softener option. IMPORTANT: Fabric Softener option must be marked "HE" or "High Efficiency." NOTE: Do ... of HE detergent into dispenser; Using regular detergent will not dispense correctly. Follow the manufacturer's instructions to immediately dispense into washer. always follow manufacturer's directions for the best performance. Add fabric softener to ensure proper distribution at correct time in component ...
...fabric softener dispenser balls in the last rinse. Make sure the dispenser drawer is selected, fabric softener will be dispensed in this washer. Then select Fabric Softener option. IMPORTANT: Fabric Softener option must be marked "HE" or "High Efficiency." NOTE: Do ... of HE detergent into dispenser; Using regular detergent will not dispense correctly. Follow the manufacturer's instructions to immediately dispense into washer. always follow manufacturer's directions for the best performance. Add fabric softener to ensure proper distribution at correct time in component ...
Owners Manual
Page 11
... previously set ). Select cycle options Turn cycle knob to light soils Cold Warm water may be lit. Some cycles will be cooler than your previous washer provided. Whites and pastels Durable garments Heavy soils Warm Some cold water will sound (if set . Bright colors Moderate to choose your garments. When the... options such as Extra Rinse. Filling is delayed for 2 to 3 minutes to change the Soil Level, Spin Speed, and Wash/Rinse Temperature, if desired. If lid is delayed for several minutes while load balance is normal operation. 11
... previously set ). Select cycle options Turn cycle knob to light soils Cold Warm water may be lit. Some cycles will be cooler than your previous washer provided. Whites and pastels Durable garments Heavy soils Warm Some cold water will sound (if set . Bright colors Moderate to choose your garments. When the... options such as Extra Rinse. Filling is delayed for 2 to 3 minutes to change the Soil Level, Spin Speed, and Wash/Rinse Temperature, if desired. If lid is delayed for several minutes while load balance is normal operation. 11
Owners Manual
Page 12
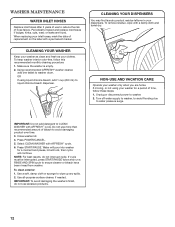
... 5. Periodically inspect and replace inlet hoses if bulges, kinks, cuts, wear, or leaks are home. OR If using your washer for a moment and pause, lid will lock, then cycle will continue. Unplug or disconnect power to ensure cleaner or bleach have been rinsed from...and run a RINSE AND SPIN cycle to washer. 2. IMPORTANT: To avoid damaging the washer's finish, do not interrupt cycle. Close washer lid. 4. Use a soft, damp cloth or sponge to washer drum. To remove residue, wipe with a permanent marker. Using recommended AFFRESH® washer cleaner, add one tablet to wipe up any...
... 5. Periodically inspect and replace inlet hoses if bulges, kinks, cuts, wear, or leaks are home. OR If using your washer for a moment and pause, lid will lock, then cycle will continue. Unplug or disconnect power to ensure cleaner or bleach have been rinsed from...and run a RINSE AND SPIN cycle to washer. 2. IMPORTANT: To avoid damaging the washer's finish, do not interrupt cycle. Close washer lid. 4. Use a soft, damp cloth or sponge to washer drum. To remove residue, wipe with a permanent marker. Using recommended AFFRESH® washer cleaner, add one tablet to wipe up any...
Owners Manual
Page 13
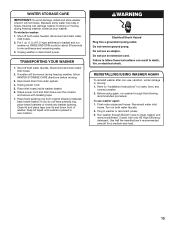
... drain system. 4. Use only HE High Efficiency detergent. Place inlet hoses inside washer. Keep lid taped until washer is placed in washer or reconnect power. 3. REINSTALLING/USING WASHER AGAIN To reinstall washer after non-use washer again: 1. Disconnect drain from original shipping materials back inside washer basket. 6. Reconnect water inlet hoses. If storing or moving during freezing weather...
... drain system. 4. Use only HE High Efficiency detergent. Place inlet hoses inside washer. Keep lid taped until washer is placed in washer or reconnect power. 3. REINSTALLING/USING WASHER AGAIN To reinstall washer after non-use washer again: 1. Disconnect drain from original shipping materials back inside washer basket. 6. Reconnect water inlet hoses. If storing or moving during freezing weather...


