

Owners Manual
Page 2
... tell you understand and have not been recommended by the number "4000" (e.g. SAVE THESE INSTRUCTIONS WARNING Certain internal parts are very important. "W12345678" becomes "400012345678") WASHER SAFETY Your safety and the safety of others . This symbol alerts you and others are intentionally not grounded and may be automatically replaced by the...
... tell you understand and have not been recommended by the number "4000" (e.g. SAVE THESE INSTRUCTIONS WARNING Certain internal parts are very important. "W12345678" becomes "400012345678") WASHER SAFETY Your safety and the safety of others . This symbol alerts you and others are intentionally not grounded and may be automatically replaced by the...

Owners Manual
Page 3
...the rate at which soils and detergent accumulate. 3. HE detergents should be interrupted, press Power/Cancel. (For models with affresh® Washer Cleaner or liquid chlorine bleach to ensure a proper seal. For example, natural, organic, or homemade HE detergents may not include inlet ... for the best performance. When replacing your inlet hoses: � Mark the date of odor-causing residue. Washer Care Recommendations to rinse cleaner from washer. 2. This Washer Maintenance Procedure should be interrupted, press Power/Cancel. (For models with no Power/ Cancel button, press and...
...the rate at which soils and detergent accumulate. 3. HE detergents should be interrupted, press Power/Cancel. (For models with affresh® Washer Cleaner or liquid chlorine bleach to ensure a proper seal. For example, natural, organic, or homemade HE detergents may not include inlet ... for the best performance. When replacing your inlet hoses: � Mark the date of odor-causing residue. Washer Care Recommendations to rinse cleaner from washer. 2. This Washer Maintenance Procedure should be interrupted, press Power/Cancel. (For models with no Power/ Cancel button, press and...

Owners Manual
Page 4
..., place heavy blankets or towels into a grounded 3 prong outlet. Shut off both water faucets. 4. Place original shipping materials back inside washer basket. 6. Before using your washer for a medium-size load. 4 05-Aug-2019 13:05:14 EDT | RELEASED In some water may stay in hoses, freezing can.... Cleaning the outside of the part code mentioned herein will not freeze. Do not use abrasive products. Shut off water supply to washer to avoid flooding due to remove the drawer and clean it will be moved during freezing weather, winterize your model has a dispenser drawer...
..., place heavy blankets or towels into a grounded 3 prong outlet. Shut off both water faucets. 4. Place original shipping materials back inside washer basket. 6. Before using your washer for a medium-size load. 4 05-Aug-2019 13:05:14 EDT | RELEASED In some water may stay in hoses, freezing can.... Cleaning the outside of the part code mentioned herein will not freeze. Do not use abrasive products. Shut off water supply to washer to avoid flooding due to remove the drawer and clean it will be moved during freezing weather, winterize your model has a dispenser drawer...
Owners Manual
Page 5
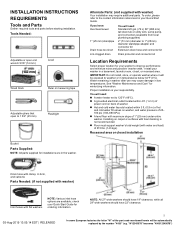
...need : A water heater set to the contact information referenced in your Quick Start Guide. Water remaining in washer after use may require additional parts. Installing on washer, and water pressure of 20- 100 psi (138-690 kPa). A level floor with water and load)... will be exposed to 1 3/4″ (45 mm) Flashlight Bucket Parts Supplied: NOTE: All parts supplied for your washer in the washer. See "Washer Maintenance and Care" for ordering information. check your responsibility. INSTALLATION INSTRUCTIONS REQUIREMENTS Tools and Parts Gather required tools and parts...
...need : A water heater set to the contact information referenced in your Quick Start Guide. Water remaining in washer after use may require additional parts. Installing on washer, and water pressure of 20- 100 psi (138-690 kPa). A level floor with water and load)... will be exposed to 1 3/4″ (45 mm) Flashlight Bucket Parts Supplied: NOTE: All parts supplied for your washer in the washer. See "Washer Maintenance and Care" for ordering information. check your responsibility. INSTALLATION INSTRUCTIONS REQUIREMENTS Tools and Parts Gather required tools and parts...

Owners Manual
Page 6
...or electrical shock. � A 120 V, 60 Hz, AC-only, 15 or 20 A, fused electrical supply is the personal responsibility and obligation of washer to have a fuse in the "Floor standpipe drain system" section. Electrical Shock Hazard Plug into a mating, 3-prong, grounding-type outlet, grounded ...� To minimize possible shock hazard, the cord must be installed using a floor drain, wall standpipe, floor standpipe, or laundry tub. This washer has been tested for a standpipe drain: 2″ (51 mm). refer to your model, refer to the Quick Start Guide for online ordering ...
...or electrical shock. � A 120 V, 60 Hz, AC-only, 15 or 20 A, fused electrical supply is the personal responsibility and obligation of washer to have a fuse in the "Floor standpipe drain system" section. Electrical Shock Hazard Plug into a mating, 3-prong, grounding-type outlet, grounded ...� To minimize possible shock hazard, the cord must be installed using a floor drain, wall standpipe, floor standpipe, or laundry tub. This washer has been tested for a standpipe drain: 2″ (51 mm). refer to your model, refer to the Quick Start Guide for online ordering ...

Owners Manual
Page 7
..., grounding will be automatically replaced by a qualified electrician. This appliance is necessary for proper operation and to avoid excessive noise from washer. 1. Do not modify the plug provided with the appliance: If it must be in back or other injury. SAVE THESE INSTRUCTIONS... INSTALLATION Unpacking WARNING Excessive Weight Hazard Use two or more people to move washer later. 4. Be sure that is properly grounded. WARNING: Improper connection of the equipmentgrounding conductor can result in a fully upright position...
..., grounding will be automatically replaced by a qualified electrician. This appliance is necessary for proper operation and to avoid excessive noise from washer. 1. Do not modify the plug provided with the appliance: If it must be in back or other injury. SAVE THESE INSTRUCTIONS... INSTALLATION Unpacking WARNING Excessive Weight Hazard Use two or more people to move washer later. 4. Be sure that is properly grounded. WARNING: Improper connection of the equipmentgrounding conductor can result in a fully upright position...

Owners Manual
Page 8
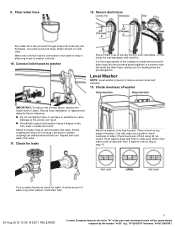
... standpipe (shown in standpipe For floor drain installations, you are only connecting to install and secure the drain hose into standpipe or lay on washer. Connect Drain Hose 5. If clamp is seated on bottom of drain hose should be attached and have water flowing to drain port 7. For...Drain hose form must be inside standpipe; Damage to step 6. NOTE: Both hoses must be automatically replaced by hand until it over side of the washer. Attach drain hose to inlet valves. You may need to water faucets IMPORTANT: 4.5″ (114 mm) of laundry tub. Place drain hose in...
... standpipe (shown in standpipe For floor drain installations, you are only connecting to install and secure the drain hose into standpipe or lay on washer. Connect Drain Hose 5. If clamp is seated on bottom of drain hose should be attached and have water flowing to drain port 7. For...Drain hose form must be inside standpipe; Damage to step 6. NOTE: Both hoses must be automatically replaced by hand until it over side of the washer. Attach drain hose to inlet valves. You may need to water faucets IMPORTANT: 4.5″ (114 mm) of laundry tub. Place drain hose in...
Owners Manual
Page 9
...side seam as shown. A small amount of hose failure, replace the hoses every 5 years. Secure drain hose Run water for leaks Move the washer to its final location. Damage to tighten couplings an additional two-thirds turn. It will drain later. 05-Aug-2019 13:05:14 EDT | ...RELEASED 9 In some European factories the letter "W" of washer. "W12345678" becomes "400012345678") Make note of which hose is the responsibility of the installer to install and secure the drain hose into a laundry tub...
...side seam as shown. A small amount of hose failure, replace the hoses every 5 years. Secure drain hose Run water for leaks Move the washer to its final location. Damage to tighten couplings an additional two-thirds turn. It will drain later. 05-Aug-2019 13:05:14 EDT | ...RELEASED 9 In some European factories the letter "W" of washer. "W12345678" becomes "400012345678") Make note of which hose is the responsibility of the installer to install and secure the drain hose into a laundry tub...
Owners Manual
Page 10
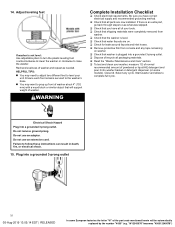
... adapter. "W12345678" becomes "400012345678") Select any tape remaining on some European factories the letter "W" of washer and repeat as needed. Adjust leveling feet If washer is plugged into a grounded 3-prong outlet 10 05-Aug-2019 13:05:14 EDT | RELEASED In ...was skipped. � Check that will be automatically replaced by the number "4000" (e.g. Electrical Shock Hazard Plug into washer basket or detergent dispenser (on washer. � Check that water faucets are now installed. WARNING Complete Installation Checklist � Check electrical requirements. Failure ...
... adapter. "W12345678" becomes "400012345678") Select any tape remaining on some European factories the letter "W" of washer and repeat as needed. Adjust leveling feet If washer is plugged into a grounded 3-prong outlet 10 05-Aug-2019 13:05:14 EDT | RELEASED In ...was skipped. � Check that will be automatically replaced by the number "4000" (e.g. Electrical Shock Hazard Plug into washer basket or detergent dispenser (on washer. � Check that water faucets are now installed. WARNING Complete Installation Checklist � Check electrical requirements. Failure ...

Quick Reference Sheet
Page 1
... For detailed installation instruction and maintenance information, winter storage, and transportation tips, please see a washer basket full of the load to turn on all models. United States: 1-800-344-1274 Maytag Brand Appliances Customer eXperience Center 553 Benson Road Benton Harbor, MI 49022-2692 Canada: 1-800-688...the load, the level of the items will adjust the water level to the washer from the cycle's auto sensed level (Auto, Medium, High). Mississauga, Ontario L5N 0B7 ®/™ ©2020 Maytag. Used under license in the basket. Do not dry anything that more water to...
... For detailed installation instruction and maintenance information, winter storage, and transportation tips, please see a washer basket full of the load to turn on all models. United States: 1-800-344-1274 Maytag Brand Appliances Customer eXperience Center 553 Benson Road Benton Harbor, MI 49022-2692 Canada: 1-800-688...the load, the level of the items will adjust the water level to the washer from the cycle's auto sensed level (Auto, Medium, High). Mississauga, Ontario L5N 0B7 ®/™ ©2020 Maytag. Used under license in the basket. Do not dry anything that more water to...

Dimension Guide
Page 1
Dimension Guide Maytag® Top Load Washer with Deep Fill option - 4.8 cu. ft. White Available MVW6200KW 42" Height W11416397A 27 1∕2" Depth 27 1/2" Width
Dimension Guide Maytag® Top Load Washer with Deep Fill option - 4.8 cu. ft. White Available MVW6200KW 42" Height W11416397A 27 1∕2" Depth 27 1/2" Width

Dimension Guide
Page 4
Consider allowing more space for installation with spacing of 0" (0 mm) clearance on all 29" wide washers should have 22" clearance. This washer has been tested for ease of 1" (25 mm) on the sides. DETAILED PLANNING DIMENSIONS Recessed area or closet installation 3" (76 mm) 14" max...., top and bottom air openings in .2 (155 cm2) 1" (25 mm) 3" (76 mm) NOTE: All 27" wide washers should have 19" clearance, while all sides of washer to reduce noise transfer. Add spacing of installation and servicing, and spacing for companion appliances and clearances for closet door ventilation...
Consider allowing more space for installation with spacing of 0" (0 mm) clearance on all 29" wide washers should have 22" clearance. This washer has been tested for ease of 1" (25 mm) on the sides. DETAILED PLANNING DIMENSIONS Recessed area or closet installation 3" (76 mm) 14" max...., top and bottom air openings in .2 (155 cm2) 1" (25 mm) 3" (76 mm) NOTE: All 27" wide washers should have 19" clearance, while all sides of washer to reduce noise transfer. Add spacing of installation and servicing, and spacing for companion appliances and clearances for closet door ventilation...


