
Use and Care Manual
Page 2
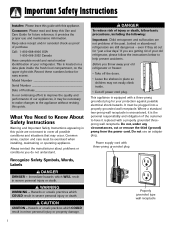
...these numbers below to have it may occur. Always contact the manufacturer about problems or conditions you are getting rid of your old refrigerator, please follow basic precautions, including the following: Important: Child entrapment and suffocation are not problems of purchase. Recognize Safety Symbols, Words...provides the proper use an adapter plug. Call: 1-800-688-9900 USA 1-800-688-2002 Canada Have complete model and serial number identification of your refrigerator. If you do not understand. it is located on the upper right side. What You Need to the ...
...these numbers below to have it may occur. Always contact the manufacturer about problems or conditions you are getting rid of your old refrigerator, please follow basic precautions, including the following: Important: Child entrapment and suffocation are not problems of purchase. Recognize Safety Symbols, Words...provides the proper use an adapter plug. Call: 1-800-688-9900 USA 1-800-688-2002 Canada Have complete model and serial number identification of your refrigerator. If you do not understand. it is located on the upper right side. What You Need to the ...

Use and Care Manual
Page 4
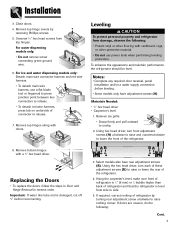
...cap to top hinge while performing door removal and replacement. • Tape decorative panels (select models) securely into the connector. If the refrigerator is not possible, lay refrigerator on its front. • Protect outside finish. 3 Door and Hinge Removal Some installations require...observe the following : • Protect vinyl or other heat source. Subflooring or floor coverings (i.e. Installation Location • Do not install refrigerator near oven, radiator or other flooring with cabinet material. • Do not install where temperature falls below 55° F (13&#...
...cap to top hinge while performing door removal and replacement. • Tape decorative panels (select models) securely into the connector. If the refrigerator is not possible, lay refrigerator on its front. • Protect outside finish. 3 Door and Hinge Removal Some installations require...observe the following : • Protect vinyl or other heat source. Subflooring or floor coverings (i.e. Installation Location • Do not install refrigerator near oven, radiator or other flooring with cabinet material. • Do not install where temperature falls below 55° F (13&#...
Use and Care Manual
Page 5
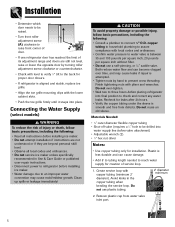
...grille. • Grasp firmly and pull outward to raise rocking corner. If required, correct rocking of refrigerator and that the refrigerator is damaged, cut off 5⁄8" before leveling. • Some models only have rear adjustment screws (B). Remove bottom hinges with doors. 8. To enhance the appearance and .... • To detach red wire harness, press tab on underside of the refrigerator. 4. Remove top hinge covers by turning rear adjustment screw clockwise to unclip. 2. For ice and water dispensing models only: Detach main wire connector harness and red wire harness. • To...
...grille. • Grasp firmly and pull outward to raise rocking corner. If required, correct rocking of refrigerator and that the refrigerator is damaged, cut off 5⁄8" before leveling. • Some models only have rear adjustment screws (B). Remove bottom hinges with doors. 8. To enhance the appearance and .... • To detach red wire harness, press tab on underside of the refrigerator. 4. Remove top hinge covers by turning rear adjustment screw clockwise to unclip. 2. For ice and water dispensing models only: Detach main wire connector harness and red wire harness. • To...
Use and Care Manual
Page 6
... prevent cross threading. Avoid kinks in Use & Care Guide or published user-repair instructions. • Disconnect power to refrigerator before placing refrigerator into place. CAUTION To avoid property damage or possible injury, follow basic precautions, including the following : • Consult... a plumber to check and correct any water leaks. Connecting the Water Supply (select models) WARNING To reduce the risk of ...
... prevent cross threading. Avoid kinks in Use & Care Guide or published user-repair instructions. • Disconnect power to refrigerator before placing refrigerator into place. CAUTION To avoid property damage or possible injury, follow basic precautions, including the following : • Consult... a plumber to check and correct any water leaks. Connecting the Water Supply (select models) WARNING To reduce the risk of ...
Use and Care Manual
Page 7
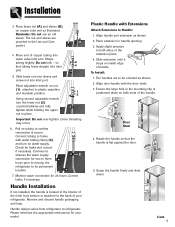
...turn the lower nut (2) counterclockwise and fully tighten while holding the upper nut in place. Do not kink - Pull on inside edge of your model. Grasp the handle firmly and slide down on copper tube end as shown. 2. Important: Do not over sleeve and screw nut into inlet port.... Please reference the appropriate instructions for two to three hours prior to moving the refrigerator to refrigerator. Place brass nut (A) and sleeve (B) on both sides of the handle. Ensure the large hole in the interior of the fresh food ...
...turn the lower nut (2) counterclockwise and fully tighten while holding the upper nut in place. Do not kink - Pull on inside edge of your model. Grasp the handle firmly and slide down on copper tube end as shown. 2. Important: Do not over sleeve and screw nut into inlet port.... Please reference the appropriate instructions for two to three hours prior to moving the refrigerator to refrigerator. Place brass nut (A) and sleeve (B) on both sides of the handle. Ensure the large hole in the interior of the fresh food ...
Use and Care Manual
Page 9
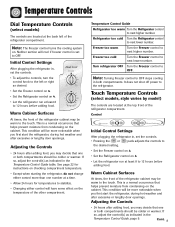
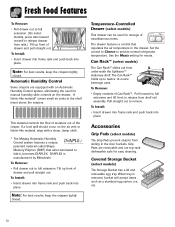
... Turn the Freezer control to next higher number. This condition will have some effect on 4. • Let the refrigerator run at the top front of the refrigerator compartment. Touch Temperature Controls (select models, style varies by model) The controls are located at the back left or right as indicated in , set to stabilize. •...
... Turn the Freezer control to next higher number. This condition will have some effect on 4. • Let the refrigerator run at the top front of the refrigerator compartment. Touch Temperature Controls (select models, style varies by model) The controls are located at the back left or right as indicated in , set to stabilize. •...

Use and Care Manual
Page 10
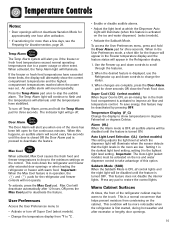
...Triple Cool Climate Control (select models) The control is located at 38° F (3° C) in the fresh food compartment and 0° F (-17° C) in the freezer compartment. Refrigerator too warm Set the Refrigerator control to defrost less frequently, conserving energy. Turn refrigerator OFF Press the Freezer pad until...more than one degree at a time. Reset Filter (select models) When a water filter has been installed in operation, the and pads for the Freezer control will illuminate when the feature is in the refrigerator, the yellow Order light will show the new setting for...
...Triple Cool Climate Control (select models) The control is located at 38° F (3° C) in the fresh food compartment and 0° F (-17° C) in the freezer compartment. Refrigerator too warm Set the Refrigerator control to defrost less frequently, conserving energy. Turn refrigerator OFF Press the Freezer pad until...more than one degree at a time. Reset Filter (select models) When a water filter has been installed in operation, the and pads for the Freezer control will illuminate when the feature is in the refrigerator, the yellow Order light will show the new setting for...
Use and Care Manual
Page 11
... and down the refrigerator and freezer after 12 hours, OR press the Max Cool pad to the minimum settings on the ice and water dispenser) (select models). • Activate the Sabbath Mode. To save energy, this option. Sabbath Mode (SAB) When the Sabbath Mode is ON, all ...audible alarms will alternately show temperatures in operation, the and pads for three seconds. Warm Cabinet Surfaces At times, the front of the refrigerator cabinet may...
... and down the refrigerator and freezer after 12 hours, OR press the Max Cool pad to the minimum settings on the ice and water dispenser) (select models). • Activate the Sabbath Mode. To save energy, this option. Sabbath Mode (SAB) When the Sabbath Mode is ON, all ...audible alarms will alternately show temperatures in operation, the and pads for three seconds. Warm Cabinet Surfaces At times, the front of the refrigerator cabinet may...
Use and Care Manual
Page 12
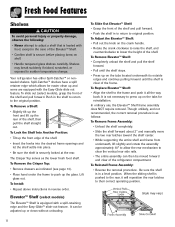
...if nicked, scratched, or exposed to clear the vertical rear side rails. • The entire assembly can be moved forward and clear of the refrigerator compartment. It can then be adjusted up or down without unloading. Shelves may vary) 11 The Crisper Top serves as indicated (see page 13).... the tabs for easier clean up and some are equipped with the Easy-Glide slide out feature. Your refrigerator has either Spill-Catcher™ or nonsealed shelves. To slide out (select models), grasp the front of the shelf, then pull the shelf straight out. Push in reverse order. To...
...if nicked, scratched, or exposed to clear the vertical rear side rails. • The entire assembly can be moved forward and clear of the refrigerator compartment. It can then be adjusted up or down without unloading. Shelves may vary) 11 The Crisper Top serves as indicated (see page 13).... the tabs for easier clean up and some are equipped with the Easy-Glide slide out feature. Your refrigerator has either Spill-Catcher™ or nonsealed shelves. To slide out (select models), grasp the front of the shelf, then pull the shelf straight out. Push in reverse order. To...
Use and Care Manual
Page 13
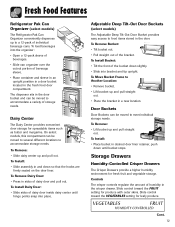
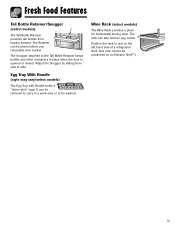
... Bucket: • Tilt bucket out. • Pull straight out of storage needs. Adjustable Deep Tilt-Out Door Buckets (select models) The Adjustable Deep Tilt-Out Door Bucket provides easy access to accommodate storage needs. Slide control toward the FRUIT setting for fresh fruit...Another Location: • Remove bucket. • Lift bracket up to accommodate a variety of the bracket. Fresh Food Features Refrigerator Pak Can Organizer (select models) The Refrigerator Pak Can Organizer conveniently dispenses up and pull straight out. • Place the bracket in a new location. To load ...
... Bucket: • Tilt bucket out. • Pull straight out of storage needs. Adjustable Deep Tilt-Out Door Buckets (select models) The Adjustable Deep Tilt-Out Door Bucket provides easy access to accommodate storage needs. Slide control toward the FRUIT setting for fresh fruit...Another Location: • Remove bucket. • Lift bracket up to accommodate a variety of the bracket. Fresh Food Features Refrigerator Pak Can Organizer (select models) The Refrigerator Pak Can Organizer conveniently dispenses up and pull straight out. • Place the bracket in a new location. To load ...
Use and Care Manual
Page 14
...items such as a standard egg carton, ice, etc. 13 The Can Rack™ holds up to provide normal refrigerator temperature. Accessories Grip Pads (select models) The Grip Pads prevent objects from underneath the Spillsaver™ stationary shelf. When tray is manufactured by Mitsubishi. Set...into place. Use the Meats setting for easy cleaning. Grip Pads are removable and are equipped with a clean, damp cloth. * The Maytag Automatic Humidity Control system features a unique, patented material called Shape Memory Polymer (SMP) that regulates the air temperature in the door buckets...
...items such as a standard egg carton, ice, etc. 13 The Can Rack™ holds up to provide normal refrigerator temperature. Accessories Grip Pads (select models) The Grip Pads prevent objects from underneath the Spillsaver™ stationary shelf. When tray is manufactured by Mitsubishi. Set...into place. Use the Meats setting for easy cleaning. Grip Pads are removable and are equipped with a clean, damp cloth. * The Maytag Automatic Humidity Control system features a unique, patented material called Shape Memory Polymer (SMP) that regulates the air temperature in the door buckets...
Use and Care Manual
Page 15
... area or to be placed above any removable door bucket. It can also hold an egg carton. Egg Tray With Handle (style may vary/select models) The Egg Tray with Handle holds a "dozen-plus" eggs. Position the rack to the Tall Bottle Retainer keeps bottles and other containers in place... when the door is opened or closed. Fresh Food Features Tall Bottle Retainer/Snugger (select models) The Tall Bottle Retainer prevents tall bottles from side to side. The Snugger attached to rest on the left hand side of a refrigerator shelf (this rack cannot be positioned on an Elevator Shelf™). 14
... area or to be placed above any removable door bucket. It can also hold an egg carton. Egg Tray With Handle (style may vary/select models) The Egg Tray with Handle holds a "dozen-plus" eggs. Position the rack to the Tall Bottle Retainer keeps bottles and other containers in place... when the door is opened or closed. Fresh Food Features Tall Bottle Retainer/Snugger (select models) The Tall Bottle Retainer prevents tall bottles from side to side. The Snugger attached to rest on the left hand side of a refrigerator shelf (this rack cannot be positioned on an Elevator Shelf™). 14
Use and Care Manual
Page 16
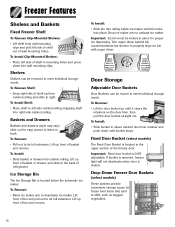
...stops. To Install: • Slide bucket in left side of shelf out of the freezer door. Drop-Down Freezer Door Baskets (select models) These baskets provide convenient storage space for easy access to items in the upper section of wall mounting holes. Shelves Shelves can be ...removed to meet individual storage needs. To Remove: • Pull out to its full extension. Lift front of refrigerator. Door Storage Adjustable Door Buckets Door Buckets can be moved to meet individual storage needs. To Install: • Slide bin into right side...
...stops. To Install: • Slide bucket in left side of shelf out of the freezer door. Drop-Down Freezer Door Baskets (select models) These baskets provide convenient storage space for easy access to items in the upper section of wall mounting holes. Shelves Shelves can be ...removed to meet individual storage needs. To Remove: • Pull out to its full extension. Lift front of refrigerator. Door Storage Adjustable Door Buckets Door Buckets can be moved to meet individual storage needs. To Install: • Slide bin into right side...
Use and Care Manual
Page 17
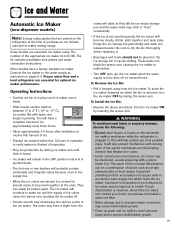
...Ice Bin: • Reverse the above procedure. This will continue to the water supply as instructed on pages 5-6. Some models are essential for several hours. Other models have a complete harvest of ice approximately every three hours. • Allow approximately 3-6 hours after installation to receive first...until the supply of the appropriate ice maker kit is normal for optimal ice maker performance. Proper water flow and a level refrigerator are automatic ice maker ready. Empty the ice storage bin periodically and wash it is IC10S. The cause of this unusual ...
...Ice Bin: • Reverse the above procedure. This will continue to the water supply as instructed on pages 5-6. Some models are essential for several hours. Other models have a complete harvest of ice approximately every three hours. • Allow approximately 3-6 hours after installation to receive first...until the supply of the appropriate ice maker kit is normal for optimal ice maker performance. Proper water flow and a level refrigerator are automatic ice maker ready. Empty the ice storage bin periodically and wash it is IC10S. The cause of this unusual ...
Use and Care Manual
Page 18
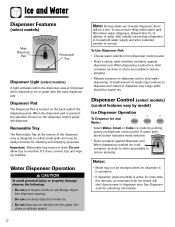
...Choose water selection from dispenser control panel. • Press a sturdy, wide-mouthed container against dispenser pad. Dispenser Control (select models) (control features vary by model) Ice Dispenser Operation To Dispense Ice and Water: • Select Water, Crush or Cube ice mode by pushing button on dispenser... to two-minute delay while water tank fills before water dispenses. Discard first 10-14 glasses of water after initially connecting refrigerator to household water supply and after extended periods of nonuse. When dispensing crushed ice, hold container as close to chute as...
...Choose water selection from dispenser control panel. • Press a sturdy, wide-mouthed container against dispenser pad. Dispenser Control (select models) (control features vary by model) Ice Dispenser Operation To Dispense Ice and Water: • Select Water, Crush or Cube ice mode by pushing button on dispenser... to two-minute delay while water tank fills before water dispenses. Discard first 10-14 glasses of water after initially connecting refrigerator to household water supply and after extended periods of nonuse. When dispensing crushed ice, hold container as close to chute as...
Use and Care Manual
Page 20
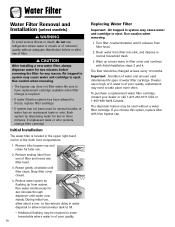
... cap. The dispenser feature may cause water and cartridge to three minutes. Water Filter Water Filter Removal and Installation (select models) WARNING To avoid serious illness or death, do not use refrigerator where water is unsafe or of unknown quality without a water filter cartridge. Remove sealing label from filter head. 2. Reduce water...
... cap. The dispenser feature may cause water and cartridge to three minutes. Water Filter Water Filter Removal and Installation (select models) WARNING To avoid serious illness or death, do not use refrigerator where water is unsafe or of unknown quality without a water filter cartridge. Remove sealing label from filter head. 2. Reduce water...
Use and Care Manual
Page 21
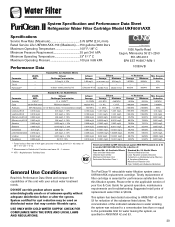
...; 10% Mercury at least 10,000 particles/ml Influent Average Effluent Average Maximum 1.88 mg / L 97.26% 96.84% - - 99.52% 98.94% Min. Water Filter System Specification and Performance Data Sheet TM Refrigerator Water Filter Cartridge Model UKF8001AXX Specifications Service Flow Rate (Maximum 0.78 GPM (2.9 L/min) Rated Service Life UKF8001AXX-750 (Maximum...
...; 10% Mercury at least 10,000 particles/ml Influent Average Effluent Average Maximum 1.88 mg / L 97.26% 96.84% - - 99.52% 98.94% Min. Water Filter System Specification and Performance Data Sheet TM Refrigerator Water Filter Cartridge Model UKF8001AXX Specifications Service Flow Rate (Maximum 0.78 GPM (2.9 L/min) Rated Service Life UKF8001AXX-750 (Maximum...
Use and Care Manual
Page 26
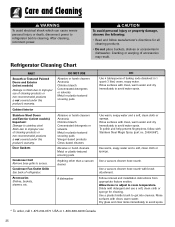
... no. 20000008*). Use a vacuum cleaner hose nozzle with clean, warm water and dry immediately to avoid water spots. Allow items to adjust to refrigerator before cleaning. Use a plastic bristle brush to avoid spots. * To order, call 1-877-232-6771 USA or 1-800-688-8408 Canada. ... and a soft, clean cloth or sponge. Use warm, soapy water and a soft, clean cloth or sponge. Refrigerator Cleaning Chart PART Smooth or Textured Painted Doors and Exterior (select models) Damage to finish due to access. Cracking or warping of accessories may result. Accessories Shelves, buckets, drawers, etc...
... no. 20000008*). Use a vacuum cleaner hose nozzle with clean, warm water and dry immediately to avoid water spots. Allow items to adjust to refrigerator before cleaning. Use a plastic bristle brush to avoid spots. * To order, call 1-877-232-6771 USA or 1-800-688-8408 Canada. ... and a soft, clean cloth or sponge. Use warm, soapy water and a soft, clean cloth or sponge. Refrigerator Cleaning Chart PART Smooth or Textured Painted Doors and Exterior (select models) Damage to finish due to access. Cracking or warping of accessories may result. Accessories Shelves, buckets, drawers, etc...
Use and Care Manual
Page 29
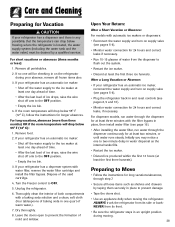
...you may notice a one to the OFF position. • Empty the ice bin. 4. Dispose of warm water.). 7. Unplug the refrigerator. 6. For dispenser models, run water through the dispenser for at least three minutes with automatic ice makers or dispensers: • Reconnect the water supply and ... its front. • Be sure the refrigerator stays in an upright position during your absence, remove all perishables. 2. Upon Your Return: After a Short Vacation or Absence: For models with the filter bypass in place, then install water filter (see pages 5-6). • Monitor water ...
...you may notice a one to the OFF position. • Empty the ice bin. 4. Dispose of warm water.). 7. Unplug the refrigerator. 6. For dispenser models, run water through the dispenser for at least three minutes with automatic ice makers or dispensers: • Reconnect the water supply and ... its front. • Be sure the refrigerator stays in an upright position during your absence, remove all perishables. 2. Upon Your Return: After a Short Vacation or Absence: For models with the filter bypass in place, then install water filter (see pages 5-6). • Monitor water ...
Use and Care Manual
Page 30
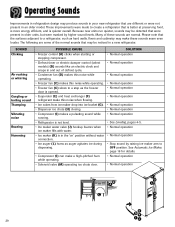
...; Freezer control (A) clicks when starting or stopping compressor. • Normal operation • Defrost timer or electric damper control (select models) (B) sounds like an electric clock and snaps in and out of defrost cycle. • Normal operation • Condenser fan (D)...8226; Dispenser ice chute (H) closing. • Normal operation • Compressor (I) makes a pulsating sound while running. • Normal operation • Refrigerator is not level. • See Leveling, pages 4-5. • Ice maker water valve (J) hookup buzzes when ice maker fills with water. • ...
...; Freezer control (A) clicks when starting or stopping compressor. • Normal operation • Defrost timer or electric damper control (select models) (B) sounds like an electric clock and snaps in and out of defrost cycle. • Normal operation • Condenser fan (D)...8226; Dispenser ice chute (H) closing. • Normal operation • Compressor (I) makes a pulsating sound while running. • Normal operation • Refrigerator is not level. • See Leveling, pages 4-5. • Ice maker water valve (J) hookup buzzes when ice maker fills with water. • ...


