
Use and Care Manual
Page 3
... not service or replace any part of fire, electric shock, serious injury or death when using the refrigerator. 2. Always read and follow manufacturer's storage and ideal environment instructions for water, electrical power and grounding must comply with a qualified electrician if you are beyond personal skill level. 14. Important Safety Instructions WARNING To reduce risk of refrigerator unless specifically recommended in Use and Care Guide or published user-repair instructions. Refrigerator is...
... not service or replace any part of fire, electric shock, serious injury or death when using the refrigerator. 2. Always read and follow manufacturer's storage and ideal environment instructions for water, electrical power and grounding must comply with a qualified electrician if you are beyond personal skill level. 14. Important Safety Instructions WARNING To reduce risk of refrigerator unless specifically recommended in Use and Care Guide or published user-repair instructions. Refrigerator is...

Use and Care Manual
Page 4
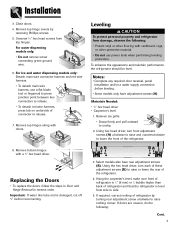
... this temperature. • Refrigerator is completely covered, use dimensions from floor to top of the refrigerator is designed for proper air circulation. Unplug power cord from its front. • Protect outside finish. 3 Door and Hinge Removal Some installations require door removal to get refrigerator to final location. Installation Location • Do not install refrigerator near oven, radiator or other protective material prior to moving refrigerator. To Reconnect the Water Line: • Firmly push tube 5⁄...
... this temperature. • Refrigerator is completely covered, use dimensions from floor to top of the refrigerator is designed for proper air circulation. Unplug power cord from its front. • Protect outside finish. 3 Door and Hinge Removal Some installations require door removal to get refrigerator to final location. Installation Location • Do not install refrigerator near oven, radiator or other protective material prior to moving refrigerator. To Reconnect the Water Line: • Firmly push tube 5⁄...
Use and Care Manual
Page 5
... driver. Remove bottom hinges with doors. 8. Replacing the Doors • To replace the doors, follow the steps in Door and Hinge Removal in reverse order. Important: If water line tube end is 1⁄4" (6 mm) or 1⁄2 bubble higher than back of refrigerator by removing Phillips screws. 5. To enhance the appearance and maintain performance, the refrigerator should be level. Notes: • Complete any required door reversal, panel installation and/or a water supply connection before reconnecting. AB BA 3. Using...
... driver. Remove bottom hinges with doors. 8. Replacing the Doors • To replace the doors, follow the steps in Door and Hinge Removal in reverse order. Important: If water line tube end is 1⁄4" (6 mm) or 1⁄2 bubble higher than back of refrigerator by removing Phillips screws. 5. To enhance the appearance and maintain performance, the refrigerator should be level. Notes: • Complete any required door reversal, panel installation and/or a water supply connection before reconnecting. AB BA 3. Using...
Use and Care Manual
Page 6
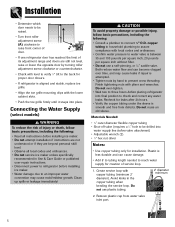
... before installing ice maker. • Water damage due to an improper water connection may cause leaks if repair is between 35 and 100 pounds per square inch, 20 pounds per square inch without filter. • Do not use plastic tubing. 2' diameter minimum 2. Avoid kinks in Use & Care Guide or published user-repair instructions. • Disconnect power to refrigerator before placing refrigerator into final position to check and correct any water leaks. copper tubing...
... before installing ice maker. • Water damage due to an improper water connection may cause leaks if repair is between 35 and 100 pounds per square inch, 20 pounds per square inch without filter. • Do not use plastic tubing. 2' diameter minimum 2. Avoid kinks in Use & Care Guide or published user-repair instructions. • Disconnect power to refrigerator before placing refrigerator into final position to check and correct any water leaks. copper tubing...
Use and Care Manual
Page 8
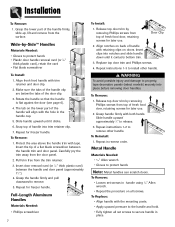
... retainer. 3. Installation To Remove: 1. Carefully pry the trim away from top of the door clip. 3. Wide-by removing Phillips screws from the door panel. 2. Repeat for freezer handle. Insert door removal card (or 1⁄32" thick plastic card) between the handle trim and door panel. Repeat for freezer handle. Release top door trim by -Side™ Handles Materials Needed: • Gloves to install other handle. Align notches on doors. Repeat instructions 1-3 to protect...
... retainer. 3. Installation To Remove: 1. Carefully pry the trim away from top of the door clip. 3. Wide-by removing Phillips screws from the door panel. 2. Repeat for freezer handle. Insert door removal card (or 1⁄32" thick plastic card) between the handle trim and door panel. Repeat for freezer handle. Release top door trim by -Side™ Handles Materials Needed: • Gloves to install other handle. Align notches on doors. Repeat instructions 1-3 to protect...

Use and Care Manual
Page 10
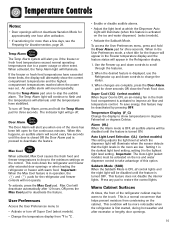
.... Reset Filter (select models) When a water filter has been installed in the refrigerator, the yellow Order light will go off . The indicator light will illuminate when the feature is illuminated. Refrigerator too warm Set the Refrigerator control to next higher number by pressing the pad. Vacation Mode The Vacation Mode feature causes the freezer to next lower number by pressing the pad. A new filter should be installed immediately when the Replace light is activated. Temperature Control Guide Refrigerator too cold Set...
.... Reset Filter (select models) When a water filter has been installed in the refrigerator, the yellow Order light will go off . The indicator light will illuminate when the feature is illuminated. Refrigerator too warm Set the Refrigerator control to next higher number by pressing the pad. Vacation Mode The Vacation Mode feature causes the freezer to next lower number by pressing the pad. A new filter should be installed immediately when the Replace light is activated. Temperature Control Guide Refrigerator too cold Set...
Use and Care Manual
Page 11
... pad to improve air flow and temperature control. To turn off Super Cool (select models). • Change the temperature display from condensing on the ice and water dispenser control to deactivate the feature. When this option. To access the User Preferences menu, press and hold the Temp Alarm pad for three seconds. When changes are low. Auto Light Level Selection (LL) (select models) This setting adjusts the light level at which the dispenser light will illuminate...
... pad to improve air flow and temperature control. To turn off Super Cool (select models). • Change the temperature display from condensing on the ice and water dispenser control to deactivate the feature. When this option. To access the User Preferences menu, press and hold the Temp Alarm pad for three seconds. When changes are low. Auto Light Level Selection (LL) (select models) This setting adjusts the light level at which the dispenser light will illuminate...
Use and Care Manual
Page 12
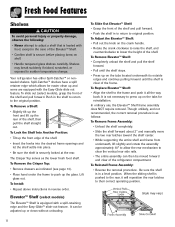
... shelf. • Insert the hooks into the desired frame openings and let the shelf settle into place. • Be sure the shelf is securely locked at the rear. Shelves may vary) 11 To Reinstall Frame Assembly: • Reverse the removal procedure. To Lock the Shelf Into Another Position: • Tilt up on shelf. • Handle tempered glass shelves carefully. To Replace Elevator™ Shelf: • Align the shelf...
... shelf. • Insert the hooks into the desired frame openings and let the shelf settle into place. • Be sure the shelf is securely locked at the rear. Shelves may vary) 11 To Reinstall Frame Assembly: • Reverse the removal procedure. To Lock the Shelf Into Another Position: • Tilt up on shelf. • Handle tempered glass shelves carefully. To Replace Elevator™ Shelf: • Align the shelf...
Use and Care Manual
Page 13
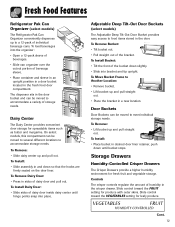
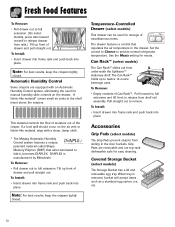
... meet individual storage needs. To Remove: • Lift bucket up and pull out. To Install: • Slide assembly in and down slightly. • Slide into the organizer: • Open a 12-pack sleeve of beverages. • Slide can be moved to several different locations to food items stored in the fresh food door compartment. Controls The crisper controls regulate the amount...
... meet individual storage needs. To Remove: • Lift bucket up and pull out. To Install: • Slide assembly in and down slightly. • Slide into the organizer: • Open a 12-pack sleeve of beverages. • Slide can be moved to several different locations to food items stored in the fresh food door compartment. Controls The crisper controls regulate the amount...
Use and Care Manual
Page 14
... an Automatic Humidity Control system, eliminating the need for easy cleaning. DIAPLEX is removed, bucket will accept items such as a standard egg carton, ice, etc. 13 Temperature-Controlled Drawer (select models) This drawer can be used for meats. Use the Meats setting for storage of drawer and pull straight out. Can Rack™ (select models) The Can Rack™ slides out from shelf rail assembly. Pull straight...
... an Automatic Humidity Control system, eliminating the need for easy cleaning. DIAPLEX is removed, bucket will accept items such as a standard egg carton, ice, etc. 13 Temperature-Controlled Drawer (select models) This drawer can be used for meats. Use the Meats setting for storage of drawer and pull straight out. Can Rack™ (select models) The Can Rack™ slides out from shelf rail assembly. Pull straight...
Use and Care Manual
Page 17
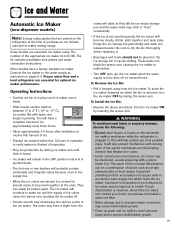
...; Clean up ) the ice maker when the water supply is plugged in an inactive water supply line which feeds the ice maker. Connect the ice maker to -17° C), ice maker fills with water and begins operating. Be sure to health. It will rattle as they fall into an empty storage pan and the water valve may be a combination of copper salts in . Some models are automatic ice maker ready. The kit contains installation instructions and water connection instructions. They...
...; Clean up ) the ice maker when the water supply is plugged in an inactive water supply line which feeds the ice maker. Connect the ice maker to -17° C), ice maker fills with water and begins operating. Be sure to health. It will rattle as they fall into an empty storage pan and the water valve may be a combination of copper salts in . Some models are automatic ice maker ready. The kit contains installation instructions and water connection instructions. They...
Use and Care Manual
Page 18
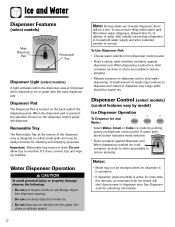
... not be easily removed for cleaning and emptying purposes. A small amount of nonuse. Dispenser Control (select models) (control features vary by model) Ice Dispenser Operation To Dispense Ice and Water: • Select Water, Crush or Cube ice mode by pushing button on the dispenser control panel will shut down power to dispenser area. Notes: • Mode may continue to household water supply and after initially connecting refrigerator to dispense and collect in operation. • If dispenser (select models) is located on dispenser pad to...
... not be easily removed for cleaning and emptying purposes. A small amount of nonuse. Dispenser Control (select models) (control features vary by model) Ice Dispenser Operation To Dispense Ice and Water: • Select Water, Crush or Cube ice mode by pushing button on the dispenser control panel will shut down power to dispenser area. Notes: • Mode may continue to household water supply and after initially connecting refrigerator to dispense and collect in operation. • If dispenser (select models) is located on dispenser pad to...
Use and Care Manual
Page 19
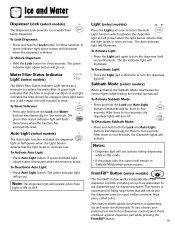
... Auto Light buttons simultaneously for three seconds. Notes: • Dispenser light will not activate during dispensing while in this mode. • If the power fails, the control will operate when Auto Light is reset. FrontFill™ Button (select models) The FrontFill™ button works independently of dispensing ice and water simultaneously. Once light turns red, it will turn the dispenser light on continuously. A red light indicates the filter should be changed. To Deactivate Light: • Press the Light pad...
... Auto Light buttons simultaneously for three seconds. Notes: • Dispenser light will not activate during dispensing while in this mode. • If the power fails, the control will operate when Auto Light is reset. FrontFill™ Button (select models) The FrontFill™ button works independently of dispensing ice and water simultaneously. Once light turns red, it will turn the dispenser light on continuously. A red light indicates the filter should be changed. To Deactivate Light: • Press the Light pad...
Use and Care Manual
Page 20
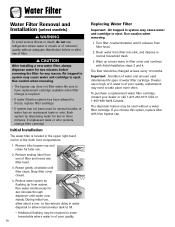
... option, replace filter with Initial Installation, steps 2 and 4. Remove sealing label from filter head. 2. Drain water from system. Important: Condition of water and amount used for two minutes before or after use . 2. Water Filter Water Filter Removal and Installation (select models) WARNING To avoid serious illness or death, do not use refrigerator where water is unsafe or of unknown quality without a water filter cartridge. Be sure to have replacement cartridge available when filter change filter cartridge. Use caution when removing. 1. If...
... option, replace filter with Initial Installation, steps 2 and 4. Remove sealing label from filter head. 2. Drain water from system. Important: Condition of water and amount used for two minutes before or after use . 2. Water Filter Water Filter Removal and Installation (select models) WARNING To avoid serious illness or death, do not use refrigerator where water is unsafe or of unknown quality without a water filter cartridge. Be sure to have replacement cartridge available when filter change filter cartridge. Use caution when removing. 1. If...
Use and Care Manual
Page 21
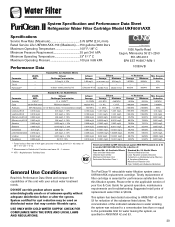
... Effects Influent Challenge Concentration 2.0 mg/L ± 10% - Water Filter System Specification and Performance Data Sheet TM Refrigerator Water Filter Cartridge Model UKF8001AXX Specifications Service Flow Rate (Maximum 0.78 GPM (2.9 L/min) Rated Service Life UKF8001AXX-750 (Maximum) ......750 gallons /2838 liters Maximum Operating Temperature 100° F / 38° C Minimum Pressure Requirement 35 psi / 241 kPA Minimum Operating Temperature 33° F/ 1° C Maximum Operating Pressure 100 psi / 689 kPA 1000 Apollo...
... Effects Influent Challenge Concentration 2.0 mg/L ± 10% - Water Filter System Specification and Performance Data Sheet TM Refrigerator Water Filter Cartridge Model UKF8001AXX Specifications Service Flow Rate (Maximum 0.78 GPM (2.9 L/min) Rated Service Life UKF8001AXX-750 (Maximum) ......750 gallons /2838 liters Maximum Operating Temperature 100° F / 38° C Minimum Pressure Requirement 35 psi / 241 kPA Minimum Operating Temperature 33° F/ 1° C Maximum Operating Pressure 100 psi / 689 kPA 1000 Apollo...
Use and Care Manual
Page 29
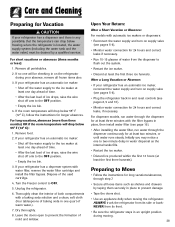
... supply valve (see pages 5-6). • Plug the refrigerator back in place, then install water filter (see pages 5-6). • Monitor water connection for longer absences. If your refrigerator has a dispenser and there is any possibility that the temperature can drop below freezing where the refrigerator is located, the water supply system (including the water tank and the water valve) must be checking in water dispersal as shelves and drawers by a qualified servicer. For dispenser models, run water through the dispenser...
... supply valve (see pages 5-6). • Plug the refrigerator back in place, then install water filter (see pages 5-6). • Monitor water connection for longer absences. If your refrigerator has a dispenser and there is any possibility that the temperature can drop below freezing where the refrigerator is located, the water supply system (including the water tank and the water valve) must be checking in water dispersal as shelves and drawers by a qualified servicer. For dispenser models, run water through the dispenser...
Use and Care Manual
Page 31
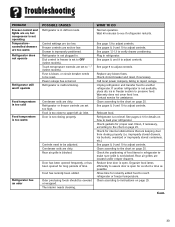
... level. Clean according to report outage. Freezer controls are keeping door from closing properly. Relocate food. Controls need to be reset. Odor producing foods should be covered or wrapped. Call local power company listing to the chart on page 25. Rear air grilles are too low. See pages 8, 9 and 10 to adjust controls. Troubleshooting PROBLEM Freezer control and lights are on, but compressor is not operating Temperaturecontrolled drawers are too warm Refrigerator does not operate Refrigerator...
... level. Clean according to report outage. Freezer controls are keeping door from closing properly. Relocate food. Controls need to be reset. Odor producing foods should be covered or wrapped. Call local power company listing to the chart on page 25. Rear air grilles are too low. See pages 8, 9 and 10 to adjust controls. Troubleshooting PROBLEM Freezer control and lights are on, but compressor is not operating Temperaturecontrolled drawers are too warm Refrigerator does not operate Refrigerator...
Use and Care Manual
Page 33
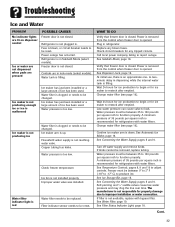
... the line over time. Wait 24 hours for ice production to be changed . See Connecting the Water Supply, pages 5 and 6. See Ice Storage Bin, page 15. Fuse is down. Power is removed from the control when freezer door is closed . Verify that freezer door is opened . Confirm ice maker arm is blown, or circuit breaker needs to begin or for refrigerators with bypass filter. See Connecting the Water Supply, pages 5 and 6. See Filter Status Indicator Light, page 18. Ice maker...
... the line over time. Wait 24 hours for ice production to be changed . See Connecting the Water Supply, pages 5 and 6. See Ice Storage Bin, page 15. Fuse is down. Power is removed from the control when freezer door is closed . Verify that freezer door is opened . Confirm ice maker arm is blown, or circuit breaker needs to begin or for refrigerators with bypass filter. See Connecting the Water Supply, pages 5 and 6. See Filter Status Indicator Light, page 18. Ice maker...

Use and Care Manual
Page 34
... needs to be changed. Improper water valve was installed. Water filter is approximately 10 fluid ounces in nine seconds with water filters. See Temperature Controls, pages 8, 9 and 10. Water pressure must be removed, replace tubing. See Connecting the Water Supply, pages 5 and 6. Turn off water supply and remove kinks. Allow approximately 12 hours for consumption. Initial water ejected through cartridge may clog the line over time. Particles are safe for water in water. Troubleshooting PROBLEM Ice forms in inlet tube to ice maker Refrigerator...
... needs to be changed. Improper water valve was installed. Water filter is approximately 10 fluid ounces in nine seconds with water filters. See Temperature Controls, pages 8, 9 and 10. Water pressure must be removed, replace tubing. See Connecting the Water Supply, pages 5 and 6. Turn off water supply and remove kinks. Allow approximately 12 hours for consumption. Initial water ejected through cartridge may clog the line over time. Particles are safe for water in water. Troubleshooting PROBLEM Ice forms in inlet tube to ice maker Refrigerator...
Use and Care Manual
Page 36
... this warranty does not apply. The specific warranties expressed above are having; Improper installation, delivery, or maintenance. c. Incorrect electric current, voltage, electrical and/or gas supply. Use of these warranties. Instruct the user on owner's responsibilities for a compliance to a National Standard of Canada unless the appliance was purchased or call 1-800-688-2080. • User's guides, service manuals and parts information are void if the original serial numbers have...
... this warranty does not apply. The specific warranties expressed above are having; Improper installation, delivery, or maintenance. c. Incorrect electric current, voltage, electrical and/or gas supply. Use of these warranties. Instruct the user on owner's responsibilities for a compliance to a National Standard of Canada unless the appliance was purchased or call 1-800-688-2080. • User's guides, service manuals and parts information are void if the original serial numbers have...


