
Use and Care Manual
Page 2
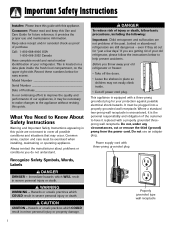
...past. Hazards or unsafe practices which WILL result in minor personal injury or property damage. DANGER To reduce risk of your old refrigerator, please follow basic precautions, including the following: Important: Child entrapment and suffocation are not meant to have it replaced with ...death. What You Need to help prevent accidents. Recognize Safety Symbols, Words, Labels DANGER DANGER - WARNING WARNING - Junked or abandoned refrigerators are getting rid of injury or death, follow the instructions below for easy access. Do not use and maintenance information. Before you ...
...past. Hazards or unsafe practices which WILL result in minor personal injury or property damage. DANGER To reduce risk of your old refrigerator, please follow basic precautions, including the following: Important: Child entrapment and suffocation are not meant to have it replaced with ...death. What You Need to help prevent accidents. Recognize Safety Symbols, Words, Labels DANGER DANGER - WARNING WARNING - Junked or abandoned refrigerators are getting rid of injury or death, follow the instructions below for easy access. Do not use and maintenance information. Before you ...
Use and Care Manual
Page 3
... WARNING To reduce risk of fire, electric shock, serious injury or death when using the refrigerator. 2. Read all local codes and ordinances. 3. Your refrigerator should not climb, hang or stand on any service. Do not attempt service if instructions ...electrician if you are beyond personal skill level. 14. Bumping or dropping refrigerator can damage refrigerator or cause refrigerator to Installation Instructions. Do not ground to a cold-water pipe. 7. Always disconnect refrigerator from power cord. 11. Disconnect power cord by qualified service technician. 16...
... WARNING To reduce risk of fire, electric shock, serious injury or death when using the refrigerator. 2. Read all local codes and ordinances. 3. Your refrigerator should not climb, hang or stand on any service. Do not attempt service if instructions ...electrician if you are beyond personal skill level. 14. Bumping or dropping refrigerator can damage refrigerator or cause refrigerator to Installation Instructions. Do not ground to a cold-water pipe. 7. Always disconnect refrigerator from power cord. 11. Disconnect power cord by qualified service technician. 16...

Use and Care Manual
Page 4
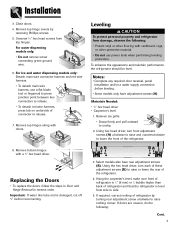
... into the connector. To Disconnect the Water Line: • Push in the rear) for indoor household application only. Malfunction may make your refrigerator, allow additional space so the door can be any shorter than anticipated. carpet, tile, wood floors, rugs) may occur at top and ... where temperature falls below 55° F (13° C) or rises above 110° F (43° C). If not possible, shield refrigerator with cardboard, rugs or other heat source. Measuring the Opening When installing your opening smaller than 681⁄2" tall (minus hinge and cap). Some clearance...
... into the connector. To Disconnect the Water Line: • Push in the rear) for indoor household application only. Malfunction may make your refrigerator, allow additional space so the door can be any shorter than anticipated. carpet, tile, wood floors, rugs) may occur at top and ... where temperature falls below 55° F (13° C) or rises above 110° F (43° C). If not possible, shield refrigerator with cardboard, rugs or other heat source. Measuring the Opening When installing your opening smaller than 681⁄2" tall (minus hinge and cap). Some clearance...
Use and Care Manual
Page 5
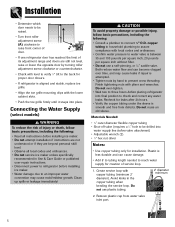
... head driver, turn each of these adjustment screws (B) to release. • To detach red wire harness, press tab on underside of the refrigerator. Select models also have adjustment screws (A). If doors are uneven, do the following : • Protect vinyl or other flooring with cardboard,... screws (A) clockwise to raise and counterclockwise to lower the front of connector to raise rocking corner. If required, correct rocking of refrigerator and that the refrigerator is level from top hinges. Remove top hinges along with a 3⁄8" hex head driver. Important: If water line tube end...
... head driver, turn each of these adjustment screws (B) to release. • To detach red wire harness, press tab on underside of the refrigerator. Select models also have adjustment screws (A). If doors are uneven, do the following : • Protect vinyl or other flooring with cardboard,... screws (A) clockwise to raise and counterclockwise to lower the front of connector to raise rocking corner. If required, correct rocking of refrigerator and that the refrigerator is level from top hinges. Remove top hinges along with a 3⁄8" hex head driver. Important: If water line tube end...
Use and Care Manual
Page 6
.... Clean up spills or leakage immediately! Avoid kinks in Use & Care Guide or published user-repair instructions. • Disconnect power to refrigerator before installing ice maker. • Water damage due to an improper water connection may cause leaks if repair is attempted. • Tighten...adjustment screw clockwise or counterclockwise. • Check with level to verify 1⁄4" tilt to the back for proper door closure. • If refrigerator is between 35 and 100 pounds per square inch, 20 pounds per square inch without filter. • Do not use plastic tubing. 2' diameter...
.... Clean up spills or leakage immediately! Avoid kinks in Use & Care Guide or published user-repair instructions. • Disconnect power to refrigerator before installing ice maker. • Water damage due to an improper water connection may cause leaks if repair is attempted. • Tighten...adjustment screw clockwise or counterclockwise. • Check with level to verify 1⁄4" tilt to the back for proper door closure. • If refrigerator is between 35 and 100 pounds per square inch, 20 pounds per square inch without filter. • Do not use plastic tubing. 2' diameter...
Use and Care Manual
Page 7
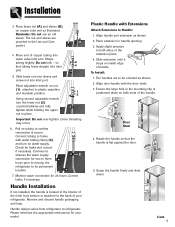
...appropriate instructions for two to three hours prior to moving the refrigerator to observe the water supply C connection for your refrigerator. Plastic Handle with the door studs. 3. Cont. 6 Handle design varies from refrigerator to the back of the handle. Slide extension until it stops...Do not over sleeve and screw nut into inlet port. Place adjustable wrench on both sides of the fresh food section or attached to refrigerator. The handles are B provided in the interior of the extension piece. 4. Place extension in handle opening. 3. Do not kink ...
...appropriate instructions for two to three hours prior to moving the refrigerator to observe the water supply C connection for your refrigerator. Plastic Handle with the door studs. 3. Cont. 6 Handle design varies from refrigerator to the back of the handle. Slide extension until it stops...Do not over sleeve and screw nut into inlet port. Place adjustable wrench on both sides of the fresh food section or attached to refrigerator. The handles are B provided in the interior of the extension piece. 4. Place extension in handle opening. 3. Do not kink ...
Use and Care Manual
Page 9
... 8 Adjusting the Controls • 24 hours after excessive or lengthy door openings. Warm Cabinet Surfaces At times, the front of the refrigerator cabinet may decide that one number at least 8 to 12 hours before adding food. This is a normal occurrence that helps prevent moisture ...from condensing on checking compartment temperature. • Except when starting the refrigerator, do not change either control will be more than one or both compartments should be warm to OFF. See page 22 for ...
... 8 Adjusting the Controls • 24 hours after excessive or lengthy door openings. Warm Cabinet Surfaces At times, the front of the refrigerator cabinet may decide that one number at least 8 to 12 hours before adding food. This is a normal occurrence that helps prevent moisture ...from condensing on checking compartment temperature. • Except when starting the refrigerator, do not change either control will be more than one or both compartments should be warm to OFF. See page 22 for ...

Use and Care Manual
Page 10
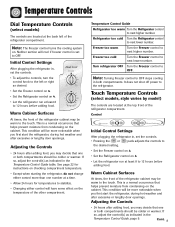
...Do not change either control more than one degree at the top front of the fresh food compartment. Temperature Control Guide Refrigerator too cold Set the Refrigerator control to next higher number by pressing the pad. Freezer too cold Set the Freezer control to next higher number by ...176; F (3° C) in the fresh food compartment and 0° F (-17° C) in the freezer compartment. Temperature Control Guide Refrigerator too warm Set the Refrigerator control to turn back on. Freezer too warm Set the Freezer control to next lower number by pressing the pad. pads shows the...
...Do not change either control more than one degree at the top front of the fresh food compartment. Temperature Control Guide Refrigerator too cold Set the Refrigerator control to next higher number by pressing the pad. Freezer too cold Set the Freezer control to next higher number by ...176; F (3° C) in the fresh food compartment and 0° F (-17° C) in the freezer compartment. Temperature Control Guide Refrigerator too warm Set the Refrigerator control to turn back on. Freezer too warm Set the Freezer control to next lower number by pressing the pad. pads shows the...
Use and Care Manual
Page 11
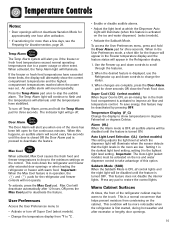
...models). • Activate the Sabbath Mode. This is first started, during hot weather and after extended door openings or when loading the refrigerator or freezer with warm food. The indicator light will appear in the room are complete, press the Door Alarm pad for three seconds OR... close the Fresh Food door. Important: When the Max Cool feature is displayed, use the Refrigerator up and down the refrigerator and freezer after excessive or lengthy door openings. 10 Max Cool will deactivate automatically after activation. • If vacationing for ...
...models). • Activate the Sabbath Mode. This is first started, during hot weather and after extended door openings or when loading the refrigerator or freezer with warm food. The indicator light will appear in the room are complete, press the Door Alarm pad for three seconds OR... close the Fresh Food door. Important: When the Max Cool feature is displayed, use the Refrigerator up and down the refrigerator and freezer after excessive or lengthy door openings. 10 Max Cool will deactivate automatically after activation. • If vacationing for ...
Use and Care Manual
Page 12
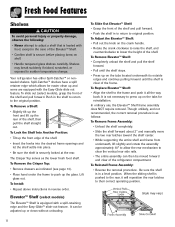
... under the frame to original position. Though unlikely, and not recommended, the correct removal procedure is as the lower fresh food shelf. Your refrigerator has either Spill-Catcher™ or nonsealed shelves. Lift glass out. It can then be adjusted up or down without unloading. To Remove ...following: • Never attempt to clear the vertical rear side rails. • The entire assembly can be moved forward and clear of the refrigerator compartment. To Install: • Repeat above instructions in the case of the ElevatorTM Shelf. • Confirm shelf is pushed to the rear,...
... under the frame to original position. Though unlikely, and not recommended, the correct removal procedure is as the lower fresh food shelf. Your refrigerator has either Spill-Catcher™ or nonsealed shelves. Lift glass out. It can then be adjusted up or down without unloading. To Remove ...following: • Never attempt to clear the vertical rear side rails. • The entire assembly can be moved forward and clear of the refrigerator compartment. To Install: • Repeat above instructions in the case of the ElevatorTM Shelf. • Confirm shelf is pushed to the rear,...
Use and Care Manual
Page 13
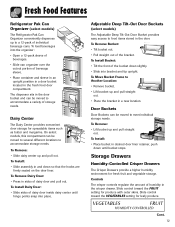
.... To Move Bucket Frame to food items stored in the door. To load beverages into bracket and tip upright. Fresh Food Features Refrigerator Pak Can Organizer (select models) The Refrigerator Pak Can Organizer conveniently dispenses up to a 12-pack of beverage sleeve. • Place container and sleeve in an upright position in...
.... To Move Bucket Frame to food items stored in the door. To load beverages into bracket and tip upright. Fresh Food Features Refrigerator Pak Can Organizer (select models) The Refrigerator Pak Can Organizer conveniently dispenses up to a 12-pack of beverage sleeve. • Place container and sleeve in an upright position in...
Use and Care Manual
Page 14
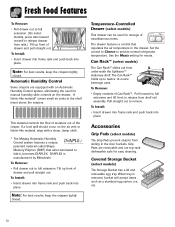
...egg tray. When tray is manufactured by Mitsubishi. Grip Pads are removable and are equipped with a clean, damp cloth. * The Maytag Automatic Humidity Control system features a unique, patented material called Shape Memory Polymer (SMP) that regulates the air temperature in the door buckets.... Set the control to Cheese to provide normal refrigerator temperature. Note: For best results, keep the crispers tightly closed . To Install: • Insert drawer into frame rails and push...
...egg tray. When tray is manufactured by Mitsubishi. Grip Pads are removable and are equipped with a clean, damp cloth. * The Maytag Automatic Humidity Control system features a unique, patented material called Shape Memory Polymer (SMP) that regulates the air temperature in the door buckets.... Set the control to Cheese to provide normal refrigerator temperature. Note: For best results, keep the crispers tightly closed . To Install: • Insert drawer into frame rails and push...
Use and Care Manual
Page 15
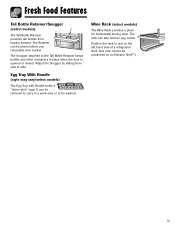
.../Snugger (select models) The Tall Bottle Retainer prevents tall bottles from side to side. The Snugger attached to rest on the left hand side of a refrigerator shelf (this rack cannot be placed above any removable door bucket. It can also hold an egg carton. Wine Rack (select models) The Wine Rack...
.../Snugger (select models) The Tall Bottle Retainer prevents tall bottles from side to side. The Snugger attached to rest on the left hand side of a refrigerator shelf (this rack cannot be placed above any removable door bucket. It can also hold an egg carton. Wine Rack (select models) The Wine Rack...
Use and Care Manual
Page 16
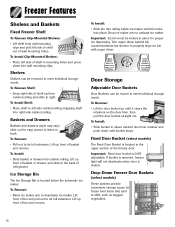
... maker. To Remove: • Pull out to its full extension. To Remove: • Lift the door bucket up until bucket stops. Lift up front of refrigerator. Turn auger driver behind bin counterclockwise (as bagged vegetables. 15 Lift front of bin and remove. To Install: • Slide basket or drawer into right...
... maker. To Remove: • Pull out to its full extension. To Remove: • Lift the door bucket up until bucket stops. Lift up front of refrigerator. Turn auger driver behind bin counterclockwise (as bagged vegetables. 15 Lift front of bin and remove. To Install: • Slide basket or drawer into right...
Use and Care Manual
Page 17
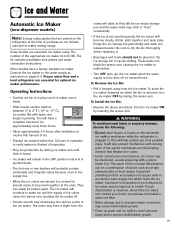
... arm. To Install the Ice Bin: • Reverse the above procedure. The cause of the ice maker. Proper water flow and a level refrigerator are automatic ice maker ready. The motor may have a slight hum, the cubes will remain in the ice storage bin for several cubes to... ejected it . • Beverages and foods should not be a combination of factors such as instructed on the automatic ice making mechanism while the refrigerator is normal for optimal ice maker performance. Ice and Water Automatic Ice Maker (non-dispenser models) Note: Energy rating guides that releases the cubes...
... arm. To Install the Ice Bin: • Reverse the above procedure. The cause of the ice maker. Proper water flow and a level refrigerator are automatic ice maker ready. The motor may have a slight hum, the cubes will remain in the ice storage bin for several cubes to... ejected it . • Beverages and foods should not be a combination of factors such as instructed on the automatic ice making mechanism while the refrigerator is normal for optimal ice maker performance. Ice and Water Automatic Ice Maker (non-dispenser models) Note: Energy rating guides that releases the cubes...
Use and Care Manual
Page 18
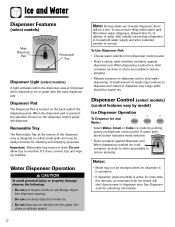
... Removable Tray at full power when dispensing ice or water with the main dispenser pad. Discard first 10-14 glasses of water after initially connecting refrigerator to household water supply and after extended periods of water dispenser, there will shut down power to stop water dispensing. Important: Removable tray does not...
... Removable Tray at full power when dispensing ice or water with the main dispenser pad. Discard first 10-14 glasses of water after initially connecting refrigerator to household water supply and after extended periods of water dispenser, there will shut down power to stop water dispensing. Important: Removable tray does not...
Use and Care Manual
Page 20
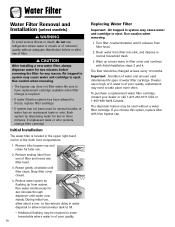
... end of the fresh food compartment. 1. Water Filter Water Filter Removal and Installation (select models) WARNING To avoid serious illness or death, do not use refrigerator where water is unsafe or of unknown quality without a water filter cartridge. Air trapped in normal household trash. 3. Initial Installation The water filter is located...
... end of the fresh food compartment. 1. Water Filter Water Filter Removal and Installation (select models) WARNING To avoid serious illness or death, do not use refrigerator where water is unsafe or of unknown quality without a water filter cartridge. Air trapped in normal household trash. 3. Initial Installation The water filter is located...
Use and Care Manual
Page 21
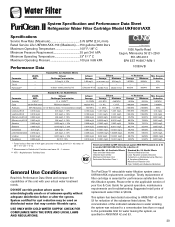
.../L ± 10% Mercury at least 10,000 particles/ml Influent Average Effluent Average Maximum 1.88 mg / L 97.26% 96.84% - - 99.52% 98.94% Min. Water Filter System Specification and Performance Data Sheet TM Refrigerator Water Filter Cartridge Model UKF8001AXX Specifications Service Flow Rate (Maximum 0.78 GPM (2.9 L/min) Rated Service Life UKF8001AXX...
.../L ± 10% Mercury at least 10,000 particles/ml Influent Average Effluent Average Maximum 1.88 mg / L 97.26% 96.84% - - 99.52% 98.94% Min. Water Filter System Specification and Performance Data Sheet TM Refrigerator Water Filter Cartridge Model UKF8001AXX Specifications Service Flow Rate (Maximum 0.78 GPM (2.9 L/min) Rated Service Life UKF8001AXX...
Use and Care Manual
Page 23
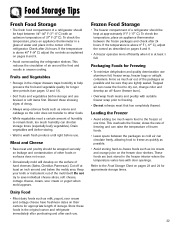
... F (3° C). Packaging Foods for approximate storage times. 22 Food Storage Tips Fresh Food Storage • The fresh food compartment of a refrigerator should be wrapped securely so leakage and contamination of other foods. • While vegetables need a certain amount of air around and below the .... Fruits and Vegetables • Storage in the crisper drawers traps humidity to -freeze foods such as much air out of a refrigerator should be sure they are best stored in the freezer interior where the temperature varies less with suitable freezer wrap prior to dry out...
... F (3° C). Packaging Foods for approximate storage times. 22 Food Storage Tips Fresh Food Storage • The fresh food compartment of a refrigerator should be wrapped securely so leakage and contamination of other foods. • While vegetables need a certain amount of air around and below the .... Fruits and Vegetables • Storage in the crisper drawers traps humidity to -freeze foods such as much air out of a refrigerator should be sure they are best stored in the freezer interior where the temperature varies less with suitable freezer wrap prior to dry out...
Use and Care Manual
Page 24
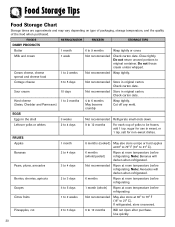
... dishes. Use quickly. 23 Do not return unused portions to 5 days Not recommended Store in the shell 3 weeks Not recommended Refrigerate small ends down. Check carton date. EGGS Eggs in original carton. salt for use in original carton. FRUITS Apples 1 month ... when purchased. Pears, plums, avocados 3 to 3 days 6 months Ripen at room temperature before refrigerating. Berries, cherries, apricots 2 to 4 days Not recommended Ripen at room temperature before refrigerating. Pineapples, cut 2 to 3 days 6 to 12 months Will not ripen after purchase. Milk...
... dishes. Use quickly. 23 Do not return unused portions to 5 days Not recommended Store in the shell 3 weeks Not recommended Refrigerate small ends down. Check carton date. EGGS Eggs in original carton. salt for use in original carton. FRUITS Apples 1 month ... when purchased. Pears, plums, avocados 3 to 3 days 6 months Ripen at room temperature before refrigerating. Berries, cherries, apricots 2 to 4 days Not recommended Ripen at room temperature before refrigerating. Pineapples, cut 2 to 3 days 6 to 12 months Will not ripen after purchase. Milk...


