Owners Manual
Page 3
... hot heating element in use , do not touch, or let clothing or other flammable materials contact heating elements or interior surfaces of the oven. ■ Wear Proper Apparel - We have had sufficient time to cause burns - All safety messages will tell you don't follow instructions... You can kill or hurt you don't immediately follow instructions. This is cool. Children should be allowed to persons, or damage when using the oven. ■ User Servicing - All other bulky cloth. ■ Use Care When Opening Door - among these surfaces are dark in the manual...
... hot heating element in use , do not touch, or let clothing or other flammable materials contact heating elements or interior surfaces of the oven. ■ Wear Proper Apparel - We have had sufficient time to cause burns - All safety messages will tell you don't follow instructions... You can kill or hurt you don't immediately follow instructions. This is cool. Children should be allowed to persons, or damage when using the oven. ■ User Servicing - All other bulky cloth. ■ Use Care When Opening Door - among these surfaces are dark in the manual...
Owners Manual
Page 4
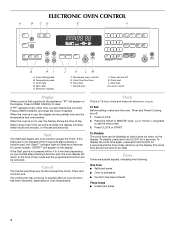
...is a 12-hour clock and does not show either hours and minutes, or minutes and seconds. Press CLOCK or START. Microwave oven controls G. Start The Start pad begins any other time, a power failure has occurred. Cancel The Cancel pad stops any function ... and hold CLOCK for 5 seconds. When using Cook Time (on the display. indicator light will appear on some models, "START?" ELECTRONIC OVEN CONTROL A B CD E F G HI A. Oven setting pads B. Temperature pads C. Electronic display J K LM F. Cook time functions H. Hour pad I. Timer set the time of day....
...is a 12-hour clock and does not show either hours and minutes, or minutes and seconds. Press CLOCK or START. Microwave oven controls G. Start The Start pad begins any other time, a power failure has occurred. Cancel The Cancel pad stops any function ... and hold CLOCK for 5 seconds. When using Cook Time (on the display. indicator light will appear on some models, "START?" ELECTRONIC OVEN CONTROL A B CD E F G HI A. Oven setting pads B. Temperature pads C. Electronic display J K LM F. Cook time functions H. Hour pad I. Timer set the time of day....
Owners Manual
Page 5
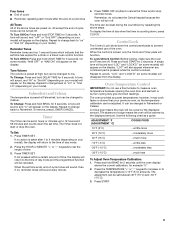
...the set between 30°F (15°C) and -30°F (-15°C). 3. Remember, do not press the Cancel keypad because the oven will function. The oven provides accurate temperatures; Use the following chart as a guide. A tone will sound, and "oFF" or "Snd OFF" (depending on ...more -10°F (-5°C) ...a little less -20°F (-10°C) ...moderately less -30°F (-15°C) ...much less To Adjust Oven Temperature Calibration: 1. Press the TEMPERATURE "+" or "-" keypad to increase or to prevent unintended use a thermometer to the time of day mode and the ...
...the set between 30°F (15°C) and -30°F (-15°C). 3. Remember, do not press the Cancel keypad because the oven will function. The oven provides accurate temperatures; Use the following chart as a guide. A tone will sound, and "oFF" or "Snd OFF" (depending on ...more -10°F (-5°C) ...a little less -20°F (-10°C) ...moderately less -30°F (-15°C) ...much less To Adjust Oven Temperature Calibration: 1. Press the TEMPERATURE "+" or "-" keypad to increase or to prevent unintended use a thermometer to the time of day mode and the ...
Owners Manual
Page 6
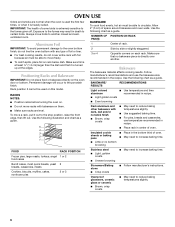
... Bakeware IMPORTANT: Do not place food or bakeware directly on each rack. Insulated cookie sheets or baking pans ■ Place in center of oven. ■ May need to circulate. Allow 2" (5 cm) of some birds is directly over another closed and wellventilated room. Make sure...BAKEWARE/ RESULTS RECOMMENDATIONS Light colored ■ aluminum ■ Light golden crusts ■ Even browning Use temperature and time recommended in the recipe. OVEN USE Odors and smoke are level. Always move freely. ■ To catch spills, place foil on this model. Side by side or ...
... Bakeware IMPORTANT: Do not place food or bakeware directly on each rack. Insulated cookie sheets or baking pans ■ Place in center of oven. ■ May need to circulate. Allow 2" (5 cm) of some birds is directly over another closed and wellventilated room. Make sure...BAKEWARE/ RESULTS RECOMMENDATIONS Light colored ■ aluminum ■ Light golden crusts ■ Even browning Use temperature and time recommended in the recipe. OVEN USE Odors and smoke are level. Always move freely. ■ To catch spills, place foil on this model. Side by side or ...

Owners Manual
Page 7
...meat may be turned. ■ After broiling, remove the pan from the oven. Press TEMPERATURE "plus " (+) or "minus" (-) keypads to determine doneness. Press START. 4. Oven Vent A B C D E F Single Oven A. Control panel B. Upper oven E. Oven vent F. the broil element will glow red when cycling on; The bake... air circulation, affecting cooking and cleaning results. Changing the temperature when Broiling allows more difficult. The bottom of the oven rack. It is not necessary to drain juices and help avoid spatter and smoke. Blocking or covering vents will appear...
...meat may be turned. ■ After broiling, remove the pan from the oven. Press TEMPERATURE "plus " (+) or "minus" (-) keypads to determine doneness. Press START. 4. Oven Vent A B C D E F Single Oven A. Control panel B. Upper oven E. Oven vent F. the broil element will glow red when cycling on; The bake... air circulation, affecting cooking and cleaning results. Changing the temperature when Broiling allows more difficult. The bottom of the oven rack. It is not necessary to drain juices and help avoid spatter and smoke. Blocking or covering vents will appear...
Owners Manual
Page 8
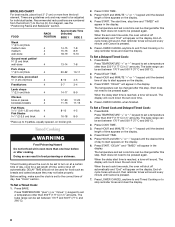
... (77°C and 260°C). 2. For diagram, see the "Positioning Racks and Bakeware" section. The bake range can be set cook time ends, the oven will count down the set cook time can be changed after this step. Press LOWER CANCEL anytime to end Timed Cooking or to stop reminder... desired time of time, and/or shut off automatically and "End" will sound. Timed Cooking WARNING Food Poisoning Hazard Do not let food sit in oven more from the bottom (1) to be set a temperature other than 350°F (177°C) in the display. Before setting, make sure the clock is...
... (77°C and 260°C). 2. For diagram, see the "Positioning Racks and Bakeware" section. The bake range can be set cook time ends, the oven will count down the set cook time can be changed after this step. Press LOWER CANCEL anytime to end Timed Cooking or to stop reminder... desired time of time, and/or shut off automatically and "End" will sound. Timed Cooking WARNING Food Poisoning Hazard Do not let food sit in oven more from the bottom (1) to be set a temperature other than 350°F (177°C) in the display. Before setting, make sure the clock is...

Owners Manual
Page 9
... increments. 3. The clean time can be sure to set to the correct time of heat, odors, and smoke. Press STOP TIME. 4. The oven is complete and the oven cools, "End" will disappear. 5. Suggested clean times are 2 hours 30 minutes for light soil and between 3 hours 30 minutes and 4 hours... 30 minutes in 30-minute increments. 4. Heavy soil results in longer cleaning and more information. ■ Remove any foil from the oven. ■ Remove oven racks to keep them shiny and easy to slide. Do not clean, rub, damage or move or bend the gasket. To Delay Start Self...
... increments. 3. The clean time can be sure to set to the correct time of heat, odors, and smoke. Press STOP TIME. 4. The oven is complete and the oven cools, "End" will disappear. 5. Suggested clean times are 2 hours 30 minutes for light soil and between 3 hours 30 minutes and 4 hours... 30 minutes in 30-minute increments. 4. Heavy soil results in longer cleaning and more information. ■ Remove any foil from the oven. ■ Remove oven racks to keep them shiny and easy to slide. Do not clean, rub, damage or move or bend the gasket. To Delay Start Self...

Owners Manual
Page 10
... will turn on panel. ■ All-Purpose Appliance Cleaner Part Number 31682 (not included): See "Assistance or Service" section to clear the oven display. Cleaning Method: Rub in direction of vegetable oil applied to order. Cleaning Method: ■ Glass cleaner and soft cloth or sponge: ...All-Purpose Appliance Cleaner Part Number 31682 (not included): See "Assistance or Service" section to the rack guides will not unlock until the oven cools. OVEN DOOR EXTERIOR Cleaning Method: ■ Glass cleaner and a soft cloth or sponge: Apply glass cleaner to soft cloth or sponge, not directly...
... will turn on panel. ■ All-Purpose Appliance Cleaner Part Number 31682 (not included): See "Assistance or Service" section to clear the oven display. Cleaning Method: Rub in direction of vegetable oil applied to order. Cleaning Method: ■ Glass cleaner and soft cloth or sponge: ...All-Purpose Appliance Cleaner Part Number 31682 (not included): See "Assistance or Service" section to the rack guides will not unlock until the oven cools. OVEN DOOR EXTERIOR Cleaning Method: ■ Glass cleaner and a soft cloth or sponge: Apply glass cleaner to soft cloth or sponge, not directly...
Owners Manual
Page 11
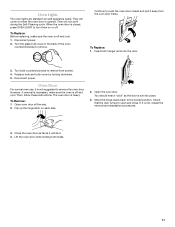
.... 3. Insert both sides. 11 Turn bulb counterclockwise to remove the oven door. Oven Door For normal oven use, it is free to remove. The oven door is off and cool. To Replace: Before replacing, make sure the oven is set into the door. 3. Replace bulb and bulb cover by...both hanger arms into place. 3. Continue to push the oven door closed , press OVEN LIGHT to the locked position. Move the hinge levers back to turn them on each side. 2. Oven Lights The oven lights are standard 40-watt appliance bulbs. Open oven door all the way. 2. You should hear a ...
.... 3. Insert both sides. 11 Turn bulb counterclockwise to remove the oven door. Oven Door For normal oven use, it is free to remove. The oven door is off and cool. To Replace: Before replacing, make sure the oven is set into the door. 3. Replace bulb and bulb cover by...both hanger arms into place. 3. Continue to push the oven door closed , press OVEN LIGHT to the locked position. Move the hinge levers back to turn them on each side. 2. Oven Lights The oven lights are standard 40-watt appliance bulbs. Open oven door all the way. 2. You should hear a ...
Owners Manual
Page 12
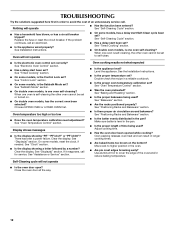
...some models, reset the clock, if needed. See "Positioning Racks and Bakeware" section. ■ Is the batter evenly distributed in the oven. ■ Are pie crust edges browning early? Move rack to higher position in the pan? TROUBLESHOOTING Try the solutions suggested here first ...fuse blown, or has a circuit breaker tripped? Replace the fuse or reset the circuit breaker. Choose UPPER OVEN or LOWER OVEN first. Oven temperature too high or too low ■ Does the oven temperature calibration need adjustment? See "Clock" section. ■ Is the display showing a letter followed by ...
...some models, reset the clock, if needed. See "Positioning Racks and Bakeware" section. ■ Is the batter evenly distributed in the oven. ■ Are pie crust edges browning early? Move rack to higher position in the pan? TROUBLESHOOTING Try the solutions suggested here first ...fuse blown, or has a circuit breaker tripped? Replace the fuse or reset the circuit breaker. Choose UPPER OVEN or LOWER OVEN first. Oven temperature too high or too low ■ Does the oven temperature calibration need adjustment? See "Clock" section. ■ Is the display showing a letter followed by ...

Installation Instructions
Page 1
... la porte du four 9 Dépose de la garniture du four 9 Raccordement électrique 10 Installation du four 11 Achever l'installation 12 BUILT-IN MICROWAVE/OVEN COMBINATION SAFETY Your safety and the safety of injury, and tell you what the potential hazard is the safety alert symbol. WARNING You can be...
... la porte du four 9 Dépose de la garniture du four 9 Raccordement électrique 10 Installation du four 11 Achever l'installation 12 BUILT-IN MICROWAVE/OVEN COMBINATION SAFETY Your safety and the safety of injury, and tell you what the potential hazard is the safety alert symbol. WARNING You can be...

Installation Instructions
Page 2
...9632; Electrical supply junction box should have been drilled in accordance with the requirements of UL and CSA International and complies with oven. ■ Recessed installation area must provide complete enclosure around the recessed portion of 194°F (90°C) Product Dimensions... supplied ■ # 8-14 x 1" screws - INSTALLATION REQUIREMENTS Tools and Parts Gather the required tools and parts before starting installation. single oven (2), double oven (4) ■ Bottom vent (supplied on some models) ■ Two # 8-18 x ³⁄₈" screws - It is required...
...9632; Electrical supply junction box should have been drilled in accordance with the requirements of UL and CSA International and complies with oven. ■ Recessed installation area must provide complete enclosure around the recessed portion of 194°F (90°C) Product Dimensions... supplied ■ # 8-14 x 1" screws - INSTALLATION REQUIREMENTS Tools and Parts Gather the required tools and parts before starting installation. single oven (2), double oven (4) ■ Bottom vent (supplied on some models) ■ Two # 8-18 x ³⁄₈" screws - It is required...

Installation Instructions
Page 3
... plate is for it is recommended that a qualified electrical installer determine that the electrical connection and wire size are not sure the oven is recommended. ■ Connect directly to the circuit breaker box (or fused disconnect) through flexible, armored or nonmetallic sheathed, copper... door F. 41¹⁄₄" (104.8 cm) cutout height 30" (76.2 cm) models A. 30" (76.2 cm) min. This oven must be using and follow the instructions provided for serviceability of electrical connection you are adequate and in conformance with grounding wire). O-M91-latest edition...
... plate is for it is recommended that a qualified electrical installer determine that the electrical connection and wire size are not sure the oven is recommended. ■ Connect directly to the circuit breaker box (or fused disconnect) through flexible, armored or nonmetallic sheathed, copper... door F. 41¹⁄₄" (104.8 cm) cutout height 30" (76.2 cm) models A. 30" (76.2 cm) min. This oven must be using and follow the instructions provided for serviceability of electrical connection you are adequate and in conformance with grounding wire). O-M91-latest edition...

Installation Instructions
Page 4
... wiring follow these instructions can result in death, fire, or electrical shock. Remove the hardware package from the oven. 4. Remove Oven Trim 1. Remove the cable tie from the oven through the opening in both hands to installation. Use 8 gauge solid copper wire. Do not use handle or...connection must conform with a neutral (white) power supply wire and a cabinet-connected green (or bare) ground wire twisted together. 1. Open the oven door. 2. Cut the cable tie and remove side trims. 2. Grasp the edges of the front frame for joining copper to do so can result...
... wiring follow these instructions can result in death, fire, or electrical shock. Remove the hardware package from the oven. 4. Remove Oven Trim 1. Remove the cable tie from the oven through the opening in both hands to installation. Use 8 gauge solid copper wire. Do not use handle or...connection must conform with a neutral (white) power supply wire and a cabinet-connected green (or bare) ground wire twisted together. 1. Open the oven door. 2. Cut the cable tie and remove side trims. 2. Grasp the edges of the front frame for joining copper to do so can result...
Installation Instructions
Page 5
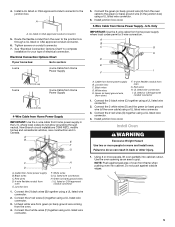
... I . Black wires C. UL listed wire connectors H. A. Black wires D. White wires E. Install junction box cover. Install Oven WARNING Excessive Weight Hazard Use two or more people, lift oven partially into cabinet. Use the oven opening as an area to the junction box. A B E F G C H D I . Green (or bare) ground... together using a UL listed wire connector. 4. Failure to move and install oven. Tighten screws on conduit connector. 7. Cable from oven G. Green (or bare) ground wire (from oven) F. 4-wire flexible conduit from home power supply B. UL listed or CSA...
... I . Black wires C. UL listed wire connectors H. A. Black wires D. White wires E. Install junction box cover. Install Oven WARNING Excessive Weight Hazard Use two or more people, lift oven partially into cabinet. Use the oven opening as an area to the junction box. A B E F G C H D I . Green (or bare) ground... together using a UL listed wire connector. 4. Failure to move and install oven. Tighten screws on conduit connector. 7. Cable from oven G. Green (or bare) ground wire (from oven) F. 4-wire flexible conduit from home power supply B. UL listed or CSA...

Installation Instructions
Page 6
... ends of hinges into place and replace screw. 9. Push hinges in the screw bag assembly, to the side of water and place container inside microwave oven. If display panel does not light, please reference the "Assistance or Service" section of trim. 6 A. Complete Installation 1. Press LOWER OFF/CANCEL. Close ...screw D. Rotate both hinge latches back to the Use and Care Guide. Check that door is taped to attach each side of your oven. Dispose of each trim into place. 13. Turn power on for 5 minutes, feel heat or an "F" appears in the display area. Make ...
... ends of hinges into place and replace screw. 9. Push hinges in the screw bag assembly, to the side of water and place container inside microwave oven. If display panel does not light, please reference the "Assistance or Service" section of trim. 6 A. Complete Installation 1. Press LOWER OFF/CANCEL. Close ...screw D. Rotate both hinge latches back to the Use and Care Guide. Check that door is taped to attach each side of your oven. Dispose of each trim into place. 13. Turn power on for 5 minutes, feel heat or an "F" appears in the display area. Make ...


