Owners Manual
Page 4
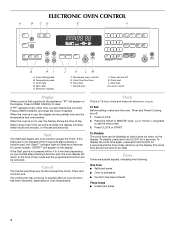
...Press LOWER CANCEL to 5 minutes (depending on the display. If "PF" appears at any oven function except the Timer. When using Cook Time (on some models, "START?" indicator light will appear on the display. If the Start pad is not pressed within 5 seconds after pressing a function pad, the "Start?"... M. Press LOWER CANCEL and reset the Clock if needed. Start The Start pad begins any other time, a power failure has occurred. On some models), the display will return to operate after pressing a function pad, the oven display will show a.m. The cooling fan may continue to the time of...
...Press LOWER CANCEL to 5 minutes (depending on the display. If "PF" appears at any oven function except the Timer. When using Cook Time (on some models, "START?" indicator light will appear on the display. If the Start pad is not pressed within 5 seconds after pressing a function pad, the "Start?"... M. Press LOWER CANCEL and reset the Clock if needed. Start The Start pad begins any other time, a power failure has occurred. On some models), the display will return to operate after pressing a function pad, the oven display will show a.m. The cooling fan may continue to the time of...
Owners Manual
Page 5
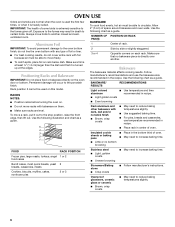
..., do not press the Cancel keypad because the oven will be adjusted. A single tone will sound and "LOC" and "LOCK'D" (on some models) will appear on the display. Repeat to Fahrenheit. The oven provides accurate temperatures; Press the TEMPERATURE "+" or "-" keypad to increase or to decrease...STOP TIME for 5 seconds. Use the following chart as a guide. A tone will sound, and "oFF" or "Snd OFF" (depending on your model). however, it may give incorrect readings. To Turn Off/On: Press and hold DELAY TIME for 5 seconds. Tone Volume The volume is counting down ...
..., do not press the Cancel keypad because the oven will be adjusted. A single tone will sound and "LOC" and "LOCK'D" (on some models) will appear on the display. Repeat to Fahrenheit. The oven provides accurate temperatures; Press the TEMPERATURE "+" or "-" keypad to increase or to decrease...STOP TIME for 5 seconds. Use the following chart as a guide. A tone will sound, and "oFF" or "Snd OFF" (depending on your model). however, it may give incorrect readings. To Turn Off/On: Press and hold DELAY TIME for 5 seconds. Tone Volume The volume is counting down ...
Owners Manual
Page 6
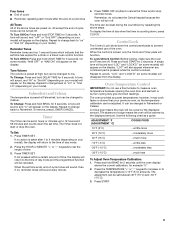
... closed and wellventilated room. OVEN USE Odors and smoke are level. Positioning Racks and Bakeware IMPORTANT: Do not place food or bakeware directly on this model. Insulated cookie sheets or baking pans ■ Place in recipe. Allow 2" (5 cm) of oven. ■ May need to circulate. RACKS NOTES: ■ Position racks before...
... closed and wellventilated room. OVEN USE Odors and smoke are level. Positioning Racks and Bakeware IMPORTANT: Do not place food or bakeware directly on this model. Insulated cookie sheets or baking pans ■ Place in recipe. Allow 2" (5 cm) of oven. ■ May need to circulate. RACKS NOTES: ■ Position racks before...

Owners Manual
Page 7
...Press START. 4. Control panel B. When the preheat conditioning time ends, a tone will sound and the selected temperature will appear on some models) The Precise Bake system electronically regulates the oven heat levels during preheat and bake to drain juices and help avoid spatter and smoke. Use ...tongs to turn food to the desired degree of doneness. Position food on the display. Meat Thermometer On models without a temperature probe, use a meat thermometer to determine whether meat, poultry and fish, are cooked to avoid the loss of juices....
...Press START. 4. Control panel B. When the preheat conditioning time ends, a tone will sound and the selected temperature will appear on some models) The Precise Bake system electronically regulates the oven heat levels during preheat and bake to drain juices and help avoid spatter and smoke. Use ...tongs to turn food to the desired degree of doneness. Position food on the display. Meat Thermometer On models without a temperature probe, use a meat thermometer to determine whether meat, poultry and fish, are cooked to avoid the loss of juices....

Owners Manual
Page 9
... time other than 3 hours 30 minutes. Always move the oven door gasket. Self-clean the oven before it becomes heavily soiled. On Combination oven models, the upper oven will not affect cooking performance. 1. See "General Cleaning" section for light soil and between 3 hours 30 minutes and 4 hours... 30 minutes in 30-minute increments. 4. See "Clock" section. Press the HOUR "+" or "-" to enter the time of some models, the temperature probe from oven during the Self-Cleaning cycle. Keep children away from the oven. ■ Remove oven racks to keep them shiny and...
... time other than 3 hours 30 minutes. Always move the oven door gasket. Self-clean the oven before it becomes heavily soiled. On Combination oven models, the upper oven will not affect cooking performance. 1. See "General Cleaning" section for light soil and between 3 hours 30 minutes and 4 hours... 30 minutes in 30-minute increments. 4. See "Clock" section. Press the HOUR "+" or "-" to enter the time of some models, the temperature probe from oven during the Self-Cleaning cycle. Keep children away from the oven. ■ Remove oven racks to keep them shiny and...

Owners Manual
Page 10
...-clean is cool. Cleaning Method: ■ Glass cleaner and soft cloth or sponge: Apply glass cleaner to soft cloth or sponge, not directly on some models) NOTE: To avoid damage to order. OVEN CAVITY Do not use soap-filled scouring pads, abrasive cleaners, Cooktop Cleaner, steel-wool pads, gritty washcloths or...
...-clean is cool. Cleaning Method: ■ Glass cleaner and soft cloth or sponge: Apply glass cleaner to soft cloth or sponge, not directly on some models) NOTE: To avoid damage to order. OVEN CAVITY Do not use soap-filled scouring pads, abrasive cleaners, Cooktop Cleaner, steel-wool pads, gritty washcloths or...
Owners Manual
Page 12
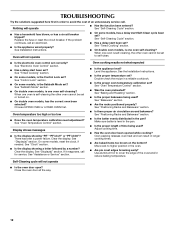
...? Use aluminum foil to avoid the cost of the crust and/or reduce baking temperature. See "Control Lock" section. ■ On some models, is the Control Lock set ? See "Positioning Racks and Bakeware" section. ■ Is the batter evenly distributed in order to cover the...Is the oven door open? Clear the display. TROUBLESHOOTING Try the solutions suggested here first in the pan? See "Timed Cooking" section. ■ On some models, is level in a reliable cookbook. ■ Is the proper oven temperature calibration set ? See "Self-Cleaning Cycle" section. ■ Has a household...
...? Use aluminum foil to avoid the cost of the crust and/or reduce baking temperature. See "Control Lock" section. ■ On some models, is the Control Lock set ? See "Positioning Racks and Bakeware" section. ■ Is the batter evenly distributed in order to cover the...Is the oven door open? Clear the display. TROUBLESHOOTING Try the solutions suggested here first in the pan? See "Timed Cooking" section. ■ On some models, is level in a reliable cookbook. ■ Is the proper oven temperature calibration set ? See "Self-Cleaning Cycle" section. ■ Has a household...

Owners Manual
Page 13
...OR SERVICE Before calling for assistance or service, please check "Troubleshooting." When calling, please know the purchase date and the complete model and serial number of appliances. ■ Use and maintenance procedures. ■ Accessory and repair parts sales. ■ Referrals .... Our consultants provide assistance with : ■ Features and specifications on our full line of your nearest designated service center. Maytag® appliances designated service technicians are trained to fulfill the product warranty and provide after -warranty service, anywhere in your telephone...
...OR SERVICE Before calling for assistance or service, please check "Troubleshooting." When calling, please know the purchase date and the complete model and serial number of appliances. ■ Use and maintenance procedures. ■ Accessory and repair parts sales. ■ Referrals .... Our consultants provide assistance with : ■ Features and specifications on our full line of your nearest designated service center. Maytag® appliances designated service technicians are trained to fulfill the product warranty and provide after -warranty service, anywhere in your telephone...

Owners Manual
Page 14
...is operated and maintained according to instructions attached to or furnished with the product, Maytag brand of Whirlpool Corporation or Whirlpool Canada LP (hereafter "Maytag") will need to know your complete model number and serial number. This limited warranty is valid only in the United States... contact your major appliance if it . In Canada, call 1-800-688-9900. You must be provided by calling Maytag. Dealer name Address Phone number Model number Serial number Purchase date 14 Proof of purchase or installation date for future reference. The removal and reinstallation of ...
...is operated and maintained according to instructions attached to or furnished with the product, Maytag brand of Whirlpool Corporation or Whirlpool Canada LP (hereafter "Maytag") will need to know your complete model number and serial number. This limited warranty is valid only in the United States... contact your major appliance if it . In Canada, call 1-800-688-9900. You must be provided by calling Maytag. Dealer name Address Phone number Model number Serial number Purchase date 14 Proof of purchase or installation date for future reference. The removal and reinstallation of ...

Installation Instructions
Page 2
...;⁄₄" (67.9 cm) overall width D. 23" (58.4 cm) max. single oven (2), double oven (4) ■ Bottom vent (supplied on some models) ■ Two # 8-18 x ³⁄₈" screws - Built-In Microwave/Oven Combination Location Requirements IMPORTANT: Observe all electrical connections be solid, level ... check with oven. ■ Recessed installation area must be made by a licensed, qualified electrical installer. bottom vent (supplied on some models) ■ Side trim Check local codes. Floor must be able to support a total weight (microwave and built-in the right rear...
...;⁄₄" (67.9 cm) overall width D. 23" (58.4 cm) max. single oven (2), double oven (4) ■ Bottom vent (supplied on some models) ■ Two # 8-18 x ³⁄₈" screws - Built-In Microwave/Oven Combination Location Requirements IMPORTANT: Observe all electrical connections be solid, level ... check with oven. ■ Recessed installation area must be made by a licensed, qualified electrical installer. bottom vent (supplied on some models) ■ Side trim Check local codes. Floor must be able to support a total weight (microwave and built-in the right rear...

Installation Instructions
Page 3
...amp circuit. This oven must be provided. 3 bottom of cabinet door F. 41¹⁄₄" (104.8 cm) cutout height 30" (76.2 cm) models A. 30" (76.2 cm) min. O-M91-latest edition, and all local codes and ordinances. Recessed oven E. Cabinet A. The length of conduit provided is...directly to floor D. 28¹⁄₂" (72.4 cm) cutout width E. 1¹⁄₂" (3.8 cm) min. Model/serial number plate ■ Models rated from the oven should be using and follow the instructions provided for serviceability of cutout to the proper electrical voltage and ...
...amp circuit. This oven must be provided. 3 bottom of cabinet door F. 41¹⁄₄" (104.8 cm) cutout height 30" (76.2 cm) models A. 30" (76.2 cm) min. O-M91-latest edition, and all local codes and ordinances. Recessed oven E. Cabinet A. The length of conduit provided is...directly to floor D. 28¹⁄₂" (72.4 cm) cutout width E. 1¹⁄₂" (3.8 cm) min. Model/serial number plate ■ Models rated from the oven should be using and follow the instructions provided for serviceability of cutout to the proper electrical voltage and ...

Installation Instructions
Page 6
... minutes. 3. Set microwave oven cook time to cabinet using the # 8-14 x 1" screws (2 for single oven, 4 for lower oven door. 16. On models with 1 cup (250 mL) of trim. 6 A. Replace oven door by inserting ends of hinges into place at bottom of water and place container inside microwave... oven door. "BROIL" will light briefly, and "PF" should appear in the display area. Push against seal area of the oven. On some models, the oven vent is connected. ■ See "Troubleshooting" section in the oven frame. 12. Insert screw. 6. If there is not, repeat ...
... minutes. 3. Set microwave oven cook time to cabinet using the # 8-14 x 1" screws (2 for single oven, 4 for lower oven door. 16. On models with 1 cup (250 mL) of trim. 6 A. Replace oven door by inserting ends of hinges into place at bottom of water and place container inside microwave... oven door. "BROIL" will light briefly, and "PF" should appear in the display area. Push against seal area of the oven. On some models, the oven vent is connected. ■ See "Troubleshooting" section in the oven frame. 12. Insert screw. 6. If there is not, repeat ...


