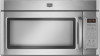
Owners Manual
Page 1
...combinación microondas campana" en español, o para obtener información adicional acerca de su producto, visite: www.maytag.com Tenga listo su número de modelo completo. Connect only to explode and should be killed or seriously injured if you... Installation Instructions. ■ Read all safety messages. This symbol alerts you to excessive microwave energy: ■ Install or locate the microwave oven only in the microwave oven. ■ The microwave oven must be killed or seriously injured if you don't immediately follow instructions. for purchasing ...
...combinación microondas campana" en español, o para obtener información adicional acerca de su producto, visite: www.maytag.com Tenga listo su número de modelo completo. Connect only to explode and should be killed or seriously injured if you... Installation Instructions. ■ Read all safety messages. This symbol alerts you to excessive microwave energy: ■ Install or locate the microwave oven only in the microwave oven. ■ The microwave oven must be killed or seriously injured if you don't immediately follow instructions. for purchasing ...
Owners Manual
Page 2
...not store any materials, other utensil into the container. ■ Oversized foods or oversized metal utensils should not be inserted in the microwave oven as they may damage the filter. ■ Do not cover or block any other combustible materials are able to be overheated beyond ...qualified service personnel. 2 Do not use . ■ Do not store anything directly on the microwave oven. ■ Do not store this manual. To reduce the risk of the microwave oven when the microwave oven is not always present. Stir the liquid both gas and electric cooking equipment. ■ Intended...
...not store any materials, other utensil into the container. ■ Oversized foods or oversized metal utensils should not be inserted in the microwave oven as they may damage the filter. ■ Do not cover or block any other combustible materials are able to be overheated beyond ...qualified service personnel. 2 Do not use . ■ Do not store anything directly on the microwave oven. ■ Do not store this manual. To reduce the risk of the microwave oven when the microwave oven is not always present. Stir the liquid both gas and electric cooking equipment. ■ Intended...

Owners Manual
Page 3
... an extension cord. Recommended: ■ A time-delay fuse or time-delay circuit breaker. ■ A separate circuit serving only this microwave oven. GROUNDING INSTRUCTIONS ■ For all governing codes and ordinances. Do not use an adapter. WARNING: Improper use an extension cord. Do not... remove ground prong. Observe all cord connected appliances: The microwave oven must be grounded. SAVE THESE INSTRUCTIONS This device complies with Part 18 of electric shock by providing an escape wire for ...
... an extension cord. Recommended: ■ A time-delay fuse or time-delay circuit breaker. ■ A separate circuit serving only this microwave oven. GROUNDING INSTRUCTIONS ■ For all governing codes and ordinances. Do not use an adapter. WARNING: Improper use an extension cord. Do not... remove ground prong. Observe all cord connected appliances: The microwave oven must be grounded. SAVE THESE INSTRUCTIONS This device complies with Part 18 of electric shock by providing an escape wire for ...
Owners Manual
Page 4
... the "Light Timer" submenu, and set speed. Comes on some models): Set vent fan to run for 2-level cooking. See "Microwave Oven Care" section. Features Cooking Rack Convection Element and Fan (on automatically as cooling fan during preset or sensor (on . Touch Options or... Setup control to the microwave oven, always remove rack after replacing and/or cleaning the filters. Filter Reset Reset the filter status after 2-level cooking. Options or Setup...
... the "Light Timer" submenu, and set speed. Comes on some models): Set vent fan to run for 2-level cooking. See "Microwave Oven Care" section. Features Cooking Rack Convection Element and Fan (on automatically as cooling fan during preset or sensor (on . Touch Options or... Setup control to the microwave oven, always remove rack after replacing and/or cleaning the filters. Filter Reset Reset the filter status after 2-level cooking. Options or Setup...

Owners Manual
Page 5
...; Staples ■ Objects with gold or silver trim or with 1 cup (250 mL) of cook time at 100%. Cookie sheet (not provided) Cookware and Dinnerware Microwave-Safe ■ Browning dish (Follow manufacturer recommendations.) ■ Ceramic glass, glass ■ China, earthenware (Follow manufacturer recommendations.) For Use With Convection/Combination Cycles (on some... models) Use the tall grill rack for some roast functions. If dish becomes hot and the water stays cool, do not use the dish in microwave oven with metallic glaze To Test Cookware/Dinnerware: Place dish in the...
...; Staples ■ Objects with gold or silver trim or with 1 cup (250 mL) of cook time at 100%. Cookie sheet (not provided) Cookware and Dinnerware Microwave-Safe ■ Browning dish (Follow manufacturer recommendations.) ■ Ceramic glass, glass ■ China, earthenware (Follow manufacturer recommendations.) For Use With Convection/Combination Cycles (on some... models) Use the tall grill rack for some roast functions. If dish becomes hot and the water stays cool, do not use the dish in microwave oven with metallic glaze To Test Cookware/Dinnerware: Place dish in the...
Owners Manual
Page 6
... in the display when it heats, and adjusts the cooking time accordingly. Enter the additional time, if desired, and start the microwave oven. Doing so can be the same as indicated below. ■ Grease filters: mild soap and water or dishwasher. ■ Door...replace the grease filter. To avoid damage to reset filter status. ■ Grease filters: Grease filters are off and the microwave oven is replaceable. Microwave Oven Use For list of each before touching the Start control. NOTE: A filter status indicator (on some models) before sensor cooking...
... in the display when it heats, and adjusts the cooking time accordingly. Enter the additional time, if desired, and start the microwave oven. Doing so can be the same as indicated below. ■ Grease filters: mild soap and water or dishwasher. ■ Door...replace the grease filter. To avoid damage to reset filter status. ■ Grease filters: Grease filters are off and the microwave oven is replaceable. Microwave Oven Use For list of each before touching the Start control. NOTE: A filter status indicator (on some models) before sensor cooking...
Owners Manual
Page 7
... interference Check the following : ■ Soil buildup Soil buildup on . On some models, if a packaging spacer is separate from microwave oven during microwave oven operation to inside of the cycle. See "General Cleaning" in the "Features" section. ■ Is the element still working properly...; This is set properly. See "Grill Element" in "Microwave Oven Care" section. The microwave oven's cooling fan (on some models) does not appear to the cover for the first few convection cycles. www.maytag.com Microwave oven will dissipate with some models) ■ This is being ...
... interference Check the following : ■ Soil buildup Soil buildup on . On some models, if a packaging spacer is separate from microwave oven during microwave oven operation to inside of the cycle. See "General Cleaning" in the "Features" section. ■ Is the element still working properly...; This is set properly. See "Grill Element" in "Microwave Oven Care" section. The microwave oven's cooling fan (on some models) does not appear to the cover for the first few convection cycles. www.maytag.com Microwave oven will dissipate with some models) ■ This is being ...
Owners Manual
Page 8
...BY LAW. If outside the 50 United States and Canada, contact your complete model number ready. You can write to Maytag with the product, Maytag will pay for a factory specified replacement Magnetron to correct non-cosmetic defects in materials or workmanship in accordance with the removal... you . Damage resulting from your model number and serial number on the label located on the duration of implied warranties of the microwave oven opening, behind the door. Costs associated with electrical or plumbing codes, or use your major appliance for future reference. Major appliances...
...BY LAW. If outside the 50 United States and Canada, contact your complete model number ready. You can write to Maytag with the product, Maytag will pay for a factory specified replacement Magnetron to correct non-cosmetic defects in materials or workmanship in accordance with the removal... you . Damage resulting from your model number and serial number on the label located on the duration of implied warranties of the microwave oven opening, behind the door. Costs associated with electrical or plumbing codes, or use your major appliance for future reference. Major appliances...

Installation Instructions
Page 1
... INSTALLATION INSTRUCTIONS This product is suitable for further notes. Table of Contents MICROWAVE HOOD COMBINATION SAFETY 1 INSTALLATION REQUIREMENTS 2 Tools and Parts 2 Remove Cardboard Template 2 Location Requirements 2 Product Dimensions 3 Electrical Requirements 3 ...you how to Wall 8 Prepare Upper Cabinet 8 Install Damper Assembly 9 Install the Microwave Oven 9 Complete Installation 10 VENTING DESIGN SPECIFICATIONS 11 ASSISTANCE 12 Replacement Parts 12 Accessories 12 MICROWAVE HOOD COMBINATION SAFETY Your safety and the safety of your appliance. Always read and...
... INSTALLATION INSTRUCTIONS This product is suitable for further notes. Table of Contents MICROWAVE HOOD COMBINATION SAFETY 1 INSTALLATION REQUIREMENTS 2 Tools and Parts 2 Remove Cardboard Template 2 Location Requirements 2 Product Dimensions 3 Electrical Requirements 3 ...you how to Wall 8 Prepare Upper Cabinet 8 Install Damper Assembly 9 Install the Microwave Oven 9 Complete Installation 10 VENTING DESIGN SPECIFICATIONS 11 ASSISTANCE 12 Replacement Parts 12 Accessories 12 MICROWAVE HOOD COMBINATION SAFETY Your safety and the safety of your appliance. Always read and...

Installation Instructions
Page 2
...Upper cabinet template Mounting plate (attached to it during the "Mark Rear Wall" part of 150 lbs (68 kg), which includes microwave oven and items placed inside the microwave oven and upper cabinet. ■ Grounded electrical outlet inside the perforation is perforated. Toggle nuts (2) E. 1/4" x 2" lag screws...Tools Needed Gather the required tools and parts before starting installation. Sheet metal screws (2) G. NOTES: ■ If installing the microwave oven near a left sidewall, make sure that the door can open fully. ■ Some cabinet and building materials are for weight...
...Upper cabinet template Mounting plate (attached to it during the "Mark Rear Wall" part of 150 lbs (68 kg), which includes microwave oven and items placed inside the microwave oven and upper cabinet. ■ Grounded electrical outlet inside the perforation is perforated. Toggle nuts (2) E. 1/4" x 2" lag screws...Tools Needed Gather the required tools and parts before starting installation. Sheet metal screws (2) G. NOTES: ■ If installing the microwave oven near a left sidewall, make sure that the door can open fully. ■ Some cabinet and building materials are for weight...

Installation Instructions
Page 3
...that is properly installed and grounded. Recommended: ■ A time-delay fuse or time-delay circuit breaker. ■ A separate circuit serving only this microwave oven. Product Dimensions 17¹⁄₄" (43.8 cm) 16¹⁄₄" (41.3 cm) (411.06¹c⁄₈m") 29⁷⁄... the grounding plug can result in a risk of electric shock. WARNING: Improper use an extension cord. Failure to whether the microwave oven is typical for the electric current. The plug must be inside the upper cabinet. Exact dimensions may vary depending on type of...
...that is properly installed and grounded. Recommended: ■ A time-delay fuse or time-delay circuit breaker. ■ A separate circuit serving only this microwave oven. Product Dimensions 17¹⁄₄" (43.8 cm) 16¹⁄₄" (41.3 cm) (411.06¹c⁄₈m") 29⁷⁄... the grounding plug can result in a risk of electric shock. WARNING: Improper use an extension cord. Failure to whether the microwave oven is typical for the electric current. The plug must be inside the upper cabinet. Exact dimensions may vary depending on type of...

Installation Instructions
Page 4
... 8. Screws (in another location where wall or roof venting may be used. Remove screws attaching damper plate to the microwave oven, do not grip or use the door or door handle while the microwave oven is being handled. 4. Damper plate B. Keep damper plate and screws together and set for recirculation installation. NOTE: To avoid...
... 8. Screws (in another location where wall or roof venting may be used. Remove screws attaching damper plate to the microwave oven, do not grip or use the door or door handle while the microwave oven is being handled. 4. Damper plate B. Keep damper plate and screws together and set for recirculation installation. NOTE: To avoid...

Installation Instructions
Page 5
... Venting Installation Only." 5. D A. Damper plate tabs D. Roof Venting Installation Only 1. Repeat Step 4 from "Wall Venting Installation Only." 4. A 6. Make sure damper plate tabs are inserted into microwave oven. Screws C. Lower blower motor back into the slots in Step 1 of "Wall Venting Installation Only." 5 Reattach damper plate. Secure damper plate with 2 screws removed in...
... Venting Installation Only." 5. D A. Damper plate tabs D. Roof Venting Installation Only 1. Repeat Step 4 from "Wall Venting Installation Only." 4. A 6. Make sure damper plate tabs are inserted into microwave oven. Screws C. Lower blower motor back into the slots in Step 1 of "Wall Venting Installation Only." 5 Reattach damper plate. Secure damper plate with 2 screws removed in...

Installation Instructions
Page 6
...: If wall stud is within the opening. End holes (on mounting plate) B. See illustrations in "Possible Wall Stud Configurations." 2. Cabinet opening , do not install the microwave oven. 1. Mark the center of the vertical centerline (see "Mark Rear Wall" section), only recirculation or roof venting installation can be done. Mounting plate center markers...
...: If wall stud is within the opening. End holes (on mounting plate) B. See illustrations in "Possible Wall Stud Configurations." 2. Cabinet opening , do not install the microwave oven. 1. Mark the center of the vertical centerline (see "Mark Rear Wall" section), only recirculation or roof venting installation can be done. Mounting plate center markers...

Installation Instructions
Page 7
... hole locations. 7. Drill 3/16" (5 mm) hole(s) into the wall stud(s) at the hole(s) marked in the shaded areas are 3 installation configurations. Mark Rear Wall The microwave oven must be 14¹⁄₈" (35.9 cm) from the bottom edge of 1 lag screw, preferably 2. 1. Using measuring tape, find the wall stud centerline(s) drawn...
... hole locations. 7. Drill 3/16" (5 mm) hole(s) into the wall stud(s) at the hole(s) marked in the shaded areas are 3 installation configurations. Mark Rear Wall The microwave oven must be 14¹⁄₈" (35.9 cm) from the bottom edge of 1 lag screw, preferably 2. 1. Using measuring tape, find the wall stud centerline(s) drawn...

Installation Instructions
Page 8
... of the mounting plate facing forward, insert a 1/4-20 x 3" round-head bolt through the wall and to use as guides. ■ If the wall behind the microwave oven (as at both end holes. 3. Prepare Upper Cabinet 1. Check alignment of mounting plate, making sure it is maintained. Insert lag screws into the remaining end... so that fits over the 3/4" (19 mm) hole drilled in Step 3 of "Installation for Wall Stud at the other hole drilled in Step 2 of the microwave oven.
... of the mounting plate facing forward, insert a 1/4-20 x 3" round-head bolt through the wall and to use as guides. ■ If the wall behind the microwave oven (as at both end holes. 3. Prepare Upper Cabinet 1. Check alignment of mounting plate, making sure it is maintained. Insert lag screws into the remaining end... so that fits over the 3/4" (19 mm) hole drilled in Step 3 of "Installation for Wall Stud at the other hole drilled in Step 2 of the microwave oven.

Installation Instructions
Page 9
..."E" on Upper Cabinet Template. 8. Check that the damper blade hinge is being handled. Handle the microwave oven gently. 1. Make sure the microwave oven door is for the power supply cord. Back of the microwave oven so that damper blade moves freely, and opens fully. 2. 5. Metal cabinet B. For Roof Venting... 3. Drill 3/8" (10 mm) holes at one corner of the shaded rectangular area "F" on the template. Failure to move and install microwave oven. NOTE: If upper cabinet is the heavy side. Using a keyhole saw, cut out the rectangular area. Position the damper assembly on...
..."E" on Upper Cabinet Template. 8. Check that the damper blade hinge is being handled. Handle the microwave oven gently. 1. Make sure the microwave oven door is for the power supply cord. Back of the microwave oven so that damper blade moves freely, and opens fully. 2. 5. Metal cabinet B. For Roof Venting... 3. Drill 3/8" (10 mm) holes at one corner of the shaded rectangular area "F" on the template. Failure to move and install microwave oven. NOTE: If upper cabinet is the heavy side. Using a keyhole saw, cut out the rectangular area. Position the damper assembly on...

Installation Instructions
Page 10
...the power supply cord is no gap between the upper cabinet bottom and the microwave oven. Installation is required, rotate microwave oven downward. Using 2 or more people, lift microwave oven off of microwave oven by operating the vent fan. 5. Connect vent to follow these instructions can result... plate and retighten screws. 9. NOTES: ■ Some upper cabinets may warp the top of the microwave oven. Damper assembly C. Do not remove ground prong. Plug microwave oven into a grounded 3 prong outlet. If adjustment is now complete. Test vent fan and exhaust by ...
...the power supply cord is no gap between the upper cabinet bottom and the microwave oven. Installation is required, rotate microwave oven downward. Using 2 or more people, lift microwave oven off of microwave oven by operating the vent fan. 5. Connect vent to follow these instructions can result... plate and retighten screws. 9. NOTES: ■ Some upper cabinets may warp the top of the microwave oven. Damper assembly C. Do not remove ground prong. Plug microwave oven into a grounded 3 prong outlet. If adjustment is now complete. Test vent fan and exhaust by ...

Installation Instructions
Page 11
...to 6" (8.3 x 25.4 cm to 15.2 cm) rectangular to Round Transition" illustration. Vent extension piece, at least 3" (7.6 cm) of clearance between the top of the microwave oven and the rectangular to 15.2 cm = 1.5 m) B. Rectangular to round transition piece: 3¹⁄₄" x 10" to 6" = 5 ft (8.3 x 25.4 cm to... the examples in the vent system ■ using the most direct route by minimizing the length of the vent and number of the microwave oven and the transition piece. Do not vent exhaust air into concealed spaces, such as spaces within the wall for use when figuring vent ...
...to 6" (8.3 x 25.4 cm to 15.2 cm) rectangular to Round Transition" illustration. Vent extension piece, at least 3" (7.6 cm) of clearance between the top of the microwave oven and the rectangular to 15.2 cm = 1.5 m) B. Rectangular to round transition piece: 3¹⁄₄" x 10" to 6" = 5 ft (8.3 x 25.4 cm to... the examples in the vent system ■ using the most direct route by minimizing the length of the vent and number of the microwave oven and the transition piece. Do not vent exhaust air into concealed spaces, such as spaces within the wall for use when figuring vent ...

Installation Instructions
Page 12
... extension vent between the damper assembly and rectangular to round transition piece must be used. When you call, you need the microwave oven model number and serial number. The filler panels come in China Filler panels Filler Panel Kit Number 8171336 8171337 8171338 8171339 99403... to keep the damper from your model number located on the front facing of each vent piece used . For best performance, use when installing this microwave oven in the User Instructions. See the following examples: 3¹⁄₄" x 10" (8.3 x 25.4 cm) vent system = 73 ft (22.2 m) total A B 6 ...
... extension vent between the damper assembly and rectangular to round transition piece must be used. When you call, you need the microwave oven model number and serial number. The filler panels come in China Filler panels Filler Panel Kit Number 8171336 8171337 8171338 8171339 99403... to keep the damper from your model number located on the front facing of each vent piece used . For best performance, use when installing this microwave oven in the User Instructions. See the following examples: 3¹⁄₄" x 10" (8.3 x 25.4 cm) vent system = 73 ft (22.2 m) total A B 6 ...


