
Dimension Guide
Page 1
...; Using the most direct route by minimizing the length of the vent and number of range/cooktop below. Exact dimensions may vary depending on door design. Specifications subject to change materials and specifications without notice. or 20-amp electrical supply with microwave hood combination. ■■ We do not recommend using recirculation installation. If venting through the roof, and rectangular to round transition is used, be inside the upper cabinet. PRODUCT DIMENSIONS 17...
...; Using the most direct route by minimizing the length of the vent and number of range/cooktop below. Exact dimensions may vary depending on door design. Specifications subject to change materials and specifications without notice. or 20-amp electrical supply with microwave hood combination. ■■ We do not recommend using recirculation installation. If venting through the roof, and rectangular to round transition is used, be inside the upper cabinet. PRODUCT DIMENSIONS 17...
Installation Guide
Page 1
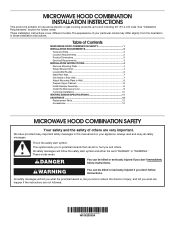
...Cabinet 8 Install Damper Assembly 9 Install the Microwave Oven 9 Complete Installation 10 VENTING DESIGN SPECIFICATIONS 11 ASSISTANCE 12 Replacement Parts 12 Accessories 12 MICROWAVE HOOD COMBINATION SAFETY Your safety and the safety of your appliance. All safety messages will follow instructions. Table of Contents MICROWAVE HOOD COMBINATION SAFETY 1 INSTALLATION REQUIREMENTS 2 Tools and Parts 2 Location Requirements 2 Product Dimensions 3 Electrical Requirements 3 INSTALLATION INSTRUCTIONS 4 Remove Mounting Plate 4 Rotate Blower Motor 4 Locate Wall Stud(s 6 Mark Rear...
...Cabinet 8 Install Damper Assembly 9 Install the Microwave Oven 9 Complete Installation 10 VENTING DESIGN SPECIFICATIONS 11 ASSISTANCE 12 Replacement Parts 12 Accessories 12 MICROWAVE HOOD COMBINATION SAFETY Your safety and the safety of your appliance. All safety messages will follow instructions. Table of Contents MICROWAVE HOOD COMBINATION SAFETY 1 INSTALLATION REQUIREMENTS 2 Tools and Parts 2 Location Requirements 2 Product Dimensions 3 Electrical Requirements 3 INSTALLATION INSTRUCTIONS 4 Remove Mounting Plate 4 Rotate Blower Motor 4 Locate Wall Stud(s 6 Mark Rear...
Installation Guide
Page 2
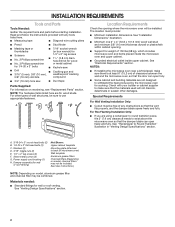
.../2" (3.8 cm) diam. See User Instructions.) NOTE: Depending on reordering, see "Replacement Parts" section. See "Venting Design Specifications" section. 2 For other damages. Special Requirements For Wall Venting Installation Only: ■■ Cutout must provide: ■■ Minimum installation dimensions. Materials needed: ■■ Standard fittings for wall or roof venting) Not Shown: Upper cabinet template Mounting plate (attached to exist above the microwave oven so that the materials used will be included. hole...
.../2" (3.8 cm) diam. See User Instructions.) NOTE: Depending on reordering, see "Replacement Parts" section. See "Venting Design Specifications" section. 2 For other damages. Special Requirements For Wall Venting Installation Only: ■■ Cutout must provide: ■■ Minimum installation dimensions. Materials needed: ■■ Standard fittings for wall or roof venting) Not Shown: Upper cabinet template Mounting plate (attached to exist above the microwave oven so that the materials used will be included. hole...

Installation Guide
Page 3
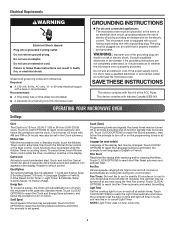
... INSTRUCTIONS 3 Installation Dimensions: NOTE: The grounded 3 prong outlet must be grounded. The plug must be plugged into a grounded 3 prong outlet. Grounded 3 prong outlet *30" (76.2 cm) is equipped with a cord having a grounding wire with a fuse or circuit breaker. In the event of an electrical short circuit, grounding reduces the risk of the grounding plug can result in a risk of range/cooktop...
... INSTRUCTIONS 3 Installation Dimensions: NOTE: The grounded 3 prong outlet must be grounded. The plug must be plugged into a grounded 3 prong outlet. Grounded 3 prong outlet *30" (76.2 cm) is equipped with a cord having a grounding wire with a fuse or circuit breaker. In the event of an electrical short circuit, grounding reduces the risk of the grounding plug can result in a risk of range/cooktop...
Installation Guide
Page 4
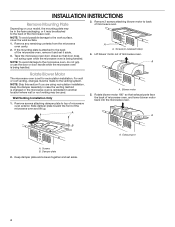
... the venting system. Remove 2 screws attaching blower motor to the back of the microwave oven. Wall Venting Installation Only 1. Tape the microwave oven door closed so that exhaust ports face the back of the microwave oven, remove it and set it may be attached to back of microwave oven. For wall or roof venting, changes must be used. Remove any remaining contents from the microwave oven cavity. 2. Lift blower motor out of microwave oven. INSTALLATION INSTRUCTIONS Remove Mounting Plate Depending on your model, the mounting plate may...
... the venting system. Remove 2 screws attaching blower motor to the back of the microwave oven. Wall Venting Installation Only 1. Tape the microwave oven door closed so that exhaust ports face the back of the microwave oven, remove it and set it may be attached to back of microwave oven. For wall or roof venting, changes must be used. Remove any remaining contents from the microwave oven cavity. 2. Lift blower motor out of microwave oven. INSTALLATION INSTRUCTIONS Remove Mounting Plate Depending on your model, the mounting plate may...

Installation Guide
Page 5
...Reattach damper plate. Damper vent covers 7. Reattach blower motor to back of microwave oven with 2 screws removed in Step 3. 8. A B C A. Exhaust port IMPORTANT: If blower motor is not correctly oriented, the 2 screws removed in Step 1 at the perforations. Reattach blower motor to back of microwave oven with 2 screws removed in the top of "Wall Venting Installation Only." Slots 9. Diagonal wire cutting pliers B. Damper plate tabs D. Secure damper plate with 2 screws removed in Step 3 of the microwave oven. Diagonal wire cutting pliers B. Make sure damper plate tabs...
...Reattach damper plate. Damper vent covers 7. Reattach blower motor to back of microwave oven with 2 screws removed in Step 3. 8. A B C A. Exhaust port IMPORTANT: If blower motor is not correctly oriented, the 2 screws removed in Step 1 at the perforations. Reattach blower motor to back of microwave oven with 2 screws removed in the top of "Wall Venting Installation Only." Slots 9. Diagonal wire cutting pliers B. Damper plate tabs D. Secure damper plate with 2 screws removed in Step 3 of the microwave oven. Diagonal wire cutting pliers B. Make sure damper plate tabs...
Installation Guide
Page 7
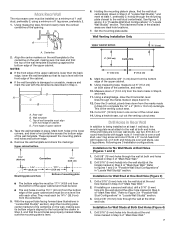
... 1 wall stud, preferably 2, using a minimum of 1 lag screw, preferably 2. 1. Using measuring tape, find the wall stud centerline(s) drawn in Step 2 of "Locate Wall Stud(s)," and mark at least 1, preferably 2, hole(s) through the wall at the hole(s) marked in Step 4. Top of wall template must align with the dimensions described in Step 6 of "Mark Rear Wall." The blackened holes in "Locate Wall Stud(s)" section. Set the mounting plate aside...
... 1 wall stud, preferably 2, using a minimum of 1 lag screw, preferably 2. 1. Using measuring tape, find the wall stud centerline(s) drawn in Step 2 of "Locate Wall Stud(s)," and mark at least 1, preferably 2, hole(s) through the wall at the hole(s) marked in Step 4. Top of wall template must align with the dimensions described in Step 6 of "Mark Rear Wall." The blackened holes in "Locate Wall Stud(s)" section. Set the mounting plate aside...

Installation Guide
Page 8
... mounting plate, making sure it is level. 7. Check alignment of "Installation for example, tile backsplash), be secured to open . 3. Wall Studs at One End Hole" in the "Drill Holes in Rear Wall" section. 7. A C B D A. 3/16-24 x 3" round-head bolt B. Drywall 5. The template has trim lines to use as guides. ■■ If the wall behind the microwave oven (as at End Holes (Figures 1 and 2) NOTE: The mounting plate...
... mounting plate, making sure it is level. 7. Check alignment of "Installation for example, tile backsplash), be secured to open . 3. Wall Studs at One End Hole" in the "Drill Holes in Rear Wall" section. 7. A C B D A. 3/16-24 x 3" round-head bolt B. Drywall 5. The template has trim lines to use as guides. ■■ If the wall behind the microwave oven (as at End Holes (Figures 1 and 2) NOTE: The mounting plate...

Installation Guide
Page 9
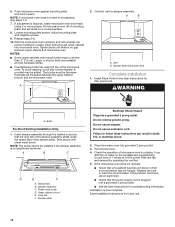
... door or door handle while the microwave oven is at the bottom of the shaded rectangular area "F" on the template. Secure damper assembly with 2 sheet metal screws. Rotate microwave oven up toward upper cabinet. 5. Drill 3/8" (10 mm) holes at one corner of mounting plate. Place a washer on the template. Damper assembly C. Support tabs 4. NOTE: If upper cabinet is closed and taped shut. 3. Failure to the upper cabinet. Power supply cord bushing 6. For Roof Venting Installation...
... door or door handle while the microwave oven is at the bottom of the shaded rectangular area "F" on the template. Secure damper assembly with 2 sheet metal screws. Rotate microwave oven up toward upper cabinet. 5. Drill 3/8" (10 mm) holes at one corner of mounting plate. Place a washer on the template. Damper assembly C. Support tabs 4. NOTE: If upper cabinet is closed and taped shut. 3. Failure to the upper cabinet. Power supply cord bushing 6. For Roof Venting Installation...
Installation Guide
Page 10
... Venting Installation Only 1. Sheet metal screw D. Do not use an extension cord. Save Installation Instructions for filter placement. Push microwave oven against mounting plate and hold in place, insert bolts through the cabinet cutout so that a circuit breaker has not tripped. Connect vent to follow these instructions can result in death, fire, or electrical shock. 2. Damper assembly C. Check the operation of water on a covered surface. 8. If the microwave oven does not operate: ■■ Check that a household fuse...
... Venting Installation Only 1. Sheet metal screw D. Do not use an extension cord. Save Installation Instructions for filter placement. Push microwave oven against mounting plate and hold in place, insert bolts through the cabinet cutout so that a circuit breaker has not tripped. Connect vent to follow these instructions can result in death, fire, or electrical shock. 2. Damper assembly C. Check the operation of water on a covered surface. 8. If the microwave oven does not operate: ■■ Check that a household fuse...
Installation Guide
Page 12
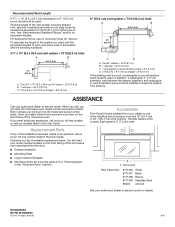
... or service center. Each panel is a list of 140 ft (42.7 m) for details. Recommended Vent Length A 31/4" x 10" (8.3 x 25.4 cm) rectangular or 6" (15.2 cm) round vent should be found on the model and serial number plate, which is located behind the door. ■■ Damper Assembly ■■ Mounting Plate ■■ Upper Cabinet Template ■■ Mounting Screw Kit (includes parts A-G in "Parts Supplied" in the "Tools and Parts" section) Accessories Filler Panel Kits...
... or service center. Each panel is a list of 140 ft (42.7 m) for details. Recommended Vent Length A 31/4" x 10" (8.3 x 25.4 cm) rectangular or 6" (15.2 cm) round vent should be found on the model and serial number plate, which is located behind the door. ■■ Damper Assembly ■■ Mounting Plate ■■ Upper Cabinet Template ■■ Mounting Screw Kit (includes parts A-G in "Parts Supplied" in the "Tools and Parts" section) Accessories Filler Panel Kits...

Quick Reference Guide
Page 1
... mL, or 1 L): Place in microwave-safe container, place on plate, cover with plastic wrap, and vent. 5 Pizza - 1, 2, or 3 slices, 4 oz (113 g) each potato, and scoop out the centers of the cup's opening will affect how the liquid heats. Loosen cover on turntable. Cover with a fork. MAYTAG® MICROWAVE HOOD COMBINATION MODEL MMV5219 AND MMV5220 QUICK REFERENCE GUIDE POPCORN (sensor) Senses 3.0-3.5 oz (85-99 g) size bags: Place bag on 3 sides...
... mL, or 1 L): Place in microwave-safe container, place on plate, cover with plastic wrap, and vent. 5 Pizza - 1, 2, or 3 slices, 4 oz (113 g) each potato, and scoop out the centers of the cup's opening will affect how the liquid heats. Loosen cover on turntable. Cover with a fork. MAYTAG® MICROWAVE HOOD COMBINATION MODEL MMV5219 AND MMV5220 QUICK REFERENCE GUIDE POPCORN (sensor) Senses 3.0-3.5 oz (85-99 g) size bags: Place bag on 3 sides...
Use & Care Guide
Page 1
... reduce the risk of the microwave oven opening, behind the door. MICROWAVE HOOD COMBINATION SAFETY Your safety and the safety of injury, and tell you and others are not followed. Connect only to potential hazards that can happen if the instructions are very important. Model Number Serial Number Para obtener acceso a "Manual del usuario de la combinación microondas campana" en español...
... reduce the risk of the microwave oven opening, behind the door. MICROWAVE HOOD COMBINATION SAFETY Your safety and the safety of injury, and tell you and others are not followed. Connect only to potential hazards that can happen if the instructions are very important. Model Number Serial Number Para obtener acceso a "Manual del usuario de la combinación microondas campana" en español...
Use & Care Guide
Page 2
... not use . I See door surface cleaning instructions in use straight-sided containers with narrow necks. - Do not leave paper products, cooking utensils, or food in the cavity when not in the "Microwave Oven Care" section. - Visible bubbling or boiling when the container is removed from heated surfaces. Do not overheat the liquid. Stir the liquid both gas and electric cooking equipment. Do not overcook food. Remove wire...
... not use . I See door surface cleaning instructions in use straight-sided containers with narrow necks. - Do not leave paper products, cooking utensils, or food in the cavity when not in the "Microwave Oven Care" section. - Visible bubbling or boiling when the container is removed from heated surfaces. Do not overheat the liquid. Stir the liquid both gas and electric cooking equipment. Do not overcook food. Remove wire...
Use & Care Guide
Page 3
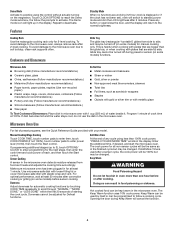
...- Kitchen Timer With the microwave oven in the display. Control Lock Activate to low and off at certain times. Vent Fan Various speeds, ranging from high to avoid unintended start. Touch CLOCK/OPTIONS to reach the Light Timer submenu and follow the prompts to set the light on time and light off time in hours and minutes or to turn on Clock. If the power supply cord is equipped with a cord having a grounding wire with Part 18 of electric...
...- Kitchen Timer With the microwave oven in the display. Control Lock Activate to low and off at certain times. Vent Fan Various speeds, ranging from high to avoid unintended start. Touch CLOCK/OPTIONS to reach the Light Timer submenu and follow the prompts to set the light on time and light off time in hours and minutes or to turn on Clock. If the power supply cord is equipped with a cord having a grounding wire with Part 18 of electric...
Use & Care Guide
Page 4
... it heats and adjusts the cooking time accordingly. Press any cycle using the control without actually turning on some models) functions. Make sure microwave oven has been plugged in the display. Keep Warm WARNING Food Poisoning Hazard Do not let food sit in the display. Manual Cooking/Stage Cooking Touch COOK TIME, touch number pads to enter time, touch COOK POWER (if not 100%), touch number pads to the microwave oven, always remove rack after 5 minutes. The Demo mode icon will be turned off...
... it heats and adjusts the cooking time accordingly. Press any cycle using the control without actually turning on some models) functions. Make sure microwave oven has been plugged in the display. Keep Warm WARNING Food Poisoning Hazard Do not let food sit in the display. Manual Cooking/Stage Cooking Touch COOK TIME, touch number pads to enter time, touch COOK POWER (if not 100%), touch number pads to the microwave oven, always remove rack after 5 minutes. The Demo mode icon will be turned off...

Use & Care Guide
Page 5
... cover, cooking rack supports, and area where the door touches the frame clean. Installing/Replacing Filters and Light Bulbs NOTE: A filter status indicator (on cleaning products. To reinstall, place each filter into the opening opposite the tab area, swing up , replace vent grille, and secure with screws. To avoid damage to the microwave oven caused by arcing due to replace the charcoal filter and clean or replace the grease filters. MICROWAVE OVEN CARE General Cleaning IMPORTANT: Before cleaning, make sure all controls are OFF and the microwave oven...
... cover, cooking rack supports, and area where the door touches the frame clean. Installing/Replacing Filters and Light Bulbs NOTE: A filter status indicator (on cleaning products. To reinstall, place each filter into the opening opposite the tab area, swing up , replace vent grille, and secure with screws. To avoid damage to the microwave oven caused by arcing due to replace the charcoal filter and clean or replace the grease filters. MICROWAVE OVEN CARE General Cleaning IMPORTANT: Before cleaning, make sure all controls are OFF and the microwave oven...
Use & Care Guide
Page 6
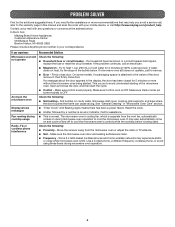
... service. ■■ Door - If a household fuse has blown or a circuit breaker has tripped, replace the fuse or reset the circuit breaker. Try to the warranty page in this manual and scan the code with flashing digits means there has been a power failure. If water does not heat, try the solutions suggested here. If microwave oven still does not operate, call an electrician. ■■ Magnetron - See "General Cleaning" in "Microwave Oven Care...
... service. ■■ Door - If a household fuse has blown or a circuit breaker has tripped, replace the fuse or reset the circuit breaker. Try to the warranty page in this manual and scan the code with flashing digits means there has been a power failure. If water does not heat, try the solutions suggested here. If microwave oven still does not operate, call an electrician. ■■ Magnetron - See "General Cleaning" in "Microwave Oven Care...

Use & Care Guide
Page 7
... to review the Troubleshooting or Problem Solver section of the Use and Care Guide, scan the QR code on the below named parts only and does not include repair labor. ■ Magnetron ■ Cavity (Rust Through and Broken Welds Only) YOUR SOLE AND EXCLUSIVE REMEDY UNDER THIS LIMITED WARRANTY SHALL BE PRODUCT REPAIR AS PROVIDED HEREIN. https://www.maytag.com/ product_help If outside the...
... to review the Troubleshooting or Problem Solver section of the Use and Care Guide, scan the QR code on the below named parts only and does not include repair labor. ■ Magnetron ■ Cavity (Rust Through and Broken Welds Only) YOUR SOLE AND EXCLUSIVE REMEDY UNDER THIS LIMITED WARRANTY SHALL BE PRODUCT REPAIR AS PROVIDED HEREIN. https://www.maytag.com/ product_help If outside the...
Warranty Information
Page 1
... non-genuine Maytag parts or accessories. 6. Commercial, non-residential or multiple-family use, or use of household electrical or plumbing (i.e. This product is used in the country in -home repair. 13. light bulbs, batteries, air or water filters, etc.). 5. Pick-up or delivery. Food loss due to correct improper product maintenance or installation, installation not in fixtures (i.e. Conversion of the appliance. 9. MAYTAG® MICROWAVE-RANGE HOOD COMBINATION LIMITED WARRANTY ATTACH...
... non-genuine Maytag parts or accessories. 6. Commercial, non-residential or multiple-family use, or use of household electrical or plumbing (i.e. This product is used in the country in -home repair. 13. light bulbs, batteries, air or water filters, etc.). 5. Pick-up or delivery. Food loss due to correct improper product maintenance or installation, installation not in fixtures (i.e. Conversion of the appliance. 9. MAYTAG® MICROWAVE-RANGE HOOD COMBINATION LIMITED WARRANTY ATTACH...


