
Installation Instructions
Page 6
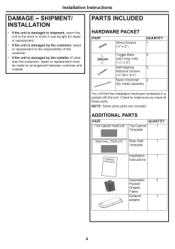
... other than the customer), repair or replacement must be made by arrangement between customer and installer. ADDITIONAL PARTS PART TOP CABINET TEMPLATE Top Cabinet Template QUANTITY 1 REAR WALL TEMPLATE Rear Wall Template Installation Instructions Separately Packed Grease Filters Exhaust adaptor 6 Installation Instructions DAMAGE - PARTS INCLUDED HARDWARE PACKET PART Wood Screws (¼" x 2") QUANTITY 1 Toggle Bolts 3 @_ (and wing nuts...
... other than the customer), repair or replacement must be made by arrangement between customer and installer. ADDITIONAL PARTS PART TOP CABINET TEMPLATE Top Cabinet Template QUANTITY 1 REAR WALL TEMPLATE Rear Wall Template Installation Instructions Separately Packed Grease Filters Exhaust adaptor 6 Installation Instructions DAMAGE - PARTS INCLUDED HARDWARE PACKET PART Wood Screws (¼" x 2") QUANTITY 1 Toggle Bolts 3 @_ (and wing nuts...

Installation Instructions
Page 7
..." wide. • If you are going to vent your microwave oven to the outside, see Hood Exhaust Backsplash Section for exhaust duct preparation. • When installing the microwave oven beneath smooth flat cabinets be careful to cut template, if necessary) Electric drill with 3/16", _/2" and 5/8" ... Tin snips (for cutting damper, if required) Scissors (to follow the instructions on the top cabinet template for top cabinet spacing (used on recessed bottom cabinet installations only) Safety goggles Level Duct and masking tape MOUNTING SPACE NOTES: Bottom edge of • The space...
..." wide. • If you are going to vent your microwave oven to the outside, see Hood Exhaust Backsplash Section for exhaust duct preparation. • When installing the microwave oven beneath smooth flat cabinets be careful to cut template, if necessary) Electric drill with 3/16", _/2" and 5/8" ... Tin snips (for cutting damper, if required) Scissors (to follow the instructions on the top cabinet template for top cabinet spacing (used on recessed bottom cabinet installations only) Safety goggles Level Duct and masking tape MOUNTING SPACE NOTES: Bottom edge of • The space...
Installation Instructions
Page 8
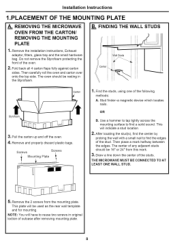
Installation Instructions 1.PLACEMENT OF THE MOUNTING PLATE A. B. Find the studs, using one of the stud. Use a hammer to tap lightly across the mounting surface to find the edges of the following methods: A. THE MICROWAVE MUST BE CONNECTED TO AT LEAST ONE WALL STUD. 5, Remove the 2 screws...of any adjacent studs should be used as the rear wall template and for mounting. This plate will have to find a solid sound. REMOVING THE MICROWAVE OVEN FROM THE CARTON/ REMOVING THE MOUNTING PLATE 1, Remove the installation instructions, Exhaust adaptor, filters, glass tray and the small ...
Installation Instructions 1.PLACEMENT OF THE MOUNTING PLATE A. B. Find the studs, using one of the stud. Use a hammer to tap lightly across the mounting surface to find the edges of the following methods: A. THE MICROWAVE MUST BE CONNECTED TO AT LEAST ONE WALL STUD. 5, Remove the 2 screws...of any adjacent studs should be used as the rear wall template and for mounting. This plate will have to find a solid sound. REMOVING THE MICROWAVE OVEN FROM THE CARTON/ REMOVING THE MOUNTING PLATE 1, Remove the installation instructions, Exhaust adaptor, filters, glass tray and the small ...
Installation Instructions
Page 9
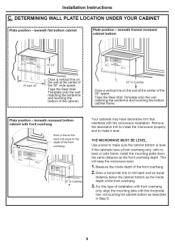
...horizontal line, not touching the cabinet bottom as the front overhang depth. For this type of installation with front overhang only, align the mounting tabs with the microwave installation. beneath recessed bottom cabinet with front overhang 'k Your cabinets may have a front overhang only,...of the front overhang. 3. Measure the inside depth of the 30" space. THE MICROWAVE MUST BE LEVEL. Installation Instructions C. beneath flat bottom cabinet Plate position - Tape the Rear Wall Template onto the wall matching the centeriine and touching the bottom cabinet frame. Plate position -...
...horizontal line, not touching the cabinet bottom as the front overhang depth. For this type of installation with front overhang only, align the mounting tabs with the microwave installation. beneath recessed bottom cabinet with front overhang 'k Your cabinets may have a front overhang only,...of the front overhang. 3. Measure the inside depth of the 30" space. THE MICROWAVE MUST BE LEVEL. Installation Instructions C. beneath flat bottom cabinet Plate position - Tape the Rear Wall Template onto the wall matching the centeriine and touching the bottom cabinet frame. Plate position -...
Installation Instructions
Page 10
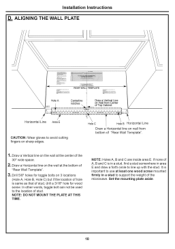
Installation Instructions D. ALIGNING THE WALL PLATE i i REAR WALk TEMPLATE Centedine notches Draw a Vertical Line on Wall from Center __ _
Installation Instructions D. ALIGNING THE WALL PLATE i i REAR WALk TEMPLATE Centedine notches Draw a Vertical Line on Wall from Center __ _
Installation Instructions
Page 12
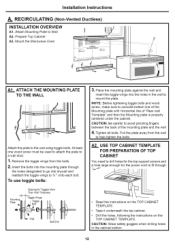
Mount the Microwave Oven + AI.__.ATTACH THE MOUNTING PLATE TO THE WALL Attach the ...the instructions on the TOP CABINET TEMPLATE. Tighten all bolts. A2.__U. CAUTION: Wear safety goggles when drilling holes in the wall to 3A" onto each bolt. Prepare Top Cabinet A3. RECIRCULATING (Non-Vented Ductless) INSTALLATION OVERVIEW A1. Place the mounting...make sure to avoid pinching fingers between the back of "Rear wall Template" and then the Mounting plate is properly centered under the cabinet. SE TOP CABINET TEMPLATE FOR PREPARATION OF TOP CABINET You need to drill holes for the...
Mount the Microwave Oven + AI.__.ATTACH THE MOUNTING PLATE TO THE WALL Attach the ...the instructions on the TOP CABINET TEMPLATE. Tighten all bolts. A2.__U. CAUTION: Wear safety goggles when drilling holes in the wall to 3A" onto each bolt. Prepare Top Cabinet A3. RECIRCULATING (Non-Vented Ductless) INSTALLATION OVERVIEW A1. Place the mounting...make sure to avoid pinching fingers between the back of "Rear wall Template" and then the Mounting plate is properly centered under the cabinet. SE TOP CABINET TEMPLATE FOR PREPARATION OF TOP CABINET You need to drill holes for the...
Installation Instructions
Page 14
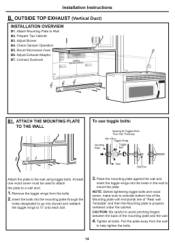
Attach Mounting Plate to mount the plate. Mount Microwave Oven B6. Installation Instructions B. Adjust Exhaust Adaptor B7. At least one wood screw must be used to attach the plate to a wall stud. 1, Remove the toggle wings from ... the wall. 4, Tighten all bolts. NOTE: Before tightening toggle bolts and wood screw, make sure to avoid pinching fingers between the back of "Rear wall Template" and then the Mounting plate is properly centered under the cabinet. Pull the plate away from the bolts. 2, Insert the bolts into the mounting plate...
Attach Mounting Plate to mount the plate. Mount Microwave Oven B6. Installation Instructions B. Adjust Exhaust Adaptor B7. At least one wood screw must be used to attach the plate to a wall stud. 1, Remove the toggle wings from ... the wall. 4, Tighten all bolts. NOTE: Before tightening toggle bolts and wood screw, make sure to avoid pinching fingers between the back of "Rear wall Template" and then the Mounting plate is properly centered under the cabinet. Pull the plate away from the bolts. 2, Insert the bolts into the mounting plate...
Installation Instructions
Page 15
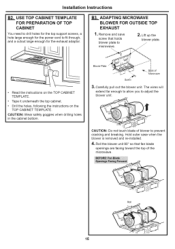
... enough for the power cord to adjust the blower unit. B3. Carefully pull out the blower unit. Installation Instructions B2. Lift up the blower plate. • Read the instructions on the TOP CABINET TEMPLATE. • Tape it underneath the top cabinet. • Drill the holes, following the instructions on.... Roll 15 Hold outer case when the blower is removed and re-installed. 4, Roll the blower unit 90 ° so that holds blower plate to prevent cracking and breaking. Biower Piate Screw Back of the microwave. Remove and save screw that fan blade openings are facing toward the ...
... enough for the power cord to adjust the blower unit. B3. Carefully pull out the blower unit. Installation Instructions B2. Lift up the blower plate. • Read the instructions on the TOP CABINET TEMPLATE. • Tape it underneath the top cabinet. • Drill the holes, following the instructions on.... Roll 15 Hold outer case when the blower is removed and re-installed. 4, Roll the blower unit 90 ° so that holds blower plate to prevent cracking and breaking. Biower Piate Screw Back of the microwave. Remove and save screw that fan blade openings are facing toward the ...
Installation Instructions
Page 18
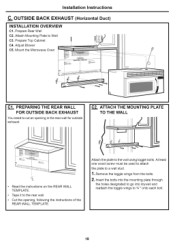
... BACK EXHAUST (Horizontal Duct) INSTALLATION OVERVIEW C1. Mount the Microwave Oven Clm PREPARING THE REAR WALL FOR OUTSIDE BACK EXHAUST You need to Wall C3. Prepare Top Cabinet | C4. Adjust Blower C5. Attach Mounting Plate to cut an opening , following the instructions REAR WALL TEMPLATE. C2m ATTACH THE MOUNTING PLATE TO THE WALL...
... BACK EXHAUST (Horizontal Duct) INSTALLATION OVERVIEW C1. Mount the Microwave Oven Clm PREPARING THE REAR WALL FOR OUTSIDE BACK EXHAUST You need to Wall C3. Prepare Top Cabinet | C4. Adjust Blower C5. Attach Mounting Plate to cut an opening , following the instructions REAR WALL TEMPLATE. C2m ATTACH THE MOUNTING PLATE TO THE WALL...

Installation Instructions
Page 19
... blower is removed and re-installed. 4, Remove "Parts "A" with Horizontal line of "Rear wall Template" and then the Mounting plate is properly centered under the cabinet. Installation Instructions C2.__A..TTACH THE MOUNTING TO THE WALL (cont.) To use toggle bolts" PLATE Spacing for the power cord to microwave. End B CAUTION: Do not touch...
... blower is removed and re-installed. 4, Remove "Parts "A" with Horizontal line of "Rear wall Template" and then the Mounting plate is properly centered under the cabinet. Installation Instructions C2.__A..TTACH THE MOUNTING TO THE WALL (cont.) To use toggle bolts" PLATE Spacing for the power cord to microwave. End B CAUTION: Do not touch...


