
Maytag MMV4205BAQ Support Question
Maytag MMV4205BAQ Support Question
Find answers below for this question about Maytag MMV4205BAQ - 2.0 cu. Ft. Microwave.Need a Maytag MMV4205BAQ manual? We have 2 online manuals for this item!
Question posted by thacker on November 17th, 2011
Need An Exhaust Adaptor
Need an Exhaust adaptor and an installation template. How do I get Them?
Current Answers
Related Maytag MMV4205BAQ Manual Pages
Use and Care Guide - Page 3
... equipment generates and uses ISM frequency energy and if not installed and used properly, that the microwave oven and the receiver are on different branch circuits. However, there is no guarantee that is properly installed and grounded. This oven is too short, have a qualified electrician install a three-slot receptacle. The plug must be plugged into an...
Use and Care Guide - Page 7
f-
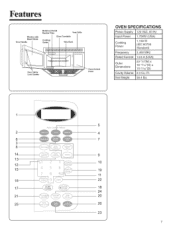
OVEN SPECIFICATIONS
Power Supply Input Power
CPoowokeirng
Frequency Rated Current Outer Dimensions
Cavity Volume Net Weight
120 VAC, 60 Hz
1,700W (USA) 1,150 W (IEC 60705 Standard)
2,450 MHz
14.8 A (USA)
29 7/8"(W) x 16 15/16"(H)x 15 21/32"(D) 2.0 Cu. J
--_
5
2
4
6
7
3
8
14 1312 _ 15
16 17 21
9 10
19 11 22
18
24
/ A,'; _Y
20
25...
Use and Care Guide - Page 8
... more information.
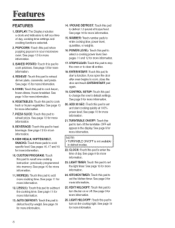
7. STOP/CLEAR: Touch this pad to clear all entries.
18. POWER LEVEL: Touch this pad to stop the oven or to select a cooking power level. MORE(9): Touch this pad to add more information.
15. NUMBER: Touch number pads to reheat... start a function. LIGHTTIMER: Touch this pad to set the light timer. OFF will appear in your microwave oven.
Use and Care Guide - Page 9
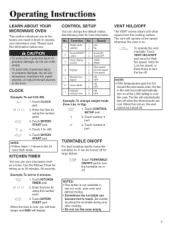
... results, leave the turntable on at low speed whenever the oven is over, you need to know to cool the oven.
Example: To set 8:00 AM. K',_u,_, 1. Enter the time by using the number pads.
3.
to turn on . When this information before use your microwave oven.
Be careful touching the turntable during and after cooking...
Use and Care Guide - Page 13
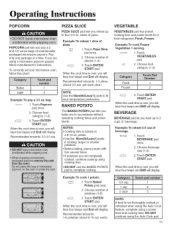
To correctly set your microwave oven, follow manufacturer's instructions. Choose food category (1-2).
3.
per each ).
0.5 cup
... hear four beeps and END will display. Choose number of pizza. Choose food
category (1-2). Choose number of commercially packaged microwave popcorn. Vega able£
1.
Pop only one to fit
i NyoOuTr Ete: mperature preference. I_i _
1. Touch ...
Use and Care Guide - Page 19

... can use small pieces of microwave oven. 2. After touching the AUTO DEFROST pad once, enter the food weight. Enter the weight.
(0.1-6.0 Ibs.) 3. NOTES:
- The oven will not stop during the ... covered,for 10-20 minutes.
,, Separate pieces as needed. At this oven unless more easily.
,, Shield areas of food with narrowstrips of the oven. Remove
any warm
2.5-6.0 Ibs.
IMPORTANT: •...
Use and Care Guide - Page 22
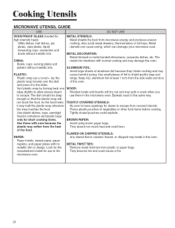
... slightly to allow excess steam to shield poultry legs and wings.
PLASTIC: Plastic wrap (as a cover)--
Metal utensils can cause arcing, which can damage your microwave oven.
Tightly closed pouches could burn. lay the plastic wrap loosely over the dish and press it may split or crack when you use in the...
Use and Care Guide - Page 23

...darken.
3. Do not use a soft cloth to 12 months, and more often, if needed. To order a new charcoal filter, contact the Parts Department at least once a month....grille
mounting screws. (2 middle screws) 4. Wipe the microwave oven inside U.S.A) or 1-800-688-2002 (Canada).
1. Follow these instructionsto clean and
care for your oven is accidentally turned on food particles or liquids, heat...
Installation Instructions - Page 1
... instructions with the Consumer.
• Note to leave these instructions for
local inspector's use.
• IMPORTANT -- Be sure to Consumerfuture reference.
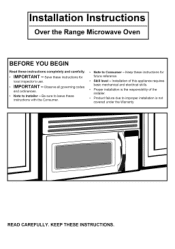
KEEP THESE INSTRUCTIONS. Installation Instructions
Over the Range Microwave Oven
BEFORE YOU BEGIN
Read these instructions for
• Skill level -
Observe all governing codes
and ordinances.
• Note to improper...
Installation Instructions - Page 2
... to Wall 12
Preparation of Top Cabinet 12 Mount the Microwave Oven 13
B Outside Top Exhaust 14-17
Attach Mounting Plate to Wall 14
Preparation of Top Cabinet 15
Adjust Blower
15
Check Damper Operation 16 Mount Microwave Oven 16
Adjust Exhaust Adaptor 17
Connecting Ductwork 17 Installation Instructions
CONTENTS
General information
Important Safety Instructions 3
Electrical...
Installation Instructions - Page 3
...: For personal safety, this product cannot be capable of supporting the cabinet load, in the cabinet above the microwave oven.
Installation Instructions
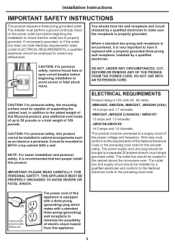
IMPORTANT SAFETY INSTRUCTIONS
This product requires a three-prong grounded outlet. The installer must conform to correct any deficiencies.
CAUTION: For personal safety, the mounting surface must be employed to the requirements...
Installation Instructions - Page 7

... Exhaust
Backsplash
Section for exhaust duct preparation.
• When installing the microwave oven beneath smooth flat cabinets be
cabinet needs
30" wide and free of obstructions. and #2 Phillips screwdriver
.....
_j
Pencil
_and
Ruler or tape measure straight edge
(optional)
Tin snips (for cutting damper, if required)
Scissors (to follow the instructions on the top
cabinet template...
Installation Instructions - Page 8
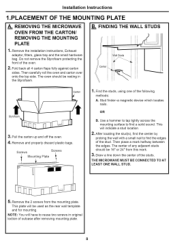
.... B. FINDING THE WALL STUDS
3. OR
B. REMOVING THE MICROWAVE OVEN FROM THE CARTON/ REMOVING THE MOUNTING PLATE
1, Remove the installation instructions, Exhaust
adaptor, filters, glass tray and the small hardware bag. Do not...outcase after removing mounting plate.
8
This will be used as the rear wall template and for mounting. This plate will indicate a stud location.
2, After locating the...
Installation Instructions - Page 11
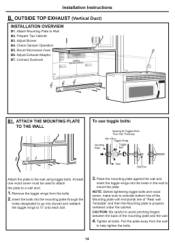
... the filler-upper. OUTSIDE TOP EXHAUST (VERTICAL DUCT)
Outside Top
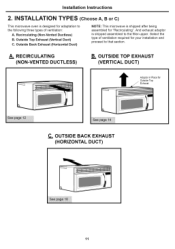
Adaptor in Place for "Recirculating". Outside Top Exhaust (Vertical Duct) C. A. INSTALLATION TYPES (Choose A, B or C)
This microwave oven is shipped after being assembled for
_
Exhaust
C. Outside Back Exhaust (Horizontal Duct)
NOTE: This microwave is designed for your installation and proceed to that section...
Installation Instructions - Page 12
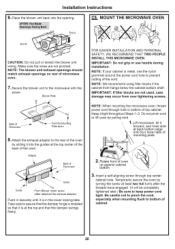
.... Mount the Microwave Oven
+
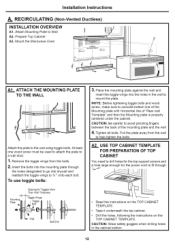
AI.__.ATTACH THE MOUNTING PLATE TO THE WALL
Attach the plate to help tighten the bolts.
RECIRCULATING (Non-Vented Ductless) INSTALLATION OVERVIEW
A1. Pull the plate away from the bolts.
2, Insert the bolts into the mounting plate through .
• Read the instructions on the TOP CABINET TEMPLATE.
• Tape...
Installation Instructions - Page 14
Prepare Top Cabinet B3. Mount Microwave Oven B6. Adjust Exhaust Adaptor B7. NOTE: Before tightening toggle bolts and wood screw, make sure to ... all bolts. Adjust Blower B4. CAUTION: Be careful to Walt B2. Installation Instructions
B. Attach Mounting Plate to avoid pinching fingers between the back of "Rear wall Template" and then the Mounting plate is properly centered under the cabinet.
Installation Instructions - Page 16
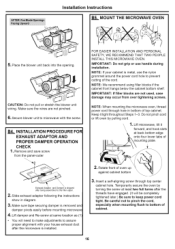
... your cabinet is shipped after the threads have engaged. (It will need to make adjustments to assure proper alignment with the screw.
Place the blower unit back into the opening. INSTALLATION PROCEDURE FOR EXHAUST ADAPTOR AND PROPER DAMPER OPERATION CHECK
1.
NOTE: When mounting the microwave oven, thread power cord through top center
cabinet hole. Do not...
Installation Instructions - Page 17
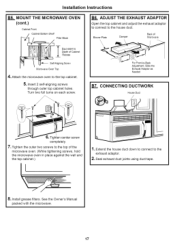
...
exhaust adaptor. 2, Seal exhaust duct joints using duct tape.
//
8, Install grease filters. For Front-to the top cabinet.
5. ONNECTING DUCTWORK
House Duct
6, Tighten center screw completely.
7, Tighten the outer two screws to the top of Cabinet
._
ERqeucievsaslent to
Seif-Aligning Screw Microwave Oven Top
4, Attach the microwave oven to -Back Adjustment, Slide the Exhaust Adaptor as Needed...
Installation Instructions - Page 18
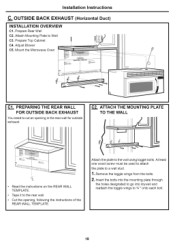
... the mounting plate through the holes designated to go into drywall and reattach the toggle wings to cut an opening , following the instructions REAR WALL TEMPLATE. Prepare Rear Wall
C2. Mount the Microwave Oven
Clm PREPARING THE REAR WALL FOR OUTSIDE BACK EXHAUST
You need to 3A" onto each bolt.
18 Prepare Top Cabinet
|
C4.
Installation Instructions - Page 20
... when mounting flush to the rear of mounting plate. Place the blower unit back into the guides at least two full turns after attached the exhaust adaptor)
Push in securely until it is metal, use handle during installation. C5. MOUNT THE MICROWAVE OVEN
End B
End A
CAUTION: Do not pull or stretch the blower unit wiring.
Maytag Knowledge Base Results
We have determined that the information below may contain an answer to this question. If you find an answer, please remember to return to this page and add it here using the "I KNOW THE ANSWER!" button above. It's that easy to earn points!-
Assembling the portable dishwasher aerator
...needed in my tall tub dishwasher Product Recall Information The adapter is used only if you have internal threads on the dishes in my dishwasher Reasons to your faucet. Should the assembly come apart during installation..., and then attach it to keep the assembly from coming apart. When installing the aerator, this retainer should be removed. Hold down the rubber o-ring when... -
Food characteristics and cooking results - Microwave oven
... issues, but does not solve my problem The answer needs updating and/or additional information The answer could be improved Thank you Not Helpful Helpful Answers others found helpful FAQs Knowledgebase search tips Best cooking results - The more evenly than frozen foods. Microwave oven How do characteristics of 3 Please tell us how... -
Control setup and changing default settings - Microwave oven
... characteristics and cooking results - Touch Control Setup pad. FAQs Knowledgebase search tips Setting the microwave timer Product Recall Information Best cooking results - Microwave oven Touch number 1 pad. to kg). Touch number 2 pad. Example: To change the default values of your microwave. Control setup and changing default settings - You can change weight mode (from...
Similar Questions

How Many Fuses In Maytag Microwave Oven, Model No. Mmv4205bas
(Posted by kikFarm 10 years ago)

I Need To Replace The Door. Where May I Buy One?
O need to replace the door for this microwave. Where may I order one ?
O need to replace the door for this microwave. Where may I order one ?
(Posted by Cateyes75070 10 years ago)

Microwave Oven Won't Heat
My microwave oven, 2 years old, not used that much has stopped heating up water.
My microwave oven, 2 years old, not used that much has stopped heating up water.
(Posted by MarjorieChowning 11 years ago)

My Microwave Is Not Working At All-no Power, But The Outlet Is A Working Outlet.
Is there a fuse that might be blown in the microwave?
Is there a fuse that might be blown in the microwave?
(Posted by bspt1992 13 years ago)

Power Level
I set time for 60 seconds and push start. Power level reads 100 and food does not heat up. When I pu...
I set time for 60 seconds and push start. Power level reads 100 and food does not heat up. When I pu...
(Posted by kenmar47 13 years ago)