
Maytag MMV4205BAQ Support Question
Maytag MMV4205BAQ Support Question
Find answers below for this question about Maytag MMV4205BAQ - 2.0 cu. Ft. Microwave.Need a Maytag MMV4205BAQ manual? We have 2 online manuals for this item!
Question posted by bspt1992 on February 26th, 2011
My Microwave Is Not Working At All-no Power, But The Outlet Is A Working Outlet.
Is there a fuse that might be blown in the microwave?
Current Answers
Related Maytag MMV4205BAQ Manual Pages
Use and Care Guide - Page 3
...blown. It is encouraged to try to correct the interference by unauthorized modification to this equipment does cause interference to radio or television reception, which are designed to radio and television reception. This oven...and fuses can be plugged into an outlet that interference will not occur in a residential installation. Do not use an extension cord. If this microwave oven....
Use and Care Guide - Page 7
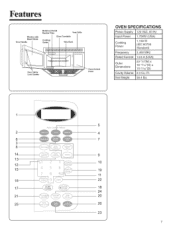
OVEN SPECIFICATIONS
Power Supply Input Power
CPoowokeirng
Frequency Rated Current Outer Dimensions
Cavity Volume Net Weight
120 VAC, 60 Hz
1,700W (USA) 1,150 W (IEC 60705 Standard)
2,450 MHz
14.8 A (USA)
29 7/8"(W) x 16 15/16"(H)x 15 21/32"(D) 2.0 Cu. Ft.
58.4 Ibs. J
--_
5
2
4
6
7
3
8
14 1312 _ 15
16 17 21
9 10
19 11 22
18
24
/ A,'; _Y
20
25...
Use and Care Guide - Page 8
...If you time of day, cooking time settings and cooking functions selected.
2. OFF will appear in your microwave oven.
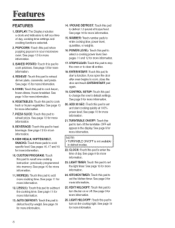
CLOCK: Touch this pad to enter the time of frozen food. See page 15 for more information....
20. TURNTABLE ON/OFF: Touch this pad to select a cooking power level. See page 9 for more information.
26. See page 9 for more information.
15. See page 9 ...
Use and Care Guide - Page 10
...automatically at 70% power.
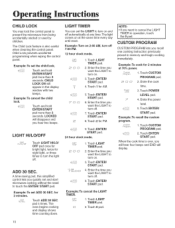
LIGHT HI/LO/OFF
Touch LIGHT HI/LO/ OFF pad once for bright light, twice for PM.
9. Example: To set and start microwave cooking without the... in memory and begin cooking immediately. Example: To cancel the child lock.
for AM.
7OO 2
5. The oven begins cooking and display shows time counting down. Touch ENTER/ START pad.
8. Touch LIGHT TIMER pad. O ...
Use and Care Guide - Page 11
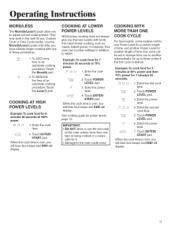
...(1) pads allow you to adjust pre-set to change from one of these procedures.
1. r-,ov,,_,_
Ievel
7
2. Enter the cook time. Touch POWER
Luvel
LEVEL pad.
_
3. They only work in this oven unless more time to HIGH.
iMPORTANT: * DO NOT store or use the wire rack
in the Add 30 sec, Custom Cook or...
Use and Care Guide - Page 12
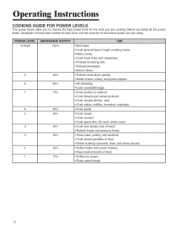
...8226; Finish cooking casserole, stew, and some sauces. • Soften butter and cream cheese. • Heat small amounts of microwave power you are using.
10 High
9 8 7
6 5 4 3 2 1
100%
9O% 80% 70%
60% 50%...; Cook cakes, muffins, brownies, cupcakes. • Cook pasta. . Below are listed all the power levels, examples of foods best cooked at each level, and the amount of food. • Soften...
Use and Care Guide - Page 13
...I_i _
1.
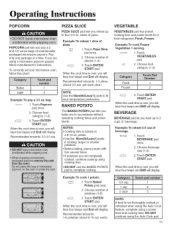
When the cook time is over, you heat up to six potatoes without selecting cooking times and power levels.
3. DO NOT continue using a power level and cooking time. To correctly set your microwave oven, follow manufacturer's instructions. Choose food category (1-2).
3. Example: To reheat 1 slice of
pieces (1-4).
3. Choose number of pizza.
Choose food...
Use and Care Guide - Page 20
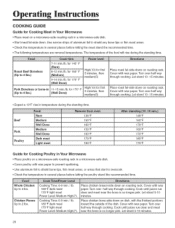
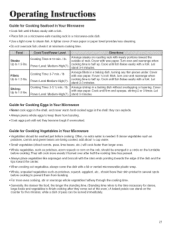
... rise during the standing time. Cooking Time: 6-9 min. / lb. 180°F dark meat
170°F light meat Power Level: Medium High(7). Operating Instructions
COOKING GUIDE
Guide for Cooking Meat in Your Microwave • Place meat on a microwave-safe roasting rack in (Up to 4 Ibs.)
7-11 min./Ib, for 145 ° F (Rare) 8-12 min...
Use and Care Guide - Page 21
.../2indcishh,thtiucrkn,intugrnanoyvethr inanpdierceeasrraunngdeer.wChoevner csotaonkding2-3timmeiniustehsa.lf up . Power Level: Medium-High(7). they come out of the oven.) A baked potato can explode. • Always pierce... the dish with a fork.
check it flakes easily with a lid or vented microwavable plastic wrap.
• Whole, unpeeled vegetables such as potatoes, carrots and green beans...
Use and Care Guide - Page 23

... out. CHARCOAL FILTER PART NO. Wipe the microwave oven inside and out, including the hood bottom cover, with a soft cloth and a warm (not hot) mild detergent solution.
Unplug oven or turn off power at the angle shown.
7. Clean your oven. • Keep the inside of water in the oven when it ; Be sure to leave a cup...
Use and Care Guide - Page 24
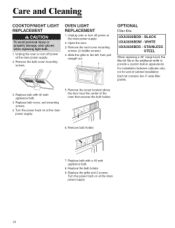
... cover, and mounting sc rews.
5. Replace the bulb holder.
9. Each kit contains two 3"-wide filler panels.
3. For installation between cabinets only; Unplug oven or turn off power at the main power supply.
2. Remove the vent cover mounting
screws. (2 middle screws) 4. Remove the screw located above the door near the center of -cabinet installation...
Use and Care Guide - Page 25

... this list
• Make sure the oven is turned on its
Neither the oven's display nor the oven operate. if the other appliances, like your microwave further away from the outlet, wait ten seconds, then plug it will display: PLEASETOUCH CLOCK AND SETTIME OF DAY, Reset
the clock and any blown fuse.
(1-800-688-9900)
25 Move...
Installation Instructions - Page 3
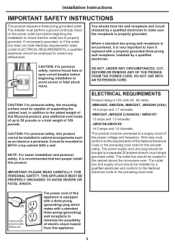
... THE PRONGS FROM THE POWER CORD. The installer must conform to a supply circuit of the National Electrical Code or the prevailing local code for this product cannot be located in cabinet arrangements such as an island ora peninsula. The outlet box and supply circuit should be installed in the cabinet above the microwave oven.
Installation Instructions - Page 7

... duct preparation.
• When installing the microwave oven beneath smooth flat cabinets be careful
to cut template, if necessary)
Electric drill with 3/16", _/2" and 5/8" drill bits
Gloves
Saw (saber, hole or keyhole)
Stud finder or Hammer (optional)
Filler blocks or scrap wood
pieces, if needed for power cord clearance.
7 and #2 Phillips screwdriver
.....
_j...
Installation Instructions - Page 12
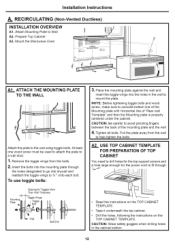
Attach Mounting Plate to the wall using toggle bolts. Mount the Microwave Oven
+
AI.__.ATTACH THE MOUNTING PLATE TO THE WALL
Attach the plate to ... the plate. Tighten all bolts.
Installation Instructions
A. To use toggle bolts:
I Mount ng
Plate
Spacing for the power cord to avoid pinching fingers between the back of "Rear wall Template" and then the Mounting plate is properly centered...
Installation Instructions - Page 13

...mounting flush to prevent cutting of the
microwave oven. (While tightening screws, hold the microwave oven in bottom of Cabinet Recess igning Screw Microwave Oven Top
4. See the Owner's Manual packed with the microwave.
13
NOTE: If your cabinet is metal, use handle during installation. Attach the microwave oven to keep power cord tight. Keep it
\
forward, and hook...
Installation Instructions - Page 15
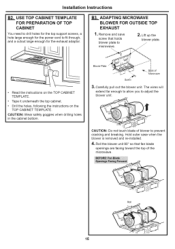
.... B3. Remove and save
screw that fan blade
openings are facing toward the top of the microwave. The wires will
extend far enough to allow you to fit through, and a cutout barge enough for the power cord to adjust the blower unit.
Lift up the
blower plate.
• Read the instructions on...
Installation Instructions - Page 16
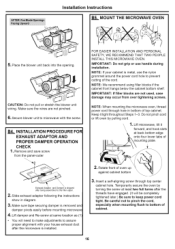
... wires are not used, case damage may occur from the panel-outer
FOR EASIER INSTALLATION SAFETY, WE RECOMMEND INSTALL THIS MICROWAVE
AND PERSONAL THAT TWO PEOPLE OVEN. B4.
NOTE: When mounting the microwave oven, thread power cord through top center
cabinet hole. Be careful not to pinch the cord, especially when mounting flush to bottom...
Installation Instructions - Page 19

... you to fit through. Blower motor
screw.
2, Lift up the Blower Plate. Blower Motor
Back of Microwave
Installation Instructions
C2.__A..TTACH THE MOUNTING TO THE WALL (cont.)
To use toggle bolts"
PLATE
Spacing for the power cord to adjust the blower unit.
"_'_r..... on the TOP CABINET TEMPLATE.
• Tape it...
Installation Instructions - Page 22

FOR
5, Plug power cord into a dedicated 20 amp electrical outlet.
22 Installation Instructions
BEFORE YOU USE YOUR MICROWAVE
1, Make sure the microwave oven has been
installed according to instructions.
6. Read the Owner's Manual.
2, Remove all packing material from the microwave oven.
3. Install turntable and ring in cavity.
4. Replace house fuse or turn breaker back on.
7, KEEP ...
Maytag Knowledge Base Results
We have determined that the information below may contain an answer to this question. If you find an answer, please remember to return to this page and add it here using the "I KNOW THE ANSWER!" button above. It's that easy to earn points!-
Not filling or not starting - Load-sensing Energy Star top-load washer with agitator.
...cycle control knob to start the washer. Filling will start - Plug power cord into a grounded three prong outlet? Washer will not start the washer. If the lid was opened ...search tips Load-sensing Energy Star top-load washer with water when I start - Has a household fuse blown, or has a circuit breaker tripped? The washer will not fill or start a cycle? Why ... -
Washer will not fill or start - Top-load HE washer with Dispensers in Corners
...properly, the washer should seem low because this washer work differently than 1 or 2 garments after the last ...outlet has tripped. The water level on the Cycle Control knob properly lined up to float off the wash plate and decrease cleaning. Has a household fuse blown...top-load washers? Is the power cord plugged into a grounded 3 prong outlet. Make sure the Cycle Control... -
Washer will not fill or start - Top-load washer
... may not start if the timer is on water, and check for proper fill. Has a household fuse blown, or has a circuit breaker tripped? Check to fill with the lid open. Is the timer knob...valve screens. Pull out the knob to start . Is the power cord plugged into a grounded 3 prong outlet. Reinstall the hoses, turn on a fuse box, check to see if the hot and/or cold water...
Similar Questions

Where Are The Fuses Located On Maytag Microwave No Power Mmv4205bas
(Posted by AdalrTJ 10 years ago)

Maytag Mmv4205bas Replaced Fuses, Microwave Worked For A Couple Secs And Quit
I took down our microwave, and replaced the 2 front fuses. Then put it back up after testing it on t...
I took down our microwave, and replaced the 2 front fuses. Then put it back up after testing it on t...
(Posted by luludalray 11 years ago)
Power Level
I set time for 60 seconds and push start. Power level reads 100 and food does not heat up. When I pu...
I set time for 60 seconds and push start. Power level reads 100 and food does not heat up. When I pu...
(Posted by kenmar47 13 years ago)

Microwave Does Not Warm
The oven no longer heats up or gets warm. It also makes a diffrent sound now.
The oven no longer heats up or gets warm. It also makes a diffrent sound now.
(Posted by jchapman 13 years ago)

Our Microwave's Door Won't Shut Poperly And The Light Stays On, How To Fix
(Posted by andriescouture 13 years ago)