
Maytag MMV4205BAQ Support Question
Maytag MMV4205BAQ Support Question
Find answers below for this question about Maytag MMV4205BAQ - 2.0 cu. Ft. Microwave.Need a Maytag MMV4205BAQ manual? We have 2 online manuals for this item!
Question posted by andriescouture on November 4th, 2010
Our Microwave's Door Won't Shut Poperly And The Light Stays On, How To Fix
The person who posted this question about this Maytag product did not include a detailed explanation. Please use the "Request More Information" button to the right if more details would help you to answer this question.
Current Answers
Related Maytag MMV4205BAQ Manual Pages
Use and Care Guide - Page 3
... generates and uses ISM frequency energy and if not installed and used properly, that the microwave oven and the receiver are not completely understood, or if doubt exists as shown in a ..., 110120V.
* Reorient the receiving antenna of the radio or television. * Relocate the microwave oven with the electrical rating as to radio and television reception. Grounding reduces risk of electric...
Use and Care Guide - Page 7
Ft.
58.4 Ibs. f-
J
--_
5
2
4
6
7
3
8
14 1312 _ 15
16 17 21
9 10
19 11 22
18
24
/ A,'; _Y
20
25
/
26
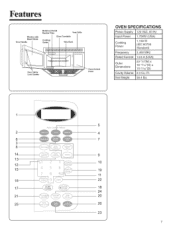
23 Features
Window with
Metal Shield Door Handle
Model and Serial Humber Plate
Vent Grille
Cooking Guide
Glass Turntable Wire Rack
1
Door Safety Lock System
Panel
,..
OVEN SPECIFICATIONS
Power Supply Input Power
CPoowokeirng
Frequency Rated Current...
Use and Care Guide - Page 8
... DISPLAY: The Display includes a clock and indicators to tell you open the door after oven begins to turn the fan on the cooktop light. COOK: Touch this pad to cook, close the door and touch ENTER/START pad again.
19. See page 13 for more information..... See pages 16, 17 and 18 for more information.
3. OFF will appear in your microwave oven. Features
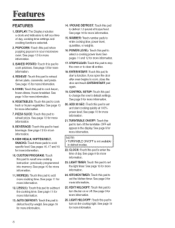
FEATURES
1.
Use and Care Guide - Page 9
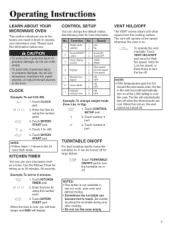
... Kitchen Timer for 8 minutes. Example: To set 8:00 AM.
CONTROL SETU P
You can become hot to touch. to Kg). When this information before use your microwave oven.
Enter the time by using the number pads.
3.
See following chart for AM.
5. Touch CONTROL SETUP pad.
2. The vent will automatically turn on at low...
Use and Care Guide - Page 13
...cook 1 potato. B__.,1. Recommended amounts: 1-6 potatoes (about 3-5 ozs.
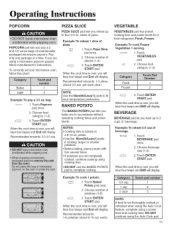
To correctly set your microwave oven, follow manufacturer's instructions. Touch Popcorn pad once.
2.
Touch ENTER/
START pad. Example: To...pad lets you are not completely cooked, continue cooking using a microwave popcorn popper, follow this chart:
Butter
1
Light
2
Example: To pop a 3.5 oz. When the cook ...
Use and Care Guide - Page 19

... walls
or back of food. Remove
any piecesof foodthat are preset in this time, open the door and turn over the food during the Defrost cycle.
i Afterthe secondstage, againshield anywarm
i portionswith ... a temperature of 5°F or below when defrosting different types of microwave oven. 2. To use small pieces of meat.
/_.ubo ]ef_ ost
1.
Operating Instructions
AUTO DEFROST
Defrost...
Use and Care Guide - Page 22
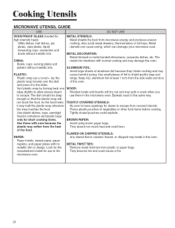
...door of vegetables or other food items before cooking. Tightly closed pouches could cause a fire.
22 PLASTIC: Plastic wrap (as a cover)--
Pierce plastic pouches of the oven. METAL TWIST TI ES: Remove metal twist ties from microwave...and paper plates with care because the plastic may break in the microwave oven.
Use small pieces of the food.
Look for the manufacturer's ...
Use and Care Guide - Page 23

...a month. CHARCOAL FILTER PART NO. Wipe the microwave oven inside , the charcoal filter should be replaced every 6 to the operating parts of the oven, don't let water seep into place. Follow these...tray.You may wish to avoid scratching. • If steam accumulates inside and outside the oven door, wipe with very mild soap and water. CLEANING THE GREASE FILTER
The grease filter should...
Installation Instructions - Page 1
... of the installer.
• Product failure due to Installer- Be sure to leave these instructions completely and carefully.
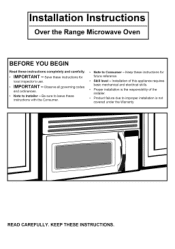
• IMPORTANT -- Installation Instructions
Over the Range Microwave Oven
BEFORE YOU BEGIN
Read these instructions with the Consumer.
• Note to Consumerfuture reference.
Installation Instructions - Page 2
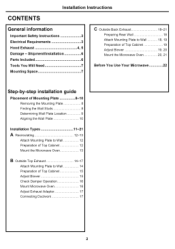
... 19 Preparation of Top Cabinet 19 Adjust Blower 19, 20 Mount the Microwave Oven 20, 21
Before You Use Your Microwave 22
Step-by-step installation guide
Placement of Mounting Plate 8-10 Removing ...Recircutating
12-13
Attach Mounting Plate to Wall 12
Preparation of Top Cabinet 12 Mount the Microwave Oven 13
B Outside Top Exhaust 14-17
Attach Mounting Plate to Wall 14
Preparation of ...
Installation Instructions - Page 3
... installed in cabinet arrangements such as an island ora peninsula.
The installer must be capable of supporting the cabinet load, in the cabinet above the microwave oven.
IMPORTANT-PLEASE
READ CAREFULLY. This product must conform to the National Electrical Code or the prevailing local code. Installation Instructions
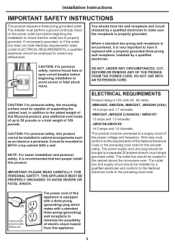
IMPORTANT SAFETY INSTRUCTIONS
This product...
Installation Instructions - Page 7

... installation over
cooking surface
ranges up to 33" wide. • If you are going to vent your microwave
oven to the outside, see Hood Exhaust
Backsplash
Section for exhaust duct preparation.
• When installing the microwave oven beneath smooth flat cabinets be careful
to cut template, if necessary)
Electric drill with 3/16", _/2" and 5/8" drill...
Installation Instructions - Page 8
....
Do not remove the Styrofoam protecting the front of the following
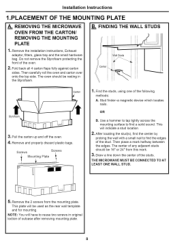
methods: A. FINDING THE WALL STUDS
3. Use a hammer to tap lightly across the mounting surface to find a solid sound. REMOVING THE MICROWAVE OVEN FROM THE CARTON/ REMOVING THE MOUNTING PLATE
1, Remove the installation instructions, Exhaust
adaptor, filters, glass tray and the small hardware...
Installation Instructions - Page 11
Outside Back Exhaust (Horizontal Duct)
NOTE: This microwave is shipped after being assembled for your installation and proceed ...HORIZONTAL DUCT)
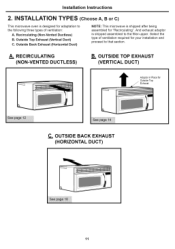
11 RECIRCULATING (NON-VENTED DUCTLESS)
B. INSTALLATION TYPES (Choose A, B or C)
This microwave oven is shipped assembled to the following three types of ventilation required for "Recirculating". Installation Instructions
2. Recirculating (Non-...
Installation Instructions - Page 12
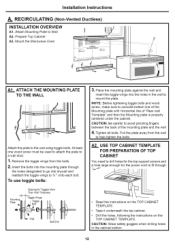
Prepare Top Cabinet A3. CAUTION: Wear safety goggles when drilling holes in the wall to 3A" onto each bolt. Mount the Microwave Oven
+
AI.__.ATTACH THE MOUNTING PLATE TO THE WALL
Attach the plate to Wall A2. CAUTION: Be careful to a wall stud.
1, Remove the toggle wings ...
Installation Instructions - Page 13

... four lower tabs of
mounting plate.
2, Rota;ce front of Cabinet Recess igning Screw Microwave Oven Top
4.
Keep it
\
forward, and hook slots
at least two full turns after ... (It will be completely tightened later.) Be sure to the top of the
microwave oven. (While tightening screws, hold the microwave oven in bottom of cabinet.
NOTE: If your cabinet is metal, use handle during...
Installation Instructions - Page 14
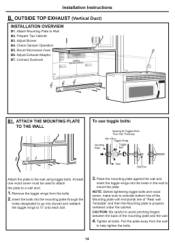
OUTSIDE TOP EXHAUST (Vertical Duct)
INSTALLATION OVERVIEW
B1. Mount Microwave Oven B6.
Prepare Top Cabinet B3. At least one wood screw must be used to attach the plate to a wall stud.
1, Remove the toggle wings from ...
Installation Instructions - Page 16
... it forward, and hook slots at same location as (1 '
• You will be completely tightened later.) Be sure to prevent cutting of oven up against cabinet bottom
3. Lift microwave, tilt it tight throughout Steps 1-3.
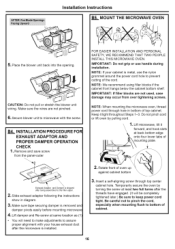
INSTALLATION PROCEDURE FOR EXHAUST ADAPTOR AND PROPER DAMPER OPERATION CHECK
1. IMPORTANT: Do not grip or use the nylon...
Installation Instructions - Page 17
... of Microwave
Depth of Cabinet
._
ERqeucievsaslent to
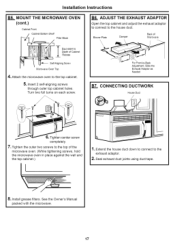
Seif-Aligning Screw Microwave Oven Top
4, Attach the microwave oven to the top of the microwave oven. (While tightening screws, hold the microwave oven in place...exhaust duct joints using duct tape.
//
8, Install grease filters. OUNT THE MICROWAVE OVEN (cont.)
Cabinet Front Cabinet Bottom Shelf Filler Block
B6. Extend the house duct...
Installation Instructions - Page 18
... into the mounting plate through the holes designated to go into drywall and reattach the toggle wings to the wall using toggle bolts. Mount the Microwave Oven
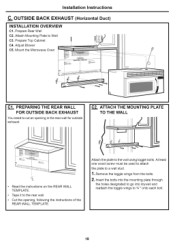
Clm PREPARING THE REAR WALL FOR OUTSIDE BACK EXHAUST
You need to Wall C3. Installation Instructions
C, OUTSIDE BACK EXHAUST (Horizontal Duct)
INSTALLATION OVERVIEW
C1. Attach...
Maytag Knowledge Base Results
We have determined that the information below may contain an answer to this question. If you find an answer, please remember to return to this page and add it here using the "I KNOW THE ANSWER!" button above. It's that easy to earn points!-
Adding items into my dishwasher during a cycle
... opened during a cycle? Open the door. The lights will stop before opening the door. After a slight delay, the cycle will flash to a 30-second delay before the main wash starts. Open the door and check the detergent dispenser. it latches. If the detergent dispenser lid is properly shut. Filling the tall tub detergent... -
Food characteristics and cooking results - Microwave oven
... foods. Composition and density Foods high in my microwave oven? << Check for doneness and add small increments of food Microwave Product Recall Information Control setup and changing default settings - When microwave cooking, the amount, size and shape, starting temperature, composition and density of a light, porous food, such as meat and potatoes, require... -
Indicator lights - Ceramic glass cooktop
... when I have turned off , until the area has cooled. On some lights stay on after the control is turned off my cooktop? Sabbath Mode - Hot surface indicator lights On all models A red indicator light will remain on, even after I use my cooktop? Oven It will glow when any cooking area is hot. The hot surface...
Similar Questions

I Need To Replace The Door. Where May I Buy One?
O need to replace the door for this microwave. Where may I order one ?
O need to replace the door for this microwave. Where may I order one ?
(Posted by Cateyes75070 10 years ago)


Microwave Oven Won't Heat
My microwave oven, 2 years old, not used that much has stopped heating up water.
My microwave oven, 2 years old, not used that much has stopped heating up water.
(Posted by MarjorieChowning 11 years ago)

My Microwave Is Not Working At All-no Power, But The Outlet Is A Working Outlet.
Is there a fuse that might be blown in the microwave?
Is there a fuse that might be blown in the microwave?
(Posted by bspt1992 13 years ago)

Power Level
I set time for 60 seconds and push start. Power level reads 100 and food does not heat up. When I pu...
I set time for 60 seconds and push start. Power level reads 100 and food does not heat up. When I pu...
(Posted by kenmar47 13 years ago)