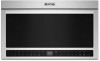
Bump Out Kit Installation Instructions
Page 1
These installation instructions are deeper than 13" (33 cm) but no more than 16" (40.6 cm), use the bump out mounting kit to the owner manual that comes with the microwave hood combination. MICROWAVE OVEN HOOD COMBINATION BUMP OUT KIT INSTALLATION INSTRUCTIONS If cabinets are only for the Bump out mounting kit, for full microwave hood combination installation, please refer to replace the mounting bracket that came with your unit. MICROWAVE OVEN SAFETY W11646788B
These installation instructions are deeper than 13" (33 cm) but no more than 16" (40.6 cm), use the bump out mounting kit to the owner manual that comes with the microwave hood combination. MICROWAVE OVEN HOOD COMBINATION BUMP OUT KIT INSTALLATION INSTRUCTIONS If cabinets are only for the Bump out mounting kit, for full microwave hood combination installation, please refer to replace the mounting bracket that came with your unit. MICROWAVE OVEN SAFETY W11646788B

Bump Out Kit Installation Instructions
Page 2
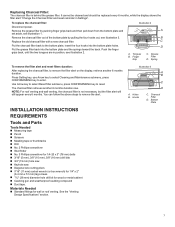
... 3/16" toggle nuts 2 1/4" x 2" lag screws 4 #6 x 3/8" Sheet metal screws 2 Power supply cord bushing 1 Damper for wall or roof venting. INSTALLATION INSTRUCTIONS REQUIREMENTS Tools and Parts Tools Needed ■ Measuring tape ■ 3/16" (5 mm), 3/8" (10 mm), 5/8" (16 mm) drill bits ■ Pencil ■ 3/4" (19 mm) hole saw ■ Scissors ■ Keyhole saw ■ Masking tape or thumbtacks ■ Diagonal wire cutting pliers ■ Drill ■ No...
... 3/16" toggle nuts 2 1/4" x 2" lag screws 4 #6 x 3/8" Sheet metal screws 2 Power supply cord bushing 1 Damper for wall or roof venting. INSTALLATION INSTRUCTIONS REQUIREMENTS Tools and Parts Tools Needed ■ Measuring tape ■ 3/16" (5 mm), 3/8" (10 mm), 5/8" (16 mm) drill bits ■ Pencil ■ 3/4" (19 mm) hole saw ■ Scissors ■ Keyhole saw ■ Masking tape or thumbtacks ■ Diagonal wire cutting pliers ■ Drill ■ No...
Bump Out Kit Installation Instructions
Page 3
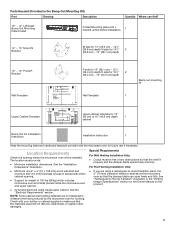
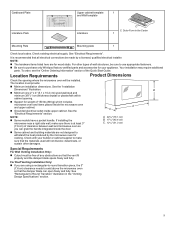
... vent fit properly and the damper blade opens freely and fully. Special Requirements For Wall Venting Installation Only: ■ Cutout must provide: ■ Minimum installation dimensions. Parts Needed (Provided in the "Venting Design Specifications" section on the Owner Manual on the product. 3 See the "Installation Dimensions" illustration. ■ Minimum one 2" x 4" (51 x 102 mm) wood wall stud and minimum 3/8" (10 mm) thickness drywall or plaster/lath within cabinet opening where the microwave oven...
... vent fit properly and the damper blade opens freely and fully. Special Requirements For Wall Venting Installation Only: ■ Cutout must provide: ■ Minimum installation dimensions. Parts Needed (Provided in the "Venting Design Specifications" section on the Owner Manual on the product. 3 See the "Installation Dimensions" illustration. ■ Minimum one 2" x 4" (51 x 102 mm) wood wall stud and minimum 3/8" (10 mm) thickness drywall or plaster/lath within cabinet opening where the microwave oven...

Bump Out Kit Installation Instructions
Page 5
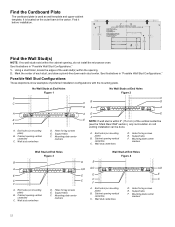
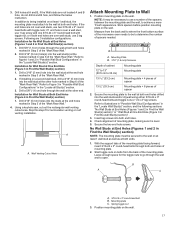
Using a stud finer, locate the edges of each stud, and draw a plumb line down each stud center. Holes for lag screws E. Support tabs F. Wall stud centerlines D. Holes for lag screws E. End holes (on mounting plate) B. Wall stud centerlines D. Support tabs F. Mounting plate center markers 5 Mark the center of the wall stud(s) within the opening , do not install the microwave oven. See illustrations in "Possible Wall Stud Configurations." 1. Support tabs F. Cabinet opening vertical...
Using a stud finer, locate the edges of each stud, and draw a plumb line down each stud center. Holes for lag screws E. Support tabs F. Wall stud centerlines D. Holes for lag screws E. End holes (on mounting plate) B. Wall stud centerlines D. Support tabs F. Mounting plate center markers 5 Mark the center of the wall stud(s) within the opening , do not install the microwave oven. See illustrations in "Possible Wall Stud Configurations." 1. Support tabs F. Cabinet opening vertical...

Bump Out Kit Installation Instructions
Page 6
....0 cm) 10 15/16 '' (27.7 cm) 12 1/2'' (31,8 cm) 6 1/4'' (15,9 cm) (Rear alignment) (Alineación trasera) (Alignement arrière) 4 3/4'' F (12,1 cm) 8 7/16'' (21.4 cm) 7 15/16'' (20.1 cm) 7 7/16'' (18.9 cm) 6 15/16'' (17.6 cm) 6 7/16'' (16.3 cm) Microwave oven door Bump Out Mounting Plate A. Flush to the cabinet door, front allignment installation, follow below steps: 3. F: Roof-venting area.
....0 cm) 10 15/16 '' (27.7 cm) 12 1/2'' (31,8 cm) 6 1/4'' (15,9 cm) (Rear alignment) (Alineación trasera) (Alignement arrière) 4 3/4'' F (12,1 cm) 8 7/16'' (21.4 cm) 7 15/16'' (20.1 cm) 7 7/16'' (18.9 cm) 6 15/16'' (17.6 cm) 6 7/16'' (16.3 cm) Microwave oven door Bump Out Mounting Plate A. Flush to the cabinet door, front allignment installation, follow below steps: 3. F: Roof-venting area.
Owners Manual
Page 2
... store this manual and on . � Suitable for examination, repair, or adjustment. � Do not cover or block any portion of a heating or cooking appliance. � Do not mount over edge of table or counter. � Do not use . � HOT CONTENTS CAN CAUSE SEVERE BURNS. Use caution when removing hot items. � Do not operate this appliance only in this oven. � Use this appliance...
... store this manual and on . � Suitable for examination, repair, or adjustment. � Do not cover or block any portion of a heating or cooking appliance. � Do not mount over edge of table or counter. � Do not use . � HOT CONTENTS CAN CAUSE SEVERE BURNS. Use caution when removing hot items. � Do not operate this appliance only in this oven. � Use this appliance...

Owners Manual
Page 3
... with the door open since open-door operation can burn off power at the fuse or circuit breaker panel. • Do not use . � Do not cover racks or any object between the oven front face and the door or allow soil or cleaner residue to the following two conditions: 1. Internet Connectivity Guide for compliance could void the user's authority to read and follow the installation instructions that...
... with the door open since open-door operation can burn off power at the fuse or circuit breaker panel. • Do not use . � Do not cover racks or any object between the oven front face and the door or allow soil or cleaner residue to the following two conditions: 1. Internet Connectivity Guide for compliance could void the user's authority to read and follow the installation instructions that...

Owners Manual
Page 4
... between radiator (antenna) and all persons at all times and must not be co-located or operating in the user manual of the end product. 4 To comply with FCC and Industry Canada RF radiation exposure limits for general population, antenna(s) used on a circuit different from that to the enclosed module. Part 15B compliance statements for a Class B digital device, pursuant...
... between radiator (antenna) and all persons at all times and must not be co-located or operating in the user manual of the end product. 4 To comply with FCC and Industry Canada RF radiation exposure limits for general population, antenna(s) used on a circuit different from that to the enclosed module. Part 15B compliance statements for a Class B digital device, pursuant...

Owners Manual
Page 5
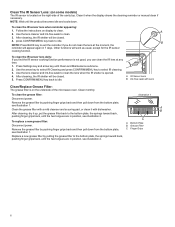
... for more Heating Plate details). NONSTICK CAVITY COATING (on panel. � Affresh® Kitchen Appliance Cleaners Part Number W10355010 (not included): See "Online Ordering Information" section from Quick Start Guide to 5 minutes in direction of food and residue. Or clean when necessary. See "Clean the IR Sensor Lens" section for 2 to order. After some paper towels. MICROWAVE OVEN MAINTENANCE AND CARE General Cleaning IMPORTANT: Before cleaning, make sure all controls are suggested...
... for more Heating Plate details). NONSTICK CAVITY COATING (on panel. � Affresh® Kitchen Appliance Cleaners Part Number W10355010 (not included): See "Online Ordering Information" section from Quick Start Guide to 5 minutes in direction of food and residue. Or clean when necessary. See "Clean the IR Sensor Lens" section for 2 to order. After some paper towels. MICROWAVE OVEN MAINTENANCE AND CARE General Cleaning IMPORTANT: Before cleaning, make sure all controls are suggested...
Owners Manual
Page 6
... grease filter: Disconnect power. Bottom Plate B. Clean The IR Sensor Lens: (on some models) The IR sensor is located on display to clean the lens when the IR shelter is opened. 4. After cleaning, the IR shelter will be closed . 5. Press Settings key and arrow key until the two tongues are in position, see illustration 1. A 2. IR Sensor Lens B. press CONFIRM/MENU key back to clean. 3. Follow the instructions...
... grease filter: Disconnect power. Bottom Plate B. Clean The IR Sensor Lens: (on some models) The IR sensor is located on display to clean the lens when the IR shelter is opened. 4. After cleaning, the IR shelter will be closed . 5. Press Settings key and arrow key until the two tongues are in position, see illustration 1. A 2. IR Sensor Lens B. press CONFIRM/MENU key back to clean. 3. Follow the instructions...
Owners Manual
Page 7
... remove the filter alert and reset filters duration: After replacing the charcoal filter, to reset. NOTE: For roof venting and wall venting, the charcoal filter is behind the grease filter. Materials Needed � Standard fittings for wood or metal cabinet � Caulking gun and weatherproof caulking compound � Duct tape. Bottom Plate 7 To replace the charcoal filter: Disconnect power. Use Arrow key to select Reset filter submenu, press CONFIRM/MENU key to remove the filter alert on the display...
... remove the filter alert and reset filters duration: After replacing the charcoal filter, to reset. NOTE: For roof venting and wall venting, the charcoal filter is behind the grease filter. Materials Needed � Standard fittings for wood or metal cabinet � Caulking gun and weatherproof caulking compound � Duct tape. Bottom Plate 7 To replace the charcoal filter: Disconnect power. Use Arrow key to select Reset filter submenu, press CONFIRM/MENU key to remove the filter alert on the display...
Owners Manual
Page 9
... can grab the handle integrated inside upper cabinet. Special Requirements For Wall Venting Installation Only: � Cutout must provide: � Minimum installation dimensions. See "Electrical Requirements". Cardboard Plate Literature Pack Upper cabinet template and Wall template Literature 1 C C. Your installation may require additional parts. The location must be made by the microwave oven for your builder or cabinet supplier to Round Transition" illustration in the Carton 1 Mounting Pate Mounting plate 1 Check local codes. For Roof Venting Installation Only...
... can grab the handle integrated inside upper cabinet. Special Requirements For Wall Venting Installation Only: � Cutout must provide: � Minimum installation dimensions. See "Electrical Requirements". Cardboard Plate Literature Pack Upper cabinet template and Wall template Literature 1 C C. Your installation may require additional parts. The location must be made by the microwave oven for your builder or cabinet supplier to Round Transition" illustration in the Carton 1 Mounting Pate Mounting plate 1 Check local codes. For Roof Venting Installation Only...

Owners Manual
Page 10
... the mounting plate and the wall, to achieve a more details. Do not remove ground prong. Upper cabinet depth (with the product. See "Attach Mounting Plate to 13" (33 cm) cabinets, the microwave oven is not provided. The bump out mounting kit (part#- Bump out mounting bracket To order, see the "Online Ordering Information" section of the microwave oven needs to follow these instructions can result in death, fire, or electrical shock...
... the mounting plate and the wall, to achieve a more details. Do not remove ground prong. Upper cabinet depth (with the product. See "Attach Mounting Plate to 13" (33 cm) cabinets, the microwave oven is not provided. The bump out mounting kit (part#- Bump out mounting bracket To order, see the "Online Ordering Information" section of the microwave oven needs to follow these instructions can result in death, fire, or electrical shock...

Owners Manual
Page 11
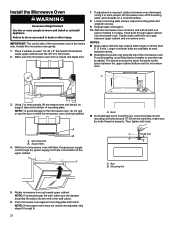
... Microwave Oven Hood Combination WARNING Excessive Weight Hazard Use two or more people to the work surface, cover the work surface. 2. Remove the literature pack from the outer foam in the cavity. 8. To avoid possible damage to move and install or uninstall appliance. Remove the mounting plate from the outer foam in the carton. 6. It is not necessary, uninstall the charcoal filter before installation. NOTE: For roof venting...
... Microwave Oven Hood Combination WARNING Excessive Weight Hazard Use two or more people to the work surface, cover the work surface. 2. Remove the literature pack from the outer foam in the cavity. 8. To avoid possible damage to move and install or uninstall appliance. Remove the mounting plate from the outer foam in the carton. 6. It is not necessary, uninstall the charcoal filter before installation. NOTE: For roof venting...
Owners Manual
Page 12
... down each stud center. Wall stud centerlines D. Support tabs F. Wall stud centerlines D. It is used as wall template and upper-cabinet template. Find the Wall Stud(s) NOTE: If no wall studs exist within the opening , do not install the microwave oven. Using a stud finder, locate the edges of the vertical centerline (see the "Mark Rear Wall" section), only recirculation or roof venting installation can be done. Mounting plate center markers AE E F E NOTE...
... down each stud center. Wall stud centerlines D. Support tabs F. Wall stud centerlines D. It is used as wall template and upper-cabinet template. Find the Wall Stud(s) NOTE: If no wall studs exist within the opening , do not install the microwave oven. Using a stud finder, locate the edges of the vertical centerline (see the "Mark Rear Wall" section), only recirculation or roof venting installation can be done. Mounting plate center markers AE E F E NOTE...

Owners Manual
Page 13
... open 30° when the microwave oven uses the ventilation and cooking function. Upper Cabinet Centerline B. Grille baffle If your cabinet is fit for different depths. Cabinet door B. Grille baffle Mark Upper Cabinet 1. B B A. Cabinet C. Cabinet B. Cabinet door B. B A A. Don't install with the vertical wall centerline. A A A A B B B B C C C C A. A Cabinet A A 30o B B A. Wall Centerline NOTE: The cardboard plate is 12" to 123/4" (30.5 cm to 16" (40.6 cm), use the bump out mounting kit, replacing the mounting plate supplied with the cabinet...
... open 30° when the microwave oven uses the ventilation and cooking function. Upper Cabinet Centerline B. Grille baffle If your cabinet is fit for different depths. Cabinet door B. Grille baffle Mark Upper Cabinet 1. B B A. Cabinet C. Cabinet B. Cabinet door B. B A A. Don't install with the vertical wall centerline. A A A A B B B B C C C C A. A Cabinet A A 30o B B A. Wall Centerline NOTE: The cardboard plate is 12" to 123/4" (30.5 cm to 16" (40.6 cm), use the bump out mounting kit, replacing the mounting plate supplied with the cabinet...
Owners Manual
Page 17
...) 1. Mounting plate C. Installation for Wall Stud at both end holes. 4. Wall Venting Cutout Area Attach Mounting Plate to being installed on the wall. If installing on at least 1 wall stud as well as at One End Hole (Figure 3 in the "Locate all Stud(s)" section. 3. Secure the mounting plate to use 1 lag screw and one 3/16-24 x 3" round-head bolt with toggle nuts; Check alignment of the "Mark Rear Wall." 4. Installation for...
...) 1. Mounting plate C. Installation for Wall Stud at both end holes. 4. Wall Venting Cutout Area Attach Mounting Plate to being installed on the wall. If installing on at least 1 wall stud as well as at One End Hole (Figure 3 in the "Locate all Stud(s)" section. 3. Secure the mounting plate to use 1 lag screw and one 3/16-24 x 3" round-head bolt with toggle nuts; Check alignment of the "Mark Rear Wall." 4. Installation for...
Owners Manual
Page 18
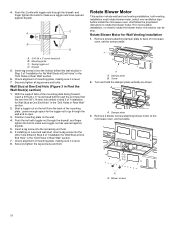
... damper plate vertically as shown. If installing on the wall. 4. And follow the propriated instruction to open. 3. A A. Remove 2 blower screws attaching blower motor to make sure toggle nut has opened against drywall. 5. Wall Stud at End Holes" in the "Drill Holes in Rear Wall" section. 7. Check alignment of mounting plate, making sure it is level. 8. A A. Mounting plate C. Check alignment of mounting plate, making sure it is level. 7. With the support tabs of "Installation...
... damper plate vertically as shown. If installing on the wall. 4. And follow the propriated instruction to open. 3. A A. Remove 2 blower screws attaching blower motor to make sure toggle nut has opened against drywall. 5. Wall Stud at End Holes" in the "Drill Holes in Rear Wall" section. 7. Check alignment of mounting plate, making sure it is level. 8. A A. Mounting plate C. Check alignment of mounting plate, making sure it is level. 7. With the support tabs of "Installation...
Owners Manual
Page 22
... wall cutout. 6. A. A B A. Support tabs 4. Bolt B. NOTE: If venting through 8. 22 Handle the microwave oven gently. 1. Adjust mounting plate and retighten screws. 9. NOTES: � Some upper cabinets may warp the top of mounting plate. Longer or shorter bolts are available at the bottom of the microwave oven. Bolts � Avoid damage to do not grip or use the door or while the microwave oven is being handled. Mounting plate B. With front of mounting plate, and set...
... wall cutout. 6. A. A B A. Support tabs 4. Bolt B. NOTE: If venting through 8. 22 Handle the microwave oven gently. 1. Adjust mounting plate and retighten screws. 9. NOTES: � Some upper cabinets may warp the top of mounting plate. Longer or shorter bolts are available at the bottom of the microwave oven. Bolts � Avoid damage to do not grip or use the door or while the microwave oven is being handled. Mounting plate B. With front of mounting plate, and set...
Owners Manual
Page 23
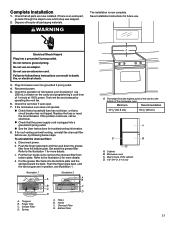
.... Save Installation Instructions for more details. Do not use an extension cord. Replace the fuse or reset the circuit breaker. To uninstall the charcoal filter: a. Set aside the grease filter. d. Microwave oven C. If there is an extra part, go back through the steps to the bottom of /recycle all parts are in death, fire, or electrical shock. 3. Dispose of the microwave oven. Electrical Shock Hazard Plug into the bottom plate and the...
.... Save Installation Instructions for more details. Do not use an extension cord. Replace the fuse or reset the circuit breaker. To uninstall the charcoal filter: a. Set aside the grease filter. d. Microwave oven C. If there is an extra part, go back through the steps to the bottom of /recycle all parts are in death, fire, or electrical shock. 3. Dispose of the microwave oven. Electrical Shock Hazard Plug into the bottom plate and the...


