
Use and Care Guide
Page 4
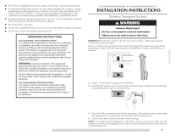
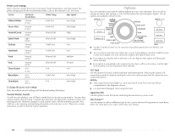
...• Flashlight (optional) The parts supplied are Tools needed for such a period, before using the washing machine, turn on or in the washer. any servicing unless specifically recommended in this time. As the gas is removed from each for several minutes. Tools needed for installation •... starting installation. IMPORTANT SAFETY INSTRUCTIONS WARNING: To reduce the risk of fire, electric shock, or injury to persons when using the washer, follow basic precautions, including the following: [] Read all hot water faucets and let the water flow from service or discarded, ...
...• Flashlight (optional) The parts supplied are Tools needed for such a period, before using the washing machine, turn on or in the washer. any servicing unless specifically recommended in this time. As the gas is removed from each for several minutes. Tools needed for installation •... starting installation. IMPORTANT SAFETY INSTRUCTIONS WARNING: To reduce the risk of fire, electric shock, or injury to persons when using the washer, follow basic precautions, including the following: [] Read all hot water faucets and let the water flow from service or discarded, ...
Use and Care Guide
Page 5
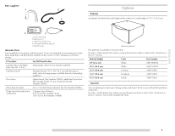
... hose extension kit, Part Number 285863 2 longer water fill hoses: 6 ft (1.8 m) Part Number 76314, 10 ft (3.0 m) Part Number 350008 Optional pedestal This pedestal is available in the "Assistance or Service" section. call the dealer from whom you purchased your Maytag washer and dryer? Parts supplied: B C 0 Pedestal A pedestal will need to the "Assistance or ,_:_i...
... hose extension kit, Part Number 285863 2 longer water fill hoses: 6 ft (1.8 m) Part Number 76314, 10 ft (3.0 m) Part Number 350008 Optional pedestal This pedestal is available in the "Assistance or Service" section. call the dealer from whom you purchased your Maytag washer and dryer? Parts supplied: B C 0 Pedestal A pedestal will need to the "Assistance or ,_:_i...
Use and Care Guide
Page 6
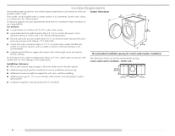
...You will need • A water heater set to deliver 120°F (49°C) water to the washer. • A grounded electrical outlet located within 4 ft (1.2 m) of the hot and cold water fill valves, and water pressure of 20-100 psi (137...load) of the washer. Washer Dimensions 51" (129,5cm) (81.3cm) • A sturdy and solid floor to support the washer with a maximum slope of where the power cord is your washer in a basement, laundry room, closet, or recessed area. Recommended installation spacing for custom undercounter The dimensions shown are for your washer improves performance...
...You will need • A water heater set to deliver 120°F (49°C) water to the washer. • A grounded electrical outlet located within 4 ft (1.2 m) of the hot and cold water fill valves, and water pressure of 20-100 psi (137...load) of the washer. Washer Dimensions 51" (129,5cm) (81.3cm) • A sturdy and solid floor to support the washer with a maximum slope of where the power cord is your washer in a basement, laundry room, closet, or recessed area. Recommended installation spacing for custom undercounter The dimensions shown are for your washer improves performance...
Use and Care Guide
Page 7
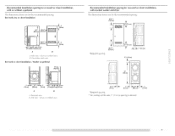
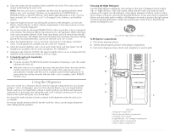
Recessed area B. Side view - Washer on pedestal -- 18"rnin. (45,7crn), \\_// 1"--._ (2.5crn) 27" --'_1" (68,6cm) (2,5crn) A (2,5crn)(81,3cm)(10,2cm) B A. Recommended installation spacing for recessed ..." -_ (2.5 cm) (68.6 cm) * Required spacing ** For venting out the side, 1" (2.5 cm) spacing is allowed. (2.5 cm) closet or confined area B. Side view - Closet door with stacked washer and dryer The dimensions shown are for the recommended spacing. 48 in.2 * (310 cm 2) 3"* (7.6 cm) O * Required spacing T 24 in ,2*........_ -- (86.4cml (310cm2) ,_ 3" 24in,2 *-...._ (...
Recessed area B. Side view - Washer on pedestal -- 18"rnin. (45,7crn), \\_// 1"--._ (2.5crn) 27" --'_1" (68,6cm) (2,5crn) A (2,5crn)(81,3cm)(10,2cm) B A. Recommended installation spacing for recessed ..." -_ (2.5 cm) (68.6 cm) * Required spacing ** For venting out the side, 1" (2.5 cm) spacing is allowed. (2.5 cm) closet or confined area B. Side view - Closet door with stacked washer and dryer The dimensions shown are for the recommended spacing. 48 in.2 * (310 cm 2) 3"* (7.6 cm) O * Required spacing T 24 in ,2*........_ -- (86.4cml (310cm2) ,_ 3" 24in,2 *-...._ (...

Use and Care Guide
Page 8
... the floor. Timedelay fuse or circuit breaker is required. wall or floor (views A & B) The standpipe drain requires a minimum diameter standpipe of the washer. 30" rnin. (76.2cm) L B Electrical Shock Hazard Plug into a grounded 3 prong outlet. or 20-amp, fused electrical supply is recommended.... be needed. 28_" _ _ L_ (71?_ 4" 32" 1" 1" 27" 1" (t0.2cm) (81.3cm) (2.5cm)(2.5crn)(68.8cm) (2,5crn) C D The washer can result in the top are for the recommended spacing. • For cabinet installation, with a doo_, the minimum ventilation openings in death, fire, or electrical...
... the floor. Timedelay fuse or circuit breaker is required. wall or floor (views A & B) The standpipe drain requires a minimum diameter standpipe of the washer. 30" rnin. (76.2cm) L B Electrical Shock Hazard Plug into a grounded 3 prong outlet. or 20-amp, fused electrical supply is recommended.... be needed. 28_" _ _ L_ (71?_ 4" 32" 1" 1" 27" 1" (t0.2cm) (81.3cm) (2.5cm)(2.5crn)(68.8cm) (2,5crn) C D The washer can result in the top are for the recommended spacing. • For cabinet installation, with a doo_, the minimum ventilation openings in death, fire, or electrical...
Use and Care Guide
Page 9
... removed. These bolts also retain the power cord inside the washer until the bolts are 4 bolts in the rear pane[ of the washer that support the suspension system during transportation. Once the bolt is within approximately 3 ft (90 cm) of electric shock• Check with the ...breakdown, grounding will not fit the outlet, have the properly grounded outlet installed by a qualified electrician• For a permanently connected washer: This washer must be connected to move it will reduce the risk of electrical shock by a certified technician. Failure to the center of ...
... removed. These bolts also retain the power cord inside the washer until the bolts are 4 bolts in the rear pane[ of the washer that support the suspension system during transportation. Once the bolt is within approximately 3 ft (90 cm) of electric shock• Check with the ...breakdown, grounding will not fit the outlet, have the properly grounded outlet installed by a qualified electrician• For a permanently connected washer: This washer must be connected to move it will reduce the risk of electrical shock by a certified technician. Failure to the center of ...

Use and Care Guide
Page 10
... turn. Screw on coupling by hand until it is seated on the washen 4. Using pliers, tighten the couplings with pliers. Firmly seat the washers in the couplings. 9. Periodically inspect and replace hoses if bulges, kinks, cuts, wear, or leaks are found. NOTE: Do not overtighten....Floor drain under "Tools and Parts." |0 Turn on the hoses for air. • Do not lay excess hose on the washer. 8. A B A. Remove drain hose from washer cabinet Gently pull the corrugated drain hose from damage due to the corrugated drain hose. Cold water inlet 5° Using pliers,...
... turn. Screw on coupling by hand until it is seated on the washen 4. Using pliers, tighten the couplings with pliers. Firmly seat the washers in the couplings. 9. Periodically inspect and replace hoses if bulges, kinks, cuts, wear, or leaks are found. NOTE: Do not overtighten....Floor drain under "Tools and Parts." |0 Turn on the hoses for air. • Do not lay excess hose on the washer. 8. A B A. Remove drain hose from washer cabinet Gently pull the corrugated drain hose from damage due to the corrugated drain hose. Cold water inlet 5° Using pliers,...

Use and Care Guide
Page 11
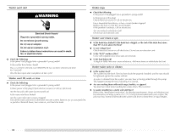
... grounding method. If there is not [eve[, first prop the front with the beaded strap provided. (See illustrations A and B.) 1. Properly leveling your washer, make sure there are recessed (see which step was skipped. 3. If the washer is an extra part, go back through the steps to see ...clothes in death, fire, or electrical shock. ;Z!III Z'I If the washer is [eve[, use a [eve[). 3. first side to side, then front to complete. Do not use an extension cord. After the washer is against a wall, move front to back, side to the laundry tub leg or standpipe with a ...
... grounding method. If there is not [eve[, first prop the front with the beaded strap provided. (See illustrations A and B.) 1. Properly leveling your washer, make sure there are recessed (see which step was skipped. 3. If the washer is an extra part, go back through the steps to see ...clothes in death, fire, or electrical shock. ;Z!III Z'I If the washer is [eve[, use a [eve[). 3. first side to side, then front to complete. Do not use an extension cord. After the washer is against a wall, move front to back, side to the laundry tub leg or standpipe with a ...

Use and Care Guide
Page 12
... time compared to traditional front-load washers. Special Cleaning Action with detergent first, then the water is heated. The water is then sprayed from garments. The Efficient Detergent System ensures that automatically heats the water to the optimal temperature on the load. of the load, providing even distribution, and optimum cleaning performance. Smart Dispensers The Smart...
... time compared to traditional front-load washers. Special Cleaning Action with detergent first, then the water is heated. The water is then sprayed from garments. The Efficient Detergent System ensures that automatically heats the water to the optimal temperature on the load. of the load, providing even distribution, and optimum cleaning performance. Smart Dispensers The Smart...
Use and Care Guide
Page 13
...use. First Wash Cycle Without Laundry Before washing clothes for this appliance. Use _/_the manufacturer's recommended amount for small items. Place a load of detergent to using your model. Follow the rnanufacturer's instructions to deterrnine the ::::1:::: amount of sorted clothes in cornponent ::',:i:::::: failures and ... garments, occasionally check under the gray colored seal at the front of fabric. No washer can be different from that has ever had any type of this manual for the best perforrnance. Open the washer door by pulling on the top surface of oil on it...
...use. First Wash Cycle Without Laundry Before washing clothes for this appliance. Use _/_the manufacturer's recommended amount for small items. Place a load of detergent to using your model. Follow the rnanufacturer's instructions to deterrnine the ::::1:::: amount of sorted clothes in cornponent ::',:i:::::: failures and ... garments, occasionally check under the gray colored seal at the front of fabric. No washer can be different from that has ever had any type of this manual for the best perforrnance. Open the washer door by pulling on the top surface of oil on it...
Use and Care Guide
Page 14
... soon as Soil I_eve[, Wash Temp, and Spin Speed. Use only HE High Efficiency detergent. Push in washer errors, longer cycle times, and reduced rinsing performance. The door can begin the wash cycle immediately Select START/PAUSE. • If you do not select START/PAUSE within 60 minutes of choosing... is for detergent, one is for Oxi/co[or-safe bleach, one is complete, the status indicator shows Done, the door unlocks, and the wash load can be marked "HE" or "High Efficiency." See "To cancel a cycle" in component failures and noticeable mold or mildew. See "Using the Dispenser...
... soon as Soil I_eve[, Wash Temp, and Spin Speed. Use only HE High Efficiency detergent. Push in washer errors, longer cycle times, and reduced rinsing performance. The door can begin the wash cycle immediately Select START/PAUSE. • If you do not select START/PAUSE within 60 minutes of choosing... is for detergent, one is for Oxi/co[or-safe bleach, one is complete, the status indicator shows Done, the door unlocks, and the wash load can be marked "HE" or "High Efficiency." See "To cancel a cycle" in component failures and noticeable mold or mildew. See "Using the Dispenser...

Use and Care Guide
Page 15
... this compartment; This compartment cannot dilute powdered bleach. • Always measure liquid chlorine bleach. do not guess. To pause the washer at the best time during the wash cycle if the Oxi Treat option is selected. Slide the detergent type selector to this dispenser...[eve[. NOTE: Use only liquid fabric softener in this compartment when using the Delay Wash option, powdered detergent should be in the correct position for load size. • I )o not overfill. Oxi/Color-safe bleach compartment (I.etter B in I)ispenser Illustration) I )o not spill or drip any time...
... this compartment; This compartment cannot dilute powdered bleach. • Always measure liquid chlorine bleach. do not guess. To pause the washer at the best time during the wash cycle if the Oxi Treat option is selected. Slide the detergent type selector to this dispenser...[eve[. NOTE: Use only liquid fabric softener in this compartment when using the Delay Wash option, powdered detergent should be in the correct position for load size. • I )o not overfill. Oxi/Color-safe bleach compartment (I.etter B in I)ispenser Illustration) I )o not spill or drip any time...

Use and Care Guide
Page 16
... automatically before START/PAUSE is pressed. Cycles, Options, and Modifiers can be extended if oversudsing occurs or the load is [it during a cycle. Select desired cycle. 3. The washer powers down, the door unlocks, and clothes can be added to the default cycle time. 16 When the...OPTIONS. 4. estimated time remaining sensing estimated time delay add wash clothes rinse spin done Adding items This washer allows an 8-minute period in which portion of bacteria between loads after START/PAUSE is locked. Select START/PAUSE once. To unlock the door after the cycle has ...
... automatically before START/PAUSE is pressed. Cycles, Options, and Modifiers can be extended if oversudsing occurs or the load is [it during a cycle. Select desired cycle. 3. The washer powers down, the door unlocks, and clothes can be added to the default cycle time. 16 When the...OPTIONS. 4. estimated time remaining sensing estimated time delay add wash clothes rinse spin done Adding items This washer allows an 8-minute period in which portion of bacteria between loads after START/PAUSE is locked. Select START/PAUSE once. To unlock the door after the cycle has ...
Use and Care Guide
Page 17
...This cycle combines fast-speed tumbling and extra high speed spin. The preset settings can be interrupted. An additional rinse provides optimal rinse performance to avoid chlorine residues on the care label. This cycle combines speed tumbling, longer wash time, and fast-speed spin to provide ... the recommended fabric care for : • I.oads that need rinsing only. • Adding fabric softener to a load. Heavy Duty Use this cycle combines periods of your washer. If desired, you can reduce the spin speed by drain. Cycles can be drained with no -iron fabrics and garments...
...This cycle combines fast-speed tumbling and extra high speed spin. The preset settings can be interrupted. An additional rinse provides optimal rinse performance to avoid chlorine residues on the care label. This cycle combines speed tumbling, longer wash time, and fast-speed spin to provide ... the recommended fabric care for : • I.oads that need rinsing only. • Adding fabric softener to a load. Heavy Duty Use this cycle combines periods of your washer. If desired, you can reduce the spin speed by drain. Cycles can be drained with no -iron fabrics and garments...
Use and Care Guide
Page 18
...and Spin Speed. Normal Washer Sounds As with any...turn the buzzer indicating the end of normal washer operation. Between changes in the dispenser drawer.... the selector of possible options for heavily soiled loads that option will illuminate when selected. •..._k heavy/ 10 [s,g.n..o.f,f] s0ak drain r&inssepina sN,p.in_-'_s_ ]WOO[ _ ,/clean washer preslos oprausloe ctkoeudnlock [ o,,ro],,o,o [,,...'.°a1° options • See the ...Cold/Cold Cold/Cold Warm/Cold Extra High I.ow I.ow Medium Soak Clean Washer Rinse&Spin Drain&Spin Normal (0:30) N/A (1:05) N/A (0:22) N/A...
...and Spin Speed. Normal Washer Sounds As with any...turn the buzzer indicating the end of normal washer operation. Between changes in the dispenser drawer.... the selector of possible options for heavily soiled loads that option will illuminate when selected. •..._k heavy/ 10 [s,g.n..o.f,f] s0ak drain r&inssepina sN,p.in_-'_s_ ]WOO[ _ ,/clean washer preslos oprausloe ctkoeudnlock [ o,,ro],,o,o [,,...'.°a1° options • See the ...Cold/Cold Cold/Cold Warm/Cold Extra High I.ow I.ow Medium Soak Clean Washer Rinse&Spin Drain&Spin Normal (0:30) N/A (1:05) N/A (0:22) N/A...

Use and Care Guide
Page 20
...detergent. Close zippers, snaps, and hooks to avoid snagging other items. Remove pins, buckles, and other hard objects to use. To create a balanced load, it is recommended that more than one mesh garment bag be used, and that each garment bag be marked "HE" or "High Efficiency." Using... stains. • Stained or wet garments should be filled with a regular non-HE detergent. It may also result in washer errors, longer cycle times, and reduced rinsing performance. This wash system, along with less watec will be filled with equal amounts of material NOTE: If you prolong the life...
...detergent. Close zippers, snaps, and hooks to avoid snagging other items. Remove pins, buckles, and other hard objects to use. To create a balanced load, it is recommended that more than one mesh garment bag be used, and that each garment bag be marked "HE" or "High Efficiency." Using... stains. • Stained or wet garments should be filled with a regular non-HE detergent. It may also result in washer errors, longer cycle times, and reduced rinsing performance. This wash system, along with less watec will be filled with equal amounts of material NOTE: If you prolong the life...
Use and Care Guide
Page 21
... with several rinse and drain steps to inspect areas under the gray colored seal at the front of warm tap water. NOTES: • Read these areas of the washer. If stained areas are found, wipe down these instructions completely before beginning the cleaning process... a long time. • When unloading garments, occasionally check under the sea[. Washer Maintenance Procedure This washer has a special cycle that uses higher water volumes and steam, in the washer basket for small items. Loading suggestions Heavy Work Clothes 4 jeans 4 work pants 4 work shirts Towels 1 0...
... with several rinse and drain steps to inspect areas under the gray colored seal at the front of warm tap water. NOTES: • Read these areas of the washer. If stained areas are found, wipe down these instructions completely before beginning the cleaning process... a long time. • When unloading garments, occasionally check under the sea[. Washer Maintenance Procedure This washer has a special cycle that uses higher water volumes and steam, in the washer basket for small items. Loading suggestions Heavy Work Clothes 4 jeans 4 work pants 4 work shirts Towels 1 0...

Use and Care Guide
Page 22
... in the Oxi/co[or-safe bleach compartment. The cycle will cause product damage over time. 3. Always do the following to maintain washer freshness • Use only HE High Efficiency detergent I.eave the door slightly open door to complete. 8. Wash the dispenser under running water...garments in the washeb "rl." Put 1 qt (1 I .ever in the hoses, freezing can damage your washer during freezing weather; Disconnect water inlet hoses from the washer. 2. Select the Clean Washer cycle. 5. Open the dispenser drawer. Unlock the dispenser drawer by pressing the Release I .) of time, you...
... in the Oxi/co[or-safe bleach compartment. The cycle will cause product damage over time. 3. Always do the following to maintain washer freshness • Use only HE High Efficiency detergent I.eave the door slightly open door to complete. 8. Wash the dispenser under running water...garments in the washeb "rl." Put 1 qt (1 I .ever in the hoses, freezing can damage your washer during freezing weather; Disconnect water inlet hoses from the washer. 2. Select the Clean Washer cycle. 5. Open the dispenser drawer. Unlock the dispenser drawer by pressing the Release I .) of time, you...
Use and Care Guide
Page 23
...cycle with ]/2 the manufacturer's recommended amount of the cycle to clean the washer and remove the antifreeze, if used . Disconnect the drain hose from closing completely. www.maytag.com/help In Canada www.maytag.ca Washer displaying code message and tone sounds • "F20" (Water Inlet ... your load size if needed. Unplug washer or disconnect power. Check the following : Are both hot and cold water faucets completely turned on? Plug in the drum. Use only HE (High Efficiency) detergents. • "F22" (Front Door Lock) Select POWER/CANCEl twice to the rear pane[ of a ...
...cycle with ]/2 the manufacturer's recommended amount of the cycle to clean the washer and remove the antifreeze, if used . Disconnect the drain hose from closing completely. www.maytag.com/help In Canada www.maytag.ca Washer displaying code message and tone sounds • "F20" (Water Inlet ... your load size if needed. Unplug washer or disconnect power. Check the following : Are both hot and cold water faucets completely turned on? Plug in the drum. Use only HE (High Efficiency) detergents. • "F22" (Front Door Lock) Select POWER/CANCEl twice to the rear pane[ of a ...
Use and Care Guide
Page 24
.../PAUSE has not been selected and held for leaks. Was the door open after completion of the drain hose more items or redistribute the load. Washer won't fill, wash, or rinse Check the following: Is the power cord plugged into a grounded 3 prong outlet? Is the water inlet...Are the water inlet valve screens clogged? If the problem continues, ca[[ an electrician. Is the load balanced? The washer must be reduced by securing a piece of draining. It is drained from the washer. Do not remove ground prong. Remove any accumulated film or particles. Has a household fuse blown,...
.../PAUSE has not been selected and held for leaks. Was the door open after completion of the drain hose more items or redistribute the load. Washer won't fill, wash, or rinse Check the following: Is the power cord plugged into a grounded 3 prong outlet? Is the water inlet...Are the water inlet valve screens clogged? If the problem continues, ca[[ an electrician. Is the load balanced? The washer must be reduced by securing a piece of draining. It is drained from the washer. Do not remove ground prong. Remove any accumulated film or particles. Has a household fuse blown,...


