Owners Manual
Page 14
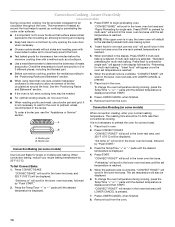
... cooking results, do not cover food. ■ When roasting poultry and meat, use , the lower oven will scroll in 2 or 3 different places, including the thickest part. 5. Press Start to the standard preheat/multi-rack baking option. 4. When the preheat cycle is complete, "CONVECT BAKE" will default to preheat for single rack...
... cooking results, do not cover food. ■ When roasting poultry and meat, use , the lower oven will scroll in 2 or 3 different places, including the thickest part. 5. Press Start to the standard preheat/multi-rack baking option. 4. When the preheat cycle is complete, "CONVECT BAKE" will default to preheat for single rack...

Owners Manual
Page 19
...clean around the model and serial number plate because scrubbing may activate the Control Lock feature (on panel. ■ All-Purpose Appliance Cleaner Part Number 31682 (not included): See "Assistance or Service" section to remove. When removing or replacing knobs, make sure all -purpose cleaner...on cleaning products. Cleaning Method: ■ Self-Cleaning cycle: See "Self-Cleaning Cycle" first. ■ Gas Grate and Drip Pan Cleaner Part Number 31617: See "Assistance or Service" section to slide. To avoid chipping, do not soak knobs. OVEN CAVITY ■ Nonabrasive plastic scrubbing...
...clean around the model and serial number plate because scrubbing may activate the Control Lock feature (on panel. ■ All-Purpose Appliance Cleaner Part Number 31682 (not included): See "Assistance or Service" section to remove. When removing or replacing knobs, make sure all -purpose cleaner...on cleaning products. Cleaning Method: ■ Self-Cleaning cycle: See "Self-Cleaning Cycle" first. ■ Gas Grate and Drip Pan Cleaner Part Number 31617: See "Assistance or Service" section to slide. To avoid chipping, do not soak knobs. OVEN CAVITY ■ Nonabrasive plastic scrubbing...

Owners Manual
Page 22
... in the oven. ■ Are pie crust edges browning early? Factory specified parts will help , follow the instructions below. Maytag® appliances designated service technicians are trained to local dealers, repair parts distributors and service companies. See "Oven Temperature Control" section. ■ Was ... companies. Oven cooking results not what expected ■ Is the range level? To locate factory specified parts in your correspondence. 22 In the U.S.A. To locate the Maytag® appliances designated service company in your area, you can also look in your area, call ...
... in the oven. ■ Are pie crust edges browning early? Factory specified parts will help , follow the instructions below. Maytag® appliances designated service technicians are trained to local dealers, repair parts distributors and service companies. See "Oven Temperature Control" section. ■ Was ... companies. Oven cooking results not what expected ■ Is the range level? To locate factory specified parts in your correspondence. 22 In the U.S.A. To locate the Maytag® appliances designated service company in your area, you can also look in your area, call ...

Owners Manual
Page 23
...when this major appliance is installed, operated and maintained according to instructions attached to or furnished with the product, Maytag will pay for factory specified parts for the following components to published user or operator instructions and/or installation instructions. 4. Repairs when your major ...FITNESS FOR A PARTICULAR PURPOSE, ARE LIMITED TO ONE YEAR OR THE SHORTEST PERIOD ALLOWED BY LAW. MAYTAG® GAS RANGE LIMITED WARRANTY FIRST YEAR LIMITED WARRANTY (PARTS AND LABOR) For one year from the date of purchase, when this major appliance is installed, operated...
...when this major appliance is installed, operated and maintained according to instructions attached to or furnished with the product, Maytag will pay for factory specified parts for the following components to published user or operator instructions and/or installation instructions. 4. Repairs when your major ...FITNESS FOR A PARTICULAR PURPOSE, ARE LIMITED TO ONE YEAR OR THE SHORTEST PERIOD ALLOWED BY LAW. MAYTAG® GAS RANGE LIMITED WARRANTY FIRST YEAR LIMITED WARRANTY (PARTS AND LABOR) For one year from the date of purchase, when this major appliance is installed, operated...

Installation Instructions
Page 3
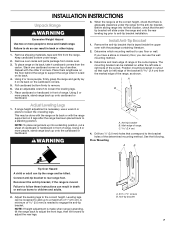
... ventilation air. ■ It is the installer's responsibility to the Manufactured Home Construction and Safety Standard, Title 24 CFR, Part 3280 (formerly the Federal Standard for Manufactured Home Installations, ANSI A225.1/NFPA 501A or with installation clearances specified on the rating ...number plate. Failure to children and adults. Parts needed ■ Tape measure 3.2 mm) drill bit ■ Phillips screwdriver ■ Marker or pencil ■ Torx† T-20...
... ventilation air. ■ It is the installer's responsibility to the Manufactured Home Construction and Safety Standard, Title 24 CFR, Part 3280 (formerly the Federal Standard for Manufactured Home Installations, ANSI A225.1/NFPA 501A or with installation clearances specified on the rating ...number plate. Failure to children and adults. Parts needed ■ Tape measure 3.2 mm) drill bit ■ Phillips screwdriver ■ Marker or pencil ■ Torx† T-20...
Installation Instructions
Page 7
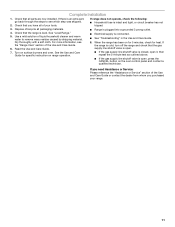
... to follow these instructions can result in front of range. Keep cardboard bottom under the range for the anti-tip bracket. Remove oven racks and parts package from the marked edge of the cutout. Place cardboard or hardboard in back or other 2 corners. Remove the anti-tip bracket that right (or...
... to follow these instructions can result in front of range. Keep cardboard bottom under the range for the anti-tip bracket. Remove oven racks and parts package from the marked edge of the cutout. Place cardboard or hardboard in back or other 2 corners. Remove the anti-tip bracket that right (or...

Installation Instructions
Page 9
A B Level Range 1. Place rack in death, fire, or electrical shock. 4. then front to cabinet opening. 2. Remove cardboard or hardboard from parts package. Use wrench to adjust leveling legs up . NOTE: Range must be level when properly positioned. Electronic Ignition System Initial lighting and gas flame adjustments ...
A B Level Range 1. Place rack in death, fire, or electrical shock. 4. then front to cabinet opening. 2. Remove cardboard or hardboard from parts package. Use wrench to adjust leveling legs up . NOTE: Range must be level when properly positioned. Electronic Ignition System Initial lighting and gas flame adjustments ...
Installation Instructions
Page 11
... on surface burners and oven. Dispose of the Use and Care Guide. 6. Read the Use and Care Guide. 7. If the range is an extra part, go back through the steps to remove waxy residue caused by shipping material. If you need Assistance or Service: Please reference the "Assistance or Service...have all of your range. 11 Use a mild solution of liquid household cleaner and warm water to see the "Range Care" section of /recycle all parts are now installed. For more information, see which step was skipped. 2. If there is cold, turn off the range and check that all packaging materials...
... on surface burners and oven. Dispose of the Use and Care Guide. 6. Read the Use and Care Guide. 7. If the range is an extra part, go back through the steps to remove waxy residue caused by shipping material. If you need Assistance or Service: Please reference the "Assistance or Service...have all of your range. 11 Use a mild solution of liquid household cleaner and warm water to see the "Range Care" section of /recycle all parts are now installed. For more information, see which step was skipped. 2. If there is cold, turn off the range and check that all packaging materials...

Installation Instructions
Page 15
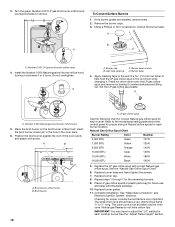
... 81L 97L 114L 5. See the "LP Gas Orifice Spud Chart." 6. Checking for each burner. Failure to help hold the Natural gas orifice spud in plastic parts bag for proper sizing of a 7.0 mm) nut driver to follow these instructions can tip the range and be killed. To range B. Replace the Natural gas...
... 81L 97L 114L 5. See the "LP Gas Orifice Spud Chart." 6. Checking for each burner. Failure to help hold the Natural gas orifice spud in plastic parts bag for proper sizing of a 7.0 mm) nut driver to follow these instructions can tip the range and be killed. To range B. Replace the Natural gas...
Installation Instructions
Page 18
... burner flame is not as distinct as the inner cone. Replace the LP gas orifice spud with screw. Place LP gas orifice spuds in plastic parts bag for the remaining burners. 9. Number 0.037 LP gas broil burner orifice hood 4. Install the Number 0.054 Natural gas broil burner orifice hood, turning it...
... burner flame is not as distinct as the inner cone. Replace the LP gas orifice spud with screw. Place LP gas orifice spuds in plastic parts bag for the remaining burners. 9. Number 0.037 LP gas broil burner orifice hood 4. Install the Number 0.054 Natural gas broil burner orifice hood, turning it...


