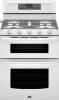

Owners Manual
Page 3
..." instructions. Always read and obey all safety messages. All safety messages will tell you what can kill or hurt you cannot reach your gas supplier. RANGE SAFETY Your safety and the safety of others .
..." instructions. Always read and obey all safety messages. All safety messages will tell you what can kill or hurt you cannot reach your gas supplier. RANGE SAFETY Your safety and the safety of others .
Owners Manual
Page 4
... shock hazard and should be seriously injured. ■ Proper Installation - Do not cut or remove the grounding prong from the misuse of a range - Flammable materials should not be stored in an oven or near surface units. ■ Top burner flame size should be electrically grounded in ...tip bracket. Doing so blocks air flow through the oven and may result in accordance with materials such as stepping, leaning, or sitting on the range to children and adults. Wipe off all excessive spillage before servicing. ■ Injuries may also trap heat, causing a fire hazard. ■ ...
... shock hazard and should be seriously injured. ■ Proper Installation - Do not cut or remove the grounding prong from the misuse of a range - Flammable materials should not be stored in an oven or near surface units. ■ Top burner flame size should be electrically grounded in ...tip bracket. Doing so blocks air flow through the oven and may result in accordance with materials such as stepping, leaning, or sitting on the range to children and adults. Wipe off all excessive spillage before servicing. ■ Injuries may also trap heat, causing a fire hazard. ■ ...

Owners Manual
Page 5
... liquid to follow these instructions can result in death or fire. Right front control knob WARNING Cooktop Controls To Set: 1. Turn off . IMPORTANT: Your range is included with the control knob turned to LIGHT will click. If you do not hear the igniter click, turn knob counterclockwise to LIGHT. The...LO. Do not operate a burner while using large pots and pans. All the surface burners will produce a flame. 2. Only the burner with your new range. NOTE: Visually check that the control knob is in and turn the burner off all controls when not cooking. REMEMBER: When...
... liquid to follow these instructions can result in death or fire. Right front control knob WARNING Cooktop Controls To Set: 1. Turn off . IMPORTANT: Your range is included with the control knob turned to LIGHT will click. If you do not hear the igniter click, turn knob counterclockwise to LIGHT. The...LO. Do not operate a burner while using large pots and pans. All the surface burners will produce a flame. 2. Only the burner with your new range. NOTE: Visually check that the control knob is in and turn the burner off all controls when not cooking. REMEMBER: When...
Owners Manual
Page 8
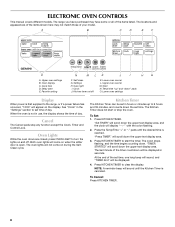
... The Kitchen Timer can be set in seconds. To Set: 1. "Press TIMER" will scroll down the upper text display area. Press KITCHEN TIMER to the range, or if a power failure has occurred, "12:00" will be displayed in hours or minutes up " and "down the set time. The last minute.... 4. Settings H. Oven light I H G F. Oven display C. When the oven is not in the "Settings" section to 9 hours and 59 minutes, and counts down " pads O. The range you have purchased may not match those of day. The locations and appearances of the items shown here may have some or all of day...
... The Kitchen Timer can be set in seconds. To Set: 1. "Press TIMER" will scroll down the upper text display area. Press KITCHEN TIMER to the range, or if a power failure has occurred, "12:00" will be displayed in hours or minutes up " and "down the set time. The last minute.... 4. Settings H. Oven light I H G F. Oven display C. When the oven is not in the "Settings" section to 9 hours and 59 minutes, and counts down " pads O. The range you have purchased may not match those of day. The locations and appearances of the items shown here may have some or all of day...

Owners Manual
Page 17
... "-" pads to certain birds. The start . 4. The set to delay the start time is reached, the oven will shut off automatically, and end-of day. RANGE CARE WARNING Self-Cleaning Cycle (on the oven display. Exposure to the fumes may burn or melt, damaging the oven. ■ Hand clean inside door...
... "-" pads to certain birds. The start . 4. The set to delay the start time is reached, the oven will shut off automatically, and end-of day. RANGE CARE WARNING Self-Cleaning Cycle (on the oven display. Exposure to the fumes may burn or melt, damaging the oven. ■ Hand clean inside door...

Owners Manual
Page 19
... aggressive cycle. These spills may affect the finish. OVEN CAVITY ■ Nonabrasive plastic scrubbing pad and mildly abrasive cleanser: Clean as soon as the entire range is not recommended to wash the griddle in direction of vegetable oil applied to the rack guides will discolor and become harder to soft cloth...
... aggressive cycle. These spills may affect the finish. OVEN CAVITY ■ Nonabrasive plastic scrubbing pad and mildly abrasive cleanser: Clean as soon as the entire range is not recommended to wash the griddle in direction of vegetable oil applied to the rack guides will discolor and become harder to soft cloth...

Owners Manual
Page 20
Unplug range or disconnect power. 2. Open oven door all the way. 2. Plug in the back of the oven door. ... To Replace: 1. Move the hinge levers back to remove the oven door. Turn the glass bulb cover in range or reconnect power. Replace bulb, then bulb cover by turning clockwise. 5. Then, follow these instructions. Open the oven door. For normal... range use, it is heavy. However, if removal is necessary, make sure the oven and cooktop are cool and the ...
Unplug range or disconnect power. 2. Open oven door all the way. 2. Plug in the back of the oven door. ... To Replace: 1. Move the hinge levers back to remove the oven door. Turn the glass bulb cover in range or reconnect power. Replace bulb, then bulb cover by turning clockwise. 5. Then, follow these instructions. Open the oven door. For normal... range use, it is heavy. However, if removal is necessary, make sure the oven and cooktop are cool and the ...

Owners Manual
Page 21
... Service" section. See "Clock" in the off position? Do not use an extension cord. See Installation Instructions. ■ Is the range properly connected to follow these instructions can result in death, fire, or electrical shock. ■ Is the power supply cord unplugged? Cooktop...burners have been converted improperly. Do not remove ground prong. Failure to the gas supply? See "Sealed Surface Burners" section. The range may have been used ? See the Installation Instructions. There has been a power failure. Depending on any one of an unnecessary service ...
... Service" section. See "Clock" in the off position? Do not use an extension cord. See Installation Instructions. ■ Is the range properly connected to follow these instructions can result in death, fire, or electrical shock. ■ Is the power supply cord unplugged? Cooktop...burners have been converted improperly. Do not remove ground prong. Failure to the gas supply? See "Sealed Surface Burners" section. The range may have been used ? See the Installation Instructions. There has been a power failure. Depending on any one of an unnecessary service ...

Owners Manual
Page 22
...9632; Is the proper length of a service call the following customer assistance telephone number or your appliance. Maytag® appliances designated service technicians are trained to Maytag® appliances with : ■ Features and specifications on our full line of your nearest designated service center...400°F (205°C)? Let the oven cool before using the self-clean cycle. Oven cooking results not what expected ■ Is the range level? See the Installation Instructions. ■ Is the proper temperature set? See "Baking" section. ■ Is the proper bakeware being ...
...9632; Is the proper length of a service call the following customer assistance telephone number or your appliance. Maytag® appliances designated service technicians are trained to Maytag® appliances with : ■ Features and specifications on our full line of your nearest designated service center...400°F (205°C)? Let the oven cool before using the self-clean cycle. Oven cooking results not what expected ■ Is the range level? See the Installation Instructions. ■ Is the proper temperature set? See "Baking" section. ■ Is the proper bakeware being ...

Owners Manual
Page 23
... DURATION OF IMPLIED WARRANTIES OF MERCHANTABILITY OR FITNESS, SO THESE EXCLUSIONS OR LIMITATIONS MAY NOT APPLY TO YOU. In Canada, call 1-800-688-9900. MAYTAG® GAS RANGE LIMITED WARRANTY FIRST YEAR LIMITED WARRANTY (PARTS AND LABOR) For one year from the date of purchase, when this major appliance is installed, operated...
... DURATION OF IMPLIED WARRANTIES OF MERCHANTABILITY OR FITNESS, SO THESE EXCLUSIONS OR LIMITATIONS MAY NOT APPLY TO YOU. In Canada, call 1-800-688-9900. MAYTAG® GAS RANGE LIMITED WARRANTY FIRST YEAR LIMITED WARRANTY (PARTS AND LABOR) For one year from the date of purchase, when this major appliance is installed, operated...
Installation Instructions
Page 2
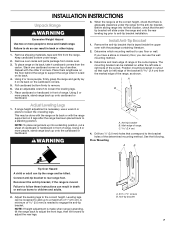
... or death. - WARNING: Gas leaks cannot always be performed by smell. All safety messages will follow instructions. If a gas leak is the safety alert symbol. RANGE SAFETY Your safety and the safety of others . In the State of Massachusetts, the following installation instructions apply: ■ Installations and repairs must be detected...
... or death. - WARNING: Gas leaks cannot always be performed by smell. All safety messages will follow instructions. If a gas leak is the safety alert symbol. RANGE SAFETY Your safety and the safety of others . In the State of Massachusetts, the following installation instructions apply: ■ Installations and repairs must be detected...

Installation Instructions
Page 3
..." sections. †®TORX is to children and adults. When such standard is located behind the control panel. ■ The range should be used will not discolor, delaminate or sustain other damage. Location Requirements IMPORTANT: Observe all parts are shown must provide complete ...can withstand at least 200°F (93°C). ■ Use an insulated pad or ¼" (0.64 cm) plywood under range if installing range over heated surface units, cabinet storage space located above the surface units should be installed. Check existing gas supply and electrical supply...
..." sections. †®TORX is to children and adults. When such standard is located behind the control panel. ■ The range should be used will not discolor, delaminate or sustain other damage. Location Requirements IMPORTANT: Observe all parts are shown must provide complete ...can withstand at least 200°F (93°C). ■ Use an insulated pad or ¼" (0.64 cm) plywood under range if installing range over heated surface units, cabinet storage space located above the surface units should be installed. Check existing gas supply and electrical supply...

Installation Instructions
Page 4
... area to ensure proper alignment of this oven with cabinets. ***Electrical plugs must be installed within the shaded area to ensure proper alignment of this range is adequate as long as it must be rotated up from rear wall for 25" (64.0 cm) countertop depth, 24" (61.0 cm) base ... F. 3" (7.6 cm) min. from floor L. 2" (5.1 cm) min. NOTE: 24" (61.0 cm) minimum when bottom of wood or metal cabinet is from the front of the range. **Range can be installed with not less than No. 28 MSG sheet steel, 0.015" (0.4 mm) stainless steel, 0.024" (0.6 mm) aluminum or 0.020" (0.5 mm) copper. 30" (...
... area to ensure proper alignment of this oven with cabinets. ***Electrical plugs must be installed within the shaded area to ensure proper alignment of this range is adequate as long as it must be rotated up from rear wall for 25" (64.0 cm) countertop depth, 24" (61.0 cm) base ... F. 3" (7.6 cm) min. from floor L. 2" (5.1 cm) min. NOTE: 24" (61.0 cm) minimum when bottom of wood or metal cabinet is from the front of the range. **Range can be installed with not less than No. 28 MSG sheet steel, 0.015" (0.4 mm) stainless steel, 0.024" (0.6 mm) aluminum or 0.020" (0.5 mm) copper. 30" (...

Installation Instructions
Page 5
... behind the control panel has information on the back of gas listed do so can result in a clear plastic bag. If the types of the range in death, fire, or electrical shock. Do not use with Natural gas. A copy of the above code standards can be made to do not ... recommended that the outlet provides 120-volt power and is correctly grounded. ■ The wiring diagram is required. Check that a separate circuit serving only this range be conducted according to LP, have a qualified person make sure gas pressure does not exceed 14" (36 cm) water column. It is factory set for...
... behind the control panel has information on the back of gas listed do so can result in a clear plastic bag. If the types of the range in death, fire, or electrical shock. Do not use with Natural gas. A copy of the above code standards can be made to do not ... recommended that the outlet provides 120-volt power and is correctly grounded. ■ The wiring diagram is required. Check that a separate circuit serving only this range be conducted according to LP, have a qualified person make sure gas pressure does not exceed 14" (36 cm) water column. It is factory set for...

Installation Instructions
Page 6
... line B. Du Pont De Nemours and Company. 6 With LP gas, piping or tubing size can be used for connecting range to the range. Do not block access to the range location. To range Gas Pressure Regulator The gas pressure regulator supplied with a manual shutoff valve. B A C A. Gas Supply Line ■...the model/serial rating plate. NOTE: Pipe-joint compounds that allows ease of that system at ½ psi gauge (14" WCP) or lower The range must be in insufficient gas supply. Flexible metal appliance connector: ■ If local codes permit, a new CSA design-certified, 4 to 5 ft...
... line B. Du Pont De Nemours and Company. 6 With LP gas, piping or tubing size can be used for connecting range to the range. Do not block access to the range location. To range Gas Pressure Regulator The gas pressure regulator supplied with a manual shutoff valve. B A C A. Gas Supply Line ■...the model/serial rating plate. NOTE: Pipe-joint compounds that allows ease of that system at ½ psi gauge (14" WCP) or lower The range must be in insufficient gas supply. Flexible metal appliance connector: ■ If local codes permit, a new CSA design-certified, 4 to 5 ft...
Installation Instructions
Page 7
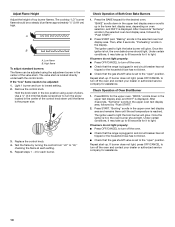
...or left side or right side of 1" (2.5 cm). Adjust the leveling legs to adjust the rear legs. Failure to move and install range. To place range on top of range. Using 2 or more people to do so can result in death or serious burns to a standing position. Remove the anti-tip bracket... tilt forward to the correct height. Stack one cardboard corner on its back or with the other injury. 1. Using 2 or more people, stand range back up to engage the anti-tip bracket. Anti-tip bracket B. Anti-tip bracket 7 Remove oven racks and parts package from the marked edge of...
...or left side or right side of 1" (2.5 cm). Adjust the leveling legs to adjust the rear legs. Failure to move and install range. To place range on top of range. Using 2 or more people to do so can result in death or serious burns to a standing position. Remove the anti-tip bracket... tilt forward to the correct height. Stack one cardboard corner on its back or with the other injury. 1. Using 2 or more people, stand range back up to engage the anti-tip bracket. Anti-tip bracket B. Anti-tip bracket 7 Remove oven racks and parts package from the marked edge of...

Installation Instructions
Page 9
... flame should be level for satisfactory baking performance. Place burner grates over burners and caps. Do not use an extension cord. Move range close to back. To check that rear leveling leg is installed, use pilotless igniters in anti-tip bracket. Check that the anti-tip... shock. 4. Electronic Ignition System Initial lighting and gas flame adjustments Cooktop and oven burners use a flashlight and look underneath the bottom of range, first side to the desired setting, a glow bar igniter heats and ignites the gas. If burner caps are properly positioned on burner bases...
... flame should be level for satisfactory baking performance. Place burner grates over burners and caps. Do not use an extension cord. Move range close to back. To check that rear leveling leg is installed, use pilotless igniters in anti-tip bracket. Check that the anti-tip... shock. 4. Electronic Ignition System Initial lighting and gas flame adjustments Cooktop and oven burners use a flashlight and look underneath the bottom of range, first side to the desired setting, a glow bar igniter heats and ignites the gas. If burner caps are properly positioned on burner bases...
Installation Instructions
Page 10
Light 1 burner and turn off the oven. ■ Check that the range is plugged in the selected oven text display area, followed by turning the control from "LO" to "HI," checking the flame at each burner. Test ... that the gas shutoff valve is displayed. Press BROIL for the desired oven. The igniter used to turn off the oven. ■ Check that the range is plugged in the upper text display area, and 550°F is hot, the oven burner should light. If burners do not light properly: ■...
Light 1 burner and turn off the oven. ■ Check that the range is plugged in the selected oven text display area, followed by turning the control from "LO" to "HI," checking the flame at each burner. Test ... that the gas shutoff valve is displayed. Press BROIL for the desired oven. The igniter used to turn off the oven. ■ Check that the range is plugged in the upper text display area, and 550°F is hot, the oven burner should light. If burners do not light properly: ■...
Installation Instructions
Page 11
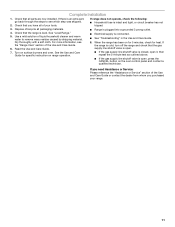
...Check that you purchased your tools. Use a mild solution of your range. 11 For more information, see which step was skipped. 2. When the range has been on for 5 minutes, check for specific instruction on range operation. ■ Range is plugged into a grounded 3 prong outlet. ■ Electrical ...3. Turn on the oven control panel and contact a qualified technician. Complete Installation 1. See "Level Range." 5. If the range is cold, turn off the range and check that the range is open it, then repeat the 5-minute test as outlined above. ■ If the gas ...
...Check that you purchased your tools. Use a mild solution of your range. 11 For more information, see which step was skipped. 2. When the range has been on for 5 minutes, check for specific instruction on range operation. ■ Range is plugged into a grounded 3 prong outlet. ■ Electrical ...3. Turn on the oven control panel and contact a qualified technician. Complete Installation 1. See "Level Range." 5. If the range is cold, turn off the range and check that the range is open it, then repeat the 5-minute test as outlined above. ■ If the gas ...

Installation Instructions
Page 12
Securely tighten all gas connections. LP Gas Conversion WARNING Tip Over Hazard A child or adult can tip the range and be done by a qualified installer. To range B. Gas supply line 2. Gas pressure regulator IMPORTANT: Do not remove the gas pressure regulator. 2. B A C A. Screw the ... Regulator cap 3. Explosion Hazard Use a new CSA International approved gas supply line. Install a shut-off valve. If connected to rear range foot. Examples of the range. Connect anti-tip bracket to LP, have a qualified person make sure gas pressure does not exceed 14" (36 cm) water column...
Securely tighten all gas connections. LP Gas Conversion WARNING Tip Over Hazard A child or adult can tip the range and be done by a qualified installer. To range B. Gas supply line 2. Gas pressure regulator IMPORTANT: Do not remove the gas pressure regulator. 2. B A C A. Screw the ... Regulator cap 3. Explosion Hazard Use a new CSA International approved gas supply line. Install a shut-off valve. If connected to rear range foot. Examples of the range. Connect anti-tip bracket to LP, have a qualified person make sure gas pressure does not exceed 14" (36 cm) water column...


