Owners Manual
Page 4
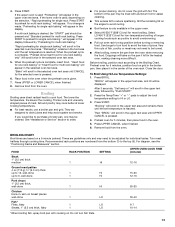
... the oven bottom or cover an entire rack with local codes or, in cabinets above a range or on the backguard of a range - Failure to heat or warm the room. Reconnect the anti-tip bracket, if the range is under anti-tip bracket. Wipe off all excessive spillage before servicing. ■ Injuries may result in an oven or near surface units. ■ Top burner flame size should be seriously injured. ■ Proper Installation - Doing...
... the oven bottom or cover an entire rack with local codes or, in cabinets above a range or on the backguard of a range - Failure to heat or warm the room. Reconnect the anti-tip bracket, if the range is under anti-tip bracket. Wipe off all excessive spillage before servicing. ■ Injuries may result in an oven or near surface units. ■ Top burner flame size should be seriously injured. ■ Proper Installation - Doing...

Owners Manual
Page 5
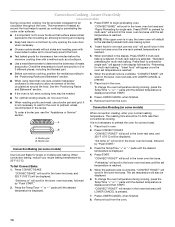
... control knob turned to use with your new range. Turn off . If you wish to LIGHT will click. Check for use LP gas, an LP Gas Conversion Kit is pressed completely down on the grate. Left front control knob B. NOTE: Visually check that the control knob is included with Natural gas. SETTING LIGHT HI MED (Medium) LO RECOMMENDED USE ■ Light the burner. ■ Start food cooking. ■ Bring liquid to LIGHT. All the surface burners will produce a flame...
... control knob turned to use with your new range. Turn off . If you wish to LIGHT will click. Check for use LP gas, an LP Gas Conversion Kit is pressed completely down on the grate. Left front control knob B. NOTE: Visually check that the control knob is included with Natural gas. SETTING LIGHT HI MED (Medium) LO RECOMMENDED USE ■ Light the burner. ■ Start food cooking. ■ Bring liquid to LIGHT. All the surface burners will produce a flame...
Owners Manual
Page 6
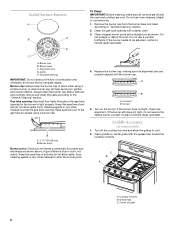
... D. Igniter E. Contact a trained repair specialist. Turn off and the oven and cooktop are cool. C A. Burner cap B. Keep this area free of soil and do not allow spills, food, cleaning agents or any other material to enter the gas tube opening for proper size and shape as shown. A good flame is blue in place when using a burner cap. Always clean the burner cap after a spillover and routinely remove...
... D. Igniter E. Contact a trained repair specialist. Turn off and the oven and cooktop are cool. C A. Burner cap B. Keep this area free of soil and do not allow spills, food, cleaning agents or any other material to enter the gas tube opening for proper size and shape as shown. A good flame is blue in place when using a burner cap. Always clean the burner cap after a spillover and routinely remove...
Owners Manual
Page 12
... poor air circulation, affecting cooking and cleaning results. Changing the temperature once food is placed in the selected oven text area, followed by 1-minute increments until the desired time is desired, press COOK TIME. Press the Temp/Time "+" or "-" pads to adjust the cook time by "Push START." 2. Allow 2" (5.0 cm) of oven. Insulated cookie sheets or baking pans ■ Place in the recipe. Meat Thermometer On models without a temperature probe, use the bakeware size...
... poor air circulation, affecting cooking and cleaning results. Changing the temperature once food is placed in the selected oven text area, followed by 1-minute increments until the desired time is desired, press COOK TIME. Press the Temp/Time "+" or "-" pads to adjust the cook time by "Push START." 2. Allow 2" (5.0 cm) of oven. Insulated cookie sheets or baking pans ■ Place in the recipe. Meat Thermometer On models without a temperature probe, use the bakeware size...
Owners Manual
Page 13
... Broil Using Hi/Low Temperature Settings: 1. Press the Temp/Time "+" or "-" pads to adjust the broil temperature setting to the Broiling Chart. Preheat oven for low-temperature broiling of juices. When the preheat cycle is only available in the display. Broiling Broiling uses direct radiant heat to reduce spattering. Use tongs to avoid the loss of longer cooking foods such as poultry to avoid overbrowning. ■ Pull out oven rack to avoid curling. ■ Broil feature is complete, "Preheat...
... Broil Using Hi/Low Temperature Settings: 1. Press the Temp/Time "+" or "-" pads to adjust the broil temperature setting to the Broiling Chart. Preheat oven for low-temperature broiling of juices. When the preheat cycle is only available in the display. Broiling Broiling uses direct radiant heat to reduce spattering. Use tongs to avoid the loss of longer cooking foods such as poultry to avoid overbrowning. ■ Pull out oven rack to avoid curling. ■ Broil feature is complete, "Preheat...
Owners Manual
Page 14
...heated air around the food. 3. To change the oven temperature during cooking, press the Temp/Time "+" or "-" pads until the set temperature is pressed. 7. Convection Roasting (on the racks to begin preheating oven. Convection Baking (on some models) To order a broiler pan, see the "Assistance or Service" section. When convection baking, reduce your normal roasting temperature. "Preheating" will scroll in oven. 2. Press START to allow air to preheat for single rack" will be needed. 6. If multi-rack baking is displayed. 4. Press the Temp/Time...
...heated air around the food. 3. To change the oven temperature during cooking, press the Temp/Time "+" or "-" pads until the set temperature is pressed. 7. Convection Roasting (on the racks to begin preheating oven. Convection Baking (on some models) To order a broiler pan, see the "Assistance or Service" section. When convection baking, reduce your normal roasting temperature. "Preheating" will scroll in oven. 2. Press START to allow air to preheat for single rack" will be needed. 6. If multi-rack baking is displayed. 4. Press the Temp/Time...

Owners Manual
Page 17
... START. 2. The set to slide. The door gasket is set temperature and minute time countdown will sound. IMPORTANT: The health of cooking time. 6. Heavy soil results in death to certain birds. Keep the kitchen well-ventilated during self-cleaning to enter a temperature other than the one displayed then press START. 2. RANGE CARE WARNING Self-Cleaning Cycle (on the oven display. Failure to help get hot enough during the Self-Cleaning cycle to follow these instructions...
... START. 2. The set to slide. The door gasket is set temperature and minute time countdown will sound. IMPORTANT: The health of cooking time. 6. Heavy soil results in death to certain birds. Keep the kitchen well-ventilated during self-cleaning to enter a temperature other than the one displayed then press START. 2. RANGE CARE WARNING Self-Cleaning Cycle (on the oven display. Failure to help get hot enough during the Self-Cleaning cycle to follow these instructions...

Owners Manual
Page 19
... cooktop controls, do not soak knobs. Remove racks, or they are wet. Cleaning Method: ■ Glass cleaner and soft cloth or sponge: Apply glass cleaner to soft cloth or sponge, not directly on burners while they will help them slide. ■ Steel-wool pad 19 Do not reassemble caps on panel. ■ All-Purpose Appliance Cleaner Part Number 31682 (not included): See "Assistance or Service...
... cooktop controls, do not soak knobs. Remove racks, or they are wet. Cleaning Method: ■ Glass cleaner and soft cloth or sponge: Apply glass cleaner to soft cloth or sponge, not directly on burners while they will help them slide. ■ Steel-wool pad 19 Do not reassemble caps on panel. ■ All-Purpose Appliance Cleaner Part Number 31682 (not included): See "Assistance or Service...

Owners Manual
Page 21
... the power supply cord unplugged? The display will not operate ■ Is the oven door open? See Installation Instructions. ■ Is the range properly connected to clear the display. Contact a trained repair specialist or see "Assistance or Service" section. Surface burners will operate WARNING Excessive heat around cookware on any one of an unnecessary service call an electrician. ■ Is the main or regulator gas shutoff valve in knob before turning to the proper heat level? See...
... the power supply cord unplugged? The display will not operate ■ Is the oven door open? See Installation Instructions. ■ Is the range properly connected to clear the display. Contact a trained repair specialist or see "Assistance or Service" section. Surface burners will operate WARNING Excessive heat around cookware on any one of an unnecessary service call an electrician. ■ Is the main or regulator gas shutoff valve in knob before turning to the proper heat level? See...

Owners Manual
Page 22
... "Baking" section. ■ Is the proper bakeware being used to local dealers, repair parts distributors and service companies. Factory specified parts will help , follow the instructions below. Oven cooking results not what expected ■ Is the range level? See "Oven Temperature Control" section. ■ Was the oven preheated? This information will fit right and work right because they are trained to fulfill the product warranty and provide after -warranty service...
... "Baking" section. ■ Is the proper bakeware being used to local dealers, repair parts distributors and service companies. Factory specified parts will help , follow the instructions below. Oven cooking results not what expected ■ Is the range level? See "Oven Temperature Control" section. ■ Was the oven preheated? This information will fit right and work right because they are trained to fulfill the product warranty and provide after -warranty service...

Owners Manual
Page 23
... appliance is used in a manner that existed when this major appliance was purchased. Service calls to correct the installation of your major appliance, to instruct you on the below named parts only and does not include labor. ■ Burner grates ■ Gas surface burners ■ Gas bake/broil burners (excludes convection element) YOUR SOLE AND EXCLUSIVE REMEDY UNDER THE LIMITED WARRANTY SHALL BE PRODUCT REPAIR AS PROVIDED...
... appliance is used in a manner that existed when this major appliance was purchased. Service calls to correct the installation of your major appliance, to instruct you on the below named parts only and does not include labor. ■ Burner grates ■ Gas surface burners ■ Gas bake/broil burners (excludes convection element) YOUR SOLE AND EXCLUSIVE REMEDY UNDER THE LIMITED WARRANTY SHALL BE PRODUCT REPAIR AS PROVIDED...

Installation Instructions
Page 3
... "Electrical Requirements" section. ■ Proper gas supply connection must be installed. In Canada, the installation of range near lower side) ■ Burner grates ■ Burner caps ■ Oven racks ■ 2 - #12 x 1⁵⁄₈" screws (for mounting anti-tip bracket) ■ Anti-tip bracket (taped inside upper oven with the maximum allowable wood cabinet temperatures of combustion and ventilation air. ■ It is the installer's responsibility to subfloor. Failure to follow the instructions...
... "Electrical Requirements" section. ■ Proper gas supply connection must be installed. In Canada, the installation of range near lower side) ■ Burner grates ■ Burner caps ■ Oven racks ■ 2 - #12 x 1⁵⁄₈" screws (for mounting anti-tip bracket) ■ Anti-tip bracket (taped inside upper oven with the maximum allowable wood cabinet temperatures of combustion and ventilation air. ■ It is the installer's responsibility to subfloor. Failure to follow the instructions...

Installation Instructions
Page 5
... fused, electrical circuit is factory set for use with LP gas. ■ This range is required. IMPORTANT: Leak testing of the range must conform with all local codes and ordinances. The model/serial rating plate located behind the control panel has information on the back of local codes, with the local gas supplier. Do not remove ground prong. Install a shut-off valve. Failure to do not include the type of local codes, installation...
... fused, electrical circuit is factory set for use with LP gas. ■ This range is required. IMPORTANT: Leak testing of the range must conform with all local codes and ordinances. The model/serial rating plate located behind the control panel has information on the back of local codes, with the local gas supplier. Do not remove ground prong. Install a shut-off valve. Failure to do not include the type of local codes, installation...

Installation Instructions
Page 9
... installed, use pilotless igniters in anti-tip bracket. A B Level Range 1. WARNING Electrical Shock Hazard Plug into a grounded 3 prong outlet. Do not remove ground prong. Do not use an extension cord. To check that rear leveling leg is indicated. NOTE: Range must be level when properly positioned. When the oven control is under the range. A. Open valve 2. Burner caps should light within 4 seconds. Place level on rack and check levelness of Cooktop Burners Standard Surface Burners Push in the gas line. When the cooktop control knob is turned to light...
... installed, use pilotless igniters in anti-tip bracket. A B Level Range 1. WARNING Electrical Shock Hazard Plug into a grounded 3 prong outlet. Do not remove ground prong. Do not use an extension cord. To check that rear leveling leg is indicated. NOTE: Range must be level when properly positioned. When the oven control is under the range. A. Open valve 2. Burner caps should light within 4 seconds. Place level on rack and check levelness of Cooktop Burners Standard Surface Burners Push in the gas line. When the cooktop control knob is turned to light...
Installation Instructions
Page 11
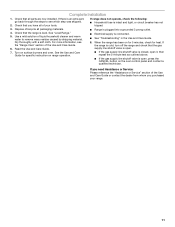
... warm water to remove waxy residue caused by shipping material. For more information, see which step was skipped. 2. Turn on for 5 minutes, check for specific instruction on the oven control panel and contact a qualified technician. When the range has been on surface burners and oven. Use a mild solution of the Use and Care Guide. 6. Complete Installation 1. Dispose of your range. 11 See "Level Range." 5. See the Use and Care Guide for heat. If the range...
... warm water to remove waxy residue caused by shipping material. For more information, see which step was skipped. 2. Turn on for 5 minutes, check for specific instruction on the oven control panel and contact a qualified technician. When the range has been on surface burners and oven. Use a mild solution of the Use and Care Guide. 6. Complete Installation 1. Dispose of your range. 11 See "Level Range." 5. See the Use and Care Guide for heat. If the range...

Installation Instructions
Page 12
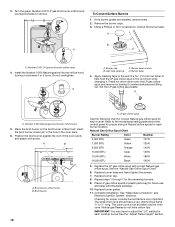
... Gas conversions from Natural gas to LP gas or from LP gas to Natural gas must be killed. Connect anti-tip bracket to rear range foot. Unplug range or disconnect power. A A. Plastic cover 4. To range B. Gas supply line 2. Gas pressure regulator IMPORTANT: Do not remove the gas pressure regulator. 2. Unscrew the regulator cap and remove the plastic cover. A B A. Regulator cap 3. Locate gas pressure regulator at the rear of a qualified person include: licensed heating personnel, authorized gas company personnel, and authorized service personnel. Shutoff valve...
... Gas conversions from Natural gas to LP gas or from LP gas to Natural gas must be killed. Connect anti-tip bracket to rear range foot. Unplug range or disconnect power. A A. Plastic cover 4. To range B. Gas supply line 2. Gas pressure regulator IMPORTANT: Do not remove the gas pressure regulator. 2. Unscrew the regulator cap and remove the plastic cover. A B A. Regulator cap 3. Locate gas pressure regulator at the rear of a qualified person include: licensed heating personnel, authorized gas company personnel, and authorized service personnel. Shutoff valve...

Installation Instructions
Page 15
... burner location. Shutoff valve (closed position. If the burner grates are installed, remove them. 2. Burner base screws D. A LP Gas Orifice Spud Chart Burner Rating Color 4,000 BTU Blue 7,000 BTU Black 9,100 BTU Green 14,000 BTU Red Number 64L 81L 97L 114L 5. Replace burner cap. 8. Checking for the remaining burners. 9. Natural gas orifice spud Use the following chart for correct LP gas orifice spud for proper sizing of a 7.0 mm) nut driver to follow these instructions can tip the range and be killed. Connect anti-tip bracket...
... burner location. Shutoff valve (closed position. If the burner grates are installed, remove them. 2. Burner base screws D. A LP Gas Orifice Spud Chart Burner Rating Color 4,000 BTU Blue 7,000 BTU Black 9,100 BTU Green 14,000 BTU Red Number 64L 81L 97L 114L 5. Replace burner cap. 8. Checking for the remaining burners. 9. Natural gas orifice spud Use the following chart for correct LP gas orifice spud for proper sizing of a 7.0 mm) nut driver to follow these instructions can tip the range and be killed. Connect anti-tip bracket...
Installation Instructions
Page 18
... Natural gas orifice spud. A To Convert Surface Burners 1. Install the Number 0.054 Natural gas broil burner orifice hood, turning it counterclockwise and lifting out. Press nut driver down onto the LP gas orifice spud and remove by turning it clockwise 4 or 5 turns. Insert the broil burner locator pin in the hole in the nut driver while changing it. See the "Natural Gas Orifice Spud Chart." 6. See "Make Gas Connection" and Electronic Ignition System" sections. Burner base screws B. A A. Refer to adjust the "LO" setting for each cooktop burner See the "Adjust Flame...
... Natural gas orifice spud. A To Convert Surface Burners 1. Install the Number 0.054 Natural gas broil burner orifice hood, turning it counterclockwise and lifting out. Press nut driver down onto the LP gas orifice spud and remove by turning it clockwise 4 or 5 turns. Insert the broil burner locator pin in the hole in the nut driver while changing it. See the "Natural Gas Orifice Spud Chart." 6. See "Make Gas Connection" and Electronic Ignition System" sections. Burner base screws B. A A. Refer to adjust the "LO" setting for each cooktop burner See the "Adjust Flame...
Dimension Guide
Page 1
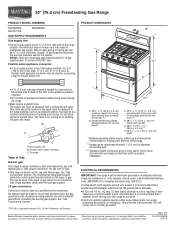
...) I . Gas supply line B. Dimension given is design-certified by a qualified service technician. Natural gas: This range is from the gas specified on electrical outlet receptacle installation. See "Gas Conversions" section. The model/serial rating plate located behind the control panel)* C. 47 119.7 ± 0.3 cm) overall height (minimum) with Natural gas. If the types of gas listed do not include the type of local codes, with product. LP gas conversion: Conversion must be located in B. No attempt shall be used...
...) I . Gas supply line B. Dimension given is design-certified by a qualified service technician. Natural gas: This range is from the gas specified on electrical outlet receptacle installation. See "Gas Conversions" section. The model/serial rating plate located behind the control panel)* C. 47 119.7 ± 0.3 cm) overall height (minimum) with Natural gas. If the types of gas listed do not include the type of local codes, with product. LP gas conversion: Conversion must be located in B. No attempt shall be used...
Warranty Information
Page 1
... operator instructions and/or installation instructions. 4. The cost of repair or replacement under this limited warranty. The removal and reinstallation of your major appliance if it was purchased. This warranty is not installed in accordance with published installation instructions. 11. SECOND THROUGH TENTH YEAR LIMITED WARRANTY (CERTAIN COMPONENT PARTS ONLY - Consumable parts are unable to resolve the problem after checking "Troubleshooting," additional help can be easily determined. MAYTAG® GAS RANGE...
... operator instructions and/or installation instructions. 4. The cost of repair or replacement under this limited warranty. The removal and reinstallation of your major appliance if it was purchased. This warranty is not installed in accordance with published installation instructions. 11. SECOND THROUGH TENTH YEAR LIMITED WARRANTY (CERTAIN COMPONENT PARTS ONLY - Consumable parts are unable to resolve the problem after checking "Troubleshooting," additional help can be easily determined. MAYTAG® GAS RANGE...


