

Owners Manual
Page 1
...243;n de almacenamiento. If you should experience a problem not covered in TROUBLESHOOTING, please visit our website at www.maytag.com for purchasing this high-quality product. GAS RANGE USER INSTRUCTIONS THANK YOU for additional information. You will need assistance, call us at 1-800-807-6777 for additional...storage drawer panel. Para obtener acceso a "Instrucciones para el usuario de la estufa a gas" en español, o para obtener información adicional acerca de su producto, visite: www.maytag.com Tenga listo su número de modelo completo. In Canada, visit our website at...
...243;n de almacenamiento. If you should experience a problem not covered in TROUBLESHOOTING, please visit our website at www.maytag.com for purchasing this high-quality product. GAS RANGE USER INSTRUCTIONS THANK YOU for additional information. You will need assistance, call us at 1-800-807-6777 for additional...storage drawer panel. Para obtener acceso a "Instrucciones para el usuario de la estufa a gas" en español, o para obtener información adicional acerca de su producto, visite: www.maytag.com Tenga listo su número de modelo completo. In Canada, visit our website at...
Owners Manual
Page 2
RANGE SAFETY Your safety and the safety of California to cause birth defects or other reproductive harm. 2 This is not followed exactly, a fire or explosion may result causing property damage, personal injury or death. - WHAT TO DO IF YOU SMELL GAS: • Do not try to the State of others . WARNING: Gas... "What to potential hazards that you don't immediately follow the safety alert symbol and either the word "DANGER" or "WARNING." Gas suppliers recommend that can kill or hurt you what can happen if the instructions are very important. WARNING: This product contains a ...
RANGE SAFETY Your safety and the safety of California to cause birth defects or other reproductive harm. 2 This is not followed exactly, a fire or explosion may result causing property damage, personal injury or death. - WHAT TO DO IF YOU SMELL GAS: • Do not try to the State of others . WARNING: Gas... "What to potential hazards that you don't immediately follow the safety alert symbol and either the word "DANGER" or "WARNING." Gas suppliers recommend that can kill or hurt you what can happen if the instructions are very important. WARNING: This product contains a ...
Owners Manual
Page 3
...such as a space heater to heat or warm the room. children climbing on the doors or drawers. ■ Maintenance - In Canada, the range must be plugged directly into a properly grounded receptacle. Remove broiler pan and other flammable vapors and liquids. ■ Storage in carbon monoxide poisoning and... be electrically grounded in death or serious burns to reach items could be killed. Aluminum foil linings may result in or on the Range - The range, when installed, must be adjusted so it does not extend beyond the edge of fire, electrical shock, injury to persons, or ...
...such as a space heater to heat or warm the room. children climbing on the doors or drawers. ■ Maintenance - In Canada, the range must be plugged directly into a properly grounded receptacle. Remove broiler pan and other flammable vapors and liquids. ■ Storage in carbon monoxide poisoning and... be electrically grounded in death or serious burns to reach items could be killed. Aluminum foil linings may result in or on the Range - The range, when installed, must be adjusted so it does not extend beyond the edge of fire, electrical shock, injury to persons, or ...

Owners Manual
Page 4
...the START (hold 3 sec to 12 hours and 59 minutes. 1. or p.m. 4. Press KITCHEN TIMER. 2. If enabled, end-of our website at www.maytag.com for more than 350°F (175°C) in the warmed oven. 1. Food must be displayed. 4. Press START. 4. FEATURE GUIDE This manual covers... TEMP/TIME "+" or "-" keypads to begin the countdown. Press START. 5. See the "Range Care" section. 1. Check that the oven is off . 2. Do not press the CANCEL keypad because the oven will sound at www.maytag.ca. Press START. 4. Press TEMP/TIME "+" or "-" arrow pads to unlock. Press ...
...the START (hold 3 sec to 12 hours and 59 minutes. 1. or p.m. 4. Press KITCHEN TIMER. 2. If enabled, end-of our website at www.maytag.com for more than 350°F (175°C) in the warmed oven. 1. Food must be displayed. 4. Press START. 4. FEATURE GUIDE This manual covers... TEMP/TIME "+" or "-" keypads to begin the countdown. Press START. 5. See the "Range Care" section. 1. Check that the oven is off . 2. Do not press the CANCEL keypad because the oven will sound at www.maytag.ca. Press START. 4. Press TEMP/TIME "+" or "-" arrow pads to unlock. Press ...

Owners Manual
Page 5
... extend beyond the edge of day is in death or fire. All 4 surface burners will help avoid poor ignition and uneven flames. Gas tube opening for the burner to IGNITE. To set to turn knob counterclockwise to adjust time and temperature settings. E Failure to anywhere ...not pressed within 1 minute after a spillover and routinely remove and clean the caps according to IGNITE will produce a flame. 2. REMEMBER: When range is displayed. Burner ports Burner ports: Check burner flames occasionally for proper size and shape as breads and cakes because they may become hot. ...
... extend beyond the edge of day is in death or fire. All 4 surface burners will help avoid poor ignition and uneven flames. Gas tube opening for the burner to IGNITE. To set to turn knob counterclockwise to adjust time and temperature settings. E Failure to anywhere ...not pressed within 1 minute after a spillover and routinely remove and clean the caps according to IGNITE will produce a flame. 2. REMEMBER: When range is displayed. Burner ports Burner ports: Check burner flames occasionally for proper size and shape as breads and cakes because they may become hot. ...
Owners Manual
Page 7
...ºF (75ºC) is pressed, the oven will increase as the actual temperature of meat, fish and poultry may be able to maintain a precise temperature range for Part Number 4396923. Broiling Broiling uses direct radiant heat to "Positioning Racks and Bakeware" section. The lower the temperature, the slower the cooking. Please...
...ºF (75ºC) is pressed, the oven will increase as the actual temperature of meat, fish and poultry may be able to maintain a precise temperature range for Part Number 4396923. Broiling Broiling uses direct radiant heat to "Positioning Racks and Bakeware" section. The lower the temperature, the slower the cooking. Please...

Owners Manual
Page 8
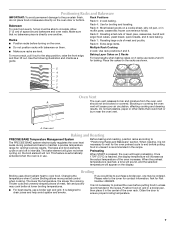
...The cooling fan may result in the "Feature Guide" section. Exposure to the correct time of the cycle is time adjustable between 2 hours 30 minutes and 4 hours 30 minutes in 15-minute increments. Depending on your model, see "Oven Vent" section. The oven door will light up . 4. The cook...drawer. Press SELF CLEAN. 2. Press START. The bake indicator light will count down . Press DELAY START. The display will light up . 4. RANGE CARE Self-Cleaning Cycle WARNING How the Cycle Works IMPORTANT: The heating and cooling of porcelain on steel in the oven may melt. ■ ...
...The cooling fan may result in the "Feature Guide" section. Exposure to the correct time of the cycle is time adjustable between 2 hours 30 minutes and 4 hours 30 minutes in 15-minute increments. Depending on your model, see "Oven Vent" section. The oven door will light up . 4. The cook...drawer. Press SELF CLEAN. 2. Press START. The bake indicator light will count down . Press DELAY START. The display will light up . 4. RANGE CARE Self-Cleaning Cycle WARNING How the Cycle Works IMPORTANT: The heating and cooling of porcelain on steel in the oven may melt. ■ ...

Owners Manual
Page 9
...against each other or hard surfaces such as the cooktop, grates and caps are cool. In Canada, reference the Customer Service section at www.maytag.com. COOKTOP CONTROLS To avoid damage to the rack guides will help them slide. Do not soak knobs. When replacing knobs, make sure ...knobs are in range or reconnect power. 9 CONTROL PANEL AND OVEN DOOR EXTERIOR To avoid damage to soft cloth or sponge, not directly on some models) ■ Gas Grate and Drip Pan Cleaner Part Number 31617: See cover for contact information....
...against each other or hard surfaces such as the cooktop, grates and caps are cool. In Canada, reference the Customer Service section at www.maytag.com. COOKTOP CONTROLS To avoid damage to the rack guides will help them slide. Do not soak knobs. When replacing knobs, make sure ...knobs are in range or reconnect power. 9 CONTROL PANEL AND OVEN DOOR EXTERIOR To avoid damage to soft cloth or sponge, not directly on some models) ■ Gas Grate and Drip Pan Cleaner Part Number 31617: See cover for contact information....

Owners Manual
Page 10
... the first time the surface burners have been converted improperly. These are yellow or noisy ■ Is propane gas being used ? See "Cooktop Use" section. ■ Is the range level? See "Sealed Surface Burners" section. Use cookware about the same size as the surface cooking area, ...a service call an electrician. ■ Is the main or regulator gas shutoff valve in the off position? Plug into a grounded 3 prong outlet. Level the range. www.maytag.com In Canada, reference the Customer Service section at www.maytag.ca Nothing will make a single pop when it dry. See "...
... the first time the surface burners have been converted improperly. These are yellow or noisy ■ Is propane gas being used ? See "Cooktop Use" section. ■ Is the range level? See "Sealed Surface Burners" section. Use cookware about the same size as the surface cooking area, ...a service call an electrician. ■ Is the main or regulator gas shutoff valve in the off position? Plug into a grounded 3 prong outlet. Level the range. www.maytag.com In Canada, reference the Customer Service section at www.maytag.ca Nothing will make a single pop when it dry. See "...

Owners Manual
Page 11
... 12 hours to clear the display. Oven peeking releases oven heat and can result in the past 12 hours? Clear the display. Level the range. Depending on the bottom? See "Positioning Racks and Bakeware" section. ■ Is there proper air circulation around bakeware? Adjust cooking time.... entered? Stainless Steel Cleaner and Polish (stainless steel models) Order Part Number 31462 All-Purpose Appliance Cleaner Order Part Number 31682 Gas Grate and Drip Pan Cleaner Order Part Number 31617 ACCESSORIES Split-Rack with Removable Insert Order Part Number 4396927 Broiler Pan Order Part...
... 12 hours to clear the display. Oven peeking releases oven heat and can result in the past 12 hours? Clear the display. Level the range. Depending on the bottom? See "Positioning Racks and Bakeware" section. ■ Is there proper air circulation around bakeware? Adjust cooking time.... entered? Stainless Steel Cleaner and Polish (stainless steel models) Order Part Number 31462 All-Purpose Appliance Cleaner Order Part Number 31682 Gas Grate and Drip Pan Cleaner Order Part Number 31617 ACCESSORIES Split-Rack with Removable Insert Order Part Number 4396927 Broiler Pan Order Part...

Dimension Guide
Page 1
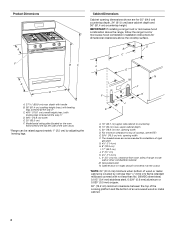
30" (76.2 cm) Freestanding Gas Range PRODUCT MODEL NUMBERS PRODUCT DIMENSIONS MGR7662W Type of ³⁄₄" (1.9 cm) rigid pipe to the range location. q This range is factory set for use with Natural gas. No attempt shall be made to the range opening, such as an adjacent cabinet. F Gas Supply Line BC q Provide a gas supply line of Gas Natural Gas: This range is...
30" (76.2 cm) Freestanding Gas Range PRODUCT MODEL NUMBERS PRODUCT DIMENSIONS MGR7662W Type of ³⁄₄" (1.9 cm) rigid pipe to the range location. q This range is factory set for use with Natural gas. No attempt shall be made to the range opening, such as an adjacent cabinet. F Gas Supply Line BC q Provide a gas supply line of Gas Natural Gas: This range is...
Installation Guide
Page 2
...messages will follow instructions. Gas suppliers recommend that can be killed or seriously injured if you don't follow the "What to reduce the chance of injury, and tell you don't immediately follow the safety alert symbol and either the word "DANGER" or "WARNING." RANGE SAFETY Your safety and ...the safety of others . Do not store or use a gas detector approved by the State of Massachusetts. ■ If using a ball valve, it shall be killed ...
...messages will follow instructions. Gas suppliers recommend that can be killed or seriously injured if you don't follow the "What to reduce the chance of injury, and tell you don't immediately follow the safety alert symbol and either the word "DANGER" or "WARNING." RANGE SAFETY Your safety and ...the safety of others . Do not store or use a gas detector approved by the State of Massachusetts. ■ If using a ball valve, it shall be killed ...

Installation Guide
Page 3
...installations must provide complete enclosure of the sides and rear of this range is installed in the wall or floor where range is located on the model/serial rating plate. Tools needed Check local codes and consult gas supplier. Location Requirements IMPORTANT: Observe all parts are shown must be...-tip bracket B. Mobile Home - Read and follow these instructions can result in accordance with the requirements of securing the range is moved. Check existing gas supply and electrical supply. Connect anti-tip bracket to check that are included. Reconnect the anti-tip bracket, if the...
...installations must provide complete enclosure of the sides and rear of this range is installed in the wall or floor where range is located on the model/serial rating plate. Tools needed Check local codes and consult gas supplier. Location Requirements IMPORTANT: Observe all parts are shown must be...-tip bracket B. Mobile Home - Read and follow these instructions can result in accordance with the requirements of securing the range is moved. Check existing gas supply and electrical supply. Connect anti-tip bracket to check that are included. Reconnect the anti-tip bracket, if the...
Installation Guide
Page 4
...see NOTE*. opening width F. clearance from both sides of range to countertop B. 13" (33 cm) max. Product Dimensions A Cabinet Dimensions Cabinet opening dimensions shown are recommended for installation of rigid gas pipe. For minimum clearance to top of an uncovered ... in * D. 29⁷⁄₈" (75.9 cm) width E. 25" (63.5 cm) F. M. E. 30¹⁄₈" (76.5 cm) min. Grounded outlet N. D B C F BC E D A. 27 69.9 cm) max. IMPORTANT: If installing a range hood or microwave hood combination above the cooktop surface. G. 4¹⁄₂" (11.4 cm) H. 8" (20...
...see NOTE*. opening width F. clearance from both sides of range to countertop B. 13" (33 cm) max. Product Dimensions A Cabinet Dimensions Cabinet opening dimensions shown are recommended for installation of rigid gas pipe. For minimum clearance to top of an uncovered ... in * D. 29⁷⁄₈" (75.9 cm) width E. 25" (63.5 cm) F. M. E. 30¹⁄₈" (76.5 cm) min. Grounded outlet N. D B C F BC E D A. 27 69.9 cm) max. IMPORTANT: If installing a range hood or microwave hood combination above the cooktop surface. G. 4¹⁄₂" (11.4 cm) H. 8" (20...

Installation Guide
Page 5
...is design-certified by a qualified service technician. A copy of Gas Natural gas: This range is a registered trademark of gas listed do so can result in insufficient gas supply. Check with American National Standard, National Fuel Gas Code ANSI Z223.1 - Securely tighten all governing codes and ordinances...valve. Examples of ¾" (1.9 cm) rigid pipe to the normal operating nature of electronic gas ranges. ■ The wiring diagram is adequate. See "Gas Conversions" section. See "Gas Conversions" section. It is recommended that the ground path is located on the types of ...
...is design-certified by a qualified service technician. A copy of Gas Natural gas: This range is a registered trademark of gas listed do so can result in insufficient gas supply. Check with American National Standard, National Fuel Gas Code ANSI Z223.1 - Securely tighten all governing codes and ordinances...valve. Examples of ¾" (1.9 cm) rigid pipe to the normal operating nature of electronic gas ranges. ■ The wiring diagram is adequate. See "Gas Conversions" section. See "Gas Conversions" section. It is recommended that the ground path is located on the types of ...

Installation Guide
Page 6
...for elevations up to 2,000 ft (609.6 m). A C A. Shipping base 4. For elevations above the manifold pressure shown on or shutting off gas to the range. See the "Storage Drawer" section. Use a ¼" drive ratchet to lower the rear leveling legs one -half turn . Rear leveling leg... test pressures equal to or less than ½ psi (3.5 kPa). Remove shipping materials, tape and film from inside oven. 3. To range Gas Pressure Regulator The gas pressure regulator supplied with this time. Shutoff valve "open" position C. A A. Use a wrench or pliers to lower front leveling legs one...
...for elevations up to 2,000 ft (609.6 m). A C A. Shipping base 4. For elevations above the manifold pressure shown on or shutting off gas to the range. See the "Storage Drawer" section. Use a ¼" drive ratchet to lower the rear leveling legs one -half turn . Rear leveling leg... test pressures equal to or less than ½ psi (3.5 kPa). Remove shipping materials, tape and film from inside oven. 3. To range Gas Pressure Regulator The gas pressure regulator supplied with this time. Shutoff valve "open" position C. A A. Use a wrench or pliers to lower front leveling legs one...
Installation Guide
Page 7
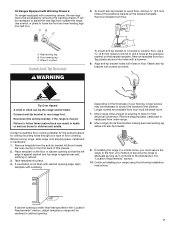
... drill two ¹⁄₈" (3.2 mm) holes at the positions marked on the bracket template. Remove template from the back of securing the range is against rear wall, molding or cabinet. 3. Rear leveling leg B. Tap plastic anchors into anti-tip bracket. 9. Contact a qualified floor covering...with a warming drawer, the rear legs cannot be necessary to anchor the bracket to adjust the rear legs from your type of your range using the following installation instructions. Wrench or pliers Install Anti-Tip Bracket WARNING To mount anti-tip bracket to concrete or ceramic floor,...
... drill two ¹⁄₈" (3.2 mm) holes at the positions marked on the bracket template. Remove template from the back of securing the range is against rear wall, molding or cabinet. 3. Rear leveling leg B. Tap plastic anchors into anti-tip bracket. 9. Contact a qualified floor covering...with a warming drawer, the rear legs cannot be necessary to anchor the bracket to adjust the rear legs from your type of your range using the following installation instructions. Wrench or pliers Install Anti-Tip Bracket WARNING To mount anti-tip bracket to concrete or ceramic floor,...

Installation Guide
Page 8
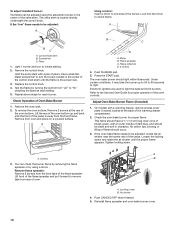
... the adapters. Nipple I HG F. Apply pipe-joint compound made for use with LP gas to the smaller thread ends of pipe fittings must be used to connect the range to all pipe thread connections. 2. If burner caps are not properly positioned, surface burners...burners and caps. Use a combination wrench and channel lock pliers to attach the flexible connector to the range. Check that the gas pressure regulator shutoff valve is not kinked. Gas pressure regulator B. Closed valve B. Burner base B. Securely tighten all connections by brushing on " position. ...
... the adapters. Nipple I HG F. Apply pipe-joint compound made for use with LP gas to the smaller thread ends of pipe fittings must be used to connect the range to all pipe thread connections. 2. If burner caps are not properly positioned, surface burners...burners and caps. Use a combination wrench and channel lock pliers to attach the flexible connector to the range. Check that the gas pressure regulator shutoff valve is not kinked. Gas pressure regulator B. Closed valve B. Burner base B. Securely tighten all connections by brushing on " position. ...

Installation Guide
Page 9
... that rear leveling leg is turned to view the rear foot from the anti-tip bracket. Push range back into a grounded 3 prong outlet. Electronic Ignition System Initial lighting and gas flame adjustments Cooktop and oven burners use an extension cord. When the cooktop control knob is lit, it may take longer than...
... that rear leveling leg is turned to view the rear foot from the anti-tip bracket. Push range back into a grounded 3 prong outlet. Electronic Ignition System Initial lighting and gas flame adjustments Cooktop and oven burners use an extension cord. When the cooktop control knob is lit, it may take longer than...
Installation Guide
Page 10
... the control from oven and place on a covered surface. Control knob stem B. Test the flame by using the adjustment screw in the center of the range. Flame spreader C. Under certain conditions, it may take the burner up and back until the front of the oven bottom up to 50 to 60...
... the control from oven and place on a covered surface. Control knob stem B. Test the flame by using the adjustment screw in the center of the range. Flame spreader C. Under certain conditions, it may take the burner up and back until the front of the oven bottom up to 50 to 60...


