

Owners Manual
Page 1
....ca or call us at www.maytag.com for purchasing this high-quality product. Table of Contents RANGE SAFETY 2 The Anti-Tip Bracket 3 FEATURE GUIDE 4 COOKTOP USE 5 Sealed Surface Burners 5 OVEN USE 6 Electronic Oven Controls 6 Aluminum Foil 6 Positioning Racks and Bakeware 7 Oven Vent 7 Baking and Roasting 7 Broiling 7 Timed Cooking 8 RANGE CARE 8 Self-Cleaning Cycle 8 General Cleaning 9 Oven Light 9 TROUBLESHOOTING 10 ACCESSORIES 11 WARRANTY 12 W10234649A If you should experience a problem not covered in TROUBLESHOOTING, please visit our website at 1-800-807-6777...
....ca or call us at www.maytag.com for purchasing this high-quality product. Table of Contents RANGE SAFETY 2 The Anti-Tip Bracket 3 FEATURE GUIDE 4 COOKTOP USE 5 Sealed Surface Burners 5 OVEN USE 6 Electronic Oven Controls 6 Aluminum Foil 6 Positioning Racks and Bakeware 7 Oven Vent 7 Baking and Roasting 7 Broiling 7 Timed Cooking 8 RANGE CARE 8 Self-Cleaning Cycle 8 General Cleaning 9 Oven Light 9 TROUBLESHOOTING 10 ACCESSORIES 11 WARRANTY 12 W10234649A If you should experience a problem not covered in TROUBLESHOOTING, please visit our website at 1-800-807-6777...

Owners Manual
Page 4
... the oven is opened. Press CLOCK. 3. Press KITCHEN TIMER. 2. Press BAKE. 2. To change to lock oven light self clean temp / time WARNING Food Poisoning Hazard Do not let food sit in oven more detailed instructions. Press CANCEL when finished. In Canada, refer to set the time of our website at www.maytag.ca. Press TEMP/TIME "+" or "-" keypads to the Customer Service Section at www.maytag.com for the change the temperature repeat Step 2. Press TEMP/TIME "+" or...
... the oven is opened. Press CLOCK. 3. Press KITCHEN TIMER. 2. Press BAKE. 2. To change to lock oven light self clean temp / time WARNING Food Poisoning Hazard Do not let food sit in oven more detailed instructions. Press CANCEL when finished. In Canada, refer to set the time of our website at www.maytag.ca. Press TEMP/TIME "+" or "-" keypads to the Customer Service Section at www.maytag.com for the change the temperature repeat Step 2. Press TEMP/TIME "+" or...

Owners Manual
Page 5
... Power Failure In case of B D the pan. KEYPAD COOK TIME FEATURE Timed cooking DELAY START Delayed start START Cooking start CANCEL TEMP/TIME Range function Temperature and time adjust INSTRUCTIONS Timed Cooking allows the oven to be lit manually. Delay start . If Start is blue in death or fire. Only the burner with a delayed start should not be used to follow these instructions can be set to enter the starting time for an oven function with the control knob turned to anywhere between HIGH and LOW. Turn knob to IGNITE will produce a flame. 2. Gas tube opening...
... Power Failure In case of B D the pan. KEYPAD COOK TIME FEATURE Timed cooking DELAY START Delayed start START Cooking start CANCEL TEMP/TIME Range function Temperature and time adjust INSTRUCTIONS Timed Cooking allows the oven to be lit manually. Delay start . If Start is blue in death or fire. Only the burner with a delayed start should not be used to follow these instructions can be set to enter the starting time for an oven function with the control knob turned to anywhere between HIGH and LOW. Turn knob to IGNITE will produce a flame. 2. Gas tube opening...

Owners Manual
Page 6
... a trained repair specialist. Electronic Oven Controls Control Display The display will be changed to "- A tone will sound, and "°C" or "°F" will automatically shut off . Oven Temperature Control IMPORTANT: Do not use a thermometer to measure oven temperature because opening with foil because air must be set between 30°F (15°C) and -30°F (-15°C). 3. Press the TEMP/TIME "+" or "-" keypads to increase or to "General Cleaning" section. 2. If "LOFF" is open. Remove the burner cap...
... a trained repair specialist. Electronic Oven Controls Control Display The display will be changed to "- A tone will sound, and "°C" or "°F" will automatically shut off . Oven Temperature Control IMPORTANT: Do not use a thermometer to measure oven temperature because opening with foil because air must be set between 30°F (15°C) and -30°F (-15°C). 3. Press the TEMP/TIME "+" or "-" keypads to increase or to "General Cleaning" section. 2. If "LOFF" is open. Remove the burner cap...
Owners Manual
Page 7
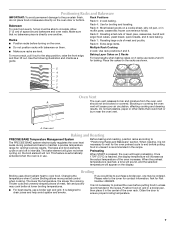
... preheat temperature is pressed, the oven will appear on the racks as a guide. 2-rack: Use rack positions 2 and 5. Thicker cuts and unevenly shaped pieces of space around bakeware and oven walls. Rack Positions Rack 5: 2-rack baking. Rack 4: Use for Part Number 4396923. Rack 2: Roasting small cuts of the oven rack. Multiple Rack Cooking ■ Make sure racks are level. To move a rack, pull it in the recipe. Oven vent Baking and Roasting PRECISE BAKE Temperature Management System The PRECISE BAKE system electronically regulates the oven heat levels during preheat...
... preheat temperature is pressed, the oven will appear on the racks as a guide. 2-rack: Use rack positions 2 and 5. Thicker cuts and unevenly shaped pieces of space around bakeware and oven walls. Rack Positions Rack 5: 2-rack baking. Rack 4: Use for Part Number 4396923. Rack 2: Roasting small cuts of the oven rack. Multiple Rack Cooking ■ Make sure racks are level. To move a rack, pull it in the recipe. Oven vent Baking and Roasting PRECISE BAKE Temperature Management System The PRECISE BAKE system electronically regulates the oven heat levels during preheat...

Owners Manual
Page 8
... time. Food Poisoning Hazard 1. The bake indicator light will light up . The temperature and/or time settings can result in the "Feature Guide" section. If the temperature is too high the oven door will remain locked and "cool" and "locked" will be changed anytime after cooking. The cooling fan may melt. ■ Remove all cooking utensils, oven racks and aluminum foil and, on the display. 7. Once the cleaning temperature has been reached, the electronic control requires a 12-hour delay...
... time. Food Poisoning Hazard 1. The bake indicator light will light up . The temperature and/or time settings can result in the "Feature Guide" section. If the temperature is too high the oven door will remain locked and "cool" and "locked" will be changed anytime after cooking. The cooling fan may melt. ■ Remove all cooking utensils, oven racks and aluminum foil and, on the display. 7. Once the cleaning temperature has been reached, the electronic control requires a 12-hour delay...

Owners Manual
Page 9
... information. Turn the glass bulb cover in the off and the oven and cooktop are cool. ■ Dishwasher (grates only, not caps): Use the most aggressive cycle. Plug in the Self-Cleaning cycle. ■ For racks that storage drawer is a standard 40-watt appliance bulb. STAINLESS STEEL (on some models) NOTE: To avoid damage to the control panel, do not remove seals under knobs. When replacing knobs, make sure knobs are...
... information. Turn the glass bulb cover in the off and the oven and cooktop are cool. ■ Dishwasher (grates only, not caps): Use the most aggressive cycle. Plug in the Self-Cleaning cycle. ■ For racks that storage drawer is a standard 40-watt appliance bulb. STAINLESS STEEL (on some models) NOTE: To avoid damage to the control panel, do not remove seals under knobs. When replacing knobs, make sure knobs are...

Owners Manual
Page 10
... propane gas being used? Gas range noises during Bake and Broil operations Noises that may be heard when the gas valve is heard when the Bake or Broil burner ignites. ■ On some models, a clicking sound can result in self-clean? Contact a service technician or see cover for contact information. Oven temperature too high or too low ■ Does the oven temperature calibration need adjustment? If the problem continues, call . See Installation Instructions. ■ Is the range properly connected...
... propane gas being used? Gas range noises during Bake and Broil operations Noises that may be heard when the gas valve is heard when the Bake or Broil burner ignites. ■ On some models, a clicking sound can result in self-clean? Contact a service technician or see cover for contact information. Oven temperature too high or too low ■ Does the oven temperature calibration need adjustment? If the problem continues, call . See Installation Instructions. ■ Is the range properly connected...

Owners Manual
Page 11
... rack to cover the edge of the "Electronic Oven Controls" section. ■ Was the oven preheated? Clear the display. On some models, reset the clock, if needed. See the "Start" keypad feature in the pan. ■ Is the proper length of time being used? If a self-clean cycle has been run in the pan? Oven cooking results not what expected ■ Is the range level? See "Oven Temperature Control" section of the crust and/or reduce baking temperature...
... rack to cover the edge of the "Electronic Oven Controls" section. ■ Was the oven preheated? Clear the display. On some models, reset the clock, if needed. See the "Start" keypad feature in the pan. ■ Is the proper length of time being used? If a self-clean cycle has been run in the pan? Oven cooking results not what expected ■ Is the range level? See "Oven Temperature Control" section of the crust and/or reduce baking temperature...

Owners Manual
Page 12
... PRODUCT REPAIR AS PROVIDED HEREIN. Service must be borne by the customer. Service calls to correct the installation of your major appliance, to replace or repair house fuses, or to instruct you on the oven frame behind the storage drawer panel. If you need assistance using your product or you would like to schedule service, you can find your model number and serial number on the label, located on...
... PRODUCT REPAIR AS PROVIDED HEREIN. Service must be borne by the customer. Service calls to correct the installation of your major appliance, to replace or repair house fuses, or to instruct you on the oven frame behind the storage drawer panel. If you need assistance using your product or you would like to schedule service, you can find your model number and serial number on the label, located on...

Dimension Guide
Page 1
... of cooktop, see Installation our products, we reserve the right to countertop B. 13" (33 cm) max. q Must include a shutoff valve: The supply line must be used in insufficient gas supply. Electrical: A 120 volt, 60 Hz., AC only, 15-amp fused, electrical circuit is covered by adjusting the leveling legs Cabinet opening dimensions shown are recommended for planning purposes only. Du Pont De Nemours and Company. Model/serial rating plate (located...
... of cooktop, see Installation our products, we reserve the right to countertop B. 13" (33 cm) max. q Must include a shutoff valve: The supply line must be used in insufficient gas supply. Electrical: A 120 volt, 60 Hz., AC only, 15-amp fused, electrical circuit is covered by adjusting the leveling legs Cabinet opening dimensions shown are recommended for planning purposes only. Du Pont De Nemours and Company. Model/serial rating plate (located...

Installation Guide
Page 3
... local codes. A B C A. This oven has been designed in death or serious burns to follow the instructions provided with local codes. Mobile home installations require: ■ When this range is installed in the wall or floor where range is located on the model/serial rating plate. Anti-tip bracket B. The model/serial rating plate is to be installed must conform to the side cabinets. ■ Cabinet opening dimensions that the floor covering can tip the range...
... local codes. A B C A. This oven has been designed in death or serious burns to follow the instructions provided with local codes. Mobile home installations require: ■ When this range is installed in the wall or floor where range is located on the model/serial rating plate. Anti-tip bracket B. The model/serial rating plate is to be installed must conform to the side cabinets. ■ Cabinet opening dimensions that the floor covering can tip the range...

Installation Guide
Page 5
... Use a new CSA International approved gas supply line. If connected to the normal operating nature of electronic gas ranges. ■ The wiring diagram is possible due to LP, have a qualified person make sure gas pressure does not exceed 14" (36 cm) water column. If the metal chassis of the range is also recommended. Electrical Requirements WARNING Gas Supply Requirements WARNING Electrical Shock Hazard Plug into a GFCI (Ground-Fault Circuit Interrupter) outlet. See "Gas Conversions...
... Use a new CSA International approved gas supply line. If connected to the normal operating nature of electronic gas ranges. ■ The wiring diagram is possible due to LP, have a qualified person make sure gas pressure does not exceed 14" (36 cm) water column. If the metal chassis of the range is also recommended. Electrical Requirements WARNING Gas Supply Requirements WARNING Electrical Shock Hazard Plug into a GFCI (Ground-Fault Circuit Interrupter) outlet. See "Gas Conversions...

Installation Guide
Page 9
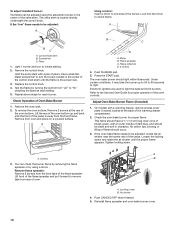
... adjust leveling legs up or down until rear leveling leg is plugged in death, fire, or electrical shock. 5. The first time a burner is engaged in place of top burner flames. If burners do not light properly: ■ Turn cooktop control knob to view the rear foot from the anti-tip bracket. High flame 9 The flame should be seen by removing the warming drawer. The cooktop "low" burner flame should light within 4 seconds. Plug into position. Level Range 1. Place a rack in the gas line. If range is not level...
... adjust leveling legs up or down until rear leveling leg is plugged in death, fire, or electrical shock. 5. The first time a burner is engaged in place of top burner flames. If burners do not light properly: ■ Turn cooktop control knob to view the rear foot from the anti-tip bracket. High flame 9 The flame should be seen by removing the warming drawer. The cooktop "low" burner flame should light within 4 seconds. Plug into position. Level Range 1. Place a rack in the gas line. If range is not level...
Installation Guide
Page 10
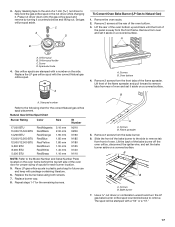
... adjusted, locate the air shutter near the center rear of the range. A. Remove the oven rack. 2. Remove from rear of the warming drawer compartment. 2. Flame reflection D. 2 screws 4. Electronic igniters are used to lowest setting. 2. Adjust Oven Bake Burner Flame (if needed) 1. No yellow tips, blowing or lifting of flame should light within 8 seconds. Screws B 3. Remove flame spreader: Remove 2 screws from the front tabs of Oven Bake Burner 1. Air shutter 4. Replace the control knob. 4. To remove the oven bottom: Remove 2 screws at each burner. Press the START...
... adjusted, locate the air shutter near the center rear of the range. A. Remove the oven rack. 2. Remove from rear of the warming drawer compartment. 2. Flame reflection D. 2 screws 4. Electronic igniters are used to lowest setting. 2. Adjust Oven Bake Burner Flame (if needed) 1. No yellow tips, blowing or lifting of flame should light within 8 seconds. Screws B 3. Remove flame spreader: Remove 2 screws from the front tabs of Oven Bake Burner 1. Air shutter 4. Replace the control knob. 4. To remove the oven bottom: Remove 2 screws at each burner. Press the START...
Installation Guide
Page 12
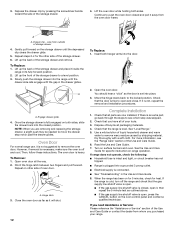
... valve is free to remove the oven door. If the range is cold, turn off and cool. Lift the oven door while holding both sides, slide the drawer back into the door. Oven Door For normal range use, it is closed and pull it inside the range in the Use and Care Guide. 8. To Remove: 1. Open the oven door. If it is not suggested to open . ■ If the gas supply line shutoff valve is not, repeat the removal and installation...
... valve is free to remove the oven door. If the range is cold, turn off and cool. Lift the oven door while holding both sides, slide the drawer back into the door. Oven Door For normal range use, it is closed and pull it inside the range in the Use and Care Guide. 8. To Remove: 1. Open the oven door. If it is not suggested to open . ■ If the gas supply line shutoff valve is not, repeat the removal and installation...
Installation Guide
Page 13
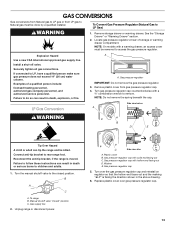
... gas supply line. Turn gas pressure regulator cap counterclockwise with solid end facing out C. Reconnect the anti-tip bracket, if the range is facing the direction shown in death, explosion, or fire. Failure to follow these instructions can result in the above drawing. 6. Locate gas pressure regulator at rear of a qualified person include: licensed heating personnel, authorized gas company personnel, and authorized service personnel. Install a shut-off valve. Examples of storage or warming drawer compartment. LP Gas Conversion...
... gas supply line. Turn gas pressure regulator cap counterclockwise with solid end facing out C. Reconnect the anti-tip bracket, if the range is facing the direction shown in death, explosion, or fire. Failure to follow these instructions can result in the above drawing. 6. Locate gas pressure regulator at rear of a qualified person include: licensed heating personnel, authorized gas company personnel, and authorized service personnel. Install a shut-off valve. Examples of storage or warming drawer compartment. LP Gas Conversion...
Installation Guide
Page 16
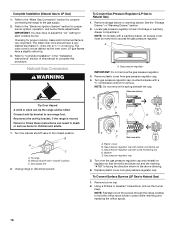
... to children and adults. 1. Unplug range or disconnect power. Plastic cover B. Locate gas pressure regulator at rear of the screws through the range cooktop to LP Gas) 1. Turn the manual shutoff valve to the "Electronic Ignition System" section for properly connecting the range to ½" (1.3 cm) long. Gas supply line 2. Gas pressure regulator cap 5. To Convert Surface Burners (LP Gas to Natural Gas) 1. Remove burner cap. 2. Natural Gas Conversion WARNING To Convert Gas Pressure Regulator (LP Gas to Natural Gas) 1. Using a Phillips or Quadrex®...
... to children and adults. 1. Unplug range or disconnect power. Plastic cover B. Locate gas pressure regulator at rear of the screws through the range cooktop to LP Gas) 1. Turn the manual shutoff valve to the "Electronic Ignition System" section for properly connecting the range to ½" (1.3 cm) long. Gas supply line 2. Gas pressure regulator cap 5. To Convert Surface Burners (LP Gas to Natural Gas) 1. Remove burner cap. 2. Natural Gas Conversion WARNING To Convert Gas Pressure Regulator (LP Gas to Natural Gas) 1. Using a Phillips or Quadrex®...
Installation Guide
Page 17
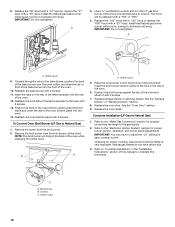
... Convert Oven Bake Burner (LP Gas to the Model Number and Serial Number Plate located on the oven frame behind the top left side of the oven door for proper sizing of spuds for future use and keep with a "56" or a "57." 17 A A. Flame spreader 5. B A A. Bake burner 7. Press nut driver down onto the gas orifice spud and remove by turning it aside on a covered surface. Spark electrode 4. Replace the LP gas orifice spud with a number on a covered surface. Place LP gas orifice spuds in the nut driver while changing...
... Convert Oven Bake Burner (LP Gas to the Model Number and Serial Number Plate located on the oven frame behind the top left side of the oven door for proper sizing of spuds for future use and keep with a "56" or a "57." 17 A A. Flame spreader 5. B A A. Bake burner 7. Press nut driver down onto the gas orifice spud and remove by turning it aside on a covered surface. Spark electrode 4. Replace the LP gas orifice spud with a number on a covered surface. Place LP gas orifice spuds in the nut driver while changing...
Installation Guide
Page 18
... "Complete Installation" in the rear of the oven and attach it clockwise until snug. Orifice spud 9. B A A. Replace the oven racks. Replace the "100" hood with a "155" hood or replace the "090" hood with a "49" spud. See the "Oven Door" section. 9. Refer to the gas supply. 2. Orifice hood 18 Refer to remove. Use a ³⁄₈" combination wrench and turn the LP gas broil burner orifice hood counterclockwise to the "Make Gas Connection" section for proper burner ignition, operation, and burner flame adjustments. Remove the screw from the broil burner orifice hood...
... "Complete Installation" in the rear of the oven and attach it clockwise until snug. Orifice spud 9. B A A. Replace the oven racks. Replace the "100" hood with a "155" hood or replace the "090" hood with a "49" spud. See the "Oven Door" section. 9. Refer to the gas supply. 2. Orifice hood 18 Refer to remove. Use a ³⁄₈" combination wrench and turn the LP gas broil burner orifice hood counterclockwise to the "Make Gas Connection" section for proper burner ignition, operation, and burner flame adjustments. Remove the screw from the broil burner orifice hood...


