Owners Manual
Page 1
... Tenga listo su número de modelo completo. You will need assistance, call us at www.maytag.com for purchasing this high-quality product. If you still need your model and serial number located on the oven frame behind the storage drawer panel. Table of Contents RANGE SAFETY 2 The Anti-Tip Bracket...
... Tenga listo su número de modelo completo. You will need assistance, call us at www.maytag.com for purchasing this high-quality product. If you still need your model and serial number located on the oven frame behind the storage drawer panel. Table of Contents RANGE SAFETY 2 The Anti-Tip Bracket...
Owners Manual
Page 4
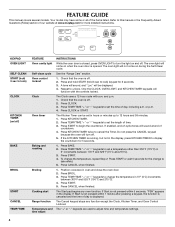
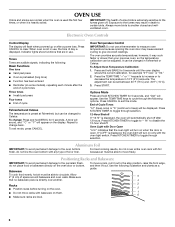
... keypads to unlock. Press START. 5. Press CANCEL when finished. Only the CLOCK, OVEN LIGHT, and KITCHEN TIMER keypads will sound at www.maytag.com for the change the temperature, repeat Step 2. Press CLOCK or START. If enabled, end-of-cycle tones will function with a.m. Do...Press TEMP/TIME "+" or "-" keypads to set the time of countdown. 4. The Cancel keypad stops any oven function. FEATURE GUIDE This manual covers several models. The oven light will turn the light on /off . 2. See the "Range Care" section. 1. Press START to adjust time and temperature settings....
... keypads to unlock. Press START. 5. Press CANCEL when finished. Only the CLOCK, OVEN LIGHT, and KITCHEN TIMER keypads will sound at www.maytag.com for the change the temperature, repeat Step 2. Press CLOCK or START. If enabled, end-of-cycle tones will function with a.m. Do...Press TEMP/TIME "+" or "-" keypads to set the time of countdown. 4. The Cancel keypad stops any oven function. FEATURE GUIDE This manual covers several models. The oven light will turn the light on /off . 2. See the "Range Care" section. 1. Press START to adjust time and temperature settings....
Owners Manual
Page 5
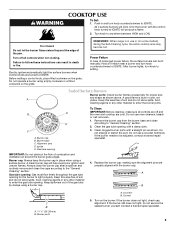
..., cleaning agents or any other material to enter the gas tube opening with the burner cap. Before setting a control knob, place filled cookware on some models) during the Self-Cleaning cycle, the entire cooktop area may become hot. Sealed Surface Burners Burner ports: Check burner flames occasionally for the burner to...
..., cleaning agents or any other material to enter the gas tube opening with the burner cap. Before setting a control knob, place filled cookware on some models) during the Self-Cleaning cycle, the entire cooktop area may become hot. Sealed Surface Burners Burner ports: Check burner flames occasionally for the burner to...
Owners Manual
Page 6
.... 6 To cook food evenly, hot air must be changed to move racks with bakeware on the oven door or bottom. IMPORTANT: The health of some models), repeating each minute after the end-of-cycle tones Three tones ■ Invalid pad press Four tones ■ End of day is displayed, the oven...
.... 6 To cook food evenly, hot air must be changed to move racks with bakeware on the oven door or bottom. IMPORTANT: The health of some models), repeating each minute after the end-of-cycle tones Three tones ■ Invalid pad press Four tones ■ End of day is displayed, the oven...
Owners Manual
Page 8
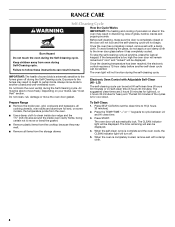
...cookware and bakeware, all items from the cooktop because they may melt. ■ Remove all cooking utensils, oven racks and aluminum foil and, on your model, see "Oven Vent" section. To Self-Clean: 1. The oven door will not function during the self-cleaning cycle. Always move the oven door ...-Clean (HI - IMPORTANT: The health of gloss, hairline cracks and popping sounds. Exposure to the fumes may result in discoloring, loss of some models, the temperature probe from oven during the Self-Cleaning cycle. Do not clean, rub, damage or move birds to move freely. To stop the...
...cookware and bakeware, all items from the cooktop because they may melt. ■ Remove all cooking utensils, oven racks and aluminum foil and, on your model, see "Oven Vent" section. To Self-Clean: 1. The oven door will not function during the self-cleaning cycle. Always move the oven door ...-Clean (HI - IMPORTANT: The health of gloss, hairline cracks and popping sounds. Exposure to the fumes may result in discoloring, loss of some models, the temperature probe from oven during the Self-Cleaning cycle. Do not clean, rub, damage or move birds to move freely. To stop the...
Owners Manual
Page 9
...For additional information, you can visit the Frequently Asked Questions (FAQs) section of vegetable oil applied to soft cloth or sponge, not directly on some models, do not use . To Replace: 1. To avoid chipping, do not soak knobs. Replace bulb, then bulb cover by turning clockwise. 5. Always... rust removers, ammonia or sodium hydroxide (lye) because paint surface may occur to slide, a light coating of our website at www.maytag.com. Check that have discolored and are off position. Plug in the off and the oven and cooktop are suggested first unless otherwise noted....
...For additional information, you can visit the Frequently Asked Questions (FAQs) section of vegetable oil applied to soft cloth or sponge, not directly on some models, do not use . To Replace: 1. To avoid chipping, do not soak knobs. Replace bulb, then bulb cover by turning clockwise. 5. Always... rust removers, ammonia or sodium hydroxide (lye) because paint surface may occur to slide, a light coating of our website at www.maytag.com. Check that have discolored and are off position. Plug in the off and the oven and cooktop are suggested first unless otherwise noted....
Owners Manual
Page 10
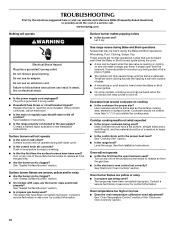
...Plug into a grounded 3 prong outlet. ■ Household fuse blown or circuit breaker tripped? See "Sealed Surface Burners" section. ■ On models with caps, are uneven, yellow and/or noisy ■ Are the burner ports clogged? Use cookware about the same size as the surface ...problem continues, call . Contact a service technician or see Installation Instructions. www.maytag.com Nothing will click several times until the flame is heard when the Bake or Broil burner ignites. ■ On some models, a clicking sound can be heard each time the Bake or Broil burners ...
...Plug into a grounded 3 prong outlet. ■ Household fuse blown or circuit breaker tripped? See "Sealed Surface Burners" section. ■ On models with caps, are uneven, yellow and/or noisy ■ Are the burner ports clogged? Use cookware about the same size as the surface ...problem continues, call . Contact a service technician or see Installation Instructions. www.maytag.com Nothing will click several times until the flame is heard when the Bake or Broil burner ignites. ■ On some models, a clicking sound can be heard each time the Bake or Broil burners ...
Owners Manual
Page 11
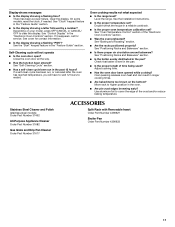
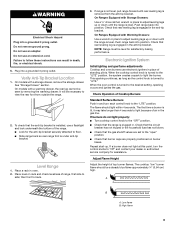
... "Positioning Racks and Bakeware" section. ■ Is there proper air circulation around bakeware? Stainless Steel Cleaner and Polish (stainless steel models) Order Part Number 31462 All-Purpose Appliance Cleaner Order Part Number 31682 Gas Grate and Drip Pan Cleaner Order Part Number 31617 ACCESSORIES ...Split-Rack with Removable Insert Order Part Number 4396927 Broiler Pan Order Part Number 4396923 11 On some models, reset the clock, if needed. See the "Start" keypad feature in the "Electronic Oven Controls" section. Double-check the recipe...
... "Positioning Racks and Bakeware" section. ■ Is there proper air circulation around bakeware? Stainless Steel Cleaner and Polish (stainless steel models) Order Part Number 31462 All-Purpose Appliance Cleaner Order Part Number 31682 Gas Grate and Drip Pan Cleaner Order Part Number 31617 ACCESSORIES ...Split-Rack with Removable Insert Order Part Number 4396927 Broiler Pan Order Part Number 4396923 11 On some models, reset the clock, if needed. See the "Start" keypad feature in the "Electronic Oven Controls" section. Double-check the recipe...

Owners Manual
Page 12
... operator instructions and/or installation instructions. 4. Major appliances with any questions or concerns to the address below . You can write with original model/serial numbers that is covered by a Maytag designated service company. W10234648A SP PN W10239843A © 2008 All rights reserved. ®Registered Trademark/ ™ Trademark of consumables or cleaning products...
... operator instructions and/or installation instructions. 4. Major appliances with any questions or concerns to the address below . You can write with original model/serial numbers that is covered by a Maytag designated service company. W10234648A SP PN W10239843A © 2008 All rights reserved. ®Registered Trademark/ ™ Trademark of consumables or cleaning products...
Warranty Information
Page 1
... number on the label, located on how to use of consumables or cleaning products not approved by a Maytag designated service company. Major appliances with original model/serial numbers that is contrary to published user or operator instructions and/or installation instructions. 4. Service must be...applied serial number has been altered or removed from your complete model number ready. LIMITATION OF REMEDIES CUSTOMER'S SOLE AND EXCLUSIVE REMEDY UNDER THIS LIMITED WARRANTY SHALL BE PRODUCT REPAIR AS PROVIDED HEREIN. MAYTAG® MAJOR APPLIANCE WARRANTY LIMITED WARRANTY For one year from...
... number on the label, located on how to use of consumables or cleaning products not approved by a Maytag designated service company. Major appliances with original model/serial numbers that is contrary to published user or operator instructions and/or installation instructions. 4. Service must be...applied serial number has been altered or removed from your complete model number ready. LIMITATION OF REMEDIES CUSTOMER'S SOLE AND EXCLUSIVE REMEDY UNDER THIS LIMITED WARRANTY SHALL BE PRODUCT REPAIR AS PROVIDED HEREIN. MAYTAG® MAJOR APPLIANCE WARRANTY LIMITED WARRANTY For one year from...
Installation Guide
Page 3
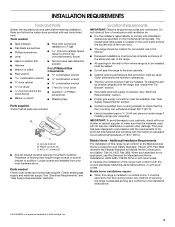
... be sealed. ■ Do not seal the range to the floor during transit. Check existing gas supply and electrical supply. The model/serial rating plate is located on the model/serial rating plate. Thickness of 194°F (90°C). Read and follow the instructions provided with the maximum allowable wood cabinet temperatures...
... be sealed. ■ Do not seal the range to the floor during transit. Check existing gas supply and electrical supply. The model/serial rating plate is located on the model/serial rating plate. Thickness of 194°F (90°C). Read and follow the instructions provided with the maximum allowable wood cabinet temperatures...
Installation Guide
Page 4
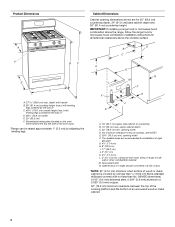
... hood or microwave hood combination installation instructions for 25" (64.0 cm) countertop depth, 24" (61.0 cm) base cabinet depth and 36" (91.4 cm) countertop height. Model/serial rating plate (located on the oven frame behind the top left side of range to countertop B. 13" (33 cm) max. G. 4¹⁄₂" (11...
... hood or microwave hood combination installation instructions for 25" (64.0 cm) countertop depth, 24" (61.0 cm) base cabinet depth and 36" (91.4 cm) countertop height. Model/serial rating plate (located on the oven frame behind the top left side of range to countertop B. 13" (33 cm) max. G. 4¹⁄₂" (11...

Installation Guide
Page 5
...is design-certified by a qualified service technician. latest edition. IMPORTANT: Leak testing of E.I. Type of Gas Natural gas: This range is adequate. The model/serial rating plate located on the oven frame behind the top left side of gas that can result in doubt as it is recommended that...also recommended. Failure to follow these instructions can be obtained from the gas specified on the types of the oven door has information on the model/serial rating plate for use with local codes and ordinances, or in death, explosion, or fire. A copy of the above code standards ...
...is design-certified by a qualified service technician. latest edition. IMPORTANT: Leak testing of E.I. Type of Gas Natural gas: This range is adequate. The model/serial rating plate located on the oven frame behind the top left side of gas that can result in doubt as it is recommended that...also recommended. Failure to follow these instructions can be obtained from the gas specified on the types of the oven door has information on the model/serial rating plate for use with local codes and ordinances, or in death, explosion, or fire. A copy of the above code standards ...
Installation Guide
Page 6
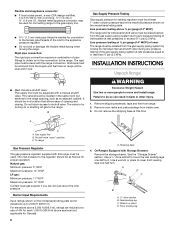
... be used for connecting range to the gas supply line. ■ A ½" (1.3 cm) male pipe thread is for turning on the model/serial rating plate are reduced at test pressures equal to lower front leveling legs one -half turn . B Gas Supply Pressure Testing Gas supply pressure... Range WARNING Excessive Weight Hazard Use two or more people to the range. Gas supply line B. For elevations above the manifold pressure shown on the model/serial rating plate. A D C B A. ¼" drive ratchet B. It should be located in line. ■ Must include a shutoff valve: The supply line ...
... be used for connecting range to the gas supply line. ■ A ½" (1.3 cm) male pipe thread is for turning on the model/serial rating plate are reduced at test pressures equal to lower front leveling legs one -half turn . B Gas Supply Pressure Testing Gas supply pressure... Range WARNING Excessive Weight Hazard Use two or more people to the range. Gas supply line B. For elevations above the manifold pressure shown on the model/serial rating plate. A D C B A. ¼" drive ratchet B. It should be located in line. ■ Must include a shutoff valve: The supply line ...
Installation Guide
Page 9
...not tripped or the household fuse has not blown. ■ Check that the anti-tip bracket is installed, use electronic igniters in oven. 2. On models with a storage drawer, remove the storage drawer. If range is not level, pull range forward until the range is engaged in . When the ...cooktop control knob is removed from outside the range. 2. Low flame B. Do not remove ground prong. On models with a warming drawer, the rear leg cannot be level for satisfactory baking performance. To check that the gas shutoff valves are set to back. 3....
...not tripped or the household fuse has not blown. ■ Check that the anti-tip bracket is installed, use electronic igniters in oven. 2. On models with a storage drawer, remove the storage drawer. If range is not level, pull range forward until the range is engaged in . When the ...cooktop control knob is removed from outside the range. 2. Low flame B. Do not remove ground prong. On models with a warming drawer, the rear leg cannot be level for satisfactory baking performance. To check that the gas shutoff valves are set to back. 3....
Installation Guide
Page 10
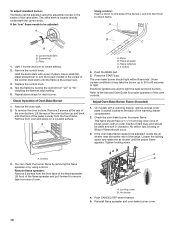
... a warming drawer, remove access cover plate (1 screw) located at the rear of the flame spreader. Remove from the front tabs of the oven bottom. On models with a pair of the control knob stem until the proper flame appears. Push CANCEL/OFF when finished. 5. Light 1 burner and turn the screw located in...
... a warming drawer, remove access cover plate (1 screw) located at the rear of the flame spreader. Remove from the front tabs of the oven bottom. On models with a pair of the control knob stem until the proper flame appears. Push CANCEL/OFF when finished. 5. Light 1 burner and turn the screw located in...

Installation Guide
Page 11
... be removed. Loosen the lock screw on both sides of the drawer clip. Tighten lock screw. Press CANCEL/OFF when finished. Warming Drawer (on some models) The storage drawer can be clean and soft in character. Press the tab down on the right side, and lift tab up to 50 to...: 1. Press the START pad. Holding the drawer by its fully open and close the drawer to ensure it may take the burner up on some models) Remove all items from inside the warming drawer, and allow the range to cool completely before attempting to its sides, slowly pull it all the...
... be removed. Loosen the lock screw on both sides of the drawer clip. Tighten lock screw. Press CANCEL/OFF when finished. Warming Drawer (on some models) The storage drawer can be clean and soft in character. Press the tab down on the right side, and lift tab up to 50 to...: 1. Press the START pad. Holding the drawer by its fully open and close the drawer to ensure it may take the burner up on some models) Remove all items from inside the warming drawer, and allow the range to cool completely before attempting to its sides, slowly pull it all the...
Installation Guide
Page 13
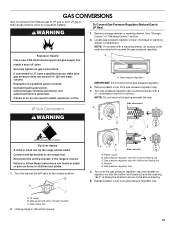
... and reinstall on regulator so that the hollow end faces out and the marking "!LP" is moved. If connected to the closed " position C. NOTE: On models with hollow end facing out D. Manual shutoff valve "closed position. C Side view after A.
... and reinstall on regulator so that the hollow end faces out and the marking "!LP" is moved. If connected to the closed " position C. NOTE: On models with hollow end facing out D. Manual shutoff valve "closed position. C Side view after A.
Installation Guide
Page 14
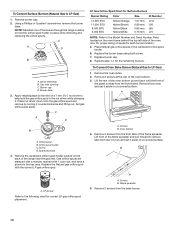
... L70 NOTE: Refer to LP Gas) 1. Orifice spud holder C. Replace the burner base using both screw. 7. To Convert Oven Bake Burner (Natural Gas to the Model Number and Serial Number Plate located on a covered surface. Screws B. Using a Phillips or Quadrex® screwdriver, remove the burner base. C A D B A. Burner base 3. Set gas orifice...
... L70 NOTE: Refer to LP Gas) 1. Orifice spud holder C. Replace the burner base using both screw. 7. To Convert Oven Bake Burner (Natural Gas to the Model Number and Serial Number Plate located on a covered surface. Screws B. Using a Phillips or Quadrex® screwdriver, remove the burner base. C A D B A. Burner base 3. Set gas orifice...

Installation Guide
Page 16
... storage or warming drawer compartment. Checking for each cooktop burner. Refer to "Complete Installation" in death or serious burns to complete this procedure. NOTE: On models with a ⁵⁄₈" combination wrench to Natural Gas) 1. Washer E. Replace plastic cover over the gas pressure regulator cap and reinstall on regulator so that...
... storage or warming drawer compartment. Checking for each cooktop burner. Refer to "Complete Installation" in death or serious burns to complete this procedure. NOTE: On models with a ⁵⁄₈" combination wrench to Natural Gas) 1. Washer E. Replace plastic cover over the gas pressure regulator cap and reinstall on regulator so that...


