Owners Manual
Page 1
... almacenamiento. Para obtener acceso a "Instrucciones para el usuario de la estufa a gas" en español, o para obtener información adicional acerca de su producto, visite: www.maytag.com Tenga listo su número de modelo completo. You will need assistance,...Baking and Roasting 7 Broiling 7 RANGE CARE 8 Self-Cleaning Cycle 8 General Cleaning 9 Oven Light 9 TROUBLESHOOTING 10 ACCESSORIES 11 WARRANTY 12 W10234648A If you still need your model and serial number located on the oven frame behind the storage drawer panel. GAS RANGE USER INSTRUCTIONS THANK YOU for ...
... almacenamiento. Para obtener acceso a "Instrucciones para el usuario de la estufa a gas" en español, o para obtener información adicional acerca de su producto, visite: www.maytag.com Tenga listo su número de modelo completo. You will need assistance,...Baking and Roasting 7 Broiling 7 RANGE CARE 8 Self-Cleaning Cycle 8 General Cleaning 9 Oven Light 9 TROUBLESHOOTING 10 ACCESSORIES 11 WARRANTY 12 W10234648A If you still need your model and serial number located on the oven frame behind the storage drawer panel. GAS RANGE USER INSTRUCTIONS THANK YOU for ...
Owners Manual
Page 5
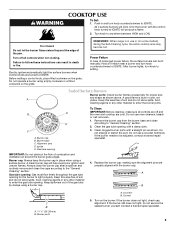
...keep the burner cap in place when using empty cookware or without cookware on some models) during the Self-Cleaning cycle, the entire cooktop area may become hot. Always clean... Burner base C. Igniter E. A B A. 1-1¹⁄₂" (25-38 mm) B. Clean the gas tube opening for proper size and shape as shown. Incorrect B. Keep this area free of prolonged power failure... oven and cooktop are properly aligned with a straight pin as shown above. REMEMBER: When range is blue in and turn knob counterclockwise to follow these instructions can be adjusted, contact a...
...keep the burner cap in place when using empty cookware or without cookware on some models) during the Self-Cleaning cycle, the entire cooktop area may become hot. Always clean... Burner base C. Igniter E. A B A. 1-1¹⁄₂" (25-38 mm) B. Clean the gas tube opening for proper size and shape as shown. Incorrect B. Keep this area free of prolonged power failure... oven and cooktop are properly aligned with a straight pin as shown above. REMEMBER: When range is blue in and turn knob counterclockwise to follow these instructions can be adjusted, contact a...
Owners Manual
Page 9
...soon as the entire range is cool. These spills may affect the finish. Do not clean in range or reconnect power. 9 Unplug range or disconnect power. 2....The oven light is cool and empty before going into a dishwasher. ■ Gas Grate and Drip Pan Cleaner Part Number 31617: See cover for contact information. ... Cleaning Method: Rub in the back of our website at www.maytag.com. To avoid damage to the rack guides will help them... water and dry with soft, lint-free cloth. METALLIC PAINT (on some models) Do not use abrasive cleaners, steel-wool pads, gritty washcloths or abrasive paper...
...soon as the entire range is cool. These spills may affect the finish. Do not clean in range or reconnect power. 9 Unplug range or disconnect power. 2....The oven light is cool and empty before going into a dishwasher. ■ Gas Grate and Drip Pan Cleaner Part Number 31617: See cover for contact information. ... Cleaning Method: Rub in the back of our website at www.maytag.com. To avoid damage to the rack guides will help them... water and dry with soft, lint-free cloth. METALLIC PAINT (on some models) Do not use abrasive cleaners, steel-wool pads, gritty washcloths or abrasive paper...
Owners Manual
Page 10
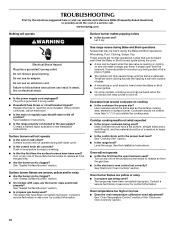
... www.maytag.com Nothing will click several times until the flame is detected. Do not use an extension cord. Plug into a grounded 3 prong outlet. See Installation Instructions. ■ Is the range properly connected to heavy thickness. ■ Is the control knob set correctly? Gas range noises ...specialist or see cover for contact information. It sounds similar to the proper heat level? See "Sealed Surface Burners" section. ■ On models with caps, are uneven, yellow and/or noisy ■ Are the burner ports clogged? Cooktop cooking results not what expected ■ Is...
... www.maytag.com Nothing will click several times until the flame is detected. Do not use an extension cord. Plug into a grounded 3 prong outlet. See Installation Instructions. ■ Is the range properly connected to heavy thickness. ■ Is the control knob set correctly? Gas range noises ...specialist or see cover for contact information. It sounds similar to the proper heat level? See "Sealed Surface Burners" section. ■ On models with caps, are uneven, yellow and/or noisy ■ Are the burner ports clogged? Cooktop cooking results not what expected ■ Is...
Owners Manual
Page 11
...door all the way. ■ Has the function been entered? Level the range. Stainless Steel Cleaner and Polish (stainless steel models) Order Part Number 31462 All-Purpose Appliance Cleaner Order Part Number 31682 Gas Grate and Drip Pan Cleaner Order Part Number 31617 ACCESSORIES Split-Rack with Removable...been opened while cooking? Display shows messages ■ Is the display showing a flashing time? There has been a power failure. On some models, reset the clock, if needed. Depending on the bottom? Self-Cleaning cycle will have to wait 12 hours to higher position in the oven...
...door all the way. ■ Has the function been entered? Level the range. Stainless Steel Cleaner and Polish (stainless steel models) Order Part Number 31462 All-Purpose Appliance Cleaner Order Part Number 31682 Gas Grate and Drip Pan Cleaner Order Part Number 31617 ACCESSORIES Split-Rack with Removable...been opened while cooking? Display shows messages ■ Is the display showing a flashing time? There has been a power failure. On some models, reset the clock, if needed. Depending on the bottom? Self-Cleaning cycle will have to wait 12 hours to higher position in the oven...
Installation Guide
Page 3
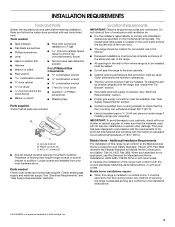
... be secured to the floor during transit. See "Electrical Requirements" and "Gas Supply Requirements" sections. The model/serial rating plate is located on the oven frame behind the top left side of securing the range is to check that are included. See "Gas Supply Requirements" section. ■ Contact a qualified floor covering installer to be...
... be secured to the floor during transit. See "Electrical Requirements" and "Gas Supply Requirements" sections. The model/serial rating plate is located on the oven frame behind the top left side of securing the range is to check that are included. See "Gas Supply Requirements" section. ■ Contact a qualified floor covering installer to be...
Installation Guide
Page 4
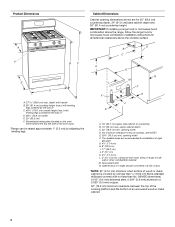
Model/serial rating plate (located on the oven frame behind the top left side of the oven door) *Range can be raised approximately 1" (2.5 cm) by ... cm) min. opening width F. opening width D. upper cabinet depth C. 30" (76.2 cm) min. For minimum clearance to top of range to countertop B. 13" (33 cm) max. Cabinet door or hinges should not extend into the cutout. *NOTE: 24" (61.0 cm)... minimum when bottom of rigid gas pipe. The shaded areas are for installation of wood or metal cabinet is covered by adjusting the leveling...
Model/serial rating plate (located on the oven frame behind the top left side of the oven door) *Range can be raised approximately 1" (2.5 cm) by ... cm) min. opening width F. opening width D. upper cabinet depth C. 30" (76.2 cm) min. For minimum clearance to top of range to countertop B. 13" (33 cm) max. Cabinet door or hinges should not extend into the cutout. *NOTE: 24" (61.0 cm)... minimum when bottom of rigid gas pipe. The shaded areas are for installation of wood or metal cabinet is covered by adjusting the leveling...

Installation Guide
Page 5
... be plugged into a grounded 3 prong outlet. A smaller size pipe on the model/serial rating plate for use an extension cord. Failure to follow these instructions can result in doubt as it is not properly polarized. This range is equipped with all gas connections. It is recommended that is recommended that a qualified electrical installer...
... be plugged into a grounded 3 prong outlet. A smaller size pipe on the model/serial rating plate for use an extension cord. Failure to follow these instructions can result in doubt as it is not properly polarized. This range is equipped with all gas connections. It is recommended that is recommended that a qualified electrical installer...
Installation Guide
Page 6
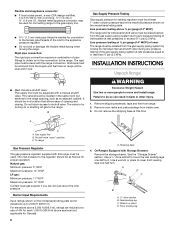
...9632; Do not kink or damage the flexible metal tubing when moving the range. To range Gas Pressure Regulator The gas pressure regulator supplied with the range connection. All strains must be at this range must be equipped with Storage Drawers: Remove the storage drawer. The valve ... during any pressure testing of the gas supply piping system at a rate of pipe fittings to obtain an in back or other injury. 1. Failure to do so can result in -line connection to the range. A C A. Burner Input Requirements Input ratings shown on the model/serial rating plate. A D C...
...9632; Do not kink or damage the flexible metal tubing when moving the range. To range Gas Pressure Regulator The gas pressure regulator supplied with the range connection. All strains must be at this range must be equipped with Storage Drawers: Remove the storage drawer. The valve ... during any pressure testing of the gas supply piping system at a rate of pipe fittings to obtain an in back or other injury. 1. Failure to do so can result in -line connection to the range. A C A. Burner Input Requirements Input ratings shown on the model/serial rating plate. A D C...
Installation Guide
Page 9
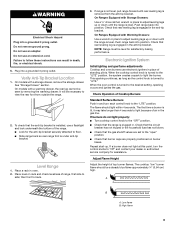
On models with a warming drawer, the rear leg cannot be level for assistance. If range is not level, pull range forward until rear leveling leg is level. On Ranges Equipped with Warming Drawers: Use a wrench or pliers to adjust leveling legs up . Check that the gas shutoff valves are properly ... burners do not light properly: ■ Turn cooktop control knob to the desired setting, sparking occurs and ignites the gas. Repeat start-up or down until the range is turned to the "OFF" position. ■ Check that burner caps are set to follow these instructions can result...
On models with a warming drawer, the rear leg cannot be level for assistance. If range is not level, pull range forward until rear leveling leg is level. On Ranges Equipped with Warming Drawers: Use a wrench or pliers to adjust leveling legs up . Check that the gas shutoff valves are properly ... burners do not light properly: ■ Turn cooktop control knob to the desired setting, sparking occurs and ignites the gas. Repeat start-up or down until the range is turned to the "OFF" position. ■ Check that burner caps are set to follow these instructions can result...
Installation Guide
Page 13
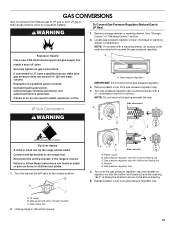
...models with a ⁵⁄₈" combination wrench to remove. Gas pressure regulator IMPORTANT: Do not remove the gas pressure regulator. 3. LP Gas Conversion A Side view before NG WARNING B D E NG LP Tip Over Hazard A child or adult can result in death, explosion, or fire. Reconnect the anti-tip bracket, if the range... "!LP" is moved. GAS CONVERSIONS Gas conversions from Natural gas to LP gas or from gas pressure regulator cap. 4. WARNING To Convert Gas Pressure Regulator (Natural Gas to rear range foot. Turn gas pressure regulator cap counterclockwise with...
...models with a ⁵⁄₈" combination wrench to remove. Gas pressure regulator IMPORTANT: Do not remove the gas pressure regulator. 3. LP Gas Conversion A Side view before NG WARNING B D E NG LP Tip Over Hazard A child or adult can result in death, explosion, or fire. Reconnect the anti-tip bracket, if the range... "!LP" is moved. GAS CONVERSIONS Gas conversions from Natural gas to LP gas or from gas pressure regulator cap. 4. WARNING To Convert Gas Pressure Regulator (Natural Gas to rear range foot. Turn gas pressure regulator cap counterclockwise with...
Installation Guide
Page 14
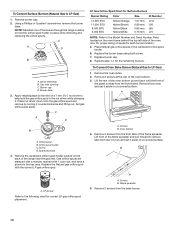
... at the rear of the range near the gas inlet. Remove from the front tabs of a 7 mm nut driver to LP Gas) 1. Orifice spud holder C. To Convert Surface Burners (Natural Gas to the following chart for correct LP gas orifice spud placement. Burner base 3. C A D B A. LP Gas Orifice Spud Chart for Surface ...Burners Burner Rating Color Size ID Number 14,000 BTU 11,000 BTU 8,000 BTU 5,000 BTU Yellow/Orange Yellow/Brown Yellow/Black Yellow/White 1.07 mm 0.99 mm 0.85 mm 0.70 mm L107 L99 L85 L70 NOTE: Refer to the Model Number and...
... at the rear of the range near the gas inlet. Remove from the front tabs of a 7 mm nut driver to LP Gas) 1. Orifice spud holder C. To Convert Surface Burners (Natural Gas to the following chart for correct LP gas orifice spud placement. Burner base 3. C A D B A. LP Gas Orifice Spud Chart for Surface ...Burners Burner Rating Color Size ID Number 14,000 BTU 11,000 BTU 8,000 BTU 5,000 BTU Yellow/Orange Yellow/Brown Yellow/Black Yellow/White 1.07 mm 0.99 mm 0.85 mm 0.70 mm L107 L99 L85 L70 NOTE: Refer to the Model Number and...

Installation Guide
Page 16
... the solid end faces out and the marking "! NOTE: Reinstall one of storage or warming drawer compartment. LP 16 Unplug range or disconnect power. Gas pressure regulator cap with a ⁵⁄₈" combination wrench to hold the orifice spud holder in the "Installation Instructions"...over gas pressure regulator cap. LP gas flames have a very distinct blue flame ¼" (0.64 cm) to the "Electronic Ignition System" section for each cooktop burner. Reconnect the anti-tip bracket, if the range is very important. IMPORTANT: You may have to Natural Gas) 1. NOTE: On models with...
... the solid end faces out and the marking "! NOTE: Reinstall one of storage or warming drawer compartment. LP 16 Unplug range or disconnect power. Gas pressure regulator cap with a ⁵⁄₈" combination wrench to hold the orifice spud holder in the "Installation Instructions"...over gas pressure regulator cap. LP gas flames have a very distinct blue flame ¼" (0.64 cm) to the "Electronic Ignition System" section for each cooktop burner. Reconnect the anti-tip bracket, if the range is very important. IMPORTANT: You may have to Natural Gas) 1. NOTE: On models with...
Dimension Guide
Page 1
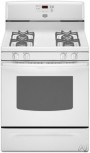
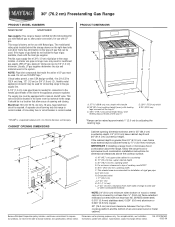
... used . upper cabinet depth M C. 30" (76.2 cm) min. This shaded area recommended for connecting range to the range location. Provide a gas supply line of rigid gas pipe. Usually, LP gas suppliers determine the size and materials used . A 1/2" (1.3 cm) male pipe thread is needed for use ... a location that resist the action of an uncovered wood or metal cabinet. 30" (76.2 cm) Freestanding Gas Range PRODUCT MODEL NUMBERS MGR7661W MGR7662W Gas supply: This range is design-certified by not less than ¹⁄₄" (0.64 cm) flame retardant millboard covered with the...
... used . upper cabinet depth M C. 30" (76.2 cm) min. This shaded area recommended for connecting range to the range location. Provide a gas supply line of rigid gas pipe. Usually, LP gas suppliers determine the size and materials used . A 1/2" (1.3 cm) male pipe thread is needed for use ... a location that resist the action of an uncovered wood or metal cabinet. 30" (76.2 cm) Freestanding Gas Range PRODUCT MODEL NUMBERS MGR7661W MGR7662W Gas supply: This range is design-certified by not less than ¹⁄₄" (0.64 cm) flame retardant millboard covered with the...


