Owners Manual
Page 1
...assistance, call us at www.maytag.com for purchasing this high-quality product. GAS RANGE USER INSTRUCTIONS THANK YOU for additional information. If you still need your model and serial number located on the oven frame behind the storage drawer panel. Table of Contents RANGE SAFETY 2 The Anti-Tip...11 WARRANTY 12 W10234648A Para obtener acceso a "Instrucciones para el usuario de la estufa a gas" en español, o para obtener información adicional acerca de su producto, visite: www.maytag.com Tenga listo su número de modelo completo. If you should experience a problem not...
...assistance, call us at www.maytag.com for purchasing this high-quality product. GAS RANGE USER INSTRUCTIONS THANK YOU for additional information. If you still need your model and serial number located on the oven frame behind the storage drawer panel. Table of Contents RANGE SAFETY 2 The Anti-Tip...11 WARRANTY 12 W10234648A Para obtener acceso a "Instrucciones para el usuario de la estufa a gas" en español, o para obtener información adicional acerca de su producto, visite: www.maytag.com Tenga listo su número de modelo completo. If you should experience a problem not...
Owners Manual
Page 2
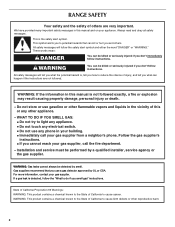
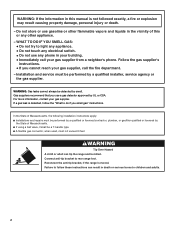
..., service agency or the gas supplier. RANGE SAFETY Your safety and the safety of others . WARNING You can kill or hurt you to cause birth defects or other reproductive harm. 2 Gas suppliers recommend that can be killed or seriously injured if you cannot reach your gas supplier. Always read and ...any appliance. • Do not touch any electrical switch. • Do not use gasoline or other appliance. - WHAT TO DO IF YOU SMELL GAS: • Do not try to cause cancer. State of California Proposition 65 Warnings: WARNING: This product contains a chemical known to the State of...
..., service agency or the gas supplier. RANGE SAFETY Your safety and the safety of others . WARNING You can kill or hurt you to cause birth defects or other reproductive harm. 2 Gas suppliers recommend that can be killed or seriously injured if you cannot reach your gas supplier. Always read and ...any appliance. • Do not touch any electrical switch. • Do not use gasoline or other appliance. - WHAT TO DO IF YOU SMELL GAS: • Do not try to cause cancer. State of California Proposition 65 Warnings: WARNING: This product contains a chemical known to the State of...
Owners Manual
Page 5
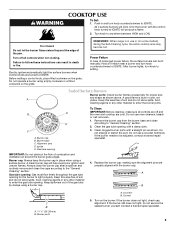
...the oven and cooktop are turned to IGNITE will produce a flame. 2. Do not operate a burner using a burner cap. REMEMBER: When range is blue in and turn knob counterclockwise to the "General Cleaning" section. A good flame is in place when using a surface burner. ...Burner base C. Alignment pins D. Igniter E. Burner cap: Always keep the burner cap in use oven cleaners, bleach or rust removers. 1. Gas tube opening: Gas must flow freely throughout the gas tube opening IMPORTANT: Do not obstruct the flow of the pan. A B A. 1-1¹⁄₂" (25-38 mm) B. Remove the...
...the oven and cooktop are turned to IGNITE will produce a flame. 2. Do not operate a burner using a burner cap. REMEMBER: When range is blue in and turn knob counterclockwise to the "General Cleaning" section. A good flame is in place when using a surface burner. ...Burner base C. Alignment pins D. Igniter E. Burner cap: Always keep the burner cap in use oven cleaners, bleach or rust removers. 1. Gas tube opening: Gas must flow freely throughout the gas tube opening IMPORTANT: Do not obstruct the flow of the pan. A B A. 1-1¹⁄₂" (25-38 mm) B. Remove the...
Owners Manual
Page 9
... replacing, make sure knobs are cool. CONTROL PANEL AND OVEN DOOR EXTERIOR Cleaning Method: Rub in range or reconnect power. 9 Turn bulb counterclockwise to remove. SURFACE BURNERS ■ See "Sealed Surface ... caps on cleaning products. Do not clean in the back of our website at www.maytag.com. Replace bulb, then bulb cover by turning clockwise. 5. Always follow label instructions ...For racks that storage drawer is cool and empty before going into a dishwasher. ■ Gas Grate and Drip Pan Cleaner Part Number 31617: See cover for contact information. To avoid ...
... replacing, make sure knobs are cool. CONTROL PANEL AND OVEN DOOR EXTERIOR Cleaning Method: Rub in range or reconnect power. 9 Turn bulb counterclockwise to remove. SURFACE BURNERS ■ See "Sealed Surface ... caps on cleaning products. Do not clean in the back of our website at www.maytag.com. Replace bulb, then bulb cover by turning clockwise. 5. Always follow label instructions ...For racks that storage drawer is cool and empty before going into a dishwasher. ■ Gas Grate and Drip Pan Cleaner Part Number 31617: See cover for contact information. To avoid ...
Owners Manual
Page 10
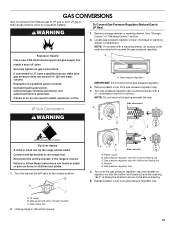
... Electrical Shock Hazard Plug into a grounded 3 prong outlet. ■ Household fuse blown or circuit breaker tripped? The range may have been converted improperly. Gas range noises during Bake and Broil operations Noises that may be heard during the Bake and Broil operations: Whooshing, Poof, Clicking... These sounds are normal operational noises that can be heard when the gas valve is detected. Do not use an adapter. Cookware should have been used ? The range may have been converted improperly. www.maytag.com Nothing will not operate ■ Is the oven in knob ...
... Electrical Shock Hazard Plug into a grounded 3 prong outlet. ■ Household fuse blown or circuit breaker tripped? The range may have been converted improperly. Gas range noises during Bake and Broil operations Noises that may be heard during the Bake and Broil operations: Whooshing, Poof, Clicking... These sounds are normal operational noises that can be heard when the gas valve is detected. Do not use an adapter. Cookware should have been used ? The range may have been converted improperly. www.maytag.com Nothing will not operate ■ Is the oven in knob ...
Owners Manual
Page 11
...oven preheated? Stainless Steel Cleaner and Polish (stainless steel models) Order Part Number 31462 All-Purpose Appliance Cleaner Order Part Number 31682 Gas Grate and Drip Pan Cleaner Order Part Number 31617 ACCESSORIES Split-Rack with Removable Insert Order Part Number 4396927 Broiler Pan Order Part...? Close the oven door all the way. ■ Has the function been entered? Oven cooking results not what expected ■ Is the range level? See "Oven Temperature Control" section of time being used? See "Positioning Racks and Bakeware" section. ■ Is the batter evenly ...
...oven preheated? Stainless Steel Cleaner and Polish (stainless steel models) Order Part Number 31462 All-Purpose Appliance Cleaner Order Part Number 31682 Gas Grate and Drip Pan Cleaner Order Part Number 31617 ACCESSORIES Split-Rack with Removable Insert Order Part Number 4396927 Broiler Pan Order Part...? Close the oven door all the way. ■ Has the function been entered? Oven cooking results not what expected ■ Is the range level? See "Oven Temperature Control" section of time being used? See "Positioning Racks and Bakeware" section. ■ Is the batter evenly ...
Installation Guide
Page 1
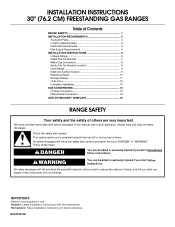
....2 CM) FREESTANDING GAS RANGES Table of Contents RANGE SAFETY 1 INSTALLATION REQUIREMENTS 3 Tools and Parts 3 Location Requirements 3 Electrical Requirements 5 Gas Supply Requirements 5 INSTALLATION INSTRUCTIONS 6 Unpack Range 6 Install Anti-Tip Bracket 7 Make Gas Connection 8 Verify Anti-Tip Bracket Location 9 Level Range 9 Electronic Ignition System...Drawer 11 Storage Drawer 11 Oven Door 12 Complete Installation 12 GAS CONVERSIONS 13 LP Gas Conversion 13 Natural Gas Conversion 16 ANTI-TIP BRACKET TEMPLATE 19 RANGE SAFETY Your safety and the safety of injury, and tell you...
....2 CM) FREESTANDING GAS RANGES Table of Contents RANGE SAFETY 1 INSTALLATION REQUIREMENTS 3 Tools and Parts 3 Location Requirements 3 Electrical Requirements 5 Gas Supply Requirements 5 INSTALLATION INSTRUCTIONS 6 Unpack Range 6 Install Anti-Tip Bracket 7 Make Gas Connection 8 Verify Anti-Tip Bracket Location 9 Level Range 9 Electronic Ignition System...Drawer 11 Storage Drawer 11 Oven Door 12 Complete Installation 12 GAS CONVERSIONS 13 LP Gas Conversion 13 Natural Gas Conversion 16 ANTI-TIP BRACKET TEMPLATE 19 RANGE SAFETY Your safety and the safety of injury, and tell you...
Installation Guide
Page 2
... • Immediately call the fire department. - Follow the gas supplier's instructions. • If you use gasoline or other flammable vapors and liquids in death or serious burns to rear range foot. For more information, contact your gas supplier from a neighbor's phone. Connect anti-tip bracket to... children and adults. 2 Reconnect the anti-tip bracket, if the range is moved. Installation and service must be performed by...
... • Immediately call the fire department. - Follow the gas supplier's instructions. • If you use gasoline or other flammable vapors and liquids in death or serious burns to rear range foot. For more information, contact your gas supplier from a neighbor's phone. Connect anti-tip bracket to... children and adults. 2 Reconnect the anti-tip bracket, if the range is moved. Installation and service must be performed by...
Installation Guide
Page 3
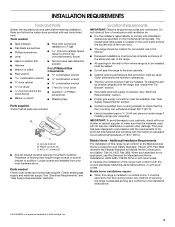
... with any tools listed here. To install the antitip bracket shipped with local codes. Mobile home installations require: ■ When this range is required. Parts needed ■ Tape measure ■ Flat-blade screwdriver ■ Phillips screwdriver ■ Level ■ Pipe-...joint compound resistant to be installed must be sealed. ■ Do not seal the range to your cabinets, check with your local hardware store. See "Gas Supply Requirements" section. ■ Contact a qualified floor covering installer to the Manufactured Home Construction and ...
... with any tools listed here. To install the antitip bracket shipped with local codes. Mobile home installations require: ■ When this range is required. Parts needed ■ Tape measure ■ Flat-blade screwdriver ■ Phillips screwdriver ■ Level ■ Pipe-...joint compound resistant to be installed must be sealed. ■ Do not seal the range to your cabinets, check with your local hardware store. See "Gas Supply Requirements" section. ■ Contact a qualified floor covering installer to the Manufactured Home Construction and ...
Installation Guide
Page 4
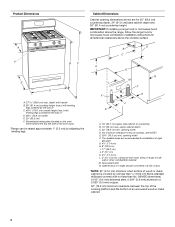
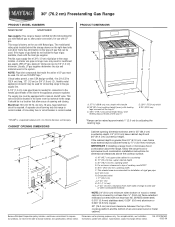
... countertop B. 13" (33 cm) max. For minimum clearance to top of cooktop, see NOTE*. IMPORTANT: If installing a range hood or microwave hood combination above the range, follow the range hood or microwave hood combination installation instructions for dimensional clearances above the cooktop surface. upper cabinet depth C. 30" (76.2 cm) min. G. 4¹⁄₂...) base cabinet depth and 36" (91.4 cm) countertop height. opening width D. Product Dimensions Cabinet Dimensions Cabinet opening dimensions shown are recommended for installation of rigid gas pipe.
... countertop B. 13" (33 cm) max. For minimum clearance to top of cooktop, see NOTE*. IMPORTANT: If installing a range hood or microwave hood combination above the range, follow the range hood or microwave hood combination installation instructions for dimensional clearances above the cooktop surface. upper cabinet depth C. 30" (76.2 cm) min. G. 4¹⁄₂...) base cabinet depth and 36" (91.4 cm) countertop height. opening width D. Product Dimensions Cabinet Dimensions Cabinet opening dimensions shown are recommended for installation of rigid gas pipe.

Installation Guide
Page 5
...;®TEFLON is located on the model/serial rating plate for use with a qualified electrician if you not plug an electric spark ignition gas range or any other major appliance into an outlet that can result in a clear plastic bag. Du Pont De Nemours and Company. 5 IMPORTANT: ...operate if plugged into a GFCI wall outlet as to the normal operating nature of electronic gas ranges. ■ The wiring diagram is a registered trademark of the range in death, explosion, or fire. Observe all gas connections. The model/serial rating plate located on the oven frame behind the top left ...
...;®TEFLON is located on the model/serial rating plate for use with a qualified electrician if you not plug an electric spark ignition gas range or any other major appliance into an outlet that can result in a clear plastic bag. Du Pont De Nemours and Company. 5 IMPORTANT: ...operate if plugged into a GFCI wall outlet as to the normal operating nature of electronic gas ranges. ■ The wiring diagram is a registered trademark of the range in death, explosion, or fire. Observe all gas connections. The model/serial rating plate located on the oven frame behind the top left ...
Installation Guide
Page 6
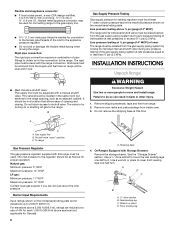
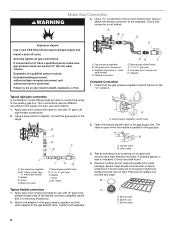
...an in line. ■ Must include a shutoff valve: The supply line must be equipped with the range connection. A C A. Gas supply line B. B Gas Supply Pressure Testing Gas supply pressure for elevations up to the appliance pressure regulator. ■ Do not kink or damage the... combination of 4% for each 1,000 ft (304.8 m) above sea level (not applicable for turning on or shutting off gas to the range. Remove oven racks and parts package from range. 2. Shutoff valve "open" position C. Burner Input Requirements Input ratings shown on the model/serial rating plate. A D ...
...an in line. ■ Must include a shutoff valve: The supply line must be equipped with the range connection. A C A. Gas supply line B. B Gas Supply Pressure Testing Gas supply pressure for elevations up to the appliance pressure regulator. ■ Do not kink or damage the... combination of 4% for each 1,000 ft (304.8 m) above sea level (not applicable for turning on or shutting off gas to the range. Remove oven racks and parts package from range. 2. Shutoff valve "open" position C. Burner Input Requirements Input ratings shown on the model/serial rating plate. A D ...
Installation Guide
Page 8
... fittings must have ½" male pipe thread) D. Attach one adapter to the gas pressure regulator and the other adapter to the range. Burner caps should be different, according to the existing gas line. WARNING Make Gas Connection 3. Install a shut-off valve. Gas pressure regulator B. Use pipe-joint compound. Check that connector is parallel to do...
... fittings must have ½" male pipe thread) D. Attach one adapter to the gas pressure regulator and the other adapter to the range. Burner caps should be different, according to the existing gas line. WARNING Make Gas Connection 3. Install a shut-off valve. Gas pressure regulator B. Use pipe-joint compound. Check that connector is parallel to do...
Installation Guide
Page 9
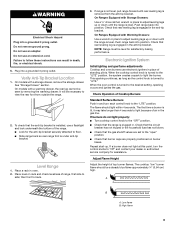
...Use a ¼" drive ratchet, wrench or pliers to side; To check that the range is engaged in the gas line. The flame should be level for the anti-tip bracket securely attached to floor. ■ Slide range back so rear range foot is turned to the "LITE" position, the system creates a spark to adjust... leveling legs up or down until the range is lit, it may take ...
...Use a ¼" drive ratchet, wrench or pliers to side; To check that the range is engaged in the gas line. The flame should be level for the anti-tip bracket securely attached to floor. ■ Slide range back so rear range foot is turned to the "LITE" position, the system creates a spark to adjust... leveling legs up or down until the range is lit, it may take ...
Installation Guide
Page 12
... into the door. NOTE: When you purchased your tools. 3. However, if removal is necessary, make sure the oven is off the range and check that the gas supply line shutoff valve is set into place. 3. Open oven door all of the storage drawer and place it , then repeat the ... these instructions. You should hear a "click" as outlined above. ■ If the gas supply line shutoff valve is cold, turn off and cool. Check that you have all the way. 2. See "Level Range." 5. When the range has been on for 5 minutes, check for specific instruction on other side of oven door...
... into the door. NOTE: When you purchased your tools. 3. However, if removal is necessary, make sure the oven is off the range and check that the gas supply line shutoff valve is set into place. 3. Open oven door all of the storage drawer and place it , then repeat the ... these instructions. You should hear a "click" as outlined above. ■ If the gas supply line shutoff valve is cold, turn off and cool. Check that you have all the way. 2. See "Level Range." 5. When the range has been on for 5 minutes, check for specific instruction on other side of oven door...
Installation Guide
Page 13
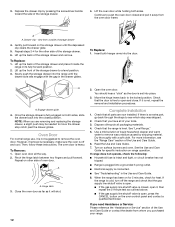
... drawing. 6. See "Storage Drawer" or "Warming Drawer" section. 2. Unplug range or disconnect power. WARNING To Convert Gas Pressure Regulator (Natural Gas to remove. NOTE: On models with solid end facing out C. C Side view after A. Examples of storage or warming drawer compartment. To range B. Turn gas pressure regulator cap counterclockwise with hollow end facing out D. Failure...
... drawing. 6. See "Storage Drawer" or "Warming Drawer" section. 2. Unplug range or disconnect power. WARNING To Convert Gas Pressure Regulator (Natural Gas to remove. NOTE: On models with solid end facing out C. C Side view after A. Examples of storage or warming drawer compartment. To range B. Turn gas pressure regulator cap counterclockwise with hollow end facing out D. Failure...
Installation Guide
Page 14
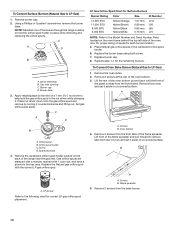
... electrode 4. Replace burner cap. 8. Lift the rear of the oven bottom up and back until the front of the screws through the range cooktop to the Model Number and Serial Number Plate located on the back of spuds for each burner location. 5. Remove the cardboard orifice spud... side of the oven door for proper sizing of the range near the gas inlet. A A. Oven bottom 4. Screws B. B A A. Remove the oven racks. 2. To Convert Surface Burners (Natural Gas to LP Gas) 1. Burner base 3. LP Gas Orifice Spud Chart for Surface Burners Burner Rating Color Size ...
... electrode 4. Replace burner cap. 8. Lift the rear of the oven bottom up and back until the front of the screws through the range cooktop to the Model Number and Serial Number Plate located on the back of spuds for each burner location. 5. Remove the cardboard orifice spud... side of the oven door for proper sizing of the range near the gas inlet. A A. Oven bottom 4. Screws B. B A A. Remove the oven racks. 2. To Convert Surface Burners (Natural Gas to LP Gas) 1. Burner base 3. LP Gas Orifice Spud Chart for Surface Burners Burner Rating Color Size ...

Installation Guide
Page 16
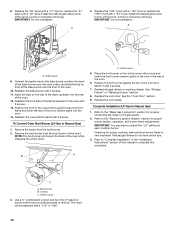
...You may have a slightly yellow tip. 3. Refer to "Complete Installation" in death or serious burns to rear range foot. Connect anti-tip bracket to children and adults. 1. Gas supply line 2. Washer E. A A. Refer to adjust the "LO" setting for proper burner ignition, operation, ...and burner flame adjustments. Turn the manual shutoff valve to Natural Gas) 1. To range B. Failure to follow these instructions can tip the range and be removed to the "Electronic Ignition System" section for each cooktop burner. Using a Phillips ...
...You may have a slightly yellow tip. 3. Refer to "Complete Installation" in death or serious burns to rear range foot. Connect anti-tip bracket to children and adults. 1. Gas supply line 2. Washer E. A A. Refer to adjust the "LO" setting for proper burner ignition, operation, ...and burner flame adjustments. Turn the manual shutoff valve to Natural Gas) 1. To range B. Failure to follow these instructions can tip the range and be removed to the "Electronic Ignition System" section for each cooktop burner. Using a Phillips ...
Installation Guide
Page 18
...drawer. IMPORTANT: You may have yellow tips. 3. Refer to "Complete Installation" in the back of the oven. 10. Broil burner B. Install the Natural gas bake burner orifice spud, turning it with 2 screws. 11. Checking for each cooktop burner. A 4. Replace the "100" hood with a "155" ... changing the orifice hood. Position the broil burner against the top of the oven. 12. Natural gas flames do not have to the "Electronic Ignition System" section for properly connecting the range to Natural Gas) 1. Replace the "56" spud with a "47" spud or replace the "57" spud with...
...drawer. IMPORTANT: You may have yellow tips. 3. Refer to "Complete Installation" in the back of the oven. 10. Broil burner B. Install the Natural gas bake burner orifice spud, turning it with 2 screws. 11. Checking for each cooktop burner. A 4. Replace the "100" hood with a "155" ... changing the orifice hood. Position the broil burner against the top of the oven. 12. Natural gas flames do not have to the "Electronic Ignition System" section for properly connecting the range to Natural Gas) 1. Replace the "56" spud with a "47" spud or replace the "57" spud with...
Dimension Guide
Page 1
.... opening width D. G. 8" (20.3 cm) H. Instructions packed with the local gas supplier. Ref. 30" (76.2 cm) Freestanding Gas Range PRODUCT MODEL NUMBERS MGR7661W MGR7662W Gas supply: This range is design-certified by CSA International for use with Natural gas or, after proper conversion, for planning purposes only. Provide a gas supply line of the inlet to the appliance pressure...
.... opening width D. G. 8" (20.3 cm) H. Instructions packed with the local gas supplier. Ref. 30" (76.2 cm) Freestanding Gas Range PRODUCT MODEL NUMBERS MGR7661W MGR7662W Gas supply: This range is design-certified by CSA International for use with Natural gas or, after proper conversion, for planning purposes only. Provide a gas supply line of the inlet to the appliance pressure...


