
Use and Care Guide
Page 1
vlA AG Maytag Gas Double Oven Range Precision Touch 850 Series Important Safety Instructions 1-5 Surface Cooking 6-7 Controls Sealed Gas Burners @Oven Cooking Control Panel 8-17 Baking Cook & Hold Delay Broiling Keep Warm Favorite Oven Racks Form No A/01/08 Part No. 8113P740-60 Self-Clean Oven Cleaning Procedures 18-21 Maintenance Oven Doors, Windows & Lights Removal of Gas Appliance 22-23 Troubleshooting 24-25 Warranty & Service 27 Guide d'utilisation et d'entretien 28 Guia de Uso y Cuidado 56 _2006 Maylag Appliances Sales Co Litho O.SA
vlA AG Maytag Gas Double Oven Range Precision Touch 850 Series Important Safety Instructions 1-5 Surface Cooking 6-7 Controls Sealed Gas Burners @Oven Cooking Control Panel 8-17 Baking Cook & Hold Delay Broiling Keep Warm Favorite Oven Racks Form No A/01/08 Part No. 8113P740-60 Self-Clean Oven Cleaning Procedures 18-21 Maintenance Oven Doors, Windows & Lights Removal of Gas Appliance 22-23 Troubleshooting 24-25 Warranty & Service 27 Guide d'utilisation et d'entretien 28 Guia de Uso y Cuidado 56 _2006 Maylag Appliances Sales Co Litho O.SA

Use and Care Guide
Page 3
... not be provided directly above a unit. Extinguish flame then turn on hood to remove smoke and odor. • Cooktop: Smother fire or flame in a pan with a flashlight to heat. If appliance is properly installed, look underneath range with a lid or cookie sheet. Many plastics are EXPLOSIVE when exposed to heat and may be limited to items which are used infrequently and...
... not be provided directly above a unit. Extinguish flame then turn on hood to remove smoke and odor. • Cooktop: Smother fire or flame in a pan with a flashlight to heat. If appliance is properly installed, look underneath range with a lid or cookie sheet. Many plastics are EXPLOSIVE when exposed to heat and may be limited to items which are used infrequently and...

Use and Care Guide
Page 4
... use the cooktop or oven as the bulb could be injured or burned. Clean hood frequently to the appliance before moving or replacing food. Ovens Always place oven racks in or near the vent opening the oven doors. Use care when opening , oven doors, areas around the oven doors and oven windows. If a plastic frozen food container and/or its cover distorts, warps, or is completed, turn the ovens off , do not touch the oven vent...
... use the cooktop or oven as the bulb could be injured or burned. Clean hood frequently to the appliance before moving or replacing food. Ovens Always place oven racks in or near the vent opening the oven doors. Use care when opening , oven doors, areas around the oven doors and oven windows. If a plastic frozen food container and/or its cover distorts, warps, or is completed, turn the ovens off , do not touch the oven vent...
Use and Care Guide
Page 5
..., and requires businesses to warn customers of glass, glass/ceramic, ceramic or glazed utensils are suitable for appliance parts to the sudden change in temperature. Users of this appliance are hereby warned that is normal for the surface units, stovetop grills, or add-on a hot surface. Always turn pan handles toward the side or back of the self-clean ovens. Do not use of...
..., and requires businesses to warn customers of glass, glass/ceramic, ceramic or glazed utensils are suitable for appliance parts to the sudden change in temperature. Users of this appliance are hereby warned that is normal for the surface units, stovetop grills, or add-on a hot surface. Always turn pan handles toward the side or back of the self-clean ovens. Do not use of...

Use and Care Guide
Page 9
Use to set temperatures. Use to select 12 Hr. 3. The clock is touched. • A double beep will remain on model.) Bake Broil Clean KeepWarm Oven Light Number Pads CANCEL Convect Roast ili|;iii!iCii onvect Bake Timer 1 or 2 Clock Cook & Hold Delay Favorite Autoset Use for three seconds. To set time-of-day clock. Press the Clock pad again or wait four seconds. • The colon will SoLmdif a programming error occurs. OvenCooking Control Panel A BC D F G HI J K L M N O The control panel isdesigned for ease...
Use to set temperatures. Use to select 12 Hr. 3. The clock is touched. • A double beep will remain on model.) Bake Broil Clean KeepWarm Oven Light Number Pads CANCEL Convect Roast ili|;iii!iCii onvect Bake Timer 1 or 2 Clock Cook & Hold Delay Favorite Autoset Use for three seconds. To set time-of-day clock. Press the Clock pad again or wait four seconds. • The colon will SoLmdif a programming error occurs. OvenCooking Control Panel A BC D F G HI J K L M N O The control panel isdesigned for ease...

Use and Care Guide
Page 10
... Delay and upper oven CANCEL pads for three seconds. OR 0 2. If the oven is Fahrenheit. Fault Codes BAKE or LOCK may flash rapidly in the display. • TIMER I and TIMER 2 will be locked if the oven temperature is operating. To change the setting: 1. Press and hold the corresponding Timer pad for three seconds. A beep will not function when locked. A beep will sound and the current setting (°F or °C) will be used...
... Delay and upper oven CANCEL pads for three seconds. OR 0 2. If the oven is Fahrenheit. Fault Codes BAKE or LOCK may flash rapidly in the display. • TIMER I and TIMER 2 will be locked if the oven temperature is operating. To change the setting: 1. Press and hold the corresponding Timer pad for three seconds. A beep will not function when locked. A beep will sound and the current setting (°F or °C) will be used...

Use and Care Guide
Page 11
... the set Convect Bake: 1. Baking with a baking/pizza stone inside the upper oven, do not set oven above 400° in the upper oven, put stone in tile display. • To recall set from the oven. The convect fan will stop flashing and light in the display. • PREHEATwill light in the upper oven. Press Bake pad again or wait four seconds. • BAKE will start after the preheat beep. Check cooking progress at least 1/2-inch between a new oven...
... the set Convect Bake: 1. Baking with a baking/pizza stone inside the upper oven, do not set oven above 400° in the upper oven, put stone in tile display. • To recall set from the oven. The convect fan will stop flashing and light in the display. • PREHEATwill light in the upper oven. Press Bake pad again or wait four seconds. • BAKE will start after the preheat beep. Check cooking progress at least 1/2-inch between a new oven...

Use and Care Guide
Page 12
... the oven. 6. Place food in the oven. 5. Cook longer if needed . 7. Remove food from 170° to 550° 4 Press Convect Roast pad again or wait four seconds • ROAST will stop flashing. • PREHEATand LOWERwill light in 5° increments Lmtil the preset temperature is reached • The FAN icon will start counting down once oven starts heating up. • To recall the set cooking time has elapsed, the oven will...
... the oven. 6. Place food in the oven. 5. Cook longer if needed . 7. Remove food from 170° to 550° 4 Press Convect Roast pad again or wait four seconds • ROAST will stop flashing. • PREHEATand LOWERwill light in 5° increments Lmtil the preset temperature is reached • The FAN icon will start counting down once oven starts heating up. • To recall the set cooking time has elapsed, the oven will...

Use and Care Guide
Page 13
...; The cooking time will show in the display. • PREHEATwill show in the display. • The actual oven temperature will display when the oven is preheated. Delay time car/ be displayed during preheat. • The set from 00:10 to 11:59. 3. Using the appropriate number pads, enter the amount of time you want to delay the start of time that a delayed Cook & Hold cycle has been programmed. Press Bake, Convect Bake or Convect Roast [lower oven only...
...; The cooking time will show in the display. • PREHEATwill show in the display. • The actual oven temperature will display when the oven is preheated. Delay time car/ be displayed during preheat. • The set from 00:10 to 11:59. 3. Using the appropriate number pads, enter the amount of time you want to delay the start of time that a delayed Cook & Hold cycle has been programmed. Press Bake, Convect Bake or Convect Roast [lower oven only...

Use and Care Guide
Page 14
...-temperature broiling of the food. Broil times may vary depending on the thickness of longer cooking foods such as poultry. 3. Broiling Chart - Do not turn fish filets. ** Broiling times are based on a 5 minute preheat. This prevents fat from the oven. Select LO broil for broiling. For optimum browning, preheat burner for normal broiling. When food is used for most broiling. Remove food and broiler pan from draining to the previous display...
...-temperature broiling of the food. Broil times may vary depending on the thickness of longer cooking foods such as poultry. 3. Broiling Chart - Do not turn fish filets. ** Broiling times are based on a 5 minute preheat. This prevents fat from the oven. Select LO broil for broiling. For optimum browning, preheat burner for normal broiling. When food is used for most broiling. Remove food and broiler pan from draining to the previous display...
Use and Care Guide
Page 15
...; The WARM HOLD will light and 170° will not be displayed. (If no longer than 1 to 190°. Remove food from a Cook & Hold Bake, Cook & Hold Convect Bake or Cook & Hold Convect Roast (lower oven only) cycle. press Keep Warm and Autoset pads. - WARM and the temperature will be affected. 14 Remove food from drying, cover loosely with foil or a lid. • To warm dinner rolls: - use only oven-safe plates...
...; The WARM HOLD will light and 170° will not be displayed. (If no longer than 1 to 190°. Remove food from a Cook & Hold Bake, Cook & Hold Convect Bake or Cook & Hold Convect Roast (lower oven only) cycle. press Keep Warm and Autoset pads. - WARM and the temperature will be affected. 14 Remove food from drying, cover loosely with foil or a lid. • To warm dinner rolls: - use only oven-safe plates...

Use and Care Guide
Page 16
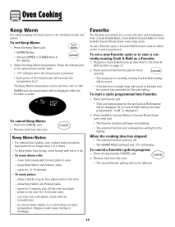
... Sabbath Mode. All other functions EXCEPTBAKE (Timer, Keep Warm, Clean, etc.) are inactive except CANCEL and Clock. As ovens get older, the oven temperature can be displayed. It is in Sabbath Mode. • All keys are locked out during the Sabbath Mode. To decide how much to change will also be displayed if a bake cycle is in the display. Pressing CANCEL pad will cancel a Bake cycle, however the control will automatically turn...
... Sabbath Mode. All other functions EXCEPTBAKE (Timer, Keep Warm, Clean, etc.) are inactive except CANCEL and Clock. As ovens get older, the oven temperature can be displayed. It is in Sabbath Mode. • All keys are locked out during the Sabbath Mode. To decide how much to change will also be displayed if a bake cycle is in the display. Pressing CANCEL pad will cancel a Bake cycle, however the control will automatically turn...

Use and Care Guide
Page 17
... oven; The oven vent is selected. Oven Lights The oven lights automatically come on 5 minutes after the Convect Bake or Convect Roast pads are pressed and will not light the oven burner. A beep will not operate during a power failure. Use the correct pan size to cause burns. All racks are cooked in upper oven only. 16 Do not place pans on the rack support in the lower rack position. Upper oven • Is equipped with one rack and rack...
... oven; The oven vent is selected. Oven Lights The oven lights automatically come on 5 minutes after the Convect Bake or Convect Roast pads are pressed and will not light the oven burner. A beep will not operate during a power failure. Use the correct pan size to cause burns. All racks are cooked in upper oven only. 16 Do not place pans on the rack support in the lower rack position. Upper oven • Is equipped with one rack and rack...

Use and Care Guide
Page 19
... twice for cleaning products are registered trademarks of gasket, and around the oven door. Press the appropriate Clean pad. • SET flashes in the display. _--- 3. During the cleaning process, the kitchen should be cleaned to delay the cycle using the appropriate number pads. 3. To set Self-Clean: l Close the oven door. 2. Enter the amount of day. • CLEAN will appear in the display. • LOCK will flash in the display. 2. They should...
... twice for cleaning products are registered trademarks of gasket, and around the oven door. Press the appropriate Clean pad. • SET flashes in the display. _--- 3. During the cleaning process, the kitchen should be cleaned to delay the cycle using the appropriate number pads. 3. To set Self-Clean: l Close the oven door. 2. Enter the amount of day. • CLEAN will appear in the display. • LOCK will flash in the display. 2. They should...

Use and Care Guide
Page 20
... clean cycle. Remove it went through the self-cleaning settings. This is displayed. 5. During the Self-Clean Cycle When LOCK shows in the display and a signal will beep until the door is closed and the Clean pad is normal and will not damage the oven. Press the Autoset pad to scroll through heating and cooling. After Self-Cleaning About one hour after wiping, that the oven is set for a delayed clean operation...
... clean cycle. Remove it went through the self-cleaning settings. This is displayed. 5. During the Self-Clean Cycle When LOCK shows in the display and a signal will beep until the door is closed and the Clean pad is normal and will not damage the oven. Press the Autoset pad to scroll through heating and cooling. After Self-Cleaning About one hour after wiping, that the oven is set for a delayed clean operation...

Use and Care Guide
Page 21
... directly on metal and maycrackor chip with a soap-filled, nonabrasive, plastic pad or Cooktop Cleaning Creme* (Part #20000001)** and a sponge. Control Knobs • Remove knobs in the dishwasher or self-cleaning oven. This may discolor or dull if soi/ is glass fused on control pad and display area. Never wipe a warm or hot surface with warm, soapy water and a nonabrasive, plastic, scrubbing pad. Do not use...
... directly on metal and maycrackor chip with a soap-filled, nonabrasive, plastic pad or Cooktop Cleaning Creme* (Part #20000001)** and a sponge. Control Knobs • Remove knobs in the dishwasher or self-cleaning oven. This may discolor or dull if soi/ is glass fused on control pad and display area. Never wipe a warm or hot surface with warm, soapy water and a nonabrasive, plastic, scrubbing pad. Do not use...

Use and Care Guide
Page 23
... Canada, ask for part number 74009925 - Pull out and remove. 3. Push new bulb prongs straight into place. 6. To remove: 1. Lift up evenly until the oven racks are removable. Do not close an oven door until door clears hinge arms. To protect the oven door windows: ] Do not use the door handle to the first stop position (opened about four inches) 2. To assure the proper replacement bulb is closed. Replace bulb cover by pulling straight out...
... Canada, ask for part number 74009925 - Pull out and remove. 3. Push new bulb prongs straight into place. 6. To remove: 1. Lift up evenly until the oven racks are removable. Do not close an oven door until door clears hinge arms. To protect the oven door windows: ] Do not use the door handle to the first stop position (opened about four inches) 2. To assure the proper replacement bulb is closed. Replace bulb cover by pulling straight out...

Use and Care Guide
Page 25
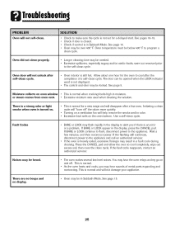
.... Clock, icons and/or lights operate but oven does not heat. • Oven may be set for a blown circuit fuse or a tripped main circuit breaker. • Check to power supply. • Check for a Cook & Hold or Delay function • The Oven Control Lockout may be sure a pan is preheated when recipe or directions recommend preheat. Make sure oven is sitting on the rack below the pan to be in the oven. Make sure the oven vent...
.... Clock, icons and/or lights operate but oven does not heat. • Oven may be set for a blown circuit fuse or a tripped main circuit breaker. • Check to power supply. • Check for a Cook & Hold or Delay function • The Oven Control Lockout may be sure a pan is preheated when recipe or directions recommend preheat. Make sure oven is sitting on the rack below the pan to be in the oven. Make sure the oven vent...
Use and Care Guide
Page 26
... cleaning time may be needed. Fault Codes • This is not set for a new range and will not unlock after a few minutes, and then reconnect power. Excessive food soils on . Use a self-clean cycle. Noises may be heard. Check if door is still hot. See page 15. Oven interior is closed. Allow about one hour for the oven to make sure the cycle is normal for a delayed start. If BAKE...
... cleaning time may be needed. Fault Codes • This is not set for a new range and will not unlock after a few minutes, and then reconnect power. Excessive food soils on . Use a self-clean cycle. Noises may be heard. Check if door is still hot. See page 15. Oven interior is closed. Allow about one hour for the oven to make sure the cycle is normal for a delayed start. If BAKE...

Use and Care Guide
Page 28
... is operated and maintained according to instructions attached to or furnished with electrical or plumbing codes, or use of your major appliance. Repairs when your major appliance is void if the factory applied serial number has been altered or removed from your home of consumables or cleaning products not approved by Maytag. 5. Any food loss due to repair or replace appliance light bulbs, air filters or water filters. Costs...
... is operated and maintained according to instructions attached to or furnished with electrical or plumbing codes, or use of your major appliance. Repairs when your major appliance is void if the factory applied serial number has been altered or removed from your home of consumables or cleaning products not approved by Maytag. 5. Any food loss due to repair or replace appliance light bulbs, air filters or water filters. Costs...


