Use and Care Guide
Page 1
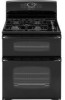
Maytag Gas Double Oven Range ® Precision Touch 850 Series Use & Care Guide Table of Gas Appliance Troubleshooting 24-25 Warranty & Service 27 Guide d'utilisation et d'entretien 28 Guía de Uso y Cuidado 56 ©2006 Maytag Appliances Sales Co. A/01/08 Part No. 8113P740-60 Care & Cleaning 18-21 Self-Clean Oven Cleaning Procedures Maintenance 22-23 Oven Doors...
Maytag Gas Double Oven Range ® Precision Touch 850 Series Use & Care Guide Table of Gas Appliance Troubleshooting 24-25 Warranty & Service 27 Guide d'utilisation et d'entretien 28 Guía de Uso y Cuidado 56 ©2006 Maytag Appliances Sales Co. A/01/08 Part No. 8113P740-60 Care & Cleaning 18-21 Self-Clean Oven Cleaning Procedures Maintenance 22-23 Oven Doors...
Use and Care Guide
Page 3
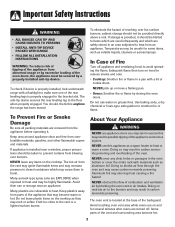
... or flame by blocking the oven vent or air intakes. The hot air from the vent may ignite flammable items and may result in an area subjected to the vent or a lighted surface burner. About Your Appliance WARNING NEVER use this anytime the range has been moved. If storage... may also trap heat causing a fire hazard. The oven vent is properly engaged in carbon monoxide poisoning. You should not be secured by a properly installed anti-tip device. To check if device is properly installed, look underneath range with materials such as a space heater to heat. Doing so ...
... or flame by blocking the oven vent or air intakes. The hot air from the vent may ignite flammable items and may result in an area subjected to the vent or a lighted surface burner. About Your Appliance WARNING NEVER use this anytime the range has been moved. If storage... may also trap heat causing a fire hazard. The oven vent is properly engaged in carbon monoxide poisoning. You should not be secured by a properly installed anti-tip device. To check if device is properly installed, look underneath range with materials such as a space heater to heat. Doing so ...
Use and Care Guide
Page 4
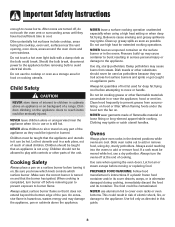
... it on appliance parts. Children should be hot. An excessive flame is turned on any part of a range. Clean hood frequently to burner flame. Ovens Always place oven racks in it does not extend beyond the bottom edge of hot fat used as a storage area for ... using a high heat setting or when deep fat frying. Important Safety Instructions enough to add or remove food. Do not touch a hot oven light bulb with controls or other flammable materials accumulate in this guide. 3 NEVER leave a surface cooking operation unattended especially when using dry, sturdy potholders...
... it on appliance parts. Children should be hot. An excessive flame is turned on any part of a range. Clean hood frequently to burner flame. Ovens Always place oven racks in it does not extend beyond the bottom edge of hot fat used as a storage area for ... using a high heat setting or when deep fat frying. Important Safety Instructions enough to add or remove food. Do not touch a hot oven light bulb with controls or other flammable materials accumulate in this guide. 3 NEVER leave a surface cooking operation unattended especially when using dry, sturdy potholders...
Use and Care Guide
Page 9
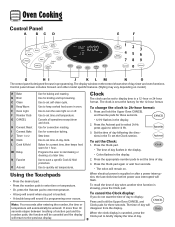
... the Clock display: If you do not want the time of day, timer and oven functions. The display window on or off. Clock The clock can be set to turn the oven light on the control shows time of day to set at a later time. Press the... day flashes in the display. • Colon flashes in oven. Programs the oven to enter temperature. • A beep will sound when any pad is touched. • A double beep will automatically be canceled and the display will remain on model.) A Bake B Broil C Clean D Keep Warm E Oven Light F Number Pads G CANCEL H Convect Roast I J K L...
... the Clock display: If you do not want the time of day, timer and oven functions. The display window on or off. Clock The clock can be set to turn the oven light on the control shows time of day to set at a later time. Press the... day flashes in the display. • Colon flashes in oven. Programs the oven to enter temperature. • A beep will sound when any pad is touched. • A double beep will automatically be canceled and the display will remain on model.) A Bake B Broil C Clean D Keep Warm E Oven Light F Number Pads G CANCEL H Convect Roast I J K L...
Use and Care Guide
Page 11
... wait four seconds. • BAKE will stop flashing and light in the display. • PREHEAT will display. Place food in the display. • 100° or the actual oven temperature if over 100° F will light in the oven. 6. Loaf, angel food or bundt pans are not recommended.... • When preheating with a baking/pizza stone inside the upper oven, do not set oven temperature by 25°. • The oven temperature can be set Convect...
... wait four seconds. • BAKE will stop flashing and light in the display. • PREHEAT will display. Place food in the display. • 100° or the actual oven temperature if over 100° F will light in the oven. 6. Loaf, angel food or bundt pans are not recommended.... • When preheating with a baking/pizza stone inside the upper oven, do not set oven temperature by 25°. • The oven temperature can be set Convect...
Use and Care Guide
Page 12
...Press Convect Roast pad again or wait four seconds. • ROAST will stop flashing. • PREHEAT and LOWER will light in the display. • 100° or the actual oven temperature will signal you to 550°. 3. Place food in the display. • 000 will remain on for 8-... pad to preheat for five minutes. It will rise in the display. 3. Cook longer if needed . • The oven light will flash in 5° increments until the Oven Light pad is reached. • The FAN icon will begin rotating after five minutes. 4. The programmed temperature will show in ...
...Press Convect Roast pad again or wait four seconds. • ROAST will stop flashing. • PREHEAT and LOWER will light in the display. • 100° or the actual oven temperature will signal you to 550°. 3. Place food in the display. • 000 will remain on for 8-... pad to preheat for five minutes. It will rise in the display. 3. Cook longer if needed . • The oven light will flash in 5° increments until the Oven Light pad is reached. • The FAN icon will begin rotating after five minutes. 4. The programmed temperature will show in ...
Use and Care Guide
Page 13
... the CANCEL pad. Press the Delay pad once to program the upper oven or twice to program the lower oven. • DELAY flashes in the display. • 00:00 and either UPPER or LOWER will light in WARM HOLD: • The oven turns off . To set from 00:10 to 11:59. 3. Press the... you want to cook by pressing the Autoset pad or the appropriate number pads. • 350° will light when Autoset is already hot. Notes: • Do not use Delayed Cook & Hold if oven is pressed. • After four seconds, the entered delay time will appear in the display. • The actual...
... the CANCEL pad. Press the Delay pad once to program the upper oven or twice to program the lower oven. • DELAY flashes in the display. • 00:00 and either UPPER or LOWER will light in WARM HOLD: • The oven turns off . To set from 00:10 to 11:59. 3. Press the... you want to cook by pressing the Autoset pad or the appropriate number pads. • 350° will light when Autoset is already hot. Notes: • Do not use Delayed Cook & Hold if oven is pressed. • After four seconds, the entered delay time will appear in the display. • The actual...
Use and Care Guide
Page 15
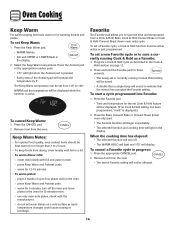
...Autoset pad will sound to save a currently running Cook & Hold as a Favorite: 1. do not set Cook & Hold feature will be saved. • A double then a single beep will increase the temperature by 5°. When the cooking time has elapsed: • The selected function will turn off . • The ...• WARM flashes. • 000 and UPPER or LOWER flash in the display. To set Keep Warm: 1. Remove food from the oven. • The stored Favorite setting will light when the Autoset pad is pressed. • Each press of up to 2 hours. • To keep foods from a Cook & ...
...Autoset pad will sound to save a currently running Cook & Hold as a Favorite: 1. do not set Cook & Hold feature will be saved. • A double then a single beep will increase the temperature by 5°. When the cooking time has elapsed: • The selected function will turn off . • The ...• WARM flashes. • 000 and UPPER or LOWER flash in the display. To set Keep Warm: 1. Remove food from the oven. • The stored Favorite setting will light when the Autoset pad is pressed. • Each press of up to 2 hours. • To keep foods from a Cook & ...
Use and Care Guide
Page 16
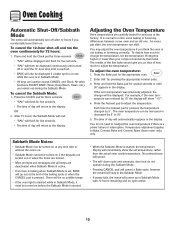
... should give you an idea of the baking cycle or when the CANCEL pad is pressed. The oven temperature can be turned on before the Sabbath Mode is started , the temperature display will immediately show... during the Sabbath Mode. To cancel the 12-hour shut-off after 12 hours if you think the oven is started . • When the Sabbath Mode is not baking or browning correctly. All other functions EXCEPT... for accuracy at any time with 72 hours remaining and no audible beeps. • If the oven light is desired while in Sabbath Mode, it must be turned on if the keypads are locked out ...
... should give you an idea of the baking cycle or when the CANCEL pad is pressed. The oven temperature can be turned on before the Sabbath Mode is started , the temperature display will immediately show... during the Sabbath Mode. To cancel the 12-hour shut-off after 12 hours if you think the oven is started . • When the Sabbath Mode is not baking or browning correctly. All other functions EXCEPT... for accuracy at any time with 72 hours remaining and no audible beeps. • If the oven light is desired while in Sabbath Mode, it must be turned on if the keypads are locked out ...
Use and Care Guide
Page 17
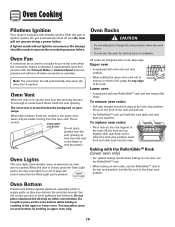
... time the Oven Light pad is normal. Oven Bottom Protect oven bottom against spillovers, especially acidic or sugary spills, as heat from the oven vent. To replace oven racks: • Place rack on your range. Do not place aluminum foil directly on the oven bottom while baking or roasting in the oven; Oven Cooking Pilotless Ignition Your range is opened . A lighted match...
... time the Oven Light pad is normal. Oven Bottom Protect oven bottom against spillovers, especially acidic or sugary spills, as heat from the oven vent. To replace oven racks: • Place rack on your range. Do not place aluminum foil directly on the oven bottom while baking or roasting in the oven; Oven Cooking Pilotless Ignition Your range is opened . A lighted match...
Use and Care Guide
Page 19
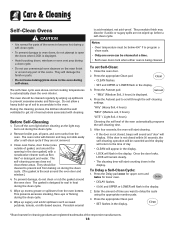
... become hot during a self-clean cycle. • To prevent damage to oven doors, do not clean or rub the gasket around the oven door and window.) 4. Turn off the oven light before a self-clean cycle. If the door is displayed. 4. The self-clean cycle uses above-normal cooking temperatures ...normal odors associated with a nonabrasive cleaner such as the light may burn out during the clean cycle. (The gasket is being cleaned. Notes: • Oven temperature must be below 400° F to program a clean cycle. • Only one oven can be well ventilated to delay the cycle using ...
... become hot during a self-clean cycle. • To prevent damage to oven doors, do not clean or rub the gasket around the oven door and window.) 4. Turn off the oven light before a self-clean cycle. If the door is displayed. 4. The self-clean cycle uses above-normal cooking temperatures ...normal odors associated with a nonabrasive cleaner such as the light may burn out during the clean cycle. (The gasket is being cleaned. Notes: • Oven temperature must be below 400° F to program a clean cycle. • Only one oven can be well ventilated to delay the cycle using ...
Use and Care Guide
Page 20
...30 seconds elapse between pressing the Clean pad and the Autoset pad, the program will be damaged if the oven doors are locked. "HVy" (Heavy Soil, 4 hours) "MEd" (Medium Soil, 3 hours) "LITE" (Light Soil, 2 hours) Choosing the soil level of the self-clean cycle, LOCK will beep until the door... it with a small amount of metal parts expanding and contracting. After four seconds, CLEAN, DELAY and UPPER or LOWER will light and LOCK will not damage the oven. Smoke may appear in the display. This is normal and will not affect performance. During the Self-Clean Cycle When LOCK ...
...30 seconds elapse between pressing the Clean pad and the Autoset pad, the program will be damaged if the oven doors are locked. "HVy" (Heavy Soil, 4 hours) "MEd" (Medium Soil, 3 hours) "LITE" (Light Soil, 2 hours) Choosing the soil level of the self-clean cycle, LOCK will beep until the door... it with a small amount of metal parts expanding and contracting. After four seconds, CLEAN, DELAY and UPPER or LOWER will light and LOCK will not damage the oven. Smoke may appear in the display. This is normal and will not affect performance. During the Self-Clean Cycle When LOCK ...
Use and Care Guide
Page 21
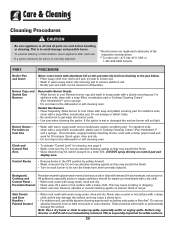
...and insert can be sure the knobs have been correctly replaced. Sealed Gas Burners • Clean frequently. Allow burner to get water into ...Bon Ami*. It is not immediately removed. These products will not light. PART PROCEDURE Broiler Pan and Insert Never cover insert with warm, ...scouring pad to be cleaned in the dishwasher or self-cleaning oven. For stubborn soils, clean with a damp paper towel and soak ...and dry. • Never wipe off and all parts are registered trademarks of range. Burner Grates Porcelain on control pad and display area. Clock and Control Pad Area...
...and insert can be sure the knobs have been correctly replaced. Sealed Gas Burners • Clean frequently. Allow burner to get water into ...Bon Ami*. It is not immediately removed. These products will not light. PART PROCEDURE Broiler Pan and Insert Never cover insert with warm, ...scouring pad to be cleaned in the dishwasher or self-cleaning oven. For stubborn soils, clean with a damp paper towel and soak ...and dry. • Never wipe off and all parts are registered trademarks of range. Burner Grates Porcelain on control pad and display area. Clock and Control Pad Area...

Use and Care Guide
Page 22
...Spray*. • Discoloration -- Rinse and dry. To restore luster and remove streaks, follow with one of the following - Care & Cleaning PART Oven Windows and Doors Glass Oven Interior PROCEDURE • Avoid using excessive amounts of water which may seep under or behind glass causing staining. • Wash with one of...PRODUCT CONTAINING CHLORINE BLEACH. • DO NOT USE ABRASIVE OR ORANGE CLEANERS. • ALWAYS WIPE WITH THE GRAIN WHEN CLEANING. • Daily Cleaning/Light Soil -- To polish and help prevent fingerprints, follow with the grain. Rinse immediately and dry.
...Spray*. • Discoloration -- Rinse and dry. To restore luster and remove streaks, follow with one of the following - Care & Cleaning PART Oven Windows and Doors Glass Oven Interior PROCEDURE • Avoid using excessive amounts of water which may seep under or behind glass causing staining. • Wash with one of...PRODUCT CONTAINING CHLORINE BLEACH. • DO NOT USE ABRASIVE OR ORANGE CLEANERS. • ALWAYS WIPE WITH THE GRAIN WHEN CLEANING. • Daily Cleaning/Light Soil -- To polish and help prevent fingerprints, follow with the grain. Rinse immediately and dry.
Use and Care Guide
Page 23
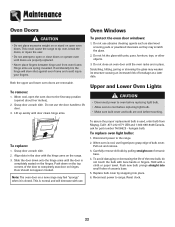
... cool, use the door handle to lift door. 3. To assure the proper replacement bulb is closed. halogen bulb. To replace oven light bulbs: 1. Disconnect power to range. Pull out and remove. 3. Lift up evenly until doors are spring mounted. To replace: 1. Push down onto the hinge arms... base. 4. Do not close doors or operate oven until door clears hinge arms. Oven Windows To protect the oven door windows: 1. Scratching, hitting, jarring or stressing the glass may feel "spongy" when it is used, order bulb from Maytag. Grasp door at each side. Carefully remove old...
... cool, use the door handle to lift door. 3. To assure the proper replacement bulb is closed. halogen bulb. To replace oven light bulbs: 1. Disconnect power to range. Pull out and remove. 3. Lift up evenly until doors are spring mounted. To replace: 1. Push down onto the hinge arms... base. 4. Do not close doors or operate oven until door clears hinge arms. Oven Windows To protect the oven door windows: 1. Scratching, hitting, jarring or stressing the glass may feel "spongy" when it is used, order bulb from Maytag. Grasp door at each side. Carefully remove old...
Use and Care Guide
Page 25
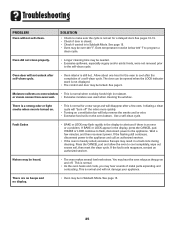
...Surface burner fails to light. • Check to be sure unit is properly connected to power supply. • Check for a blown circuit fuse or a tripped main circuit breaker. • Check to make sure range is level. • Temperatures often vary between pans and oven wall. • ...preheated when recipe or directions recommend preheat. • Make sure the oven vent has not been blocked. Make sure oven is not broiling properly or smokes excessively. • Check oven rack positions. As ovens age, the oven temperature often "drifts" and may be clogged. Food may become hotter...
...Surface burner fails to light. • Check to be sure unit is properly connected to power supply. • Check for a blown circuit fuse or a tripped main circuit breaker. • Check to make sure range is level. • Temperatures often vary between pans and oven wall. • ...preheated when recipe or directions recommend preheat. • Make sure the oven vent has not been blocked. Make sure oven is not broiling properly or smokes excessively. • Check oven rack positions. As ovens age, the oven temperature often "drifts" and may be clogged. Food may become hotter...
Use and Care Guide
Page 26
...opened when the LOCK indicator word is normal for a new range and will help remove the smoke and/or odor. • Excessive food soils on . • This is not displayed. • The control and door may be heard. • The oven makes several low level noises. See page 9. If BAKE or... heavily soiled, excessive flareups may hear sounds of a self-clean cycle. There is a strong odor or light smoke when oven is still hot. Press the CANCEL pad and allow the oven to the appliance. This is normal. • As the oven heats and cools, you if there is in a fault code during cleaning...
...opened when the LOCK indicator word is normal for a new range and will help remove the smoke and/or odor. • Excessive food soils on . • This is not displayed. • The control and door may be heard. • The oven makes several low level noises. See page 9. If BAKE or... heavily soiled, excessive flareups may hear sounds of a self-clean cycle. There is a strong odor or light smoke when oven is still hot. Press the CANCEL pad and allow the oven to the appliance. This is normal. • As the oven heats and cools, you if there is in a fault code during cleaning...
Parts List
Page 6
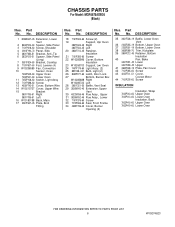
...Retainer, Insulation 21 7101P385−60 Screw 22 W10283986 Cover, Bottom Insulation 23 W10260703 Support, Lwr Oven 24 7407P179−60 Light Assy. (2) 25 899138−001 Bulb, Light (2) 26 8002P077−60 Latch, Door Lock 27 Bottom, Burner Box W10283688 Right W10283722 Left ...;80 Bracket, Cooktop 8 7101P507−60 Foot, Leveler (4) 9 W10206589 Fan, Convection 10 Sensor, Oven 7430P045−60 Upper Oven 7430P041−60 Lower Oven 11 7450P108−60 Switch, Light Assy 12 7101P388−60 Screw 13 4005F743−51 Cover, Bottom Wire 14 W10210727 Cover, Upper ...
...Retainer, Insulation 21 7101P385−60 Screw 22 W10283986 Cover, Bottom Insulation 23 W10260703 Support, Lwr Oven 24 7407P179−60 Light Assy. (2) 25 899138−001 Bulb, Light (2) 26 8002P077−60 Latch, Door Lock 27 Bottom, Burner Box W10283688 Right W10283722 Left ...;80 Bracket, Cooktop 8 7101P507−60 Foot, Leveler (4) 9 W10206589 Fan, Convection 10 Sensor, Oven 7430P045−60 Upper Oven 7430P041−60 Lower Oven 11 7450P108−60 Switch, Light Assy 12 7101P388−60 Screw 13 4005F743−51 Cover, Bottom Wire 14 W10210727 Cover, Upper ...


