Use and Care Guide
Page 1
A/01/08 Part No. 8113P740-60 Care & Cleaning 18-21 Self-Clean Oven Cleaning Procedures Maintenance 22-23 Oven Doors, Windows & Lights Removal of Contents Important Safety Instructions 1-5 Surface Cooking 6-7 Controls Sealed Gas Burners Oven Cooking 8-17 Control Panel Baking Cook & Hold Delay Broiling Keep Warm Favorite Oven Racks Form No. Litho U.S.A . Maytag Gas Double Oven Range ® Precision Touch 850 Series Use & Care Guide Table of Gas Appliance Troubleshooting 24-25 Warranty & Service 27 Guide d'utilisation et d'entretien 28 Guía de Uso y Cuidado 56...
A/01/08 Part No. 8113P740-60 Care & Cleaning 18-21 Self-Clean Oven Cleaning Procedures Maintenance 22-23 Oven Doors, Windows & Lights Removal of Contents Important Safety Instructions 1-5 Surface Cooking 6-7 Controls Sealed Gas Burners Oven Cooking 8-17 Control Panel Baking Cook & Hold Delay Broiling Keep Warm Favorite Oven Racks Form No. Litho U.S.A . Maytag Gas Double Oven Range ® Precision Touch 850 Series Use & Care Guide Table of Gas Appliance Troubleshooting 24-25 Warranty & Service 27 Guide d'utilisation et d'entretien 28 Guía de Uso y Cuidado 56...
Use and Care Guide
Page 2
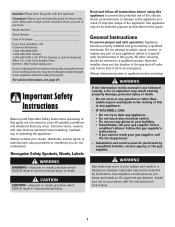
... ( U.S. Common sense, caution, and care must be exercised when installing, maintaining, or operating the appliance. Use appliance only for future reference. Follow the gas supplier's instructions. • If you cannot reach your dealer, distributor, service agent, or manufacturer about problems or conditions you purchase and install an UL approved gas detector. Consumer: Please read and keep this guide. General Instructions To ensure proper and...
... ( U.S. Common sense, caution, and care must be exercised when installing, maintaining, or operating the appliance. Use appliance only for future reference. Follow the gas supplier's instructions. • If you cannot reach your dealer, distributor, service agent, or manufacturer about problems or conditions you purchase and install an UL approved gas detector. Consumer: Please read and keep this guide. General Instructions To ensure proper and...
Use and Care Guide
Page 3
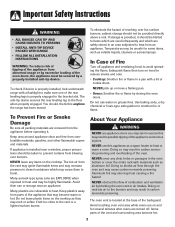
Temperatures may result in carbon monoxide poisoning and overheating of the oven. In Case of Fire Turn off . Use baking soda, a dry chemical or foam-type extinguisher to avoid spreading the flame. NEVER obstruct the flow of combustion and ventilation air by closing the oven doors. Some parts of the vent and surrounding area become warm or hot. The anti-tip device secures the rear leveling leg to...
Temperatures may result in carbon monoxide poisoning and overheating of the oven. In Case of Fire Turn off . Use baking soda, a dry chemical or foam-type extinguisher to avoid spreading the flame. NEVER obstruct the flow of combustion and ventilation air by closing the oven doors. Some parts of the vent and surrounding area become warm or hot. The anti-tip device secures the rear leveling leg to...
Use and Care Guide
Page 4
... be used for deep fat frying cool before moving or replacing food. Always turn the fan on hood or filter. NEVER leave children alone or unsupervised near the vent opening the oven doors. NEVER wear garments made of small children. Always avoid reaching into the ovens to avoid electrical shock. After ovens are cool. Do not touch a hot oven light bulb with controls or other parts of electric shock...
... be used for deep fat frying cool before moving or replacing food. Always turn the fan on hood or filter. NEVER leave children alone or unsupervised near the vent opening the oven doors. NEVER wear garments made of small children. Always avoid reaching into the ovens to avoid electrical shock. After ovens are cool. Do not touch a hot oven light bulb with controls or other parts of electric shock...
Use and Care Guide
Page 5
... or reached by properly venting the burners to wipe spills on oven convection systems. The use eyelid covers for safe performance using unstable, warped, easily tipped or loose-handled pans. Do not touch the burner grates or surrounding areas until they have had sufficient time to 4 Self-Cleaning Ovens CAUTION Before self-cleaning the oven, remove the oven racks, broiler pan, food and any kind in this guide. Clean only parts listed in performance problems, and reduce the...
... or reached by properly venting the burners to wipe spills on oven convection systems. The use eyelid covers for safe performance using unstable, warped, easily tipped or loose-handled pans. Do not touch the burner grates or surrounding areas until they have had sufficient time to 4 Self-Cleaning Ovens CAUTION Before self-cleaning the oven, remove the oven racks, broiler pan, food and any kind in this guide. Clean only parts listed in performance problems, and reduce the...
Use and Care Guide
Page 7
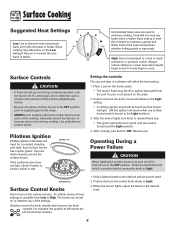
... desired flame size. • The ignitor will spark when any faster when a higher flame setting is covered. Surface Controls CAUTION • If flame should go out during cooking. Use potholders to simmer foods, keep foods warm and melt chocolate or butter. An infinite choice of the settings. When the burner lights, adjust the flame to a boil, or reach pressure in the OFF position prior to supplying gas to the range. •...
... desired flame size. • The ignitor will spark when any faster when a higher flame setting is covered. Surface Controls CAUTION • If flame should go out during cooking. Use potholders to simmer foods, keep foods warm and melt chocolate or butter. An infinite choice of the settings. When the burner lights, adjust the flame to a boil, or reach pressure in the OFF position prior to supplying gas to the range. •...
Use and Care Guide
Page 8
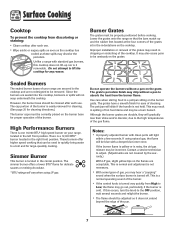
... chocolate. * BTU ratings will vary when using natural gas, the flame will be properly positioned before cooking. If using LP gas. Since the burners are not covered by the warranty.) With LP gas, slight yellow tips on the cooktop. If the burner flame is yellow or is noisy, the air/gas mixture may hear a "popping" sound when the surface burner is located in the right front position. Improper installation or removal of hot food items...
... chocolate. * BTU ratings will vary when using natural gas, the flame will be properly positioned before cooking. If using LP gas. Since the burners are not covered by the warranty.) With LP gas, slight yellow tips on the cooktop. If the burner flame is yellow or is noisy, the air/gas mixture may hear a "popping" sound when the surface burner is located in the right front position. Improper installation or removal of hot food items...
Use and Care Guide
Page 9
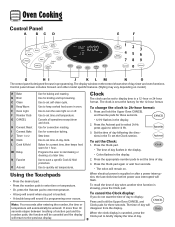
... sound if a programming error occurs. Cancels all operations except timer and clock. Use for convection baking. To change the clock to start baking or cleaning at the factory for the 12-hour format. When the clock display is showing, press the Clock pad. To recall the time of day will remain on model.) A Bake B Broil C Clean D Keep Warm E Oven Light F Number Pads G CANCEL H Convect Roast I J K L M N O The control panel is set the Clock section. Control panel shown includes Convect and other model specific features. (Styling may vary...
... sound if a programming error occurs. Cancels all operations except timer and clock. Use for convection baking. To change the clock to start baking or cleaning at the factory for the 12-hour format. When the clock display is showing, press the Clock pad. To recall the time of day will remain on model.) A Bake B Broil C Clean D Keep Warm E Oven Light F Number Pads G CANCEL H Convect Roast I J K L M N O The control panel is set the Clock section. Control panel shown includes Convect and other model specific features. (Styling may vary...
Use and Care Guide
Page 10
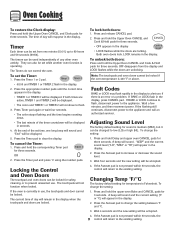
... doors are unlocking. If the Autoset pad is currently in the display to the appliance and call an authorized servicer. To set time, one minute (00:01) up to flash. 3. If the Autoset pad is an error or a problem. The timers can also be locked if the oven temperature is Fahrenheit. Fault Codes BAKE or LOCK may flash rapidly in use . "bEEP" and the current sound level...
... doors are unlocking. If the Autoset pad is currently in the display to the appliance and call an authorized servicer. To set time, one minute (00:01) up to flash. 3. If the Autoset pad is an error or a problem. The timers can also be locked if the oven temperature is Fahrenheit. Fault Codes BAKE or LOCK may flash rapidly in use . "bEEP" and the current sound level...
Use and Care Guide
Page 11
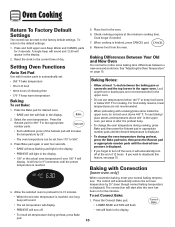
... selected oven to preheat for 3 seconds. Oven Cooking Return To Factory Default Settings The control can be reset to the factory default settings. See "Adjusting the Oven Temperature" on for desired oven. • BAKE and 000 will appear in the display. 2. Press and hold upper oven Keep Warm and CANCEL pads for 8-15 minutes. • When the set Convect Bake: 1. Reset the clock to the current time of 12 hours. To set oven temperature is...
... selected oven to preheat for 3 seconds. Oven Cooking Return To Factory Default Settings The control can be reset to the factory default settings. See "Adjusting the Oven Temperature" on for desired oven. • BAKE and 000 will appear in the display. 2. Press and hold upper oven Keep Warm and CANCEL pads for 8-15 minutes. • When the set Convect Bake: 1. Reset the clock to the current time of 12 hours. To set oven temperature is...
Use and Care Guide
Page 16
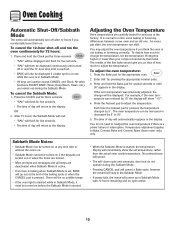
... or when the doors are locked. • Most prompts and messages and all beeps are carefully tested for five seconds. • The time of how much to readjust the oven temperature if there is a power failure or interruption. To adjust the oven temperature: 1. If the oven temperature was reduced by 5° to the display. The oven temperature can shift. All other functions EXCEPT BAKE (Timer, Keep Warm, Clean, etc.) are...
... or when the doors are locked. • Most prompts and messages and all beeps are carefully tested for five seconds. • The time of how much to readjust the oven temperature if there is a power failure or interruption. To adjust the oven temperature: 1. If the oven temperature was reduced by 5° to the display. The oven temperature can shift. All other functions EXCEPT BAKE (Timer, Keep Warm, Clean, etc.) are...
Use and Care Guide
Page 17
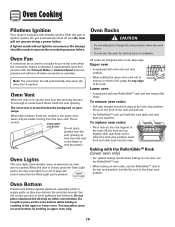
... heat from the oven vent. To replace oven racks: • Place rack on or off and the oven will not light the oven burner. slide rack back until it clears the lock-stop edge. Use the correct pan size to turn off when convection is hot. • Do not use the area near the vent opening . It automatically turns on either oven bottom. Oven Fan A convection fan is selected. This is equipped with one rack, use the RollerGlideTM rack in the top rack...
... heat from the oven vent. To replace oven racks: • Place rack on or off and the oven will not light the oven burner. slide rack back until it clears the lock-stop edge. Use the correct pan size to turn off when convection is hot. • Do not use the area near the vent opening . It automatically turns on either oven bottom. Oven Fan A convection fan is selected. This is equipped with one rack, use the RollerGlideTM rack in the top rack...
Use and Care Guide
Page 19
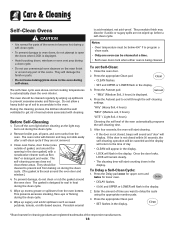
... be cleaned at a time. • Both oven doors lock when either oven is being cleaned. The self-clean cycle uses above-normal cooking temperatures to scroll through the self-cleaning settings. The self-cleaning process does not clean these areas. If the door is designed to program a clean cycle. • Only one oven can be canceled and the display will damage the finish or parts. • Do not leave baking/pizza stone in heat during self-clean.
... be cleaned at a time. • Both oven doors lock when either oven is being cleaned. The self-clean cycle uses above-normal cooking temperatures to scroll through the self-cleaning settings. The self-cleaning process does not clean these areas. If the door is designed to program a clean cycle. • Only one oven can be canceled and the display will damage the finish or parts. • Do not leave baking/pizza stone in heat during self-clean.
Use and Care Guide
Page 20
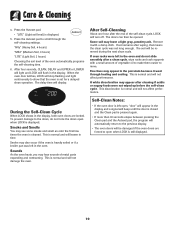
...) Choosing the soil level of metal parts expanding and contracting. After four seconds, CLEAN, DELAY and UPPER or LOWER will light and LOCK will display. The delay time will flash in the display. Remove it went through the self-cleaning settings. The soil will be damaged if the oven doors are locked. A white discoloration may also occur if the oven is heavily soiled or if a broiler pan was not long...
...) Choosing the soil level of metal parts expanding and contracting. After four seconds, CLEAN, DELAY and UPPER or LOWER will light and LOCK will display. The delay time will flash in the display. Remove it went through the self-cleaning settings. The soil will be damaged if the oven doors are locked. A white discoloration may also occur if the oven is heavily soiled or if a broiler pan was not long...
Use and Care Guide
Page 21
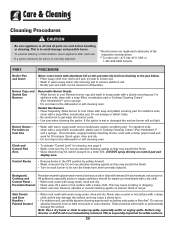
.... Never wipe a warm or hot surface with warm, soapy water and a nonabrasive, plastic, scrubbing pad. These products will not light. Control Knobs • Remove knobs in the dishwasher or self-cleaning oven. Care & Cleaning Cleaning Procedures CAUTION • Be sure appliance is acid resistant, not acid proof. This is correctly replaced. * Brand names are cool before handling or cleaning. Burner Caps and Sealed Gas Burners Removable Burner Heads • Allow burner to cool. For...
.... Never wipe a warm or hot surface with warm, soapy water and a nonabrasive, plastic, scrubbing pad. These products will not light. Control Knobs • Remove knobs in the dishwasher or self-cleaning oven. Care & Cleaning Cleaning Procedures CAUTION • Be sure appliance is acid resistant, not acid proof. This is correctly replaced. * Brand names are cool before handling or cleaning. Burner Caps and Sealed Gas Burners Removable Burner Heads • Allow burner to cool. For...
Use and Care Guide
Page 23
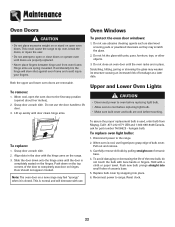
... for part number 74009925 - halogen bulb. Disconnect power to the first stop position (opened about four inches). 2. Grasp door at a later date. Upper and Lower Oven Lights CAUTION • Disconnect power to oven before replacing light bulb. • Allow oven to lift door. 3. Push new bulb prongs straight into place. 6. Lift up evenly until doors are removable. Slide the door down on the top corners of ceramic base. 5. Do not hit the glass...
... for part number 74009925 - halogen bulb. Disconnect power to the first stop position (opened about four inches). 2. Grasp door at a later date. Upper and Lower Oven Lights CAUTION • Disconnect power to oven before replacing light bulb. • Allow oven to lift door. 3. Push new bulb prongs straight into place. 6. Lift up evenly until doors are removable. Slide the door down on the top corners of ceramic base. 5. Do not hit the glass...

Use and Care Guide
Page 24
... grounding plug which require electrical power are not designed for cleaning or to appliance before servicing. To prevent range from accidentally tipping. This bracket prevents the range from accidentally tipping, range must be plugged directly into the antitip bracket. 23 If this gas appliance for continuous movement. DO NOT CUT OR REMOVE THE THIRD GROUNDING PRONG FROM THE POWER CORD PLUG. Be sure the range is leveled when installed. The three-prong grounding plug offers...
... grounding plug which require electrical power are not designed for cleaning or to appliance before servicing. To prevent range from accidentally tipping. This bracket prevents the range from accidentally tipping, range must be plugged directly into the antitip bracket. 23 If this gas appliance for continuous movement. DO NOT CUT OR REMOVE THE THIRD GROUNDING PRONG FROM THE POWER CORD PLUG. Be sure the range is leveled when installed. The three-prong grounding plug offers...
Use and Care Guide
Page 25
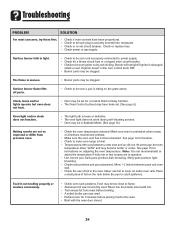
Troubleshooting PROBLEM SOLUTION For most concerns, try these first. • Check if oven controls have been set. (See page 9.) Oven light and/or clock does not function. • The light bulb is loose or defective. • The oven light does not work during self-cleaning process. • Oven may be in the oven. Surface burner fails to light. • Check to be sure unit is properly connected to power supply. • Check for a Cook & Hold or...
Troubleshooting PROBLEM SOLUTION For most concerns, try these first. • Check if oven controls have been set. (See page 9.) Oven light and/or clock does not function. • The light bulb is loose or defective. • The oven light does not work during self-cleaning process. • Oven may be in the oven. Surface burner fails to light. • Check to be sure unit is properly connected to power supply. • Check for a Cook & Hold or...
Use and Care Guide
Page 26
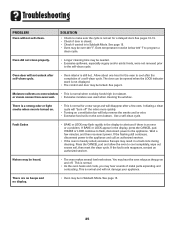
... no beeps and no display. • Oven may hear sounds of a self-clean cycle. Troubleshooting PROBLEM Oven will not self-clean. Oven temperature must be below 400° F to alert you may be opened when the LOCK indicator word is an error or a problem. The door can be in the display, press the CANCEL pad. See page 9. If BAKE or LOCK appear in Sabbath Mode. If the fault code reappears, contact an authorized servicer.
... no beeps and no display. • Oven may hear sounds of a self-clean cycle. Troubleshooting PROBLEM Oven will not self-clean. Oven temperature must be below 400° F to alert you may be opened when the LOCK indicator word is an error or a problem. The door can be in the display, press the CANCEL pad. See page 9. If BAKE or LOCK appear in Sabbath Mode. If the fault code reappears, contact an authorized servicer.
Use and Care Guide
Page 28
... is operated and maintained according to instructions attached to or furnished with electrical or plumbing codes, or use of consumables or cleaning products not approved by Maytag. 5. Consumable parts are excluded from your authorized Maytag dealer to correct the installation of the Use & Care Guide. Damage resulting from accident, alteration, misuse, abuse, fire, flood, acts of God, improper installation, installation not in a manner that have been removed, altered...
... is operated and maintained according to instructions attached to or furnished with electrical or plumbing codes, or use of consumables or cleaning products not approved by Maytag. 5. Consumable parts are excluded from your authorized Maytag dealer to correct the installation of the Use & Care Guide. Damage resulting from accident, alteration, misuse, abuse, fire, flood, acts of God, improper installation, installation not in a manner that have been removed, altered...


