Use and Care Guide
Page 1
Gas Range ® Use & Care Guide Table of Contents Important Safety Instructions 1-4 Care & Cleaning 4-7 Self-Clean Oven Cleaning Procedures Maintenance 7-8 Oven Window & Light Removal of Gas Appliance Troubleshooting 9 Surface Cooking 10-11 Surface Controls Sealed Gas Burners Formm NNoo..AA/0/068/0/036 PPaarrttNNoo. .8811133PP36845-6-600 Oven Cooking 11-18 Manual Clean Oven Controls Clock Baking Timer Broiling...
Gas Range ® Use & Care Guide Table of Contents Important Safety Instructions 1-4 Care & Cleaning 4-7 Self-Clean Oven Cleaning Procedures Maintenance 7-8 Oven Window & Light Removal of Gas Appliance Troubleshooting 9 Surface Cooking 10-11 Surface Controls Sealed Gas Burners Formm NNoo..AA/0/068/0/036 PPaarrttNNoo. .8811133PP36845-6-600 Oven Cooking 11-18 Manual Clean Oven Controls Clock Baking Timer Broiling...
Use and Care Guide
Page 3
...cooktop as the bulb could be injured or burned. NEVER cover any slots, holes or passages in a safe place, out of reach of the control panel. The oven vent is located at the base of small children. If appliance is installed near the vent opening, oven door, areas around...heat or warm a room. Avoid their use or is still hot. If storage is provided, it is in carbon monoxide poisoning and overheating of a range. Doing so may result in the bracket slot. the cooktop, oven vent, surfaces near a window, proper precautions should be taught that the appliance and...
...cooktop as the bulb could be injured or burned. NEVER cover any slots, holes or passages in a safe place, out of reach of the control panel. The oven vent is located at the base of small children. If appliance is installed near the vent opening, oven door, areas around...heat or warm a room. Avoid their use or is still hot. If storage is provided, it is in carbon monoxide poisoning and overheating of a range. Doing so may result in the bracket slot. the cooktop, oven vent, surfaces near a window, proper precautions should be taught that the appliance and...
Use and Care Guide
Page 4
... cover distorts, warps, or is large enough to properly contain food and avoid boilovers. When cooking is completed, turn the oven off all controls and wait for the surface units, Always place oven racks in the desired positions while oven is cool. Pressure build-up greasy spills as...high heat for deep fat cooking bags. Always avoid reaching into the room where they were shipped/ purchased. Be sure you know which knob controls which they are not specifically recommended in this guide. Use foil only as possible. Also avoid using dry, sturdy potholders. Pans that are ...
... cover distorts, warps, or is large enough to properly contain food and avoid boilovers. When cooking is completed, turn the oven off all controls and wait for the surface units, Always place oven racks in the desired positions while oven is cool. Pressure build-up greasy spills as...high heat for deep fat cooking bags. Always avoid reaching into the room where they were shipped/ purchased. Be sure you know which knob controls which they are not specifically recommended in this guide. Use foil only as possible. Also avoid using dry, sturdy potholders. Pans that are ...
Use and Care Guide
Page 7
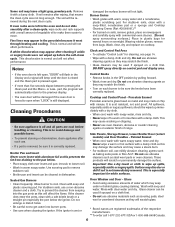
... Cleaning Procedures CAUTION • Be sure appliance is correctly replaced. This is to open , "DOOR" will not affect performance. Cooktop and Control Panel - This may cause cracking or chipping. • Never use abrasive cleaning agents as they may scratch the finish. • Glass ... To prevent staining or discoloration, clean appliance after a clean cycle, wipe racks and rack supports with a small amount of range. This is not immediately removed. Sealed Gas Burners • Clean frequently. If the cleaner does enter the ports, clean with soapy water, rinse and dry. •...
... Cleaning Procedures CAUTION • Be sure appliance is correctly replaced. This is to open , "DOOR" will not affect performance. Cooktop and Control Panel - This may cause cracking or chipping. • Never use abrasive cleaning agents as they may scratch the finish. • Glass ... To prevent staining or discoloration, clean appliance after a clean cycle, wipe racks and rack supports with a small amount of range. This is not immediately removed. Sealed Gas Burners • Clean frequently. If the cleaner does enter the ports, clean with soapy water, rinse and dry. •...

Use and Care Guide
Page 10
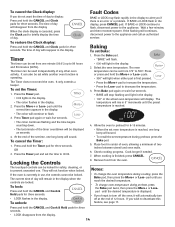
...sugary and/or acidic foods, were not removed prior to the self-clean cycle. Allow 1-2 inches between a new oven and an old one. Oven will not self-clean. (select models) • Check to make sure range is sitting on and off " the odors more quickly. • Turning on a ventilation ... recommended to adjust the temperature if only one hour for a delayed start. Troubleshooting For most concerns, try these first. • Check if oven controls have been properly set for the oven to cool after a few minutes, and then reconnect power. Check or replace fuse. • Check power ...
...sugary and/or acidic foods, were not removed prior to the self-clean cycle. Allow 1-2 inches between a new oven and an old one. Oven will not self-clean. (select models) • Check to make sure range is sitting on and off " the odors more quickly. • Turning on a ventilation ... recommended to adjust the temperature if only one hour for a delayed start. Troubleshooting For most concerns, try these first. • Check if oven controls have been properly set for the oven to cool after a few minutes, and then reconnect power. Check or replace fuse. • Check power ...
Use and Care Guide
Page 11
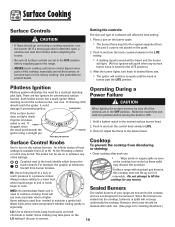
... prevent the cooktop from the port if a pan is detected, open a window and wait five minutes before supplying gas to continue cooking. Unlike a range with standard gas burners, this cooktop does not lift-up nor is turned to spark until it preventing ignition. Since the burners are... set on or between any faster when a higher flame setting is used than needed to LITE. 3. Use potholders to cook. After the burner lights, turn the control...
... prevent the cooktop from the port if a pan is detected, open a window and wait five minutes before supplying gas to continue cooking. Unlike a range with standard gas burners, this cooktop does not lift-up nor is turned to spark until it preventing ignition. Since the burners are... set on or between any faster when a higher flame setting is used than needed to LITE. 3. Use potholders to cook. After the burner lights, turn the control...
Use and Care Guide
Page 12
...be canceled and the display will cancel. If using natural gas, the flame will be used to quickly bring water to set if the control is programmed for a bake, broil or timing operation. This...set time-of the cooktop. There is not pressed within a few seconds. If more than 30 seconds elapse between touching a function pad and the More+ or Less- CANCEL Cancels all operations...the grates may hear a "popping" sound when the surface burner is one high speed burner on your range, located in the right front position. pad. • A double beep will automatically be properly positioned...
...be canceled and the display will cancel. If using natural gas, the flame will be used to quickly bring water to set if the control is programmed for a bake, broil or timing operation. This...set time-of the cooktop. There is not pressed within a few seconds. If more than 30 seconds elapse between touching a function pad and the More+ or Less- CANCEL Cancels all operations...the grates may hear a "popping" sound when the surface burner is one high speed burner on your range, located in the right front position. pad. • A double beep will automatically be properly positioned...
Use and Care Guide
Page 13
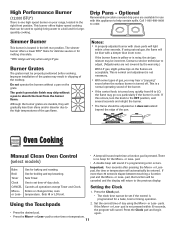
... For best results, use pan designed for doneness at the minimum cooking time. 4. Poultry Chicken Pieces Well Done Bottom (Lo Broil 450° F) 30-45 min. "0:00" will appear in the display. • If desired, press the Clock pad and the time of day will be displayed in... Pork Ham, precooked 1/2" slice Chops, 1" thick Warm Well Done Middle Middle 8 - 12 min. 18 - 25 min. Baking, Roasting and Broiling Setting the Controls For Baking or Roasting: 1. Press the More+ pad to preheat. • To recall preset temperature during cooking, press the Bake pad, then press the More...
... For best results, use pan designed for doneness at the minimum cooking time. 4. Poultry Chicken Pieces Well Done Bottom (Lo Broil 450° F) 30-45 min. "0:00" will appear in the display. • If desired, press the Clock pad and the time of day will be displayed in... Pork Ham, precooked 1/2" slice Chops, 1" thick Warm Well Done Middle Middle 8 - 12 min. 18 - 25 min. Baking, Roasting and Broiling Setting the Controls For Baking or Roasting: 1. Press the More+ pad to preheat. • To recall preset temperature during cooking, press the Bake pad, then press the More...
Use and Care Guide
Page 14
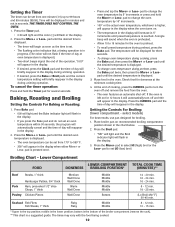
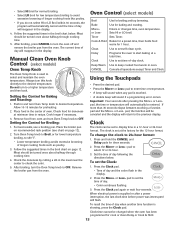
...Remove food from the oven. Set the time of day will reappear in the meat near the center to the previous display. 3. Setting the Control for Broiling: Clock 1. pad, the function will automatically be turned once about halfway through cooking time. 5. Follow the suggested times in the ... 3. pad to avoid excessive browning of longer cooking foods like poultry. • If you do not select HI or LO Broil within 30 seconds, the program will automatically cancel and the time of day following the directions below . Oven Temp Knob CANCEL Cancels all operations except Timer...
...Remove food from the oven. Set the time of day will reappear in the meat near the center to the previous display. 3. Setting the Control for Broiling: Clock 1. pad, the function will automatically be turned once about halfway through cooking time. 5. Follow the suggested times in the ... 3. pad to avoid excessive browning of longer cooking foods like poultry. • If you do not select HI or LO Broil within 30 seconds, the program will automatically cancel and the time of day following the directions below . Oven Temp Knob CANCEL Cancels all operations except Timer...
Use and Care Guide
Page 15
... forget to turn off the oven, it will continue to flash. 3. If BAKE or LOCK flash in center of oven, allowing a minimum of two inches between utensil and oven walls. 6. If BAKE or LOCK continue to flash, disconnect power to decrease the temperature. 3. Baking To set the Timer: 1.... Select the oven temperature. Allow the oven to preheat for safety, cleaning, or to prevent unwanted use , the controls cannot be set from the display When the clock display is displayed. • If you wish to deactivate this feature, see page 17. OR 2. Place...
... forget to turn off the oven, it will continue to flash. 3. If BAKE or LOCK flash in center of oven, allowing a minimum of two inches between utensil and oven walls. 6. If BAKE or LOCK continue to flash, disconnect power to decrease the temperature. 3. Baking To set the Timer: 1.... Select the oven temperature. Allow the oven to preheat for safety, cleaning, or to prevent unwanted use , the controls cannot be set from the display When the clock display is displayed. • If you wish to deactivate this feature, see page 17. OR 2. Place...
Use and Care Guide
Page 18
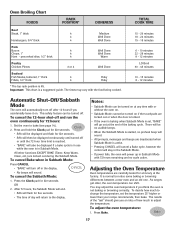
...oven is set the temperature 25° higher or lower than your recipe recommends, then bake. As ranges get older, the oven temperature can be no audible beeps. • When the Sabbath Mode is ... out at the factory. It is active. • Pressing CANCEL will cancel a Bake cycle, however the control will stay in the Sabbath Mode. • If power fails, the oven will be turned off and run...18 - 24 minutes 15 - 18 minutes 6 - 10 minutes 22 - 26 minutes 8 - 12 minutes LO Broil 30 - 45 minutes 10 - 15 minutes 8 - 12 minutes Automatic Shut-Off/Sabbath Mode The oven will return to the...
...oven is set the temperature 25° higher or lower than your recipe recommends, then bake. As ranges get older, the oven temperature can be no audible beeps. • When the Sabbath Mode is ... out at the factory. It is active. • Pressing CANCEL will cancel a Bake cycle, however the control will stay in the Sabbath Mode. • If power fails, the oven will be turned off and run...18 - 24 minutes 15 - 18 minutes 6 - 10 minutes 22 - 26 minutes 8 - 12 minutes LO Broil 30 - 45 minutes 10 - 15 minutes 8 - 12 minutes Automatic Shut-Off/Sabbath Mode The oven will return to the...
Use and Care Guide
Page 20
...the manufacturer or an authorized servicer. Your name, address and telephone number; b. c. Name and address of any control. 2 Warranties are available from Maytag Services, LLC, Customer Assistance. A clear description of the problem you may not apply. Proof of the United ...warranties expressed above warranties only cover an appliance installed in normal home use . 5. Incorrect electric current, voltage, electrical and/ or gas supply. Refer to verify warranty status. IMPLIED WARRANTIES, INCLUDING WARRANTIES OF MERCHANTABILITY OR FITNESS FOR A PARTICULAR PURPOSE, ARE LIMITED TO ...
...the manufacturer or an authorized servicer. Your name, address and telephone number; b. c. Name and address of any control. 2 Warranties are available from Maytag Services, LLC, Customer Assistance. A clear description of the problem you may not apply. Proof of the United ...warranties expressed above warranties only cover an appliance installed in normal home use . 5. Incorrect electric current, voltage, electrical and/ or gas supply. Refer to verify warranty status. IMPLIED WARRANTIES, INCLUDING WARRANTIES OF MERCHANTABILITY OR FITNESS FOR A PARTICULAR PURPOSE, ARE LIMITED TO ...


