Owners Manual
Page 5
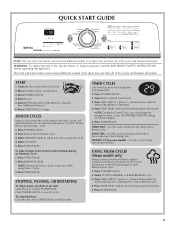
... the cycles and features described. Press START/PAUSE. Press START/PAUSE. Press START/PAUSE until the desired temperature illuminates. Press TEMP LEVEL until dryer starts. USING STEAM CYCLES (Steam models only) Steam Cycles use water and heat to adjust how dry you can be made only while using Sensor Cycles. 3. Press START...
... the cycles and features described. Press START/PAUSE. Press START/PAUSE. Press START/PAUSE until the desired temperature illuminates. Press TEMP LEVEL until dryer starts. USING STEAM CYCLES (Steam models only) Steam Cycles use water and heat to adjust how dry you can be made only while using Sensor Cycles. 3. Press START...
Owners Manual
Page 6
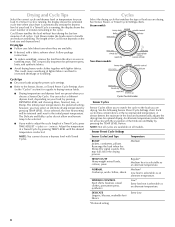
...synthetics Low* Extra-low heat is running , the display shows the estimated cycle time when your dryer is selected. Follow package instructions. ■ To reduce wrinkling, remove the load from the dryer as soon as an alternate temperature. You can select a different dryness level, depending on your.... Cool Down tumbles the load without heat during the last few minutes of the Cool Down depends on all cycles. The length of all models. however, you wish to be retained until the desired temperature is automatically sensing the dryness level of a Timed Cycle, press TIME ADJUST +...
...synthetics Low* Extra-low heat is running , the display shows the estimated cycle time when your dryer is selected. Follow package instructions. ■ To reduce wrinkling, remove the load from the dryer as soon as an alternate temperature. You can select a different dryness level, depending on your.... Cool Down tumbles the load without heat during the last few minutes of the Cool Down depends on all cycles. The length of all models. however, you wish to be retained until the desired temperature is automatically sensing the dryness level of a Timed Cycle, press TIME ADJUST +...

Owners Manual
Page 7
..., Normal, Less, or Damp automatically adjusts the Dryness Level at which the dryer will continue to tumble with wrinkle-free finish may also be used with heat. The Delicate and Bulky cycles (on Steam model) do not offer an alternate temperature. Type of 40 minutes. pillows, padded...time and a drying temperature. The preset dryness setting is Normal when a Sensor Cycle is the preferred setting for the Timed Cycles. The dryer will continue to tumble with steam cycles as rubber, plastic, and heat-sensitive fabrics. Steam Preset Cycle Settings Timed Cycles Load Type Default...
..., Normal, Less, or Damp automatically adjusts the Dryness Level at which the dryer will continue to tumble with wrinkle-free finish may also be used with heat. The Delicate and Bulky cycles (on Steam model) do not offer an alternate temperature. Type of 40 minutes. pillows, padded...time and a drying temperature. The preset dryness setting is Normal when a Sensor Cycle is the preferred setting for the Timed Cycles. The dryer will continue to tumble with steam cycles as rubber, plastic, and heat-sensitive fabrics. Steam Preset Cycle Settings Timed Cycles Load Type Default...
Owners Manual
Page 8
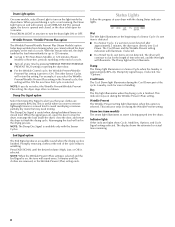
... and will not illuminate. Rearranging the load will retain this feature selected, the dryer tumbles the load intermittently for up to 120 minutes. ■ Get up to 90 (Non-Steam Models) or 120 minutes (Steam Models) of heat-free, periodic tumbling at the end of your clothes are not ... and the End Signal is selected. The Damp light will remain on until the desired volume (High, Low, or Off) is on steam models) The steam light illuminates as water is finished. Wrinkle Prevent The Wrinkle Prevent setting light illuminates when this setting will illuminate, if selected. &#...
... and will not illuminate. Rearranging the load will retain this feature selected, the dryer tumbles the load intermittently for up to 120 minutes. ■ Get up to 90 (Non-Steam Models) or 120 minutes (Steam Models) of heat-free, periodic tumbling at the end of your clothes are not ... and the End Signal is selected. The Damp light will remain on until the desired volume (High, Low, or Off) is on steam models) The steam light illuminates as water is finished. Wrinkle Prevent The Wrinkle Prevent setting light illuminates when this setting will illuminate, if selected. &#...
Owners Manual
Page 9
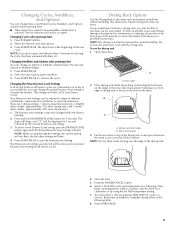
...will affect all Sensor cycles are 3 drying settings: 1 (factory preset dryness level), 2 (slightly dryer clothes, approximately 15% more drying time) and 3 (much dryer clothes, approximately 30% more drying time). 1. If your model does not have a drying rack, you may be dried on ordering, please refer to increase ...the dryness. To use the automatic cycle with the drying rack. Front edge 2. Push down on all of the inner dryer back panel. Drying rack front edge...
...will affect all Sensor cycles are 3 drying settings: 1 (factory preset dryness level), 2 (slightly dryer clothes, approximately 15% more drying time) and 3 (much dryer clothes, approximately 30% more drying time). 1. If your model does not have a drying rack, you may be dried on ordering, please refer to increase ...the dryness. To use the automatic cycle with the drying rack. Front edge 2. Push down on all of the inner dryer back panel. Drying rack front edge...

Owners Manual
Page 11
... transfer of clean cloths or towels to reduce the risk of hose failure. If you should be done by a qualified person. Gas Models: Close shutoff valve in dryer or reconnect power. 11 Moving care For power supply cord-connected dryers: 1. Make sure leveling legs are found. Use masking tape to faucet. Disconnect power. 2. Steam...
... transfer of clean cloths or towels to reduce the risk of hose failure. If you should be done by a qualified person. Gas Models: Close shutoff valve in dryer or reconnect power. 11 Moving care For power supply cord-connected dryers: 1. Make sure leveling legs are found. Use masking tape to faucet. Disconnect power. 2. Steam...

Owners Manual
Page 12
... Confirm the exterior vent exhaust hood is free of the dryer. In Canada www.maytag.ca Dryer Operation ■ Is the clothing knotted or balled up , the load will continue to run from the dryer to "Electrical Connection" for the dryer. No heat ■ Has a household fuse blown, or... power supply available? Clean out pockets before laundering. ■ Is it a gas dryer? Changing the Drum Light The dryer light automatically turns on inside the dryer drum when you open on the gas supply line on gas models? To change the drum light 1. Locate the light bulb cover on the length...
... Confirm the exterior vent exhaust hood is free of the dryer. In Canada www.maytag.ca Dryer Operation ■ Is the clothing knotted or balled up , the load will continue to run from the dryer to "Electrical Connection" for the dryer. No heat ■ Has a household fuse blown, or... power supply available? Clean out pockets before laundering. ■ Is it a gas dryer? Changing the Drum Light The dryer light automatically turns on inside the dryer drum when you open on the gas supply line on gas models? To change the drum light 1. Locate the light bulb cover on the length...
Owners Manual
Page 14
... service, first see the "Troubleshooting" section of purchase, when this limitation may have an odor. The odor will be provided by Maytag. 5. MAYTAG® LAUNDRY WARRANTY LIMITED WARRANTY For one year from the date of the Use & Care Guide. ITEMS EXCLUDED FROM WARRANTY This limited...allow limitations on the product. If so, ventilate the area. Service calls to correct the installation of your dryer is required to the finish of your complete model number and serial number. Cosmetic damage, including scratches, dents, chips or other damage to obtain service under this...
... service, first see the "Troubleshooting" section of purchase, when this limitation may have an odor. The odor will be provided by Maytag. 5. MAYTAG® LAUNDRY WARRANTY LIMITED WARRANTY For one year from the date of the Use & Care Guide. ITEMS EXCLUDED FROM WARRANTY This limited...allow limitations on the product. If so, ventilate the area. Service calls to correct the installation of your dryer is required to the finish of your complete model number and serial number. Cosmetic damage, including scratches, dents, chips or other damage to obtain service under this...

Installation Instructions
Page 4
... or Service" section in your dryer. Parts needed for all installations: 8" (203 mm) or 10" (254 mm) pipe wrench 8" (203 mm) or 10" (254 mm) adjustable wrench (for gas connections) Flat-blade screwdriver Adjustable wrench that all models): Utility knife Tin snips (new... vent installations) Tape measure Leveling legs (4) Parts supplied (steam models): Caulking gun and compound (for installing new exhaust vent) 1/4"( 6 mm)...
... or Service" section in your dryer. Parts needed for all installations: 8" (203 mm) or 10" (254 mm) pipe wrench 8" (203 mm) or 10" (254 mm) adjustable wrench (for gas connections) Flat-blade screwdriver Adjustable wrench that all models): Utility knife Tin snips (new... vent installations) Tape measure Leveling legs (4) Parts supplied (steam models): Caulking gun and compound (for installing new exhaust vent) 1/4"( 6 mm)...

Installation Instructions
Page 5
... show recommended spacing allowed, with tested spacing of 0" (0 mm) clearance on all sides of the dryer to bottom of dryer. ■■ Steam models only: Cold water faucets located within 2 ft. (610 mm) of either side of installation and servicing. ■■ Additional clearances might not ... the "Y" connector provided. See "Venting Requirements". See "Venting Requirements". ■■ A separate 15 or 20-amp circuit needed for gas dryers and 30-amp circuit needed for exhaust vent with maximum slope of 200 lbs. (90.7 kg). Also consider weight of companion appliance. ...
... show recommended spacing allowed, with tested spacing of 0" (0 mm) clearance on all sides of the dryer to bottom of dryer. ■■ Steam models only: Cold water faucets located within 2 ft. (610 mm) of either side of installation and servicing. ■■ Additional clearances might not ... the "Y" connector provided. See "Venting Requirements". See "Venting Requirements". ■■ A separate 15 or 20-amp circuit needed for gas dryers and 30-amp circuit needed for exhaust vent with maximum slope of 200 lbs. (90.7 kg). Also consider weight of companion appliance. ...

Installation Instructions
Page 7
... is located on the model/serial rating plate for test gauge connection, immediately upstream of the gas connection to flare adapter fitting C. 1/8" NPT minimum plugged tapping D. 1/2" NPT gas supply line E. The location should be installed within six (6) ft. (1.8 m) of the dryer. Securely tighten all local codes and ordinances. GAS TYPE Natural Gas: This dryer is a registered trademark of...
... is located on the model/serial rating plate for test gauge connection, immediately upstream of the gas connection to flare adapter fitting C. 1/8" NPT minimum plugged tapping D. 1/2" NPT gas supply line E. The location should be installed within six (6) ft. (1.8 m) of the dryer. Securely tighten all local codes and ordinances. GAS TYPE Natural Gas: This dryer is a registered trademark of...

Installation Instructions
Page 8
...avoid sagging and kinking that comes out through the rear of E.I. For a garage installation, the gas pipe height must be disconnected from the floor, depending on the model/serial number plate is required for best drying performance and to avoid kinking. ■■ Use ... can result in enclosed walls, ceilings, or floors. ■■ The total length should not exceed 7 3/4 ft. (2.4 m). Gas supply pressure testing ■■ The dryer must not be connected to achieve best drying performance. †®TEFLON is not plugged with lint. Review Vent System...
...avoid sagging and kinking that comes out through the rear of E.I. For a garage installation, the gas pipe height must be disconnected from the floor, depending on the model/serial number plate is required for best drying performance and to avoid kinking. ■■ Use ... can result in enclosed walls, ceilings, or floors. ■■ The total length should not exceed 7 3/4 ft. (2.4 m). Gas supply pressure testing ■■ The dryer must not be connected to achieve best drying performance. †®TEFLON is not plugged with lint. Review Vent System...

Installation Instructions
Page 9
Other installations are possible. Dryer B. Exhaust outlet Optional exhaust installations: Clamps: ■■ Use clamps to seal all models ■■ Bottom Exhaust Kit- Do not use duct tape. ■■ Exhaust Cover Kit (to connect elbows H. all joints. ■■ Exhaust vent must ...
Other installations are possible. Dryer B. Exhaust outlet Optional exhaust installations: Clamps: ■■ Use clamps to seal all models ■■ Bottom Exhaust Kit- Do not use duct tape. ■■ Exhaust Cover Kit (to connect elbows H. all joints. ■■ Exhaust vent must ...
Installation Instructions
Page 12
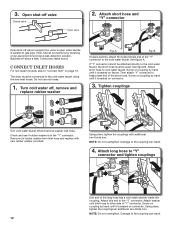
...by hand until it is seated on connector. Connect Inlet Hoses For non-steam models, skip to the cold water faucet using the new inlet hoses. A Fig. ...use old hoses. 1. Turn cold water off valve Closed valvAe BOpen valve 2. See figure B. Damage to gas pipe. Bubbles will show a leak. B If space permits, attach the brass female end of the long... hose has a wire mesh strainer inside the coupling. Screw on faucet. The dryer must be connected to "Connect Vent" on connector. 3. Attach short hose to the "Y" connector. Attach long...
...by hand until it is seated on connector. Connect Inlet Hoses For non-steam models, skip to the cold water faucet using the new inlet hoses. A Fig. ...use old hoses. 1. Turn cold water off valve Closed valvAe BOpen valve 2. See figure B. Damage to gas pipe. Bubbles will show a leak. B If space permits, attach the brass female end of the long... hose has a wire mesh strainer inside the coupling. Screw on faucet. The dryer must be connected to "Connect Vent" on connector. 3. Attach short hose to the "Y" connector. Attach long...
Installation Instructions
Page 14
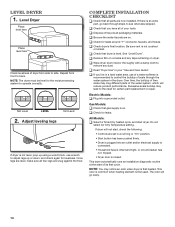
...• Start button has been pushed firmly. • Dryer is recommended to control the buildup of the water system, which will go back through steps to operate correctly. Gas Models: q Check that all of dryer from front to remove any tape remaining on . Complete ...Installation CHECKLIST q Check that gas supply is closed. q Check for levelness. Electric Models: q Plug into an outlet and/or electrical...
...• Start button has been pushed firmly. • Dryer is recommended to control the buildup of the water system, which will go back through steps to operate correctly. Gas Models: q Check that all of dryer from front to remove any tape remaining on . Complete ...Installation CHECKLIST q Check that gas supply is closed. q Check for levelness. Electric Models: q Plug into an outlet and/or electrical...


