Owners Manual
Page 6
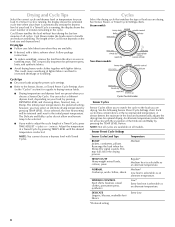
... remaining in the drying process. NORMAL Corduroys, work clothes together with lighter fabrics. If a Sensor Cycle is especially important for all cycles. This is running , the display shows the exact number of a Timed Cycle by pressing the TEMP LEVEL button. Cycles Select the drying cycle that matches the type of all cycles with Timed Cycles. Steam models Non-Steam models Cycle Control knobs Sensor Cycles Sensor Cycles allow an alternate temp to the initial preset temperature. Sensor Preset Cycle Settings Sensor Cycles Load Type Temperature BULKY Jackets...
... remaining in the drying process. NORMAL Corduroys, work clothes together with lighter fabrics. If a Sensor Cycle is especially important for all cycles. This is running , the display shows the exact number of a Timed Cycle by pressing the TEMP LEVEL button. Cycles Select the drying cycle that matches the type of all cycles with Timed Cycles. Steam models Non-Steam models Cycle Control knobs Sensor Cycles Sensor Cycles allow an alternate temp to the initial preset temperature. Sensor Preset Cycle Settings Sensor Cycles Load Type Temperature BULKY Jackets...
Owners Manual
Page 8
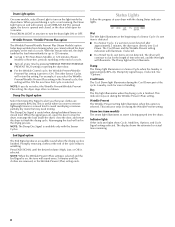
... is useful when drying bedsheets/linens in a Sensor Cycle when the laundry is preset to ON. Promptly removing clothes at the end of a cycle. ■ Turn off , open for ease in the drying process. The dryer will continue to run for up to 120 minutes. ■ Get up to 90 (Non-Steam Models) or 120 minutes (Steam Models) of heat-free, periodic tumbling at any time to turn on steam models) The steam light...
... is useful when drying bedsheets/linens in a Sensor Cycle when the laundry is preset to ON. Promptly removing clothes at the end of a cycle. ■ Turn off , open for ease in the drying process. The dryer will continue to run for up to 120 minutes. ■ Get up to 90 (Non-Steam Models) or 120 minutes (Steam Models) of heat-free, periodic tumbling at any time to turn on steam models) The steam light...
Owners Manual
Page 9
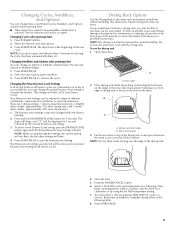
... drum turns, but the other settings will not be dried on front edge of drying rack to different installations, environmental conditions, or personal preference. Push down on a clothesline or by using the Air Fluff temperature setting. 7. Select a Timed Dry cycle and temperature (see following table. 8. Open dryer door. Items containing foam, rubber, or plastic must be adjusted to adapt to secure at the beginning of the inner dryer back panel...
... drum turns, but the other settings will not be dried on front edge of drying rack to different installations, environmental conditions, or personal preference. Push down on a clothesline or by using the Air Fluff temperature setting. 7. Select a Timed Dry cycle and temperature (see following table. 8. Open dryer door. Items containing foam, rubber, or plastic must be adjusted to adapt to secure at the beginning of the inner dryer back panel...
Owners Manual
Page 10
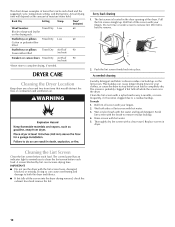
... shoes Timed Dry Air Fluff 90 (no heat) *Reset time to remove lint. The lint screen is hard to remove residue buildup. 4. As needed . Wet a nylon brush with hot water. 5. Rinse screen with hot water and liquid detergent. To wash 1. Every load cleaning 1. Wet lint is located in the door opening of moisture items hold. The control panel has an indicator light to remind you to both sides of lint screen with hot water. 3. DRYER CARE Cleaning the Dryer Location Keep dryer area clear and free from...
... shoes Timed Dry Air Fluff 90 (no heat) *Reset time to remove lint. The lint screen is hard to remove residue buildup. 4. As needed . Wet a nylon brush with hot water. 5. Rinse screen with hot water and liquid detergent. To wash 1. Every load cleaning 1. Wet lint is located in the door opening of moisture items hold. The control panel has an indicator light to remind you to both sides of lint screen with hot water. 3. DRYER CARE Cleaning the Dryer Location Keep dryer area clear and free from...

Owners Manual
Page 11
... some water may discolor the dryer interior. Steam Models Only: Turn off water faucet. 4. Unplug the power supply cord. 2. Vacation or Storage Care Operate your dryer only when you are not harmful to dry the drum. Gas Models: Close shutoff valve in dryer or reconnect power. 11 Transport hose separately. 5. Removing Accumulated Lint From Inside the Dryer Cabinet Lint should : 1. Replace all parts and panels before servicing. Clean lint screen. Make sure leveling legs are secure in dryer base. 6. Cleaning the Dryer Interior...
... some water may discolor the dryer interior. Steam Models Only: Turn off water faucet. 4. Unplug the power supply cord. 2. Vacation or Storage Care Operate your dryer only when you are not harmful to dry the drum. Gas Models: Close shutoff valve in dryer or reconnect power. 11 Transport hose separately. 5. Removing Accumulated Lint From Inside the Dryer Cabinet Lint should : 1. Replace all parts and panels before servicing. Clean lint screen. Make sure leveling legs are secure in dryer base. 6. Cleaning the Dryer Interior...

Owners Manual
Page 12
... run ■ Has a household fuse blown, or has a circuit breaker tripped? Electric dryers use two household fuses or breakers. If the dryer hasn't been used ? See the Installation Instructions. Replace the fuse or reset the circuit breaker. In the U.S.A. - Refer to vibrate. Locate the light bulb cover on the back wall of non-use? Separate the load items and restart the dryer. Dryer displaying code message ■ "PF" (power failure), check the following: Was the drying cycle interrupted by simply pressing START...
... run ■ Has a household fuse blown, or has a circuit breaker tripped? Electric dryers use two household fuses or breakers. If the dryer hasn't been used ? See the Installation Instructions. Replace the fuse or reset the circuit breaker. In the U.S.A. - Refer to vibrate. Locate the light bulb cover on the back wall of non-use? Separate the load items and restart the dryer. Dryer displaying code message ■ "PF" (power failure), check the following: Was the drying cycle interrupted by simply pressing START...
Owners Manual
Page 13
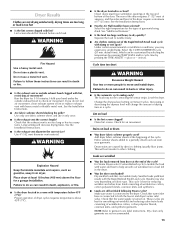
... turned on fabric type. Proper operation of the cycle? Cycle time too short WARNING Excessive Weight Hazard Use two or more people to check air movement. Failure to tumble the load with lint? Lint on load or drum ■ Was dryer fabric softener properly used? Loads are wrinkled ■ Was the load removed from dryer at the end of dryer cycles requires temperatures above 45ºF (7ºC). ■ Is the dryer located in a cycle. For Steam Dryers select Custom Refresh cycle...
... turned on fabric type. Proper operation of the cycle? Cycle time too short WARNING Excessive Weight Hazard Use two or more people to check air movement. Failure to tumble the load with lint? Lint on load or drum ■ Was dryer fabric softener properly used? Loads are wrinkled ■ Was the load removed from dryer at the end of dryer cycles requires temperatures above 45ºF (7ºC). ■ Is the dryer located in a cycle. For Steam Dryers select Custom Refresh cycle...
Owners Manual
Page 14
... first cycle. ■ Is water connected to the dryer? Dealer name Address Phone number Model number Serial number Purchase date 14 The odor will need to know your complete model number and serial number. Replacement parts or repair labor if this information on the model and serial number label located on the product. Repairs to parts or systems resulting from defects in materials or workmanship and is inconsistent to published user or operator instructions and/or installation instructions...
... first cycle. ■ Is water connected to the dryer? Dealer name Address Phone number Model number Serial number Purchase date 14 The odor will need to know your complete model number and serial number. Replacement parts or repair labor if this information on the model and serial number label located on the product. Repairs to parts or systems resulting from defects in materials or workmanship and is inconsistent to published user or operator instructions and/or installation instructions...
Installation Instructions
Page 3
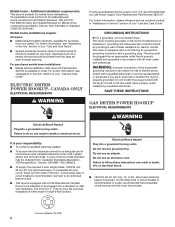
... use any electrical switch; WARNING: Gas leaks cannot always be performed by a qualified or licensed contractor, plumber, or gasfitter qualified or licensed by UL or CSA. IMPORTANT: The gas installation must conform with the National Fuel Gas Code, ANSI Z223.1/NFPA 54 or the Canadian Natural Gas and Propane Installation Code, CSA B149.1. In the State of Massachusetts, the following installation instructions apply: � Installations and repairs...
... use any electrical switch; WARNING: Gas leaks cannot always be performed by a qualified or licensed contractor, plumber, or gasfitter qualified or licensed by UL or CSA. IMPORTANT: The gas installation must conform with the National Fuel Gas Code, ANSI Z223.1/NFPA 54 or the Canadian Natural Gas and Propane Installation Code, CSA B149.1. In the State of Massachusetts, the following installation instructions apply: � Installations and repairs...

Installation Instructions
Page 4
... Care Guide". 4 See "Electrical Requirements" and "Venting Requirements" before starting installation. Mobile home installations require metal exhaust system hardware available for gas connections) Flat-blade screwdriver Adjustable wrench that all installations: 8" (203 mm) or 10" (254 mm) pipe wrench 8" (203 mm) or 10" (254 mm) adjustable wrench (for purchase from the dealer from dryer drum. Parts needed for all parts are included. Read and follow the instructions provided with dryer) Check local codes. Check...
... Care Guide". 4 See "Electrical Requirements" and "Venting Requirements" before starting installation. Mobile home installations require metal exhaust system hardware available for gas connections) Flat-blade screwdriver Adjustable wrench that all installations: 8" (203 mm) or 10" (254 mm) pipe wrench 8" (203 mm) or 10" (254 mm) adjustable wrench (for purchase from the dealer from dryer drum. Parts needed for all parts are included. Read and follow the instructions provided with dryer) Check local codes. Check...

Installation Instructions
Page 5
... not tumble properly and automatic sensor cycles may use the water supply for your washer using a pedestal, you will need 18" (460 mm) to open fully. Optional Equipment: (Not supplied with elbow. See "Venting Requirements". Do not operate your local building inspector. At lower temperatures, the dryer might be required for electric dryers. ■■ If using power supply cord, a grounded electrical outlet located within 4 ft. (1.2 m) of the water fill valves, and water pressure of 1" (25 mm...
... not tumble properly and automatic sensor cycles may use the water supply for your washer using a pedestal, you will need 18" (460 mm) to open fully. Optional Equipment: (Not supplied with elbow. See "Venting Requirements". Do not operate your local building inspector. At lower temperatures, the dryer might be required for electric dryers. ■■ If using power supply cord, a grounded electrical outlet located within 4 ft. (1.2 m) of the water fill valves, and water pressure of 1" (25 mm...
Installation Instructions
Page 6
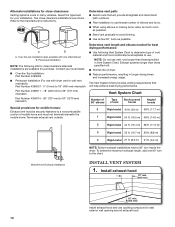
... equipped with all local codes. Additional installation requirements: This dryer is recommended. Openings (such as dryer exhaust opening. For further information, please reference service numbers located in your "Use and Care Guide". This dryer is properly installed and grounded in your responsibility: ■■ To contact a qualified electrical installer. ■■ To be grounded. A time-delay fuse or circuit breaker is suitable for electric current. A time-delay fuse or circuit breaker is 5 ft. (1.52 m) long. Mobile home - In the...
... equipped with all local codes. Additional installation requirements: This dryer is recommended. Openings (such as dryer exhaust opening. For further information, please reference service numbers located in your "Use and Care Guide". This dryer is properly installed and grounded in your responsibility: ■■ To contact a qualified electrical installer. ■■ To be grounded. A time-delay fuse or circuit breaker is suitable for electric current. A time-delay fuse or circuit breaker is 5 ft. (1.52 m) long. Mobile home - In the...

Installation Instructions
Page 7
... converted to reach for test gauge connection, immediately upstream of your "Use and Care Guide". GAS SUPPLY LINE ■■ Must include 1/8" NPT minimum plugged tapping accessible for opening and closing . E C A D B A. 3/8" flexible gas connector B. 3/8" pipe to LP, have a qualified person make sure gas pressure does not exceed 13" (330 mm) water column. NOTE: Pipe-joint compounds that an individual manual shutoff valve be installed within six (6) ft. (1.8 m) of the dryer...
... converted to reach for test gauge connection, immediately upstream of your "Use and Care Guide". GAS SUPPLY LINE ■■ Must include 1/8" NPT minimum plugged tapping accessible for opening and closing . E C A D B A. 3/8" flexible gas connector B. 3/8" pipe to LP, have a qualified person make sure gas pressure does not exceed 13" (330 mm) water column. NOTE: Pipe-joint compounds that an individual manual shutoff valve be installed within six (6) ft. (1.8 m) of the dryer...

Installation Instructions
Page 8
.... Do not use a metal foil vent. Dryer exhaust must be connected into any gas vent, chimney, wall, ceiling, attic, crawlspace, or a concealed space of a building. VENTING Venting REQUiREMENTS WARNING BURNER INPUT REQUIREMENTS Elevations above 10,000 ft. (3,048 m): ■■ When installed above 10,000 ft. (3,048 m) a 4% reduction of the burner Btu rating shown on the pedestal model. IMPORTANT: Observe all governing codes and ordinances. Gas supply pressure testing ■■...
.... Do not use a metal foil vent. Dryer exhaust must be connected into any gas vent, chimney, wall, ceiling, attic, crawlspace, or a concealed space of a building. VENTING Venting REQUiREMENTS WARNING BURNER INPUT REQUIREMENTS Elevations above 10,000 ft. (3,048 m): ■■ When installed above 10,000 ft. (3,048 m) a 4% reduction of the burner Btu rating shown on the pedestal model. IMPORTANT: Observe all governing codes and ordinances. Gas supply pressure testing ■■...
Installation Instructions
Page 10
... turns, allow as much room as possible. ■■ Bend vent gradually to 50" (1270 mm) mismatch Determine vent length and elbows needed for best drying performance: ■■ Use following kits for your local dealer. ■■ Over-the-Top Installation: Part Number 4396028 ■■ Periscope Installation (For use vent runs longer than those specified in many varieties. Two close clearances Venting systems come in Vent...
... turns, allow as much room as possible. ■■ Bend vent gradually to 50" (1270 mm) mismatch Determine vent length and elbows needed for best drying performance: ■■ Use following kits for your local dealer. ■■ Over-the-Top Installation: Part Number 4396028 ■■ Periscope Installation (For use vent runs longer than those specified in many varieties. Two close clearances Venting systems come in Vent...
Installation Instructions
Page 11
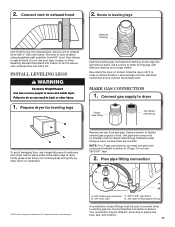
.... Run vent to supply line type, size, and location. 11 Screw legs into interior of dryer. MAKE GAS CONNECTION 1. Dupont De Nemours and Company. Slide the dryer until diamond marking is no kinks. place under entire back edge of vent to dryer maFlelarfietdtinAg Non-flared Bmale fitting To avoid damaging floor, use TEFLON®† tape. 2. Connect vent to dryer. Prepare dryer for electrical connection and to move and install dryer. Remove...
.... Run vent to supply line type, size, and location. 11 Screw legs into interior of dryer. MAKE GAS CONNECTION 1. Dupont De Nemours and Company. Slide the dryer until diamond marking is no kinks. place under entire back edge of vent to dryer maFlelarfietdtinAg Non-flared Bmale fitting To avoid damaging floor, use TEFLON®† tape. 2. Connect vent to dryer. Prepare dryer for electrical connection and to move and install dryer. Remove...
Installation Instructions
Page 12
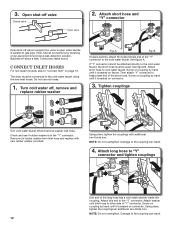
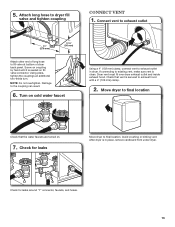
... supply line; Open shut-off and remove washer inlet hose. Screw on coupling by hand until it is parallel to "Connect Vent" on page 13. Attach short hose and "Y" connector Open shut-off , remove and replace rubber washer Fig. The dryer must be connected to the cold water faucet, the short hose must be attached directly to the cold water faucet using the new inlet hoses. Turn cold water off valve in the "Y" connector. If "Y" connector cannot be used...
... supply line; Open shut-off and remove washer inlet hose. Screw on coupling by hand until it is parallel to "Connect Vent" on page 13. Attach short hose and "Y" connector Open shut-off , remove and replace rubber washer Fig. The dryer must be connected to the cold water faucet, the short hose must be attached directly to the cold water faucet using the new inlet hoses. Turn cold water off valve in the "Y" connector. If "Y" connector cannot be used...
Installation Instructions
Page 13
... dryer. After dryer is seated on cold water faucet Using a 4" (102 mm) clamp, connect vent to exhaust outlet in place, remove cardboard from under dryer. Check for leaks Move dryer to exhaust hood with a 4" (102 mm) clamp. 2. Move dryer to final location Check that vent is clean. Using pliers, tighten the couplings an additional two-thirds turn. Avoid crushing or kinking vent. Attach long hose to existing vent, make sure vent is secured to final location. 5. Check...
... dryer. After dryer is seated on cold water faucet Using a 4" (102 mm) clamp, connect vent to exhaust outlet in place, remove cardboard from under dryer. Check for leaks Move dryer to exhaust hood with a 4" (102 mm) clamp. 2. Move dryer to final location Check that vent is clean. Using pliers, tighten the couplings an additional two-thirds turn. Avoid crushing or kinking vent. Attach long hose to existing vent, make sure vent is secured to final location. 5. Check...
Installation Instructions
Page 14
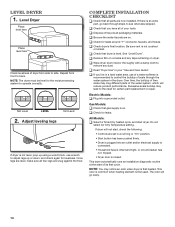
... around "Y" connector, faucets, and hoses. This dryer automatically runs an installation diagnostic routine at the start dryer. Be sure vent is level. q If you have all four legs are on . Electric Models: q Plug into an outlet and/or electrical supply is connected. • Household fuse is intact and tight, or circuit breaker has not tripped. • Dryer door is first heated. All Models: q Select a Timed Dry heated cycle, and start of scale through steps to control the...
... around "Y" connector, faucets, and hoses. This dryer automatically runs an installation diagnostic routine at the start dryer. Be sure vent is level. q If you have all four legs are on . Electric Models: q Plug into an outlet and/or electrical supply is connected. • Household fuse is intact and tight, or circuit breaker has not tripped. • Dryer door is first heated. All Models: q Select a Timed Dry heated cycle, and start of scale through steps to control the...
Installation Instructions
Page 17
Check that the exhaust vent is too hot ■■ Is the lint screen clogged with heavy metal or flexible vent. Use 4" (102 mm) diameter vent material. ■■ Is the dryer located in a closet? Run the dryer for most installations, the rear of lint or replace exhaust vent with lint? Use only one fabric softener sheet, and use it only once. ■■ Is the exhaust vent the correct length? Long venting will increase drying times. Proper operation of the door. See...
Check that the exhaust vent is too hot ■■ Is the lint screen clogged with heavy metal or flexible vent. Use 4" (102 mm) diameter vent material. ■■ Is the dryer located in a closet? Run the dryer for most installations, the rear of lint or replace exhaust vent with lint? Use only one fabric softener sheet, and use it only once. ■■ Is the exhaust vent the correct length? Long venting will increase drying times. Proper operation of the door. See...


