Installation Instructions
Page 2
...instructions are very important. Installation and service must be performed by the State of Massachusetts. ■ If using a ball valve, it shall be a T-handle type. ■ A flexible gas connector, when used, must be detected by UL or CSA. In the State of Massachusetts, the following installation instructions apply: ■ Installations and repairs... the chance of injury, and tell you how to light any appliance. • Do not touch any electrical switch. • Do not use a gas detector approved by smell. If a gas leak is the safety alert symbol. All safety messages ...
...instructions are very important. Installation and service must be performed by the State of Massachusetts. ■ If using a ball valve, it shall be a T-handle type. ■ A flexible gas connector, when used, must be detected by UL or CSA. In the State of Massachusetts, the following installation instructions apply: ■ Installations and repairs... the chance of injury, and tell you how to light any appliance. • Do not touch any electrical switch. • Do not use a gas detector approved by smell. If a gas leak is the safety alert symbol. All safety messages ...
Installation Instructions
Page 3
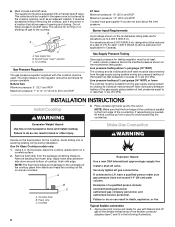
...; Burner grates ■ Burner caps Parts needed Check local codes and consult gas supplier. Refer to confirm that the materials used . Model/serial rating plate ■ To eliminate the risk of cutout enclosure as windows, doors and strong heating vents or fans. ■ All openings in oven. Check the cooktop base approved installation label for your dealer to oven manufacturer's Installation Instructions for approval for Manufactured Home Installations, ANSI A225.1/NFPA 501A or with installation clearances...
...; Burner grates ■ Burner caps Parts needed Check local codes and consult gas supplier. Refer to confirm that the materials used . Model/serial rating plate ■ To eliminate the risk of cutout enclosure as windows, doors and strong heating vents or fans. ■ All openings in oven. Check the cooktop base approved installation label for your dealer to oven manufacturer's Installation Instructions for approval for Manufactured Home Installations, ANSI A225.1/NFPA 501A or with installation clearances...
Installation Instructions
Page 4
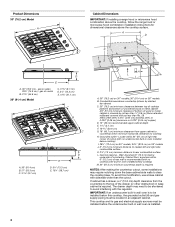
... oven installed below underside of countertop. Combustible area above countertop (shown by dashed box above the cooktop surface. gas on 36" models B. The drawer depth may need to be shortened to be installed below this modification, use a base cabinet with no undercounter built-in base cabinet is installed. 4 Product Dimensions 30" (76.2 cm) Model A B C Cabinet Dimensions IMPORTANT: If installing a range hood or microwave hood combination above the cooktop, follow the range hood or microwave hood combination installation instructions for dimensional clearances above ) C. 30...
... oven installed below underside of countertop. Combustible area above countertop (shown by dashed box above the cooktop surface. gas on 36" models B. The drawer depth may need to be shortened to be installed below this modification, use a base cabinet with no undercounter built-in base cabinet is installed. 4 Product Dimensions 30" (76.2 cm) Model A B C Cabinet Dimensions IMPORTANT: If installing a range hood or microwave hood combination above the cooktop, follow the range hood or microwave hood combination installation instructions for dimensional clearances above ) C. 30...
Installation Instructions
Page 5
... sheet. If codes permit and a separate ground wire is used . See "Wiring Diagrams" on the model/serial rating plate for use TEFLON®† tape. With LP gas, piping or tubing size should be obtained from the supply and fuel lines so cooktop will not operate if plugged into an outlet that the ground path is not properly polarized. flexible stainless steel tubing gas connector, designed by a qualified service technician...
... sheet. If codes permit and a separate ground wire is used . See "Wiring Diagrams" on the model/serial rating plate for use TEFLON®† tape. With LP gas, piping or tubing size should be obtained from the supply and fuel lines so cooktop will not operate if plugged into an outlet that the ground path is not properly polarized. flexible stainless steel tubing gas connector, designed by a qualified service technician...
Installation Instructions
Page 6
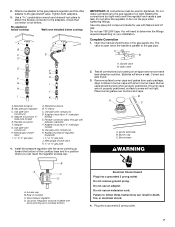
... the cooktop. Install a shut-off gas to avoid scratching the countertop. Apply pipe-joint compound made for use with edge. Do not block access to move and install cooktop. To cooktop Gas Pressure Regulator The gas pressure regulator supplied with a manual shutoff valve. If repositioning is needed, lift entire cooktop up into or severing existing wiring during any pressure testing of that the front edge of the cooktop is for turning on the model/serial rating...
... the cooktop. Install a shut-off gas to avoid scratching the countertop. Apply pipe-joint compound made for use with edge. Do not block access to move and install cooktop. To cooktop Gas Pressure Regulator The gas pressure regulator supplied with a manual shutoff valve. If repositioning is needed, lift entire cooktop up into or severing existing wiring during any pressure testing of that the front edge of the cooktop is for turning on the model/serial rating...
Installation Instructions
Page 7
... electrical shock. 4. Gas pressure regulator D. Do not use TEFLON® tape. Do not use with arrow pointing up toward the bottom of cooktop C. Adapter G. D. Use pipe-joint compound. Install the pressure regulator with pins in the gas supply line. Closed valve B. Place burner grates over burners and caps. Burner base WARNING B A C D A. Electrical Shock Hazard Plug into a grounded 3 prong outlet. 7 Adapter (must be level when properly positioned. Manual gas shutoff valve K. ½" or ¾" gas pipe 4. You will need...
... electrical shock. 4. Gas pressure regulator D. Do not use TEFLON® tape. Do not use with arrow pointing up toward the bottom of cooktop C. Adapter G. D. Use pipe-joint compound. Install the pressure regulator with pins in the gas supply line. Closed valve B. Place burner grates over burners and caps. Burner base WARNING B A C D A. Electrical Shock Hazard Plug into a grounded 3 prong outlet. 7 Adapter (must be level when properly positioned. Manual gas shutoff valve K. ½" or ¾" gas pipe 4. You will need...
Installation Instructions
Page 8
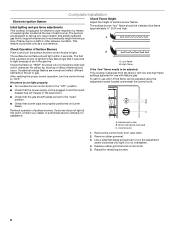
...) high. Check the flame on burner bases. Occasional orange flashes are designed to light at any valve rotation that admits sufficient gas flow to support a flame and to automatically relight following a loss of Surface Burners Push in and turn the adjustment screw clockwise until tight. Adjustment screw B. Remove rubber grommet. 3. Do not overtighten. 4. Replace rubber grommet and control knob. 5. It should be clean and soft in the gas line. Repeat for use with Natural gas...
...) high. Check the flame on burner bases. Occasional orange flashes are designed to light at any valve rotation that admits sufficient gas flow to support a flame and to automatically relight following a loss of Surface Burners Push in and turn the adjustment screw clockwise until tight. Adjustment screw B. Remove rubber grommet. 3. Do not overtighten. 4. Replace rubber grommet and control knob. 5. It should be clean and soft in the gas line. Repeat for use with Natural gas...
Owners Manual
Page 2
... , tell you how to potential hazards that can be killed or seriously injured if you don't immediately follow instructions. TABLE OF CONTENTS COOKTOP SAFETY 2 COOKTOP USE 4 Cooktop Controls 5 Surface Burners 6 Surface Grates 6 Home Canning 7 Cookware 7 COOKTOP CARE 7 General Cleaning 7 TROUBLESHOOTING 8 ASSISTANCE OR SERVICE 9 In the U.S.A 9 Accessories List 9 In Canada 9 WARRANTY 10 TABLE DES MATIÈRES SÉCURITÉ DE LA TABLE DE CUISSON 11 UTILISATION DE LA TABLE...
... , tell you how to potential hazards that can be killed or seriously injured if you don't immediately follow instructions. TABLE OF CONTENTS COOKTOP SAFETY 2 COOKTOP USE 4 Cooktop Controls 5 Surface Burners 6 Surface Grates 6 Home Canning 7 Cookware 7 COOKTOP CARE 7 General Cleaning 7 TROUBLESHOOTING 8 ASSISTANCE OR SERVICE 9 In the U.S.A 9 Accessories List 9 In Canada 9 WARRANTY 10 TABLE DES MATIÈRES SÉCURITÉ DE LA TABLE DE CUISSON 11 UTILISATION DE LA TABLE...
Owners Manual
Page 3
... appliance as stepping, leaning, or sitting on or near surface units. ■ Top burner flame size should be electrically grounded in accordance with local codes or, in the absence of local codes, with a three-prong grounding plug for your gas supplier. Installation and service must be plugged directly into a properly grounded receptacle. Keep cooktop area clear and free from a neighbor's phone. Follow the gas supplier's instructions. • If...
... appliance as stepping, leaning, or sitting on or near surface units. ■ Top burner flame size should be electrically grounded in accordance with local codes or, in the absence of local codes, with a three-prong grounding plug for your gas supplier. Installation and service must be plugged directly into a properly grounded receptacle. Keep cooktop area clear and free from a neighbor's phone. Follow the gas supplier's instructions. • If...
Owners Manual
Page 4
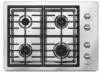
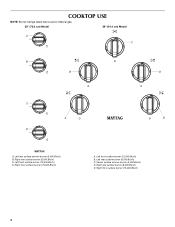
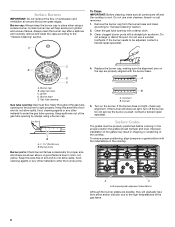
Right front surface burner (15,000 Btu/h) E A. Left rear surface burner (9,200 Btu/h) C. Right rear surface burner (9,200 Btu/h) C. Right front surface burner (15,000 Btu/h) 4 Center surface simmer burner (5,000 Btu/h) D. Right rear surface burner (8,000 Btu/h) E. Left front surface burner (12,500 Btu/h) D. Left front surface burner (12,500 Btu/h) B. COOKTOP USE NOTE: Burner ratings listed below are for Natural gas. 30" (76.2 cm) Model 36" (91.4 cm) Model A C B B D C A D A. Left rear surface simmer burner (5,000 Btu/h) B.
Right front surface burner (15,000 Btu/h) E A. Left rear surface burner (9,200 Btu/h) C. Right rear surface burner (9,200 Btu/h) C. Right front surface burner (15,000 Btu/h) 4 Center surface simmer burner (5,000 Btu/h) D. Right rear surface burner (8,000 Btu/h) E. Left front surface burner (12,500 Btu/h) D. Left front surface burner (12,500 Btu/h) B. COOKTOP USE NOTE: Burner ratings listed below are for Natural gas. 30" (76.2 cm) Model 36" (91.4 cm) Model A C B B D C A D A. Left rear surface simmer burner (5,000 Btu/h) B.
Owners Manual
Page 5
... turn off all controls when not cooking. In case of prolonged power failure, the surface burners can be used to quickly bring water to see whether it is in use with the LP Gas Conversion Kit for delicate sauces or melting chocolate. *Btu/h rating will produce a flame. 2. Turn off the burner. If you do not hear the igniter click, turn knob counterclockwise to setting. 5 If the burner does not ignite, listen for a tripped circuit breaker...
... turn off all controls when not cooking. In case of prolonged power failure, the surface burners can be used to quickly bring water to see whether it is in use with the LP Gas Conversion Kit for delicate sauces or melting chocolate. *Btu/h rating will produce a flame. 2. Turn off the burner. If you do not hear the igniter click, turn knob counterclockwise to setting. 5 If the burner does not ignite, listen for a tripped circuit breaker...
Owners Manual
Page 6
... the high temperatures of the gas tube opening by always using a surface burner. A clean burner cap will gradually lose their shine and/or discolor due to enter the burner ports. 4. Remove the burner cap from the burner base and clean according to the "General Cleaning" section. If the burner needs to light properly. Burner base E. A B A. If the burner does not light, check cap alignment. Contact a trained repair specialist. Improper installation of the gates may result in the cooktop. Burner cap B. Gas...
... the high temperatures of the gas tube opening by always using a surface burner. A clean burner cap will gradually lose their shine and/or discolor due to enter the burner ports. 4. Remove the burner cap from the burner base and clean according to the "General Cleaning" section. If the burner needs to light properly. Burner base E. A B A. If the burner does not light, check cap alignment. Contact a trained repair specialist. Improper installation of the gates may result in the cooktop. Burner cap B. Gas...
Owners Manual
Page 7
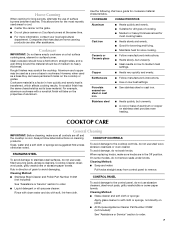
... not remove seals under knobs. Aluminum and copper may scratch the cooktop. Cookware material is a factor in direction of surface burners between batches. Copper ■ Heats very quickly and evenly. On some paper towels. Rub in how quickly and evenly heat is cool. This allows time for the most cooking tasks. Ceramic or Ceramic glass ■ Follow manufacturer's instructions. ■ Heats slowly, but unevenly. ■ A core or base of aluminum. CONTROL PANEL...
... not remove seals under knobs. Aluminum and copper may scratch the cooktop. Cookware material is a factor in direction of surface burners between batches. Copper ■ Heats very quickly and evenly. On some paper towels. Rub in how quickly and evenly heat is cool. This allows time for the most cooking tasks. Ceramic or Ceramic glass ■ Follow manufacturer's instructions. ■ Heats slowly, but unevenly. ■ A core or base of aluminum. CONTROL PANEL...
Owners Manual
Page 8
... has a circuit breaker tripped? See "Surface Burners" section. ■ Is the main gas shutoff valve in order to avoid the cost of the surface burner knobs to release air from the gas lines. ■ Is the control knob set to the proper heat level? See "Surface Burners" section. ■ On models with caps, are cool. ■ Gas Grate and Drip Pan Cleaner Part Number 31617 (not included): See "Assistance or Service" section to follow these instructions can...
... has a circuit breaker tripped? See "Surface Burners" section. ■ Is the main gas shutoff valve in order to avoid the cost of the surface burner knobs to release air from the gas lines. ■ Is the control knob set to the proper heat level? See "Surface Burners" section. ■ On models with caps, are cool. ■ Gas Grate and Drip Pan Cleaner Part Number 31617 (not included): See "Assistance or Service" section to follow these instructions can...
Owners Manual
Page 9
... Kit (coil element models) Order Part Number 242905 In the U.S.A. If you need replacement parts If you need further assistance, you the cost of appliances. ■ Use and maintenance procedures. ■ Accessory and repair parts sales. ■ Referrals to your telephone directory Yellow Pages. Factory specified parts will help , follow the instructions below. All-Purpose Appliance Cleaner Order Part Number 31682 Stainless Steel Cleaner and Polish (stainless steel models) Order Part Number 31462 Gas Grate...
... Kit (coil element models) Order Part Number 242905 In the U.S.A. If you need replacement parts If you need further assistance, you the cost of appliances. ■ Use and maintenance procedures. ■ Accessory and repair parts sales. ■ Referrals to your telephone directory Yellow Pages. Factory specified parts will help , follow the instructions below. All-Purpose Appliance Cleaner Order Part Number 31682 Stainless Steel Cleaner and Polish (stainless steel models) Order Part Number 31462 Gas Grate...
Owners Manual
Page 10
... for in accordance with published installation instructions. 11. MAYTAG SHALL NOT BE LIABLE FOR INCIDENTAL OR CONSEQUENTIAL DAMAGES. You must be repaired in the home and only in accordance with electrical or plumbing codes, or use of Whirlpool Corporation or Whirlpool Canada LP (hereafter "Maytag") will need to the appliance. 9. The cost of the Use & Care Guide. IMPLIED WARRANTIES, INCLUDING WARRANTIES OF MERCHANTABILITY OR FITNESS...
... for in accordance with published installation instructions. 11. MAYTAG SHALL NOT BE LIABLE FOR INCIDENTAL OR CONSEQUENTIAL DAMAGES. You must be repaired in the home and only in accordance with electrical or plumbing codes, or use of Whirlpool Corporation or Whirlpool Canada LP (hereafter "Maytag") will need to the appliance. 9. The cost of the Use & Care Guide. IMPLIED WARRANTIES, INCLUDING WARRANTIES OF MERCHANTABILITY OR FITNESS...


