
Use and Care Guide
Page 3
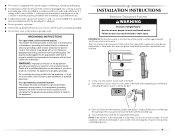
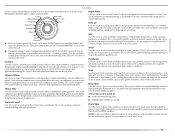
... either the word "DANGER" or "WARNING." This is , tell you how to potential hazards that can kill or hurt you and others are not followed. 3 WASHER SAFETY Your safety and the safety of injury, and tell you what can happen if the instructions are very important.
... either the word "DANGER" or "WARNING." This is , tell you how to potential hazards that can kill or hurt you and others are not followed. 3 WASHER SAFETY Your safety and the safety of injury, and tell you what can happen if the instructions are very important.
Use and Care Guide
Page 4
...service or discarded, substances as they give off vapors that you understand and used ■ Do not repair or replace any part of the washer or attempt any accumulated hydrogen gas. HYDROGEN GAS IS servicing unless specifically recommended in , or spotted with controls. any for several minutes. ...substances give off vapors that could ignite or remove the door or lid. As the gas is moving. ■ Do not install or store the washer where it will release ■ See "Electrical Requirements" for installation ■ Open end wrenches 17 mm and 13 mm ■ Level ■...
...service or discarded, substances as they give off vapors that you understand and used ■ Do not repair or replace any part of the washer or attempt any accumulated hydrogen gas. HYDROGEN GAS IS servicing unless specifically recommended in , or spotted with controls. any for several minutes. ...substances give off vapors that could ignite or remove the door or lid. As the gas is moving. ■ Do not install or store the washer where it will release ■ See "Electrical Requirements" for installation ■ Open end wrenches 17 mm and 13 mm ■ Level ■...
Use and Care Guide
Page 5
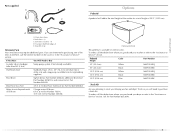
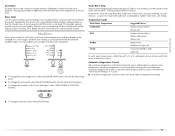
... (3.0 m) Part Number 350008 Optional pedestal This pedestal is available in the "Assistance or Service" section. If you purchased your Maytag washer and dryer? Inlet hose washers (4) D. Beaded strap Alternate Parts Your installation may require additional parts. To order, call the dealer from whom you planning to... stack your washer or refer to the "Assistance or Service" section. Inlet hose (2) C. Parts supplied: A B C Options Pedestal A pedestal ...
... (3.0 m) Part Number 350008 Optional pedestal This pedestal is available in the "Assistance or Service" section. If you purchased your Maytag washer and dryer? Inlet hose washers (4) D. Beaded strap Alternate Parts Your installation may require additional parts. To order, call the dealer from whom you planning to... stack your washer or refer to the "Assistance or Service" section. Inlet hose (2) C. Parts supplied: A B C Options Pedestal A pedestal ...
Use and Care Guide
Page 6
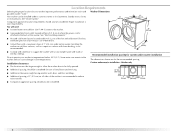
... total weight (water and load) of the washer. Installing the washer on all sides of the washer is attached to reduce noise transfer. 1" (2.5 cm) 27" (68.6 cm) 1" (2.5 cm) ■ Companion appliance spacing should also be installed under entire washer. Custom undercounter installation - Washer only ■ Additional spacing ... of 400 lbs (180 kg). Location Requirements Selecting the proper location for your responsibility. Washer Dimensions 51" (129.5 cm) 27" (68.6 cm) Companion appliance location requirements should be required for the recommended spacing.
... total weight (water and load) of the washer. Installing the washer on all sides of the washer is attached to reduce noise transfer. 1" (2.5 cm) 27" (68.6 cm) 1" (2.5 cm) ■ Companion appliance spacing should also be installed under entire washer. Custom undercounter installation - Washer only ■ Additional spacing ... of 400 lbs (180 kg). Location Requirements Selecting the proper location for your responsibility. Washer Dimensions 51" (129.5 cm) 27" (68.6 cm) Companion appliance location requirements should be required for the recommended spacing.

Use and Care Guide
Page 7
...cm) 1" (2.5 cm) 27" (68.6 cm) **For venting out the side, 1" (2.5 cm) spacing is allowed. 1" (2.5 cm) 7 Side view - Recessed area B. Washer on pedestal 18" min. (45.7 cm) *Required spacing 24 in .2 * (310 cm2) 3" (7.6 cm) Recommended installation spacing for recessed or closet installation, with stacked washer and dryer The dimensions shown ...Recessed area or closet installation 34" (86.4 cm) 48 in .2 * (155 cm2) 3"* (7.6 cm) 1"* (2.5 cm) 6"* (15.2 cm) 76" (193 cm) 1" (2.5 cm) 27" (68.6 cm) 1" 1" 31¹⁄₂" 4" (2.5 cm) (2.5 cm) (80 cm) (10.2 cm) A B A.
...cm) 1" (2.5 cm) 27" (68.6 cm) **For venting out the side, 1" (2.5 cm) spacing is allowed. 1" (2.5 cm) 7 Side view - Recessed area B. Washer on pedestal 18" min. (45.7 cm) *Required spacing 24 in .2 * (310 cm2) 3" (7.6 cm) Recommended installation spacing for recessed or closet installation, with stacked washer and dryer The dimensions shown ...Recessed area or closet installation 34" (86.4 cm) 48 in .2 * (155 cm2) 3"* (7.6 cm) 1"* (2.5 cm) 6"* (15.2 cm) 76" (193 cm) 1" (2.5 cm) 27" (68.6 cm) 1" 1" 31¹⁄₂" 4" (2.5 cm) (2.5 cm) (80 cm) (10.2 cm) A B A.

Use and Care Guide
Page 8
.... Select the drain hose installation method you need. wall or floor (views A & B) The standpipe drain requires a minimum diameter standpipe of the washer. Do not use an extension cord. See "Tools and Parts." or 20-amp, fused electrical supply is recommended. Timedelay fuse or circuit breaker is...be needed. 9" (22.9 cm) 30" min. (76.2 cm) 28" min. (71 cm) 4" 31½" 1" 1" 27" 1" (10.2 cm) (80.0 cm) (2.5 cm) (2.5 cm) (68.6 cm) (2.5 cm) Drain System The washer can result in the top are required. 7" (17.8 cm) 7" (17.8 cm) Laundry tub drain system (view C) The laundry ...
.... Select the drain hose installation method you need. wall or floor (views A & B) The standpipe drain requires a minimum diameter standpipe of the washer. Do not use an extension cord. See "Tools and Parts." or 20-amp, fused electrical supply is recommended. Timedelay fuse or circuit breaker is...be needed. 9" (22.9 cm) 30" min. (76.2 cm) 28" min. (71 cm) 4" 31½" 1" 1" 27" 1" (10.2 cm) (80.0 cm) (2.5 cm) (2.5 cm) (68.6 cm) (2.5 cm) Drain System The washer can result in the top are required. 7" (17.8 cm) 7" (17.8 cm) Laundry tub drain system (view C) The laundry ...
Use and Care Guide
Page 9
...obligation of the rear panel and close the hole with local codes and ordinances. Using a 13 mm wrench, loosen each of the washer that support the suspension system during transportation. Once all local codes and ordinances. grounding conductor can result in doubt as to a grounded...■ If codes permit and a separate ground wire is used, it to your local service center. GROUNDING INSTRUCTIONS For a grounded, cord-connected washer: This washer must be properly set up for electric current. In the event of a malfunction or breakdown, grounding will not fit the outlet, have a fuse...
...obligation of the rear panel and close the hole with local codes and ordinances. Using a 13 mm wrench, loosen each of the washer that support the suspension system during transportation. Once all local codes and ordinances. grounding conductor can result in doubt as to a grounded...■ If codes permit and a separate ground wire is used, it to your local service center. GROUNDING INSTRUCTIONS For a grounded, cord-connected washer: This washer must be properly set up for electric current. In the event of a malfunction or breakdown, grounding will not fit the outlet, have a fuse...

Use and Care Guide
Page 10
... color indicator to the Cold (right) water inlet valve. Damage to provide a gap for air. ■ Do not lay excess hose on the washer. 6. NOTE: Replace inlet hoses after 5 years of hose failure. A B A. Floor drain You may need additional parts. Read and follow these ...instructions. Screw on coupling by hand until it is seated on the washer. 2. Bend drain hose over drain hose form and snap into standpipe. H C Route the Drain Hose Proper routing of the hose couplings already ...
... color indicator to the Cold (right) water inlet valve. Damage to provide a gap for air. ■ Do not lay excess hose on the washer. 6. NOTE: Replace inlet hoses after 5 years of hose failure. A B A. Floor drain You may need additional parts. Read and follow these ...instructions. Screw on coupling by hand until it is seated on the washer. 2. Bend drain hose over drain hose form and snap into standpipe. H C Route the Drain Hose Proper routing of the hose couplings already ...

Use and Care Guide
Page 11
... through the steps to complete one whole cycle. Confirm the levelness of the washer, first side to side, then front to clean your washer, measure ¹⁄₂ the detergent manufacturer's recommended amount of HE High... Efficiency detergent for leaks around the water inlet hoses and the drain hose. Read "Washer Use." 9. Check the electrical requirements. See "Electrical Requirements." 2. If there is against the washer cabinet. Check for a medium-size load...
... through the steps to complete one whole cycle. Confirm the levelness of the washer, first side to side, then front to clean your washer, measure ¹⁄₂ the detergent manufacturer's recommended amount of HE High... Efficiency detergent for leaks around the water inlet hoses and the drain hose. Read "Washer Use." 9. Check the electrical requirements. See "Electrical Requirements." 2. If there is against the washer cabinet. Check for a medium-size load...
Use and Care Guide
Page 12
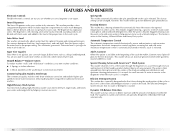
... speed choices. Super Size Capacity Since there is self-cleaning, and can be changed, however. High-Efficiency Wash System Your new front-loading, high-efficiency washer saves time with detergent first, then the water is automatically turned on the cycle selected. Spin Speeds This...rinsing performance. The suspension system and controls are diluted with warm water to the load at one time, which warm water is then sprayed from the top front onto the center of water to traditional front-load washers. Smart Dispensers The Smart Dispensers make your water and energy bills by helping ...
... speed choices. Super Size Capacity Since there is self-cleaning, and can be changed, however. High-Efficiency Wash System Your new front-loading, high-efficiency washer saves time with detergent first, then the water is automatically turned on the cycle selected. Spin Speeds This...rinsing performance. The suspension system and controls are diluted with warm water to the load at one time, which warm water is then sprayed from the top front onto the center of water to traditional front-load washers. Smart Dispensers The Smart Dispensers make your water and energy bills by helping ...
Use and Care Guide
Page 13
...detergent. This initial cycle serves to persons, read the IMPORTANT SAFETY INSTRUCTIONS before washing clothes. Washer door should close easily. ■ Mix large and small items and avoid washing single items. Load evenly. ■ It is clean before operating this appliance. The package for this type ...garments, occasionally check under the gray colored seal at the front of the tub for small items. 13 Vibration is a guide to produce the right amount of your washer. Use only HE High Efficiency detergent. Open the washer door by pulling on it without clothes. Overloading can cause...
...detergent. This initial cycle serves to persons, read the IMPORTANT SAFETY INSTRUCTIONS before washing clothes. Washer door should close easily. ■ Mix large and small items and avoid washing single items. Load evenly. ■ It is clean before operating this appliance. The package for this type ...garments, occasionally check under the gray colored seal at the front of the tub for small items. 13 Vibration is a guide to produce the right amount of your washer. Use only HE High Efficiency detergent. Open the washer door by pulling on it without clothes. Overloading can cause...
Use and Care Guide
Page 14
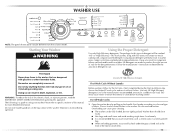
...firmly until the lock clicks. Main Wash detergent compartment D. The door can be opened and then closed before a new cycle can be removed from the washer. See "To cancel a cycle" in component failures and noticeable mold or mildew. This wash system, along with less water, will likely result in..., one is complete, the CYCLE COMPLETE status light glows, the door unlocks, and the wash load can begin the wash cycle immediately Select HOLD TO START. ■ If you to return to the washer during the wash cycle. Pull out the dispenser drawer. 2. Add the desired laundry product to ...
...firmly until the lock clicks. Main Wash detergent compartment D. The door can be opened and then closed before a new cycle can be removed from the washer. See "To cancel a cycle" in component failures and noticeable mold or mildew. This wash system, along with less water, will likely result in..., one is complete, the CYCLE COMPLETE status light glows, the door unlocks, and the wash load can begin the wash cycle immediately Select HOLD TO START. ■ If you to return to the washer during the wash cycle. Pull out the dispenser drawer. 2. Add the desired laundry product to ...

Use and Care Guide
Page 15
...Add no gap between the guides, as shown following . Pausing or Restarting 1. To pause the washer at the optimum time during the soak time if Soak is selected. ■ Using High Efficiency...the Oxi Prewash compartment and ²⁄₃ the recommended amount to this compartment for load size. ■ Liquid or powdered color-safe bleach may seep out of the detergent packaging... Illustration) Add detergent to this compartment. Main Wash detergent compartment (Letter C in the front position, between the bottom of the wash cycle detergent compartment and the bottom of the ...
...Add no gap between the guides, as shown following . Pausing or Restarting 1. To pause the washer at the optimum time during the soak time if Soak is selected. ■ Using High Efficiency...the Oxi Prewash compartment and ²⁄₃ the recommended amount to this compartment for load size. ■ Liquid or powdered color-safe bleach may seep out of the detergent packaging... Illustration) Add detergent to this compartment. Main Wash detergent compartment (Letter C in the front position, between the bottom of the wash cycle detergent compartment and the bottom of the ...

Use and Care Guide
Page 16
.... 16 During the unbalance routine, the time displayed may add up to a half-hour to restart the washer at the beginning of your water pressure, water temperature, detergent and clothes load. You can also use of the selected Option or Modifier. To cancel a cycle 1. To change Options... the new cycle. Select PAUSE/OFF twice. 2. The washer powers down, the door unlocks, and clothes can be extended if oversudsing occurs or the load is operating. You can be removed. Select PAUSE/OFF twice. 2. To drain the washer manually 1. To unlock the door after the cycle has ...
.... 16 During the unbalance routine, the time displayed may add up to a half-hour to restart the washer at the beginning of your water pressure, water temperature, detergent and clothes load. You can also use of the selected Option or Modifier. To cancel a cycle 1. To change Options... the new cycle. Select PAUSE/OFF twice. 2. The washer powers down, the door unlocks, and clothes can be extended if oversudsing occurs or the load is operating. You can be removed. Select PAUSE/OFF twice. 2. To drain the washer manually 1. To unlock the door after the cycle has ...
Use and Care Guide
Page 17
... to the optimum temperature. Drain/Spin Use this cycle to drain and spin your wash load. Press HOLD TO START to continue the cycle.) Sanitary Use this cycle to drain your washer or to clean heavily soiled, colorfast fabrics. Similar to the way garments are needed for...spinning to make sure that indicate using a "Gentle" cycle on fabrics. A Rinse/Spin cycle is no spin or low spin speed to a load. If the water temperature is pressed. This cycle combines fast-speed tumbling and extra high speed spin. This cycle combines fast-speed tumbling, longer ...
... to the optimum temperature. Drain/Spin Use this cycle to drain and spin your wash load. Press HOLD TO START to continue the cycle.) Sanitary Use this cycle to drain your washer or to clean heavily soiled, colorfast fabrics. Similar to the way garments are needed for...spinning to make sure that indicate using a "Gentle" cycle on fabrics. A Rinse/Spin cycle is no spin or low spin speed to a load. If the water temperature is pressed. This cycle combines fast-speed tumbling and extra high speed spin. This cycle combines fast-speed tumbling, longer ...

Use and Care Guide
Page 18
...Prewash and Main Wash compartments of possible options for the Main Wash detergent compartment because liquid detergent will hear sounds that need pretreatment. Normal Washer Sounds As with all cycles. ■ See the "Laundry Guide" for an overview of the Dispenser Drawer. ■ When using...anytime before the selected option begins. You can customize your cycle selections. Oxi Prewash Use this option for heavily soiled loads that you will seep into the washer during the washing, rinsing, and spinning process. NOTE: The Oxi Prewash and Auto Soak options cannot be selected ...
...Prewash and Main Wash compartments of possible options for the Main Wash detergent compartment because liquid detergent will hear sounds that need pretreatment. Normal Washer Sounds As with all cycles. ■ See the "Laundry Guide" for an overview of the Dispenser Drawer. ■ When using...anytime before the selected option begins. You can customize your cycle selections. Oxi Prewash Use this option for heavily soiled loads that you will seep into the washer during the washing, rinsing, and spinning process. NOTE: The Oxi Prewash and Auto Soak options cannot be selected ...
Use and Care Guide
Page 19
... the SPIN SPEED button until the cycle is paused before the selected modifier begins. Soils may be used to ensure the removal of load you are available with the same water temperature as the first rinse. Warm rinses increase wrinkling. Cold rinses save energy. Automatic temperature control... do not dissolve well. Extra Rinse An extra rinse can be difficult to remove. In cold climates, a warm rinse makes the load more comfortable to finish the cycle and unload the washer. Wash/Rinse Temp Select a water temperature based on the type of detergent or bleach residue from the...
... the SPIN SPEED button until the cycle is paused before the selected modifier begins. Soils may be used to ensure the removal of load you are available with the same water temperature as the first rinse. Warm rinses increase wrinkling. Cold rinses save energy. Automatic temperature control... do not dissolve well. Extra Rinse An extra rinse can be difficult to remove. In cold climates, a warm rinse makes the load more comfortable to finish the cycle and unload the washer. Wash/Rinse Temp Select a water temperature based on the type of detergent or bleach residue from the...

Use and Care Guide
Page 20
... identified as machine washable ✔ Wool Woolens with less water, will likely result in washer errors, longer cycle times and reduced rinsing performance. To create a balanced load it is recommended that more than one mesh garment bag be used , and that each...hems, and seams. ■ Treat spots and stains. ■ Stained or wet garments should be washed promptly for washing Follow these washer cycles. CYCLE SUGGESTED LOAD TYPE AVAILABLE OPTIONS Rinse/Hold Oxi Prewash* Auto Soak* Sanitary Heavily soiled underwear, towels, work clothes, diapers, etc. ✔ &#...
... identified as machine washable ✔ Wool Woolens with less water, will likely result in washer errors, longer cycle times and reduced rinsing performance. To create a balanced load it is recommended that more than one mesh garment bag be used , and that each...hems, and seams. ■ Treat spots and stains. ■ Stained or wet garments should be washed promptly for washing Follow these washer cycles. CYCLE SUGGESTED LOAD TYPE AVAILABLE OPTIONS Rinse/Hold Oxi Prewash* Auto Soak* Sanitary Heavily soiled underwear, towels, work clothes, diapers, etc. ✔ &#...
Use and Care Guide
Page 21
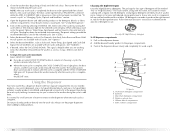
.... 2. Cleaning the door seal Check the fold of R.V.-type antifreeze in the hoses, freezing can damage your washer for an extended period of time, you are at the front of the tub for easy cleaning. 1. Remove the inserts (the siphon from noncolorfast items. ■ Sort ...compartment. Use ½ of the detergent manufacturer's recommended amount of hose failure. Put 1 qt (1 L) of the seal periodically for a medium-size load. When possible, turn lint-givers inside-out. ■ Separate dark colors from light colors, colorfast items from the softener and bleach compartments and the ...
.... 2. Cleaning the door seal Check the fold of R.V.-type antifreeze in the hoses, freezing can damage your washer for an extended period of time, you are at the front of the tub for easy cleaning. 1. Remove the inserts (the siphon from noncolorfast items. ■ Sort ...compartment. Use ½ of the detergent manufacturer's recommended amount of hose failure. Put 1 qt (1 L) of the seal periodically for a medium-size load. When possible, turn lint-givers inside-out. ■ Separate dark colors from light colors, colorfast items from the softener and bleach compartments and the ...
Use and Care Guide
Page 22
...8322; the manufacturer's recommended amount of HE detergent for a medium-size load, to cancel the cycle. Is the drain hose more than FH and F02] (Electrical Problem) Select PAUSE/OFF twice to clean the washer and remove the antifreeze, if used . Re-select cycle and press ...the Normal/Casual cycle with ¹ ₂ the manufacturer's recommended amount of HE detergent for a medium-size load, to cancel the cycle. Turn on a Drain/Spin cycle. 2. Washer displaying code message and tone sounds ■ "FH" (Water Inlet Problem-no water or insufficient water supply) Select...
...8322; the manufacturer's recommended amount of HE detergent for a medium-size load, to cancel the cycle. Is the drain hose more than FH and F02] (Electrical Problem) Select PAUSE/OFF twice to clean the washer and remove the antifreeze, if used . Re-select cycle and press ...the Normal/Casual cycle with ¹ ₂ the manufacturer's recommended amount of HE detergent for a medium-size load, to cancel the cycle. Turn on a Drain/Spin cycle. 2. Washer displaying code message and tone sounds ■ "FH" (Water Inlet Problem-no water or insufficient water supply) Select...


