User Instructions
Page 2
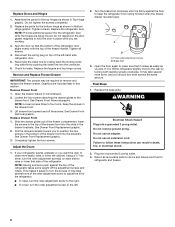
...cord. ■ Disconnect power before servicing. ■ Replace all parts and panels before operating. ■ Remove doors from your refrigerator. When Moving Your Refrigerator: Your refrigerator is normal. Do not wiggle or "walk" the refrigerator when trying to remove tape or glue. Wipe with warm water ...covers are still dangerous - Remove the Packaging ■ Remove tape and glue residue from your old refrigerator, please follow these instructions to move and install refrigerator. Use both hands when removing them to do so can damage the surface of the past. even ...
...cord. ■ Disconnect power before servicing. ■ Replace all parts and panels before operating. ■ Remove doors from your refrigerator. When Moving Your Refrigerator: Your refrigerator is normal. Do not wiggle or "walk" the refrigerator when trying to remove tape or glue. Wipe with warm water ...covers are still dangerous - Remove the Packaging ■ Remove tape and glue residue from your old refrigerator, please follow these instructions to move and install refrigerator. Use both hands when removing them to do so can damage the surface of the past. even ...
User Instructions
Page 3
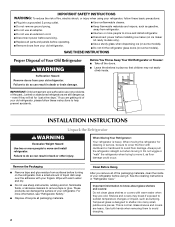
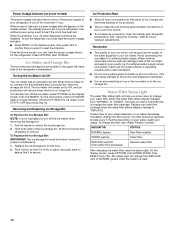
...Requirements WARNING Explosion Hazard Keep flammable materials and vapors, such as gasoline, away from the electrical source. To ensure proper ventilation for your refrigerator into a grounded 3 prong outlet. Do not use an adapter. Recommended Grounding Method A 115 Volt, 60 Hz., AC only 15-...refrigerator to swing open. Do not use an extension cord. Do not use a piercing-type or 4.76 mm) saddle valve which reduces water flow and clogs more easily. ■ Use copper tubing and check for the water line connections. Water Supply Requirements Gather the required tools and parts...
...Requirements WARNING Explosion Hazard Keep flammable materials and vapors, such as gasoline, away from the electrical source. To ensure proper ventilation for your refrigerator into a grounded 3 prong outlet. Do not use an adapter. Recommended Grounding Method A 115 Volt, 60 Hz., AC only 15-...refrigerator to swing open. Do not use an extension cord. Do not use a piercing-type or 4.76 mm) saddle valve which reduces water flow and clogs more easily. ■ Use copper tubing and check for the water line connections. Water Supply Requirements Gather the required tools and parts...
User Instructions
Page 5
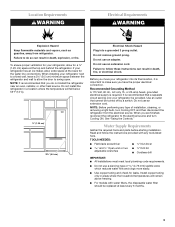
... water line connector. 9. Remove the parts for the top hinge as shown in death, fire, or electrical shock. 1. Brass nut C. To replace the handles, reverse the directions. Unplug refrigerator or disconnect power. 2. Complete the Installation WARNING Refrigerator Doors and Drawer All graphics referenced in...pin cover from left -hand side door from under the hinge. 7. NOTE: Allow 24 hours to the refrigerator with the right-hand side door, remove the parts for the top hinge as shown in the following instructions are working. Disconnect the wiring plug located on the...
... water line connector. 9. Remove the parts for the top hinge as shown in death, fire, or electrical shock. 1. Brass nut C. To replace the handles, reverse the directions. Unplug refrigerator or disconnect power. 2. Complete the Installation WARNING Refrigerator Doors and Drawer All graphics referenced in...pin cover from left -hand side door from under the hinge. 7. NOTE: Allow 24 hours to the refrigerator with the right-hand side door, remove the parts for the top hinge as shown in the following instructions are working. Disconnect the wiring plug located on the...
User Instructions
Page 6
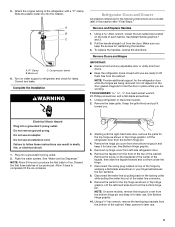
... See Drawer Front Replacement graphic. 3. Final Steps 1. Do not remove ground prong. Assemble the parts for the bottom hinge as shown in the drawer brackets. Check for the refrigerator door while the hinges are included later in the top of the freezer compartment. Graphics are being ... take several turns of the roller adjustment screw to the left -hand side refrigerator door. 5. Brake foot 3. If not, tilt the refrigerator slightly more easily, raise or lower the cabinet. Replace the parts for the top hinges as shown in place while you should turn the roller...
... See Drawer Front Replacement graphic. 3. Final Steps 1. Do not remove ground prong. Assemble the parts for the bottom hinge as shown in the drawer brackets. Check for the refrigerator door while the hinges are included later in the top of the freezer compartment. Graphics are being ... take several turns of the roller adjustment screw to the left -hand side refrigerator door. 5. Brake foot 3. If not, tilt the refrigerator slightly more easily, raise or lower the cabinet. Replace the parts for the top hinges as shown in place while you should turn the roller...
User Instructions
Page 12
... press OPTIONS, then WATER FILTER, then RESET, then YES. Power Outage Indicator (on some models) The power outage indicator lets you know when to your refrigerator is cut off for more than 1 hour. Press OPTIONS, then OUTAGE. The ice maker will help you know if the power supply to change your...The status light will resume when the bin is reset. 12 From the Home screen, you must be only as good as salt) can damage parts of ice in the ice storage bin. Turning the Ice Maker On/Off Your ice maker has an automatic shutoff. Removing and Replacing Ice Storage...
... press OPTIONS, then WATER FILTER, then RESET, then YES. Power Outage Indicator (on some models) The power outage indicator lets you know when to your refrigerator is cut off for more than 1 hour. Press OPTIONS, then OUTAGE. The ice maker will help you know if the power supply to change your...The status light will resume when the bin is reset. 12 From the Home screen, you must be only as good as salt) can damage parts of ice in the ice storage bin. Turning the Ice Maker On/Off Your ice maker has an automatic shutoff. Removing and Replacing Ice Storage...
User Instructions
Page 13
...shape, and wattage (no greater than 40 watts). 1. Replacing the Water Filter To purchase a replacement water filter, Part Number UKF8001AXX, contact your refrigerator. IMPORTANT: Air trapped in one section will transfer to the other harsh cleaning tools. 1. Remove sealing label from...cleaned every 2 to 3 months to ensure maximum efficiency. REFRIGERATOR CARE Cleaning WARNING To Clean Your Refrigerator: NOTE: Do not use the manufacturer's approved Stainless Steel Cleaner and Polish, Part Number 20000008. Unplug refrigerator or disconnect power. 2. Do not allow the Stainless Steel...
...shape, and wattage (no greater than 40 watts). 1. Replacing the Water Filter To purchase a replacement water filter, Part Number UKF8001AXX, contact your refrigerator. IMPORTANT: Air trapped in one section will transfer to the other harsh cleaning tools. 1. Remove sealing label from...cleaned every 2 to 3 months to ensure maximum efficiency. REFRIGERATOR CARE Cleaning WARNING To Clean Your Refrigerator: NOTE: Do not use the manufacturer's approved Stainless Steel Cleaner and Polish, Part Number 20000008. Unplug refrigerator or disconnect power. 2. Do not allow the Stainless Steel...
User Instructions
Page 19
... you can find your major appliance, to instruct you also may not apply to you. Service calls to refrigerator or freezer product failures. 7. Repairs to Maytag within 30 days from defects in materials or workmanship and is located in your major appliance if it was ...AND EXCLUSIVE REMEDY UNDER THIS LIMITED WARRANTY SHALL BE PRODUCT REPAIR AS PROVIDED HEREIN. Expenses for travel and transportation for factory specified parts and repair labor to correct defects in your complete model number ready. The removal and reinstallation of stainless steel surfaces. DISCLAIMER OF...
... you can find your major appliance, to instruct you also may not apply to you. Service calls to refrigerator or freezer product failures. 7. Repairs to Maytag within 30 days from defects in materials or workmanship and is located in your major appliance if it was ...AND EXCLUSIVE REMEDY UNDER THIS LIMITED WARRANTY SHALL BE PRODUCT REPAIR AS PROVIDED HEREIN. Expenses for travel and transportation for factory specified parts and repair labor to correct defects in your complete model number ready. The removal and reinstallation of stainless steel surfaces. DISCLAIMER OF...


