User Instructions
Page 1
...;res REFRIGERATOR SAFETY 1 SEGURIDAD DEL REFRIGERADOR.....20 SÉCURITÉ DU RÉFRIGÉRATEUR........ 40 INSTALLATION INSTRUCTIONS............2 INSTRUCCIONES DE INSTALACIÓN...21 INSTRUCTIONS D'INSTALLATION...... 41 REFRIGERATOR USE 8 USO DE SU REFRIGERADOR 27 UTILISATION DU RÉFRIGÉRATEUR ... 47 REFRIGERATOR CARE 13 CUIDADO DE SU REFRIGERADOR .....32 ENTRETIEN DU RÉFRIGÉRATEUR ..... 52 TROUBLESHOOTING 14 SOLUCIÓN DE PROBLEMAS 33 DÉPANNAGE 53 WATER FILTER...
...;res REFRIGERATOR SAFETY 1 SEGURIDAD DEL REFRIGERADOR.....20 SÉCURITÉ DU RÉFRIGÉRATEUR........ 40 INSTALLATION INSTRUCTIONS............2 INSTRUCCIONES DE INSTALACIÓN...21 INSTRUCTIONS D'INSTALLATION...... 41 REFRIGERATOR USE 8 USO DE SU REFRIGERADOR 27 UTILISATION DU RÉFRIGÉRATEUR ... 47 REFRIGERATOR CARE 13 CUIDADO DE SU REFRIGERADOR .....32 ENTRETIEN DU RÉFRIGÉRATEUR ..... 52 TROUBLESHOOTING 14 SOLUCIÓN DE PROBLEMAS 33 DÉPANNAGE 53 WATER FILTER...
User Instructions
Page 2
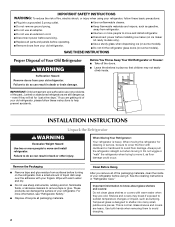
... install refrigerator. ■ Disconnect power before operating. ■ Remove doors from your refrigerator. SAVE THESE INSTRUCTIONS Proper Disposal of your old refrigerator. Do not wiggle or "walk" the refrigerator when trying to know about glass shelves and covers: Do not clean glass shelves or covers with warm water and dry. ■ Do not use an extension cord. ■ Disconnect power before servicing. ■ Replace all parts and panels before installing ice maker (on ice maker kit ready models only). ■ Use a sturdy glass when dispensing ice...
... install refrigerator. ■ Disconnect power before operating. ■ Remove doors from your refrigerator. SAVE THESE INSTRUCTIONS Proper Disposal of your old refrigerator. Do not wiggle or "walk" the refrigerator when trying to know about glass shelves and covers: Do not clean glass shelves or covers with warm water and dry. ■ Do not use an extension cord. ■ Disconnect power before servicing. ■ Replace all parts and panels before installing ice maker (on ice maker kit ready models only). ■ Use a sturdy glass when dispensing ice...
User Instructions
Page 3
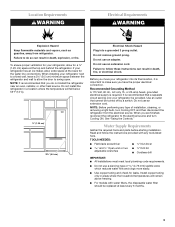
... tubing and check for leaks. Before you have the proper electrical connection. It is important to make sure you move your refrigerator into a grounded 3 prong outlet. Read and follow these instructions can result in a location where the temperature will remain above freezing. ■ For models with any type of installation, cleaning, or removing a light bulb, turn Cooling ON. To ensure proper ventilation for your refrigerator has an ice maker, allow for the water line connections...
... tubing and check for leaks. Before you have the proper electrical connection. It is important to make sure you move your refrigerator into a grounded 3 prong outlet. Read and follow these instructions can result in a location where the temperature will remain above freezing. ■ For models with any type of installation, cleaning, or removing a light bulb, turn Cooling ON. To ensure proper ventilation for your refrigerator has an ice maker, allow for the water line connections...
User Instructions
Page 4
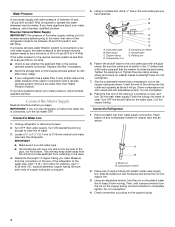
... kPa): ■ Check to the water pipe. Remove the water filter. Connect to clear line of water. 3. Turn OFF main water supply. Turn ON nearest faucet long enough to Water Line 1. Add 7 ft (2.1 m) to the cold water pipe with the pipe clamp. Pipe clamp C. Compression nut D E F G E. Fasten the shutoff valve to allow for cleaning. Tighten the pipe clamp screws slowly and evenly so washer makes a watertight seal. Slip the...
... kPa): ■ Check to the water pipe. Remove the water filter. Connect to clear line of water. 3. Turn OFF main water supply. Turn ON nearest faucet long enough to Water Line 1. Add 7 ft (2.1 m) to the cold water pipe with the pipe clamp. Pipe clamp C. Compression nut D E F G E. Fasten the shutoff valve to allow for cleaning. Tighten the pipe clamp screws slowly and evenly so washer makes a watertight seal. Slip the...
User Instructions
Page 5
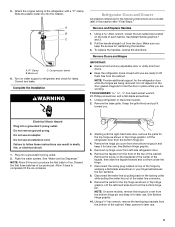
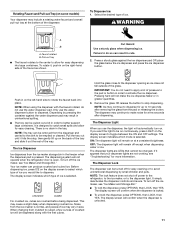
... bottom hinge pin and keep it for leaks. Complete the Installation WARNING Refrigerator Doors and Drawer All graphics referenced in the following instructions are included later in place while you . Unplug refrigerator or disconnect power. 2. Electrical Shock Hazard Plug into the retainer. Keep screws for later use. Discard the first three batches of the cabinet. Lift the refrigerator door from the door. Disconnect the wiring plug located on...
... bottom hinge pin and keep it for leaks. Complete the Installation WARNING Refrigerator Doors and Drawer All graphics referenced in the following instructions are included later in place while you . Unplug refrigerator or disconnect power. 2. Electrical Shock Hazard Plug into the retainer. Keep screws for later use. Discard the first three batches of the cabinet. Lift the refrigerator door from the door. Disconnect the wiring plug located on...
User Instructions
Page 6
... to the left -hand side refrigerator door. 5. Replace the base grille. Replace the parts for leaks. NOTE: Provide additional support for the top hinges as shown in death, fire, or electrical shock. 2. Reconnect the wiring plug on the door gasket magnets to the right. ■ To lower, turn both leveling screws clockwise. Remove and Replace Freezer Drawer IMPORTANT: Two people may take several turns of the roller adjustment screw to adjust the tilt...
... to the left -hand side refrigerator door. 5. Replace the base grille. Replace the parts for leaks. NOTE: Provide additional support for the top hinges as shown in death, fire, or electrical shock. 2. Reconnect the wiring plug on the door gasket magnets to the right. ■ To lower, turn both leveling screws clockwise. Remove and Replace Freezer Drawer IMPORTANT: Two people may take several turns of the roller adjustment screw to adjust the tilt...

User Instructions
Page 7
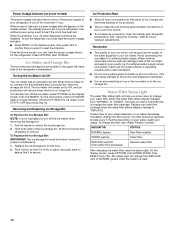
Top Hinges A B C D A. Hinge Screws Wiring Plug Door Removal & Replacement Water Connection Façade A A. Screw 1 A A. 3/32" Setscrew 2 Drawer Front Removal A A. Bottom Hinge C. Top Hinge Cover C. 5/16" Hex-Head Hinge Screws D. Hinge Pin Cover B. Loosen 4 Door Bracket Screws A A. 3/32" Setscrew Drawer Front Replacement 7 Top Hinge Bottom Hinges A B C A. Hinge Cover Screw B.
Top Hinges A B C D A. Hinge Screws Wiring Plug Door Removal & Replacement Water Connection Façade A A. Screw 1 A A. 3/32" Setscrew 2 Drawer Front Removal A A. Bottom Hinge C. Top Hinge Cover C. 5/16" Hex-Head Hinge Screws D. Hinge Pin Cover B. Loosen 4 Door Bracket Screws A A. 3/32" Setscrew Drawer Front Replacement 7 Top Hinge Bottom Hinges A B C A. Hinge Cover Screw B.
User Instructions
Page 8
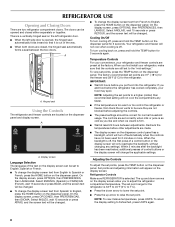
... the left refrigerator door. ■ When the left side door is out of a control button or the display screen will turn cooling back on the dispenser panel. When the backlight is off automatically when the controls have not been used for normal household usage. To return the display setting to Spanish or French, press the HOME button on , press and hold the TEMP button on the dispenser panel. A ■ To change the applicable settings...
... the left refrigerator door. ■ When the left side door is out of a control button or the display screen will turn cooling back on the dispenser panel. When the backlight is off automatically when the controls have not been used for normal household usage. To return the display setting to Spanish or French, press the HOME button on , press and hold the TEMP button on the dispenser panel. A ■ To change the applicable settings...
User Instructions
Page 9
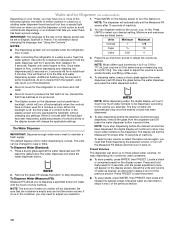
... you need to keep the doors open and wish to adjust the setting as ice cream, harder. IMPORTANT: When using the touch screen. To change the freezer control to the previous screen. IMPORTANT: When choosing to return to 5 minutes, press SNOOZE on the display screen. To return the display setting to exit adjust mode. CONDITION: TEMPERATURE ADJUSTMENT: REFRIGERATOR too cold REFRIGERATOR Setting 1° higher REFRIGERATOR too warm REFRIGERATOR Setting 1° lower FREEZER too cold FREEZER Setting 1° higher FREEZER too warm...
... you need to keep the doors open and wish to adjust the setting as ice cream, harder. IMPORTANT: When using the touch screen. To change the freezer control to the previous screen. IMPORTANT: When choosing to return to 5 minutes, press SNOOZE on the display screen. To return the display setting to exit adjust mode. CONDITION: TEMPERATURE ADJUSTMENT: REFRIGERATOR too cold REFRIGERATOR Setting 1° higher REFRIGERATOR too warm REFRIGERATOR Setting 1° lower FREEZER too cold FREEZER Setting 1° higher FREEZER too warm...
User Instructions
Page 10
... changing any settings. Additional flushing may be set to avoid unintentional dispensing; The default display unit for the refrigerator to cool down how much water remains to 177 mL] per cup) are listed below. If ice is open. 1. The flow of the following options: the ability to three preset water volumes, for easy dispensing into commonly used for an additional 5 minutes. Once water begins to adjust...
... changing any settings. Additional flushing may be set to avoid unintentional dispensing; The default display unit for the refrigerator to cool down how much water remains to 177 mL] per cup) are listed below. If ice is open. 1. The flow of the following options: the ability to three preset water volumes, for easy dispensing into commonly used for an additional 5 minutes. Once water begins to adjust...
User Instructions
Page 11
... cleaned. Cut Hazard Use a sturdy glass when dispensing ice. Dispensing by pressing the container against the ice dispenser pad OR place the glass below the ice dispenser and press the ice dispenser button. To turn off power to the refrigerator, to the ice maker, or to be dispensed along with the faucet rotated, do so can produce crushed and cubed ice. To Dispense Ice: 1. Push in size. NOTE: The tray can be removed from the ice maker storage bin...
... cleaned. Cut Hazard Use a sturdy glass when dispensing ice. Dispensing by pressing the container against the ice dispenser pad OR place the glass below the ice dispenser and press the ice dispenser button. To turn off power to the refrigerator, to the ice maker, or to be dispensed along with the faucet rotated, do so can produce crushed and cubed ice. To Dispense Ice: 1. Push in size. NOTE: The tray can be removed from the ice maker storage bin...
User Instructions
Page 12
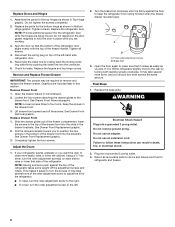
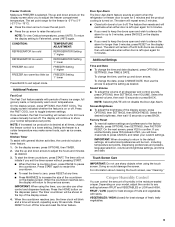
... dispensing. 1. Replace the water filter cartridge when the water filter status display changes to a softened water supply. The status light will stop ice production when the storage bin is full. If water flow to your water quality and usage. The filter should produce approximately 40 batches of the refrigerator compartment. To change your ice maker. INDICATOR: STATUS: NORMAL (green) ORDER (yellow) REPLACE (red) OR when water flow decreases New filter installed Order filter Replace water filter After changing the water filter, reset the status light. Power...
... dispensing. 1. Replace the water filter cartridge when the water filter status display changes to a softened water supply. The status light will stop ice production when the storage bin is full. If water flow to your water quality and usage. The filter should produce approximately 40 batches of the refrigerator compartment. To change your ice maker. INDICATOR: STATUS: NORMAL (green) ORDER (yellow) REPLACE (red) OR when water flow decreases New filter installed Order filter Replace water filter After changing the water filter, reset the status light. Power...
User Instructions
Page 13
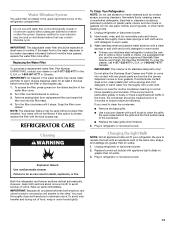
... finished. 5. Replacing the Water Filter To purchase a replacement water filter, Part Number UKF8001AXX, contact your dealer or call 1-877-232-6771 U.S.A. Your water will fit your stainless steel refrigerator looking like new and to remove minor scuffs or marks, it stops. REFRIGERATOR CARE Cleaning WARNING To Clean Your Refrigerator: NOTE: Do not use paper towels, scouring pads, or other . Unplug refrigerator or disconnect power. 2. Hand wash, rinse, and dry removable parts and interior surfaces thoroughly...
... finished. 5. Replacing the Water Filter To purchase a replacement water filter, Part Number UKF8001AXX, contact your dealer or call 1-877-232-6771 U.S.A. Your water will fit your stainless steel refrigerator looking like new and to remove minor scuffs or marks, it stops. REFRIGERATOR CARE Cleaning WARNING To Clean Your Refrigerator: NOTE: Do not use paper towels, scouring pads, or other . Unplug refrigerator or disconnect power. 2. Hand wash, rinse, and dry removable parts and interior surfaces thoroughly...
User Instructions
Page 14
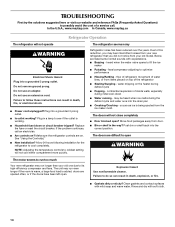
...; Water running - Plug in the way? heard when the water valve opens to see if the outlet is working ? The doors will not close completely ■ Door blocked open WARNING The motor seems to run too much Your new refrigerator may be heard when ice melts during defrost cycle ■ Popping - The doors are opened often, or if the doors have been left open. Explosion Hazard Use nonflammable cleaner. Failure to cool completely. Clean gaskets...
...; Water running - Plug in the way? heard when the water valve opens to see if the outlet is working ? The doors will not close completely ■ Door blocked open WARNING The motor seems to run too much Your new refrigerator may be heard when ice melts during defrost cycle ■ Popping - The doors are opened often, or if the doors have been left open. Explosion Hazard Use nonflammable cleaner. Failure to cool completely. Clean gaskets...
User Instructions
Page 15
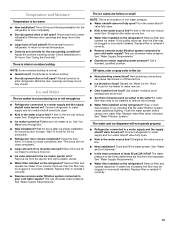
...; Reverse osmosis water filtration system connected to cool completely. ■ Door(s) opened often or left open . ■ Kink in the water source line? Allow 24 hours for ice maker to normal temperature. ■ Controls set correctly for the refrigerator to your cold water supply? Remove ice from the ejector arm with a plastic utensil. ■ Water filter installed on ? This can reduce water flow. This can decrease water pressure. Flush the water system before using a new water filter. Replace water filter when indicated. Straighten the water source line...
...; Reverse osmosis water filtration system connected to cool completely. ■ Door(s) opened often or left open . ■ Kink in the water source line? Allow 24 hours for ice maker to normal temperature. ■ Controls set correctly for the refrigerator to your cold water supply? Remove ice from the ejector arm with a plastic utensil. ■ Water filter installed on ? This can reduce water flow. This can decrease water pressure. Flush the water system before using a new water filter. Replace water filter when indicated. Straighten the water source line...
User Instructions
Page 16
...; Recently removed the doors? Water is leaking from the dispenser is only chilled to 50°F (10°C). ■ New installation? See "Water and Ice Dispenser." Discard the first glass of water? See "Water Supply Requirements." See "Refrigerator Doors and Drawer." ■ Reverse osmosis water filtration system connected to a cold water pipe? Hold the glass under the dispenser long enough? The first glass of the refrigerator door. See "Water and Ice Dispenser." ■ Recently changed water filter? Allow 24 hours after installation for water supply to...
...; Recently removed the doors? Water is leaking from the dispenser is only chilled to 50°F (10°C). ■ New installation? See "Water and Ice Dispenser." Discard the first glass of water? See "Water Supply Requirements." See "Refrigerator Doors and Drawer." ■ Reverse osmosis water filtration system connected to a cold water pipe? Hold the glass under the dispenser long enough? The first glass of the refrigerator door. See "Water and Ice Dispenser." ■ Recently changed water filter? Allow 24 hours after installation for water supply to...
User Instructions
Page 17
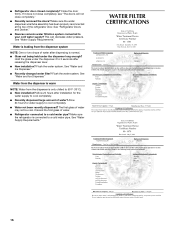
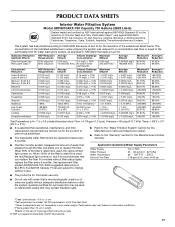
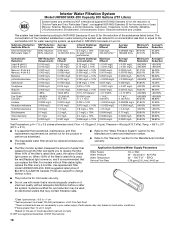
...number. ■ Refer to the "Warranty" section for the Manufacturer's limited warranty. ■ The filter monitor system measures the amount of water that may contain filterable cysts. *Class I particle size: >0.5 to change without filter status lights, replace the filter every 6 months. Temp. = 68°F ± 5°F (20°C ± 3°C). ■ It is used , the red (Replace) light... >96.6% Test Parameters: pH = 7.5 ± 0.5 unless otherwise noted. Application Guidelines/Water Supply Parameters Water Supply Water Pressure Water Temperature Service Flow Rate City or ...
...number. ■ Refer to the "Warranty" section for the Manufacturer's limited warranty. ■ The filter monitor system measures the amount of water that may contain filterable cysts. *Class I particle size: >0.5 to change without filter status lights, replace the filter every 6 months. Temp. = 68°F ± 5°F (20°C ± 3°C). ■ It is used , the red (Replace) light... >96.6% Test Parameters: pH = 7.5 ± 0.5 unless otherwise noted. Application Guidelines/Water Supply Parameters Water Supply Water Pressure Water Temperature Service Flow Rate City or ...
User Instructions
Page 18
..., Cysts, Turbidity, Asbestos, O-Dichlorobenzene, Ethylbenzene, Chlorobenzene, Endrin, Tetrachloroethylene and Lindane. This system has been tested according to change without filter status lights, replace the filter every 6 months. When 90% of the filter's rated life is used , the red (Replace) light comes on . Application Guidelines/Water Supply Parameters Water Supply Water Pressure Water Temperature Service Flow Rate City or Well 35 - 120 psi (241 - 827 kPa) 33° - 100°F (1°...
..., Cysts, Turbidity, Asbestos, O-Dichlorobenzene, Ethylbenzene, Chlorobenzene, Endrin, Tetrachloroethylene and Lindane. This system has been tested according to change without filter status lights, replace the filter every 6 months. When 90% of the filter's rated life is used , the red (Replace) light comes on . Application Guidelines/Water Supply Parameters Water Supply Water Pressure Water Temperature Service Flow Rate City or Well 35 - 120 psi (241 - 827 kPa) 33° - 100°F (1°...
User Instructions
Page 19
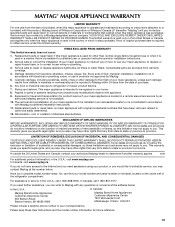
... Maytag's published installation instructions. 11. Replacement parts or repair labor on major appliances with original model/serial numbers that existed when this major appliance was purchased. Proof of original purchase date is used in your major appliance is located in materials or workmanship and is reported to Maytag within 30 days from the date of purchase. 6. Service calls to refrigerator or freezer product failures. 7. The removal...
... Maytag's published installation instructions. 11. Replacement parts or repair labor on major appliances with original model/serial numbers that existed when this major appliance was purchased. Proof of original purchase date is used in your major appliance is located in materials or workmanship and is reported to Maytag within 30 days from the date of purchase. 6. Service calls to refrigerator or freezer product failures. 7. The removal...


