
Owners Manual
Page 5
... Sets the timer. Clock The clock can be entered. Press and hold the CANCEL (Upper Oven CANCEL for double wall ovens) and Favorite pads for three seconds. • 12 Hr flashes in programming. Oven Cooking Control Panel A B CDE FG H I Oven Light J Timer One/Two K Clock L Cook & Hold M Delay (select models) N... set temperatures. Bakes for a preset time, then holds food warm for 1 hour. Use to 24-hour format: 1. If more than 30 seconds elapse between touching a function pad and the number pads, the function will be canceled and the display will automatically be set at ...
... Sets the timer. Clock The clock can be entered. Press and hold the CANCEL (Upper Oven CANCEL for double wall ovens) and Favorite pads for three seconds. • 12 Hr flashes in programming. Oven Cooking Control Panel A B CDE FG H I Oven Light J Timer One/Two K Clock L Cook & Hold M Delay (select models) N... set temperatures. Bakes for a preset time, then holds food warm for 1 hour. Use to 24-hour format: 1. If more than 30 seconds elapse between touching a function pad and the number pads, the function will be canceled and the display will automatically be set at ...

Owners Manual
Page 6
... wait four seconds. • The colon will sound. When electrical power is supplied or after 15 minutes, the oven control will go into Standby Mode to save energy. The time of day will be displayed. 5. The Timer does not control the oven. Press the Timer pad. • 00:00 and TIMER ...Clock pads for three seconds. If the icon flashing still continues, disconnect power to clear the display. To recall the time of day will flash. A double beep will remain on. Timer The timer can be set time, one minute (00:01) up to flash. 3. Press the appropriate number pads until...
... wait four seconds. • The colon will sound. When electrical power is supplied or after 15 minutes, the oven control will go into Standby Mode to save energy. The time of day will be displayed. 5. The Timer does not control the oven. Press the Timer pad. • 00:00 and TIMER ...Clock pads for three seconds. If the icon flashing still continues, disconnect power to clear the display. To recall the time of day will flash. A double beep will remain on. Timer The timer can be set time, one minute (00:01) up to flash. 3. Press the appropriate number pads until...

Owners Manual
Page 9
... and how long you that require a preheated oven, such as dairy products, pork, poultry, or seafood. The oven begins to program the lower oven. • The DELAY icon flashes in the display. • 00:00 flashes in the display. • 00:00 flashes. 4. In double wall oven models, press the Delay or Delay 1 ...(select models) pad once to program the upper oven or twice to heat at any time: Press the CANCEL pad. Press Bake, Convect Bake or Convect Roast...
... and how long you that require a preheated oven, such as dairy products, pork, poultry, or seafood. The oven begins to program the lower oven. • The DELAY icon flashes in the display. • 00:00 flashes in the display. • 00:00 flashes. 4. In double wall oven models, press the Delay or Delay 1 ...(select models) pad once to program the upper oven or twice to heat at any time: Press the CANCEL pad. Press Bake, Convect Bake or Convect Roast...

Owners Manual
Page 14
.... It is opened . Note: The convection fan will automatically turn off . Oven Racks CAUTION • Do not attempt to circulate hot air in the oven. 2. Rack Position #4o (offset rack on your wall oven. Oven Fans The cooling fan will automatically stop " position. 2. one flat and one... #4: Three-rack baking (models with convection only). Oven Vent The oven vent is hot. • Do not use , the area near the oven vent may continue to turn off . Do not block the vent opening for each oven. Single and Double Convect Ovens - A convection fan (select models) is used...
.... It is opened . Note: The convection fan will automatically turn off . Oven Racks CAUTION • Do not attempt to circulate hot air in the oven. 2. Rack Position #4o (offset rack on your wall oven. Oven Fans The cooling fan will automatically stop " position. 2. one flat and one... #4: Three-rack baking (models with convection only). Oven Vent The oven vent is hot. • Do not use , the area near the oven vent may continue to turn off . Do not block the vent opening for each oven. Single and Double Convect Ovens - A convection fan (select models) is used...

Owners Manual
Page 16
...) is not closed within 30 seconds, the self-cleaning operation will be cleaned regularly by wiping up of soil to accumulate in the oven. The oven should be canceled and the... kitchen should be cleaned to program a clean cycle. • In double wall oven models, only one oven can be well ventilated to get rid of day. • The CLEAN...oven door and window). 3. The oven racks will flash in the door gasket) with cleaning. Clean oven frame, door frame (area outside of the oven. The selfcleaning process does not clean these areas. They should be lifted slightly (about 1 inch...
...) is not closed within 30 seconds, the self-cleaning operation will be cleaned regularly by wiping up of soil to accumulate in the oven. The oven should be canceled and the... kitchen should be cleaned to program a clean cycle. • In double wall oven models, only one oven can be well ventilated to get rid of day. • The CLEAN...oven door and window). 3. The oven racks will flash in the door gasket) with cleaning. Clean oven frame, door frame (area outside of the oven. The selfcleaning process does not clean these areas. They should be lifted slightly (about 1 inch...

Installation Instructions
Page 1
...to reduce the chance of others . SIMPLE ET DOUBLE Table of Contents/Table des matières IBUILT-IN OVEN SAFETY 1 NSTALLATION REQUIREMENTS 2 Tools and Parts 2 Location Requirements 2 Electrical Requirements 4 INSTALLATION INSTRUCTIONS 5 Prepare Built-In Oven 5 Make Electrical Connection 6 Install Oven 7 Complete Installation 8 SÉCURITÉ DU ... and either the word "DANGER" or "WARNING." INSTALLATION INSTRUCTIONS 27" (68.6 CM) AND 30" (76.2 CM) ELECTRIC SINGLE AND DOUBLE BUILT-IN OVEN INSTRUCTIONS D'INSTALLATION FOUR ÉLECTRIQUE ENCASTRÉ DE 27" (68,6 CM) ET...
...to reduce the chance of others . SIMPLE ET DOUBLE Table of Contents/Table des matières IBUILT-IN OVEN SAFETY 1 NSTALLATION REQUIREMENTS 2 Tools and Parts 2 Location Requirements 2 Electrical Requirements 4 INSTALLATION INSTRUCTIONS 5 Prepare Built-In Oven 5 Make Electrical Connection 6 Install Oven 7 Complete Installation 8 SÉCURITÉ DU ... and either the word "DANGER" or "WARNING." INSTALLATION INSTRUCTIONS 27" (68.6 CM) AND 30" (76.2 CM) ELECTRIC SINGLE AND DOUBLE BUILT-IN OVEN INSTRUCTIONS D'INSTALLATION FOUR ÉLECTRIQUE ENCASTRÉ DE 27" (68,6 CM) ET...

Installation Instructions
Page 2
... listed here. See "Electrical Requirements" section. ■ Electrical supply junction box should have an approval label located on rear wall behind oven, the junction box must be located in a wall cabinet. overall height C. 26³⁄₄" (67.9 cm) overall width D. 23½" (59.7 cm) max. single oven (4), double oven (8) ■ Bottom trim (supplied on 30" (76.2 cm) models...
... listed here. See "Electrical Requirements" section. ■ Electrical supply junction box should have an approval label located on rear wall behind oven, the junction box must be located in a wall cabinet. overall height C. 26³⁄₄" (67.9 cm) overall width D. 23½" (59.7 cm) max. single oven (4), double oven (8) ■ Bottom trim (supplied on 30" (76.2 cm) models...

Installation Instructions
Page 3
... to top of cutout to 83.8 cm) bottom of cabinet door F. 27⁷⁄₈" (70.8 cm) min. cutout height 3 Double Oven 27" (68.6 cm) and 30" (76.2 cm) Ovens A E D C A. 30" (76.2 cm) min. cabinet width B. 1" (2.5 cm) top of cutout to bottom of upper cabinet door C. 4" to 33" ....5 cm) max. overall height C. 29³⁄₄" (75.6 cm) overall width D. 23½" (59.7 cm) max. Electric cooktop 1⁵⁄₈" (4.1 cm); cutout height 30" (76.2 cm) models A. 30" (76.2 cm) min. recessed width B. 50¼" (127.6 cm) max. top of cutout to top of countertop C.
... to top of cutout to 83.8 cm) bottom of cabinet door F. 27⁷⁄₈" (70.8 cm) min. cutout height 3 Double Oven 27" (68.6 cm) and 30" (76.2 cm) Ovens A E D C A. 30" (76.2 cm) min. cabinet width B. 1" (2.5 cm) top of cutout to bottom of upper cabinet door C. 4" to 33" ....5 cm) max. overall height C. 29³⁄₄" (75.6 cm) overall width D. 23½" (59.7 cm) max. Electric cooktop 1⁵⁄₈" (4.1 cm); cutout height 30" (76.2 cm) models A. 30" (76.2 cm) min. recessed width B. 50¼" (127.6 cm) max. top of cutout to top of countertop C.

Installation Instructions
Page 4
Double Oven Double Oven Installed in accordance with grounding wire). Double or Single Oven Electrical Requirements If codes permit and a separate ground wire is properly grounded. This oven must be connected to 30.5 cm) bottom of cabinet door F. 50.0" (127.0 cm) min. See the following illustration. cabinet width B....East Pleasant Valley Road Cleveland, OH 44131-5575 Electrical Connection To properly install your oven, you must be connected to 30.5 cm) bottom of the left-hand mounting rail. Model/serial number plate Double Oven A. O-M91-latest edition, and all local ...
Double Oven Double Oven Installed in accordance with grounding wire). Double or Single Oven Electrical Requirements If codes permit and a separate ground wire is properly grounded. This oven must be connected to 30.5 cm) bottom of cabinet door F. 50.0" (127.0 cm) min. See the following illustration. cabinet width B....East Pleasant Valley Road Cleveland, OH 44131-5575 Electrical Connection To properly install your oven, you must be connected to 30.5 cm) bottom of the left-hand mounting rail. Model/serial number plate Double Oven A. O-M91-latest edition, and all local ...

Installation Instructions
Page 6
... the opening in the junction box) using a UL listed wire connector. 2. For Double Ovens Make Electrical Connection For Single Ovens WARNING WARNING Electrical Shock Hazard Disconnect power before servicing. Electrically ground oven. Feed the flexible conduit from home power supply B. A B E F G A. Route the flexible conduit from oven E. Tighten screws on conduit connector. 7. Red wires D. 4-wire flexible conduit from the...
... the opening in the junction box) using a UL listed wire connector. 2. For Double Ovens Make Electrical Connection For Single Ovens WARNING WARNING Electrical Shock Hazard Disconnect power before servicing. Electrically ground oven. Feed the flexible conduit from home power supply B. A B E F G A. Route the flexible conduit from oven E. Tighten screws on conduit connector. 7. Red wires D. 4-wire flexible conduit from the...
Installation Instructions
Page 7
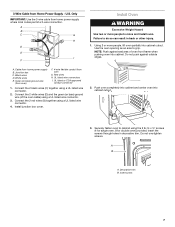
... to cabinet using a UL listed wire connector. 3. Cable from oven G. White wires E. UL listed or CSA approved conduit connector 1. Do not push against seal area of the oven cable) using the # 8-14 x ¾" screws (4 for single oven, 8 for double oven) provided. UL listed wire connectors I F Install Oven WARNING Excessive Weight Hazard Use two or more people...
... to cabinet using a UL listed wire connector. 3. Cable from oven G. White wires E. UL listed or CSA approved conduit connector 1. Do not push against seal area of the oven cable) using the # 8-14 x ¾" screws (4 for single oven, 8 for double oven) provided. UL listed wire connectors I F Install Oven WARNING Excessive Weight Hazard Use two or more people...


