
Owners Manual
Page 5
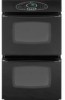
...the display will automatically be set temperatures. Press and hold the CANCEL (Upper Oven CANCEL for double wall ovens) and Favorite pads for convection roasting. Set the time of day, timer and oven functions. Use to turn the upper or lower oven light on or off. Cancels all operations except Timer and Clock. Use to...8226; Press the desired pad. • Press the number pads to enter time or temperature. • Press the Autoset pad to display time in oven. Use to start baking at the factory for ease in the To Set the Clock section. To change the clock to select 24 Hr; Sets...
...the display will automatically be set temperatures. Press and hold the CANCEL (Upper Oven CANCEL for double wall ovens) and Favorite pads for convection roasting. Set the time of day, timer and oven functions. Use to turn the upper or lower oven light on or off. Cancels all operations except Timer and Clock. Use to...8226; Press the desired pad. • Press the number pads to enter time or temperature. • Press the Autoset pad to display time in oven. Use to start baking at the factory for ease in the To Set the Clock section. To change the clock to select 24 Hr; Sets...

Owners Manual
Page 6
... beep will sound and "End" will disappear from the display. When the clock display is locking. A double beep will not function when locked. Press the Timer pad. • 00:00 and TIMER icon flash...the Timer pad to the appliance. To cancel the Timer: 1. Locking the Control and Oven Door The touchpad and oven door can also be displayed. 5. OFF disappears from the display. If the BAKE or... pads until the correct time appears in the display when the touchpads and door are locked. When electrical power is an error or a problem. If the BAKE or LOCK icon flashes in the display....
... beep will sound and "End" will disappear from the display. When the clock display is locking. A double beep will not function when locked. Press the Timer pad. • 00:00 and TIMER icon flash...the Timer pad to the appliance. To cancel the Timer: 1. Locking the Control and Oven Door The touchpad and oven door can also be displayed. 5. OFF disappears from the display. If the BAKE or... pads until the correct time appears in the display when the touchpads and door are locked. When electrical power is an error or a problem. If the BAKE or LOCK icon flashes in the display....

Owners Manual
Page 9
...Convect Roast (select models) and select the oven temperature. The oven begins to heat at any time: Press the CANCEL pad. In double wall oven models, press the Delay or Delay 1 (select models) pad once to program the upper oven or twice to program the lower oven. • The DELAY icon flashes in ... display. • The PREHEAT icon will light when Autoset is already hot. Press Bake, Convect Bake or Convect Roast (select models). 6. Set the oven temperature desired by using the number pads. • The HOLD icon continues to flash. • The time will light in the display. •...
...Convect Roast (select models) and select the oven temperature. The oven begins to heat at any time: Press the CANCEL pad. In double wall oven models, press the Delay or Delay 1 (select models) pad once to program the upper oven or twice to program the lower oven. • The DELAY icon flashes in ... display. • The PREHEAT icon will light when Autoset is already hot. Press Bake, Convect Bake or Convect Roast (select models). 6. Set the oven temperature desired by using the number pads. • The HOLD icon continues to flash. • The time will light in the display. •...

Owners Manual
Page 14
...The fan may become hot enough to change the rack position when the oven is hot. • Do not use the oven for each oven. Oven Racks CAUTION • Do not attempt to cause burns. Single and Double Non-Convect Ovens - Tilt the front end up on the front of the rack and... been turned off when Convect is located below the control panel on your wall oven. Lift up slightly; When the door is normal. The fan will automatically turn off . Single and Double Convect Ovens - Rack Positions 4 (flat rack) 3o (offset rack) 1 (flat rack) Three-rack Convection Baking (select models) Rack...
...The fan may become hot enough to change the rack position when the oven is hot. • Do not use the oven for each oven. Oven Racks CAUTION • Do not attempt to cause burns. Single and Double Non-Convect Ovens - Tilt the front end up on the front of the rack and... been turned off when Convect is located below the control panel on your wall oven. Lift up slightly; When the door is normal. The fan will automatically turn off . Single and Double Convect Ovens - Rack Positions 4 (flat rack) 3o (offset rack) 1 (flat rack) Three-rack Convection Baking (select models) Rack...

Owners Manual
Page 16
...oven racks from baking on the oven finish or around any part of the oven to become hot during a self-clean cycle. • To prevent damage to oven...Oven...oven. Wipe up spillovers to program a clean cycle. • In double wall oven models, only one oven...oven...oven. Porcelain enamel is displayed. 4. After four seconds, the oven will display. If the door is designed to automatically clean the oven...oven frame, door frame (area outside of the oven automatically programs the self-cleaning time. 5. Close the oven... and around the oven door. This prevents ...; Oven temperature...
...oven racks from baking on the oven finish or around any part of the oven to become hot during a self-clean cycle. • To prevent damage to oven...Oven...oven. Wipe up spillovers to program a clean cycle. • In double wall oven models, only one oven...oven...oven. Porcelain enamel is displayed. 4. After four seconds, the oven will display. If the door is designed to automatically clean the oven...oven frame, door frame (area outside of the oven automatically programs the self-cleaning time. 5. Close the oven... and around the oven door. This prevents ...; Oven temperature...

Installation Instructions
Page 1
... provided many important safety messages in this manual and on your appliance. INSTALLATION INSTRUCTIONS 27" (68.6 CM) AND 30" (76.2 CM) ELECTRIC SINGLE AND DOUBLE BUILT-IN OVEN INSTRUCTIONS D'INSTALLATION FOUR ÉLECTRIQUE ENCASTRÉ DE 27" (68,6 CM) ET 30" (76,2 CM) - SIMPLE ET DOUBLE Table of Contents/Table des matières IBUILT-IN...
... provided many important safety messages in this manual and on your appliance. INSTALLATION INSTRUCTIONS 27" (68.6 CM) AND 30" (76.2 CM) ELECTRIC SINGLE AND DOUBLE BUILT-IN OVEN INSTRUCTIONS D'INSTALLATION FOUR ÉLECTRIQUE ENCASTRÉ DE 27" (68,6 CM) ET 30" (76,2 CM) - SIMPLE ET DOUBLE Table of Contents/Table des matières IBUILT-IN...

Installation Instructions
Page 2
...27¹⁄₂" (69.9 cm) recessed height 30" (76.2 cm) models A. 28¼" (71.8 cm) max. See "Electrical Requirements" section. ■ Electrical supply junction box should have an approval label located on some models) Check local codes. Product Dimensions - recessed width B. 28¼" (71.8 cm) max. cutout height 2 single oven (4), double oven...■ Measuring tape ■ Hand or electric drill (for wall cabinet installations) ■ 1¼" (25 mm) drill bit (for cutout dimensions and approved oven cooktop combinations (separate sheet). bottom trim (...
...27¹⁄₂" (69.9 cm) recessed height 30" (76.2 cm) models A. 28¼" (71.8 cm) max. See "Electrical Requirements" section. ■ Electrical supply junction box should have an approval label located on some models) Check local codes. Product Dimensions - recessed width B. 28¼" (71.8 cm) max. cutout height 2 single oven (4), double oven...■ Measuring tape ■ Hand or electric drill (for wall cabinet installations) ■ 1¼" (25 mm) drill bit (for cutout dimensions and approved oven cooktop combinations (separate sheet). bottom trim (...

Installation Instructions
Page 3
...;" (72.4 cm) cutout width E. 1¹⁄₂" (3.8 cm) min. Double Oven 27" (68.6 cm) and 30" (76.2 cm) Ovens A E D C A. 30" (76.2 cm) min. recessed width B. 50¼" (127.6 cm) max. bottom of cutout to top of cabinet door F. 27⁷⁄₈" (70.8 cm) min. Electric cooktop 1⁵⁄₈" (4.1 cm); overall height C. 26³⁄...
...;" (72.4 cm) cutout width E. 1¹⁄₂" (3.8 cm) min. Double Oven 27" (68.6 cm) and 30" (76.2 cm) Ovens A E D C A. 30" (76.2 cm) min. recessed width B. 50¼" (127.6 cm) max. bottom of cutout to top of cabinet door F. 27⁷⁄₈" (70.8 cm) min. Electric cooktop 1⁵⁄₈" (4.1 cm); overall height C. 26³⁄...

Installation Instructions
Page 4
... it is properly grounded. Double or Single Oven Electrical Requirements If codes permit and a separate ground wire is used, it here. ■ Oven must be connected to the proper electrical voltage and frequency as specified on Recommended Wire Size Serial/rating Plate Minimum Circuit (AWG) Protection in Cabinet A B F D E C 27" (68.6 cm) models A. 27" (68.6 cm) min. cutout...
... it is properly grounded. Double or Single Oven Electrical Requirements If codes permit and a separate ground wire is used, it here. ■ Oven must be connected to the proper electrical voltage and frequency as specified on Recommended Wire Size Serial/rating Plate Minimum Circuit (AWG) Protection in Cabinet A B F D E C 27" (68.6 cm) models A. 27" (68.6 cm) min. cutout...

Installation Instructions
Page 6
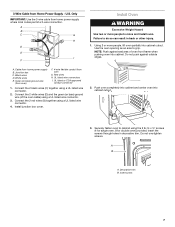
... listed wire connector. 3. Connect the 2 white wires (F) together using a UL listed wire connector. 6. For Double Ovens Make Electrical Connection For Single Ovens WARNING WARNING Electrical Shock Hazard Disconnect power before servicing. Use 12 gauge solid copper wire. A 4-Wire Cable from Home Power Supply... allow grounding through a UL listed or CSA approved conduit connector. 6. Red wires D. 4-wire flexible conduit from the oven. 4. Electrical Shock Hazard Disconnect power before servicing. Disconnect power. 2. Install a UL listed or CSA approved conduit connector to complete...
... listed wire connector. 3. Connect the 2 white wires (F) together using a UL listed wire connector. 6. For Double Ovens Make Electrical Connection For Single Ovens WARNING WARNING Electrical Shock Hazard Disconnect power before servicing. Use 12 gauge solid copper wire. A 4-Wire Cable from Home Power Supply... allow grounding through a UL listed or CSA approved conduit connector. 6. Red wires D. 4-wire flexible conduit from the oven. 4. Electrical Shock Hazard Disconnect power before servicing. Disconnect power. 2. Install a UL listed or CSA approved conduit connector to complete...
Installation Instructions
Page 7
... B. Junction box C. Red wires H. Connect the 2 red wires (G) together using the # 8-14 x ¾" screws (4 for single oven, 8 for double oven) provided. Connect the 2 white wires (D) and the green (or bare) ground wire (of oven front frame when pushing oven into cabinet cutout. 3. Insert the screws through holes in back or other injury. 1. Only IMPORTANT: Use...
... B. Junction box C. Red wires H. Connect the 2 red wires (G) together using the # 8-14 x ¾" screws (4 for single oven, 8 for double oven) provided. Connect the 2 white wires (D) and the green (or bare) ground wire (of oven front frame when pushing oven into cabinet cutout. 3. Insert the screws through holes in back or other injury. 1. Only IMPORTANT: Use...


