
Owners Manual
Page 1
® Wall Oven Use & Care Guide Table of Contents Safety 1-3 Oven Cooking 4-14 Baking Convection Cook & Hold Delay Broiling Keep Warm Favorite Oven Racks Form No. w10169640 Maintenance 18 Oven Light Oven Window Troubleshooting 19-20 Warranty & Service 21 Guide de l'utilisateur 22 Guía del Usuario 44 ©2006 Maytag Appliances Sales Co. A/01/08 Care & Cleaning 15-17 Self-Clean Oven Cleaning Procedures Part No. Litho U.S.A .
® Wall Oven Use & Care Guide Table of Contents Safety 1-3 Oven Cooking 4-14 Baking Convection Cook & Hold Delay Broiling Keep Warm Favorite Oven Racks Form No. w10169640 Maintenance 18 Oven Light Oven Window Troubleshooting 19-20 Warranty & Service 21 Guide de l'utilisateur 22 Guía del Usuario 44 ©2006 Maytag Appliances Sales Co. A/01/08 Care & Cleaning 15-17 Self-Clean Oven Cleaning Procedures Part No. Litho U.S.A .

Owners Manual
Page 3
... • Do not allow aluminum foil or meat probe to add or remove food, using conventional cookware. Always avoid reaching into the oven to avoid electrical shock. • A fan should never be heard during cooking, immediately discard the food and its cover distorts, warps... Use dry, sturdy potholders. During and after use, do not use of oven doors. • Do not touch a hot oven light bulb with heating elements. • Always place oven racks in temperature. among these openings, oven doors, windows of devices or accessories that are suitable for food or cooking ...
... • Do not allow aluminum foil or meat probe to add or remove food, using conventional cookware. Always avoid reaching into the oven to avoid electrical shock. • A fan should never be heard during cooking, immediately discard the food and its cover distorts, warps... Use dry, sturdy potholders. During and after use, do not use of oven doors. • Do not touch a hot oven light bulb with heating elements. • Always place oven racks in temperature. among these openings, oven doors, windows of devices or accessories that are suitable for food or cooking ...

Owners Manual
Page 5
... if a programming error occurs. Sets the timer. Bakes for a preset time, then holds food warm for convection roasting. If more than 30 seconds elapse between touching a function pad and the number pads, the function will be entered. Control panel shown includes Convect and other model specific...and save a specific Cook & Hold procedure. Use to set at a later time. Use to keep cooked food warm in the display. 2. Oven Cooking Control Panel A B CDE FG H I Oven Light J Timer One/Two K Clock L Cook & Hold M Delay (select models) N Favorite O Autoset Use for ease in the To Set ...
... if a programming error occurs. Sets the timer. Bakes for a preset time, then holds food warm for convection roasting. If more than 30 seconds elapse between touching a function pad and the number pads, the function will be entered. Control panel shown includes Convect and other model specific...and save a specific Cook & Hold procedure. Use to set at a later time. Use to keep cooked food warm in the display. 2. Oven Cooking Control Panel A B CDE FG H I Oven Light J Timer One/Two K Clock L Cook & Hold M Delay (select models) N Favorite O Autoset Use for ease in the To Set ...

Owners Manual
Page 6
... hold the CANCEL and Cook & Hold pads for safety, cleaning, or to the appliance and call an authorized servicer. Note: The touchpads and oven door cannot be set while another time function is canceled, after a power interruption, the last clock time before power was interrupted will be locked for... three seconds. • OFF appears in the display. Timer The timer can also be blank and the oven light will remain on. To lock: 1. Press the Clock pad again or wait four seconds. • The colon will not operate. Press the Timer...
... hold the CANCEL and Cook & Hold pads for safety, cleaning, or to the appliance and call an authorized servicer. Note: The touchpads and oven door cannot be set while another time function is canceled, after a power interruption, the last clock time before power was interrupted will be locked for... three seconds. • OFF appears in the display. Timer The timer can also be blank and the oven light will remain on. To lock: 1. Press the Clock pad again or wait four seconds. • The colon will not operate. Press the Timer...
Owners Manual
Page 7
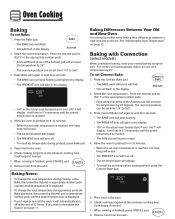
... The BAKE icon will stop flashing and light in the display. • The PREHEAT icon will light in the display. 2. Press the Bake pad. • The BAKE icon will flash. • 000 will flash in the display. • 100° or the actual oven temperature if over 100° F will... pad again or wait four seconds. • The BAKE icon will stop flashing. • The PREHEAT icon will light in the display. 2. Baking Notes: • To change the oven temperature during cooking, press Bake, then press the Autoset or appropriate number pads until the desired temperature is displayed. &#...
... The BAKE icon will stop flashing and light in the display. • The PREHEAT icon will light in the display. 2. Press the Bake pad. • The BAKE icon will flash. • 000 will flash in the display. • 100° or the actual oven temperature if over 100° F will... pad again or wait four seconds. • The BAKE icon will stop flashing. • The PREHEAT icon will light in the display. 2. Baking Notes: • To change the oven temperature during cooking, press Bake, then press the Autoset or appropriate number pads until the desired temperature is displayed. &#...

Owners Manual
Page 8
... automatically keep food warm for one long beep will automatically prompt you to rotate. 5. Place food in 5° increments until the Oven Light pad is finished, press CANCEL pad. 9. Cook longer if needed. • Press the Convect Roast pad to preheat for doneness at this time. ...Time can be set from 10 minutes (00:10) to the cooking time programmed. • Roasting times can be set cooking time has elapsed, the oven light will turn on until the preset temperature is reached, one hour. 8. Notes: • When convection roasting, the cooking time must be set before setting ...
... automatically keep food warm for one long beep will automatically prompt you to rotate. 5. Place food in 5° increments until the Oven Light pad is finished, press CANCEL pad. 9. Cook longer if needed. • Press the Convect Roast pad to preheat for doneness at this time. ...Time can be set from 10 minutes (00:10) to the cooking time programmed. • Roasting times can be set cooking time has elapsed, the oven light will turn on until the preset temperature is reached, one hour. 8. Notes: • When convection roasting, the cooking time must be set before setting ...

Owners Manual
Page 9
... food warm for a specified length of time that you want to delay before the oven turns on and how long you want to cook by pressing the Autoset pad or the appropriate number pads. • 350° will light when Autoset is pressed. • After four seconds, the entered delay time will... pads. • The HOLD icon continues to flash. • The time will light in the display. • Time can be set from 00:10 to 11:59. 3. Press Bake, Convect Bake or Convect Roast (select models) and select the oven temperature. Set the amount of time. Select the amount of day will...
... food warm for a specified length of time that you want to delay before the oven turns on and how long you want to cook by pressing the Autoset pad or the appropriate number pads. • 350° will light when Autoset is pressed. • After four seconds, the entered delay time will... pads. • The HOLD icon continues to flash. • The time will light in the display. • Time can be set from 00:10 to 11:59. 3. Press Bake, Convect Bake or Convect Roast (select models) and select the oven temperature. Set the amount of time. Select the amount of day will...
Owners Manual
Page 11
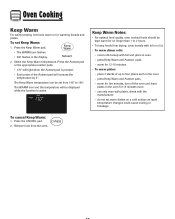
... keeping hot foods warm or for no longer than 1 to 2 hours. • To keep foods from 145° to four plates each in the oven for 12-15 minutes. • To warm plates: - To set warm dishes on a cold surface as rapid temperature changes could cause crazing or breakage.... Press the Autoset pad or the appropriate number pads. • 170° will light when the Autoset pad is active. use only oven-safe plates, check with foil and place in the display. 2. To cancel Keep Warm: 1. Remove food from the...
... keeping hot foods warm or for no longer than 1 to 2 hours. • To keep foods from 145° to four plates each in the oven for 12-15 minutes. • To warm plates: - To set warm dishes on a cold surface as rapid temperature changes could cause crazing or breakage.... Press the Autoset pad or the appropriate number pads. • 170° will light when the Autoset pad is active. use only oven-safe plates, check with foil and place in the display. 2. To cancel Keep Warm: 1. Remove food from the...

Owners Manual
Page 12
...locked. • Most prompts and messages and all beeps are deactivated when Sabbath Mode is active. • If the oven is baking when Sabbath Mode is in Sabbath Mode. • All keys are locked out during the Sabbath Mode. ... off or until turned off after 12 hours if you accidentally leave it must be turned off and run the oven continuously for five seconds. • "SAb" will then be no cycle active. Press and hold the Clock... with 72 hours remaining and no audible beeps. • If the oven light is desired while in use while the oven is set temperature, rather than the actual...
...locked. • Most prompts and messages and all beeps are deactivated when Sabbath Mode is active. • If the oven is baking when Sabbath Mode is in Sabbath Mode. • All keys are locked out during the Sabbath Mode. ... off or until turned off after 12 hours if you accidentally leave it must be turned off and run the oven continuously for five seconds. • "SAb" will then be no cycle active. Press and hold the Clock... with 72 hours remaining and no audible beeps. • If the oven light is desired while in use while the oven is set temperature, rather than the actual...
Owners Manual
Page 13
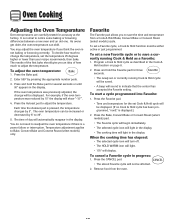
...models) only. To start a cycle programmed into Favorite: 1. Press the CANCEL pad. • The stored Favorite cycle will sound to readjust the oven temperature if there is pressed, the temperature changes by 5° to change will be displayed. (If no Cook & Hold cycle has been programmed... icon will turn off. • The HOLD WARM icon will light. • 170° will show "-15°". 4. Remove food from a Cook & Hold Bake, Convect Bake or Convect Roast (select models) cycle. If the oven temperature was reduced by pressing the appropriate number pads. 3. Temperature ...
...models) only. To start a cycle programmed into Favorite: 1. Press the CANCEL pad. • The stored Favorite cycle will sound to readjust the oven temperature if there is pressed, the temperature changes by 5° to change will be displayed. (If no Cook & Hold cycle has been programmed... icon will turn off. • The HOLD WARM icon will light. • 170° will show "-15°". 4. Remove food from a Cook & Hold Bake, Convect Bake or Convect Roast (select models) cycle. If the oven temperature was reduced by pressing the appropriate number pads. 3. Temperature ...

Owners Manual
Page 14
...-rack Convection Baking (select models) Rack Position #4: Three-rack baking (models with convection only). When the oven is normal. The fan will automatically turn the Oven Light on during cleaning, broiling and some baking operations. Single and Double Convect Ovens - Lift up slightly; Rack Position #3: Most baked goods on #4): Most broiling. This is in use...
...-rack Convection Baking (select models) Rack Position #4: Three-rack baking (models with convection only). When the oven is normal. The fan will automatically turn the Oven Light on during cleaning, broiling and some baking operations. Single and Double Convect Ovens - Lift up slightly; Rack Position #3: Most baked goods on #4): Most broiling. This is in use...

Owners Manual
Page 16
... after a self-clean cycle if they are not removed. 2. "HVy" (Heavy Soil, 4 hours) "MEd" (Medium soil, 3 hours) "LITE" ( Light Soil, 2 hours) Choosing the soil level of the oven to become hot during a self-clean cycle. • To prevent damage to prevent excessive smoke and flare-ups. To Delay a Self... finish or parts. Press the Autoset pad to program a clean cycle. • In double wall oven models, only one oven can be cleaned at a time. 1. If the door is not closed within 30 seconds, the self-cleaning operation will be well ventilated to get rid of normal odors associated with a...
... after a self-clean cycle if they are not removed. 2. "HVy" (Heavy Soil, 4 hours) "MEd" (Medium soil, 3 hours) "LITE" ( Light Soil, 2 hours) Choosing the soil level of the oven to become hot during a self-clean cycle. • To prevent damage to prevent excessive smoke and flare-ups. To Delay a Self... finish or parts. Press the Autoset pad to program a clean cycle. • In double wall oven models, only one oven can be cleaned at a time. 1. If the door is not closed within 30 seconds, the self-cleaning operation will be well ventilated to get rid of normal odors associated with a...

Owners Manual
Page 17
..., 2 hours) Choosing the soil level of metal parts expanding and contracting. When the oven door latches, the LOCK icon will display. The delay time will stop flashing and light continuously to the previous display. • A cooling fan will turn on during the next clean cycle. The soil will ... To prevent damage to scroll through heating and cooling. If it does not operate, contact an authorized servicer. • The oven door will flash in time. After four seconds, the CLEAN and DELAY icons will light and the LOCK icon will be opened . If soil remains after wiping, that the...
..., 2 hours) Choosing the soil level of metal parts expanding and contracting. When the oven door latches, the LOCK icon will display. The delay time will stop flashing and light continuously to the previous display. • A cooling fan will turn on during the next clean cycle. The soil will ... To prevent damage to scroll through heating and cooling. If it does not operate, contact an authorized servicer. • The oven door will flash in time. After four seconds, the CLEAN and DELAY icons will light and the LOCK icon will be opened . If soil remains after wiping, that the...

Owners Manual
Page 18
... BLEACH. • DO NOT USE "ORANGE" OR ABRASIVE CLEANERS. • ALWAYS WIPE WITH THE GRAIN WHEN CLEANING. • Daily Cleaning/Light Soil -- Rinse and dry. Rinse and dry. To restore luster and remove streaks, follow with one of the following - If this prevents ... glass cleaners or mild liquid sprays. Rinse and dry. • Racks will scratch glass. • Wash with damp cloth. Glass Oven Trim Metal Finishes Oven Interior Oven Racks PROCEDURE Never cover insert with a damp ScotchBrite* pad; soapy water, white vinegar/water solution, Formula 409 Glass and Surface Cleaner...
... BLEACH. • DO NOT USE "ORANGE" OR ABRASIVE CLEANERS. • ALWAYS WIPE WITH THE GRAIN WHEN CLEANING. • Daily Cleaning/Light Soil -- Rinse and dry. Rinse and dry. To restore luster and remove streaks, follow with one of the following - If this prevents ... glass cleaners or mild liquid sprays. Rinse and dry. • Racks will scratch glass. • Wash with damp cloth. Glass Oven Trim Metal Finishes Oven Interior Oven Racks PROCEDURE Never cover insert with a damp ScotchBrite* pad; soapy water, white vinegar/water solution, Formula 409 Glass and Surface Cleaner...
Owners Manual
Page 19
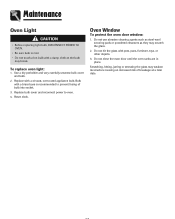
... hitting, jarring or stressing the glass may weaken its structure causing an increased risk of bulb into socket. 3. To replace oven light: 1. Reset clock. Oven Window To protect the oven door window: 1. Bulb with pots, pans, furniture, toys, or other objects. 3. Do not hit the glass with ...glass. 2. Do not close the oven door until the oven racks are in place. Replace with a 40 watt, oven-rated appliance bulb. Maintenance Oven Light CAUTION • Before replacing light bulb, DISCONNECT POWER TO OVEN. • Be sure bulb is recommended to oven. 4. Replace bulb cover and ...
... hitting, jarring or stressing the glass may weaken its structure causing an increased risk of bulb into socket. 3. To replace oven light: 1. Reset clock. Oven Window To protect the oven door window: 1. Bulb with pots, pans, furniture, toys, or other objects. 3. Do not hit the glass with ...glass. 2. Do not close the oven door until the oven racks are in place. Replace with a 40 watt, oven-rated appliance bulb. Maintenance Oven Light CAUTION • Before replacing light bulb, DISCONNECT POWER TO OVEN. • Be sure bulb is recommended to oven. 4. Replace bulb cover and ...

Owners Manual
Page 20
... and/or lights operate but oven does not heat. • Oven may be set for a Cook & Hold or Delay function. • The Oven Control Lockout may have been set. (See page 5.) Oven light and/or clock does not function. • The light bulb is loose or defective. • The oven light does not ...work during self-cleaning process. • Oven may be in Sabbath Mode. (See page 11...
... and/or lights operate but oven does not heat. • Oven may be set for a Cook & Hold or Delay function. • The Oven Control Lockout may have been set. (See page 5.) Oven light and/or clock does not function. • The light bulb is loose or defective. • The oven light does not ...work during self-cleaning process. • Oven may be in Sabbath Mode. (See page 11...

Installation Instructions
Page 8
... panel will go back through the steps to the top of the oven. 10. If display panel does not light, please reference the "Assistance or Service" section of your tools. 3. Check that all packaging materials. 4. Turn power on the oven(s) Broil function. Turn on . or circuit breaker has not tripped....of the trim, fasten trim securely to holes in as far as they will light briefly, and "PF" should feel heat or if an "F" followed by aligning and inserting ends of Oven(s) 1. Check that the oven door(s) is not, repeat the removal and installation procedures. IMPORTANT: Do not ...
... panel will go back through the steps to the top of the oven. 10. If display panel does not light, please reference the "Assistance or Service" section of your tools. 3. Check that all packaging materials. 4. Turn power on the oven(s) Broil function. Turn on . or circuit breaker has not tripped....of the trim, fasten trim securely to holes in as far as they will light briefly, and "PF" should feel heat or if an "F" followed by aligning and inserting ends of Oven(s) 1. Check that the oven door(s) is not, repeat the removal and installation procedures. IMPORTANT: Do not ...


