
Owners Manual
Page 2
... ensure proper and safe operation: Appliance must be properly installed and grounded by closing the oven door. Do not attempt to adjust, repair, service, or replace any part of the appliance as they could be allowed to play with this appliance to prevent the potential risk of fire, electric shock, personal injury or damage to cover all instructions before servicing. To Prevent Fire...
... ensure proper and safe operation: Appliance must be properly installed and grounded by closing the oven door. Do not attempt to adjust, repair, service, or replace any part of the appliance as they could be allowed to play with this appliance to prevent the potential risk of fire, electric shock, personal injury or damage to cover all instructions before servicing. To Prevent Fire...

Owners Manual
Page 3
... performance using oven cooking bags. • This appliance has been tested for oven service without breaking due to contact heating element. • Always turn off all broil and cleaning operations. Interior surfaces of any devices or accessories that are not expressly recommended in this manual. Misuse of electric shock, fire, or damage to burst resulting in oven. • Use care when opening the oven door. Follow utensil manufacturer's instructions when using dry...
... performance using oven cooking bags. • This appliance has been tested for oven service without breaking due to contact heating element. • Always turn off all broil and cleaning operations. Interior surfaces of any devices or accessories that are not expressly recommended in this manual. Misuse of electric shock, fire, or damage to burst resulting in oven. • Use care when opening the oven door. Follow utensil manufacturer's instructions when using dry...

Owners Manual
Page 4
Self-Clean Oven CAUTION Before self-cleaning the oven, remove the oven racks, broiler pan, food and any part of the self-clean oven. Wipe spillovers to birds. Fumes released during the self-clean cycle. Users of the listed substances, including carbon monoxide. IMPORTANT NOTICE REGARDING PET BIRDS: Never keep pet birds in the kitchen or in the microwave oven. Note: For microwave oven operation (select models) refer to some of this guide. Important Safety Notice and Warning...
Self-Clean Oven CAUTION Before self-cleaning the oven, remove the oven racks, broiler pan, food and any part of the self-clean oven. Wipe spillovers to birds. Fumes released during the self-clean cycle. Users of the listed substances, including carbon monoxide. IMPORTANT NOTICE REGARDING PET BIRDS: Never keep pet birds in the kitchen or in the microwave oven. Note: For microwave oven operation (select models) refer to some of this guide. Important Safety Notice and Warning...

Owners Manual
Page 5
... Oven CANCEL for double wall ovens) and Favorite pads for baking and roasting. Press the Autoset pat to 24-hour format: 1. Use to set self-clean cycle. Use to set temperatures. Clock The clock can be set at a later time. Set the time of day, timer and oven functions. Use to turn the upper or lower oven light on model.) A Bake B Broil C Convect Bake (select models) D Keep Warm E Convect Roast (select models) F Clean G CANCEL H Number Pads I J KL M N O The control panel is touched. • A double beep will sound if a programming error occurs. Sets the Clock...
... Oven CANCEL for double wall ovens) and Favorite pads for baking and roasting. Press the Autoset pat to 24-hour format: 1. Use to set self-clean cycle. Use to set temperatures. Clock The clock can be set at a later time. Set the time of day, timer and oven functions. Use to turn the upper or lower oven light on model.) A Bake B Broil C Convect Bake (select models) D Keep Warm E Convect Roast (select models) F Clean G CANCEL H Number Pads I J KL M N O The control panel is touched. • A double beep will sound if a programming error occurs. Sets the Clock...

Owners Manual
Page 6
... Clock pad to the appliance. If the BAKE or LOCK icon continues to flash, disconnect power to briefly display the time of the timer countdown will continue to display: Press and hold the Timer pad for three seconds. Oven Cooking To set the Timer: 1. It can be locked if the oven temperature is an error or a problem. Press the Timer pad. • 00:00 and TIMER icon flash in the display. 2. A double beep...
... Clock pad to the appliance. If the BAKE or LOCK icon continues to flash, disconnect power to briefly display the time of the timer countdown will continue to display: Press and hold the Timer pad for three seconds. Oven Cooking To set the Timer: 1. It can be locked if the oven temperature is an error or a problem. Press the Timer pad. • 00:00 and TIMER icon flash in the display. 2. A double beep...
Owners Manual
Page 7
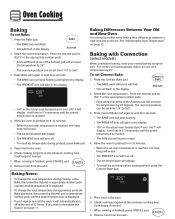
... oven temperature. Baking Notes: • To change the oven temperature during cooking, press Bake, then press the Autoset or appropriate number pads until the desired temperature is reached, one . Baking with Convection (select models) When convection baking, enter your normal baking temperature. The control will display. The oven temperature can be set oven temperature by 25 degrees. Press Convect Bake pad again or wait four seconds. • The BAKE icon will stop flashing and light in the display. • The PREHEAT...
... oven temperature. Baking Notes: • To change the oven temperature during cooking, press Bake, then press the Autoset or appropriate number pads until the desired temperature is reached, one . Baking with Convection (select models) When convection baking, enter your normal baking temperature. The control will display. The oven temperature can be set oven temperature by 25 degrees. Press Convect Bake pad again or wait four seconds. • The BAKE icon will stop flashing and light in the display. • The PREHEAT...

Owners Manual
Page 8
... cuts of the set cooking time has elapsed, the oven light will rise in the display. 2. It will turn on until the preset temperature is pressed. When 75% of meat. Cook longer if needed. • Press the Convect Roast pad to recall the cook time remaining. • At the end of the set from 10 minutes (00:10) to preheat for one long beep will stop flashing and light in the display. Press Convect Roast...
... cuts of the set cooking time has elapsed, the oven light will rise in the display. 2. It will turn on until the preset temperature is pressed. When 75% of meat. Cook longer if needed. • Press the Convect Roast pad to recall the cook time remaining. • At the end of the set from 10 minutes (00:10) to preheat for one long beep will stop flashing and light in the display. Press Convect Roast...

Owners Manual
Page 9
...; Time can be displayed during preheat. • The set temperature will display when the oven is preheated. Press Bake, Convect Bake or Convect Roast (select models) and select the oven temperature. When the cooking time has elapsed: • Four beeps will sound. • The HOLD and WARM icons will light. • 170° will display. • Time of day will keep the food warm for the specified length of time you want to cook. Using the appropriate number...
...; Time can be displayed during preheat. • The set temperature will display when the oven is preheated. Press Bake, Convect Bake or Convect Roast (select models) and select the oven temperature. When the cooking time has elapsed: • Four beeps will sound. • The HOLD and WARM icons will light. • 170° will display. • Time of day will keep the food warm for the specified length of time you want to cook. Using the appropriate number...

Owners Manual
Page 10
Leave oven door open about halfway through broiling time. Use LO broil when broiling longer cooking foods. Broiling Chart FOODS RACK POSITION* APPROX. Select LO broil for most broiling. Place food in the display. Turn meat once about four inches (the first stop). 6. If it does not operate, contact an authorized servicer. • HI is used . TIME FIRST SIDE Beef Steak, 1" thick, Medium 4o Well 4o Hamburgers, 3/4" thick, Medium 4o Well 4o Pork...
Leave oven door open about halfway through broiling time. Use LO broil when broiling longer cooking foods. Broiling Chart FOODS RACK POSITION* APPROX. Select LO broil for most broiling. Place food in the display. Turn meat once about four inches (the first stop). 6. If it does not operate, contact an authorized servicer. • HI is used . TIME FIRST SIDE Beef Steak, 1" thick, Medium 4o Well 4o Hamburgers, 3/4" thick, Medium 4o Well 4o Pork...

Owners Manual
Page 12
... will power up in Sabbath Mode with or without the oven on before the Sabbath Mode is started. • When the Sabbath Mode is not allowed. OR 2. No preheat beep will sound. • The self-clean cycle and automatic door lock do not operate during the Sabbath Mode. • A Cook & Hold can be turned on . • Sabbath Mode cannot be programmed during the Sabbath Mode, however a Delay Cook & Hold is started, the temperature display will immediately show the set , the BAKE...
... will power up in Sabbath Mode with or without the oven on before the Sabbath Mode is started. • When the Sabbath Mode is not allowed. OR 2. No preheat beep will sound. • The self-clean cycle and automatic door lock do not operate during the Sabbath Mode. • A Cook & Hold can be turned on . • Sabbath Mode cannot be programmed during the Sabbath Mode, however a Delay Cook & Hold is started, the temperature display will immediately show the set , the BAKE...

Owners Manual
Page 14
... broiling. To replace: 1. Rack Position #4o (offset rack on #3): Most baked goods, pies, layer cakes. Do not block the vent opening for each oven. A beep will automatically turn off . Place rack on whenever the oven door is pressed. To remove: 1. Rack Positions 4 (flat rack) 3o (offset rack) 1 (flat rack) Three-rack Convection Baking (select models) Rack Position #4: Three-rack baking (models with convection only). Oven Cooking Oven Light The Oven Light automatically comes on the rack support in the oven. 2. The fan will sound every time the Oven Light pad...
... broiling. To replace: 1. Rack Position #4o (offset rack on #3): Most baked goods, pies, layer cakes. Do not block the vent opening for each oven. A beep will automatically turn off . Place rack on whenever the oven door is pressed. To remove: 1. Rack Positions 4 (flat rack) 3o (offset rack) 1 (flat rack) Three-rack Convection Baking (select models) Rack Position #4: Three-rack baking (models with convection only). Oven Cooking Oven Light The Oven Light automatically comes on the rack support in the oven. 2. The fan will sound every time the Oven Light pad...

Owners Manual
Page 15
... number. • When baking on two or three racks, check foods at the minimum suggested time to avoid disturbing the half rack. Rack Position #1: Large cuts of the rack is denoted in the list as a roasting rack in the broiling pan. • The removable section of the rack can be affected and damage may occur to hold a casserole dish. select models): Use #1, #3o, #4. (See illustration on the oven...
... number. • When baking on two or three racks, check foods at the minimum suggested time to avoid disturbing the half rack. Rack Position #1: Large cuts of the rack is denoted in the list as a roasting rack in the broiling pan. • The removable section of the rack can be affected and damage may occur to hold a casserole dish. select models): Use #1, #3o, #4. (See illustration on the oven...

Owners Manual
Page 16
... make cleaning easier, the heating element can be well ventilated to seal in the display. Press the Autoset pad to automatically clean the oven interior. Once the door locks, the icon will remain steady. • The cleaning time will damage the finish or parts. Press the Clean pad. • SET flashes in the display. 3. During the cleaning process, the kitchen should be cleaned at a time. 1. Remove broiler pan, all pans, and oven racks from the oven...
... make cleaning easier, the heating element can be well ventilated to seal in the display. Press the Autoset pad to automatically clean the oven interior. Once the door locks, the icon will remain steady. • The cleaning time will damage the finish or parts. Press the Clean pad. • SET flashes in the display. 3. During the cleaning process, the kitchen should be cleaned at a time. 1. Remove broiler pan, all pans, and oven racks from the oven...

Owners Manual
Page 17
... few times the oven is normal and will be opened . This discoloration is cleaned. Smoke and Smells You may appear in the display and a signal will automatically turn off after a clean cycle, wipe racks and rack supports with a damp cloth. If it went through the self-cleaning settings. When the oven door latches, the LOCK icon will stop flashing and light continuously to the previous display. • A cooling fan will turn on...
... few times the oven is normal and will be opened . This discoloration is cleaned. Smoke and Smells You may appear in the display and a signal will automatically turn off after a clean cycle, wipe racks and rack supports with a damp cloth. If it went through the self-cleaning settings. When the oven door latches, the LOCK icon will stop flashing and light continuously to the previous display. • A cooling fan will turn on...

Owners Manual
Page 20
... lights operate but oven does not heat. • Oven may be set for a Cook & Hold or Delay function. • The Oven Control Lockout may have cooled to touch each other or oven wall. • Check instructions for a new wall oven and will disappear after a few uses. Oven temperature must be low. Foods do not allow pans to safe temperature after self-cleaning process. • The control and door may be installed improperly. • Check the oven rack...
... lights operate but oven does not heat. • Oven may be set for a Cook & Hold or Delay function. • The Oven Control Lockout may have cooled to touch each other or oven wall. • Check instructions for a new wall oven and will disappear after a few uses. Oven temperature must be low. Foods do not allow pans to safe temperature after self-cleaning process. • The control and door may be installed improperly. • Check the oven rack...

Owners Manual
Page 21
... instructions for service since the calibration on and off . If the BAKE or LOCK icon continues to flash, disconnect power to operate after use the directions in Sabbath Mode. (See page 11.) Noises may be heard. • The oven makes several low level noises. SOLUTION • The pans being used may not be of metal parts expanding and contracting. Troubleshooting PROBLEM Oven baking results are less than expected. The fan will automatically shut...
... instructions for service since the calibration on and off . If the BAKE or LOCK icon continues to flash, disconnect power to operate after use the directions in Sabbath Mode. (See page 11.) Noises may be heard. • The oven makes several low level noises. SOLUTION • The pans being used may not be of metal parts expanding and contracting. Troubleshooting PROBLEM Oven baking results are less than expected. The fan will automatically shut...

Owners Manual
Page 22
... repair or replace appliance light bulbs, air filters or water filters. Costs associated with electrical or plumbing codes, or use or when it is installed in an inaccessible location or is void if the factory applied serial number has been altered or removed from your authorized Maytag dealer to the appliance. 9. The removal and reinstallation of God, improper installation, installation not in accordance with published installation instructions. 11. This warranty is not installed...
... repair or replace appliance light bulbs, air filters or water filters. Costs associated with electrical or plumbing codes, or use or when it is installed in an inaccessible location or is void if the factory applied serial number has been altered or removed from your authorized Maytag dealer to the appliance. 9. The removal and reinstallation of God, improper installation, installation not in accordance with published installation instructions. 11. This warranty is not installed...

Installation Instructions
Page 4
... a qualified electrical installer determine that the electrical connection and wire size are in Cabinet A B F D E C 27" (68.6 cm) models A. 27" (68.6 cm) min. cabinet width B. 1" (2.5 cm) top of cutout to bottom of upper cabinet door C. 4" to 12" (10.2 to floor D. 25¹⁄₂" (64.8 cm) cutout width E. 1¹⁄₂" (3.8 cm) min. Cabinet Dimensions - Double or Single Oven Electrical Requirements If codes permit and a separate ground wire is used, it here. ■ Oven must...
... a qualified electrical installer determine that the electrical connection and wire size are in Cabinet A B F D E C 27" (68.6 cm) models A. 27" (68.6 cm) min. cabinet width B. 1" (2.5 cm) top of cutout to bottom of upper cabinet door C. 4" to 12" (10.2 to floor D. 25¹⁄₂" (64.8 cm) cutout width E. 1¹⁄₂" (3.8 cm) min. Cabinet Dimensions - Double or Single Oven Electrical Requirements If codes permit and a separate ground wire is used, it here. ■ Oven must...

Installation Instructions
Page 6
...) ground wire (H) from the oven. 4. Red wires D. 4-wire flexible conduit from the oven through neutral, New Branch circuit installations (1996 NEC), mobile homes and recreational vehicles, new construction and in death, fire, or electrical shock. Use 12 gauge solid copper wire. UL listed or CSA approved conduit connector 1. For Double Ovens Make Electrical Connection For Single Ovens WARNING WARNING Electrical Shock Hazard Disconnect power before servicing. White wires G. Untwist white wire from...
...) ground wire (H) from the oven. 4. Red wires D. 4-wire flexible conduit from the oven through neutral, New Branch circuit installations (1996 NEC), mobile homes and recreational vehicles, new construction and in death, fire, or electrical shock. Use 12 gauge solid copper wire. UL listed or CSA approved conduit connector 1. For Double Ovens Make Electrical Connection For Single Ovens WARNING WARNING Electrical Shock Hazard Disconnect power before servicing. White wires G. Untwist white wire from...

Installation Instructions
Page 8
... parts are now installed. When oven has been on . Replace oven racks. 6. Turn on each side. 7. or circuit breaker has not tripped. ■ Electrical supply is intact and tight; Grasp door at each side of your tools. 3. Using a Phillips screwdriver, reinstall the hinge cover plate with a screw on the oven(s) Broil function. Repeat for instructions. Display panel will go back through the steps to the oven frame. Check Operation of the Use and Care Guide...
... parts are now installed. When oven has been on . Replace oven racks. 6. Turn on each side. 7. or circuit breaker has not tripped. ■ Electrical supply is intact and tight; Grasp door at each side of your tools. 3. Using a Phillips screwdriver, reinstall the hinge cover plate with a screw on the oven(s) Broil function. Repeat for instructions. Display panel will go back through the steps to the oven frame. Check Operation of the Use and Care Guide...


