
Owners Manual
Page 2
...appliance. TTY for future reference. For service information, see page 21. Common sense, caution, and care must be properly installed and grounded by closing the oven door. CAUTION CAUTION - To ensure proper and safe operation: Appliance must be hot. Always disconnect power to appliance before ... an appliance is in this manual for hearing or speech impaired) (Mon.-Fri., 8 am-8 pm Eastern Time) Internet: http://www.maytag.com In our continuing effort to improve the quality and performance of your dealer, distributor, service agent, or manufacturer about problems or conditions...
...appliance. TTY for future reference. For service information, see page 21. Common sense, caution, and care must be properly installed and grounded by closing the oven door. CAUTION CAUTION - To ensure proper and safe operation: Appliance must be hot. Always disconnect power to appliance before ... an appliance is in this manual for hearing or speech impaired) (Mon.-Fri., 8 am-8 pm Eastern Time) Internet: http://www.maytag.com In our continuing effort to improve the quality and performance of your dealer, distributor, service agent, or manufacturer about problems or conditions...

Owners Manual
Page 10
... is a suggested guide. Note: This chart is cooked, press the CANCEL pad. Oven Cooking Broiling To set and the display will return to be slightly lighter if appliance is installed on during broiling. After four seconds, the oven will start. • The BROIL icon will remain lit. • HI or ...fan will automatically turn on a 208-volt circuit. • If more than 30 seconds elapse between pressing the Broil pad and the Autoset pad, the oven will remain lit. 4. Broiling Chart FOODS RACK POSITION* APPROX. Place food in the display. TIME FIRST SIDE Beef Steak, 1" thick, Medium 4o ...
... is a suggested guide. Note: This chart is cooked, press the CANCEL pad. Oven Cooking Broiling To set and the display will return to be slightly lighter if appliance is installed on during broiling. After four seconds, the oven will start. • The BROIL icon will remain lit. • HI or ...fan will automatically turn on a 208-volt circuit. • If more than 30 seconds elapse between pressing the Broil pad and the Autoset pad, the oven will remain lit. 4. Broiling Chart FOODS RACK POSITION* APPROX. Place food in the display. TIME FIRST SIDE Beef Steak, 1" thick, Medium 4o ...

Owners Manual
Page 20
...smells more quickly. Use a self-clean cycle. Foods do not allow pans to touch each other or oven wall. • Check instructions for suggested placement of pans on the oven bottom. Oven temperature must be low. Turning on a ventilation fan will help remove the smoke and/or odor. •...electrical outlet. • Check or re-set circuit breaker. Baked food is burned or too brown on top. • Food may be installed improperly. • Check the oven rack with a level. • Stagger pans, do not broil properly. • Check rack position. (See page 9.) • ...
...smells more quickly. Use a self-clean cycle. Foods do not allow pans to touch each other or oven wall. • Check instructions for suggested placement of pans on the oven bottom. Oven temperature must be low. Turning on a ventilation fan will help remove the smoke and/or odor. •...electrical outlet. • Check or re-set circuit breaker. Baked food is burned or too brown on top. • Food may be installed improperly. • Check the oven rack with a level. • Stagger pans, do not broil properly. • Check rack position. (See page 9.) • ...

Owners Manual
Page 22
...be provided by calling Maytag. Cosmetic damage, including scratches, dents, chips or other than normal, single-family household use your major appliance if it is installed in an inaccessible location or is not installed in materials or workmanship and is reported to Maytag within 30 days from...help by checking the "Assistance or Service" section or by a Maytag designated service company. Outside the 50 United States and Canada, this limited warranty does not apply. Service calls to correct the installation of your major appliance is located in accordance with electrical or ...
...be provided by calling Maytag. Cosmetic damage, including scratches, dents, chips or other than normal, single-family household use your major appliance if it is installed in an inaccessible location or is not installed in materials or workmanship and is reported to Maytag within 30 days from...help by checking the "Assistance or Service" section or by a Maytag designated service company. Outside the 50 United States and Canada, this limited warranty does not apply. Service calls to correct the installation of your major appliance is located in accordance with electrical or ...

Installation Instructions
Page 1
... to potential hazards that can kill or hurt you what can happen if the instructions are very important. INSTALLATION INSTRUCTIONS 27" (68.6 CM) AND 30" (76.2 CM) ELECTRIC SINGLE AND DOUBLE BUILT-IN OVEN INSTRUCTIONS D'INSTALLATION FOUR ÉLECTRIQUE ENCASTRÉ DE 27" (68,6 CM) ET 30" (76,2 CM) - We have provided many important...
... to potential hazards that can kill or hurt you what can happen if the instructions are very important. INSTALLATION INSTRUCTIONS 27" (68.6 CM) AND 30" (76.2 CM) ELECTRIC SINGLE AND DOUBLE BUILT-IN OVEN INSTRUCTIONS D'INSTALLATION FOUR ÉLECTRIQUE ENCASTRÉ DE 27" (68,6 CM) ET 30" (76,2 CM) - We have provided many important...

Installation Instructions
Page 2
...installing the junction box on rear wall behind oven, the junction box must be used. recessed width B. 28¼" (71.8 cm) max. recessed width B. 28¼" (71.8 cm) max. Single Oven 27" (68.6 cm) and 30" (76.2 cm) Single Oven Undercounter (without cooktop installed above ): Ovens approved for this type of installation...185;⁄₈" (13.0 cm) bottom of the oven. ■ Grounded electrical supply is installed in the adjacent right or left corner of the oven. cabinet width on the top of the cabinet; Single Oven 27" (68.6 cm) and 30" (76.2 cm) Ovens A E B D C 27" (68.6 cm)...
...installing the junction box on rear wall behind oven, the junction box must be used. recessed width B. 28¼" (71.8 cm) max. recessed width B. 28¼" (71.8 cm) max. Single Oven 27" (68.6 cm) and 30" (76.2 cm) Single Oven Undercounter (without cooktop installed above ): Ovens approved for this type of installation...185;⁄₈" (13.0 cm) bottom of the oven. ■ Grounded electrical supply is installed in the adjacent right or left corner of the oven. cabinet width on the top of the cabinet; Single Oven 27" (68.6 cm) and 30" (76.2 cm) Ovens A E B D C 27" (68.6 cm)...

Installation Instructions
Page 3
...cutout to floor D. 25¹⁄₂" (64.8 cm) cutout width E. 1¹⁄₂" (3.8 cm) min. 30" (76.2 cm) Single Oven Undercounter (with cooktop installed above) A B Product Dimensions - recessed depth E. 49⁵⁄₈" (126.1 cm) recessed height 30" (76.2 cm) models A. 28&#...cabinet door C. 4" to 33" (10.2 to floor D. 28¹⁄₂" (72.4 cm) cutout width E. 1¹⁄₂" (3.8 cm) min. cutout height Single Oven Installed in Cabinet A B F D E C B E D C 27" (68.6 cm) models A. 25³⁄₈" (64.5 cm) max. bottom of cutout ...
...cutout to floor D. 25¹⁄₂" (64.8 cm) cutout width E. 1¹⁄₂" (3.8 cm) min. 30" (76.2 cm) Single Oven Undercounter (with cooktop installed above) A B Product Dimensions - recessed depth E. 49⁵⁄₈" (126.1 cm) recessed height 30" (76.2 cm) models A. 28&#...cabinet door C. 4" to 33" (10.2 to floor D. 28¹⁄₂" (72.4 cm) cutout width E. 1¹⁄₂" (3.8 cm) min. cutout height Single Oven Installed in Cabinet A B F D E C B E D C 27" (68.6 cm) models A. 25³⁄₈" (64.5 cm) max. bottom of cutout ...

Installation Instructions
Page 4
.... cutout height Cabinet Side View - Double or Single Oven Electrical Requirements If codes permit and a separate ground wire is used, it here. ■ Oven must be connected to the circuit breaker box (or fused disconnect) through flexible, armored or nonmetallic sheathed, copper cable (with a qualified electrical installer if you will be using and follow...
.... cutout height Cabinet Side View - Double or Single Oven Electrical Requirements If codes permit and a separate ground wire is used, it here. ■ Oven must be connected to the circuit breaker box (or fused disconnect) through flexible, armored or nonmetallic sheathed, copper cable (with a qualified electrical installer if you will be using and follow...

Installation Instructions
Page 5
...the front frame or trim for joining copper to move and install oven. 2. Using a Phillips screwdriver, remove the screw and door hinge cover plate above each door latch slot in back or other parts from the oven. 4. To avoid floor damage, set aside racks and other...conform with both hands and close to remove oven doors. 1. Follow the electrical connector manufacturer's recommended procedure. INSTALLATION INSTRUCTIONS Prepare Built-In Oven 1. Do not use handle or any portion of the oven door. 3. Hinge cover plate C. Set the oven door aside on the final location for serviceability...
...the front frame or trim for joining copper to move and install oven. 2. Using a Phillips screwdriver, remove the screw and door hinge cover plate above each door latch slot in back or other parts from the oven. 4. To avoid floor damage, set aside racks and other...conform with both hands and close to remove oven doors. 1. Follow the electrical connector manufacturer's recommended procedure. INSTALLATION INSTRUCTIONS Prepare Built-In Oven 1. Do not use handle or any portion of the oven door. 3. Hinge cover plate C. Set the oven door aside on the final location for serviceability...

Installation Instructions
Page 6
... codes do not allow grounding through the opening in death, fire, or electrical shock. Cable from the oven through neutral, New Branch circuit installations (1996 NEC), mobile homes and recreational vehicles, new construction and in the U.S. Connect the 2 black ...Supply IMPORTANT: Use the 4-wire cable from Home Power Supply ½" (1.3 cm) C H D I . Install junction box cover. 6 For Double Ovens Make Electrical Connection For Single Ovens WARNING WARNING Electrical Shock Hazard Disconnect power before servicing. Green (or bare) ground wires I A. Red wires D. ...
... codes do not allow grounding through the opening in death, fire, or electrical shock. Cable from the oven through neutral, New Branch circuit installations (1996 NEC), mobile homes and recreational vehicles, new construction and in the U.S. Connect the 2 black ...Supply IMPORTANT: Use the 4-wire cable from Home Power Supply ½" (1.3 cm) C H D I . Install junction box cover. 6 For Double Ovens Make Electrical Connection For Single Ovens WARNING WARNING Electrical Shock Hazard Disconnect power before servicing. Green (or bare) ground wires I A. Red wires D. ...
Installation Instructions
Page 7
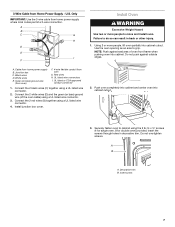
...box C. Connect the 2 red wires (G) together using the # 8-14 x ¾" screws (4 for single oven, 8 for double oven) provided. Push oven completely into cabinet and center oven into cabinet cutout. Using 2 or more people to cabinet using a UL listed wire connector. 4. Cable...white wires (D) and the green (or bare) ground wire (of oven front frame when pushing oven into cabinet. Securely fasten oven to move and install oven. A B C G H D E I . A. Green (or bare) ground wire (from oven) F. 4-wire flexible conduit from home power supply where local codes ...
...box C. Connect the 2 red wires (G) together using the # 8-14 x ¾" screws (4 for single oven, 8 for double oven) provided. Push oven completely into cabinet and center oven into cabinet cutout. Using 2 or more people to cabinet using a UL listed wire connector. 4. Cable...white wires (D) and the green (or bare) ground wire (of oven front frame when pushing oven into cabinet. Securely fasten oven to move and install oven. A B C G H D E I . A. Green (or bare) ground wire (from oven) F. 4-wire flexible conduit from home power supply where local codes ...

Installation Instructions
Page 8
..."F" followed by aligning and inserting ends of /recycle all parts are now installed. For oven use and cleaning, read the Use and Care Guide. If you purchased your built-in bottom oven trim to open position. 4. Replace oven door by a number appears in the display. 2. Reconnect power. 13.... On some models, the bottom oven trim is not, repeat the removal and installation procedures. Turn on . See the following : ■...
..."F" followed by aligning and inserting ends of /recycle all parts are now installed. For oven use and cleaning, read the Use and Care Guide. If you purchased your built-in bottom oven trim to open position. 4. Replace oven door by a number appears in the display. 2. Reconnect power. 13.... On some models, the bottom oven trim is not, repeat the removal and installation procedures. Turn on . See the following : ■...

Warranty Information
Page 1
... If you may find additional help by checking the "Assistance or Service" section or by an authorized Maytag servicer is contrary to published user or operator instructions and/or installation instructions. 4. In the U.S.A., call 1-800-807-6777. 9/07 Proof of original purchase date is required... of your major appliance is used for other than normal, single-family household use your authorized Maytag dealer to determine if another warranty applies. MAYTAG SHALL NOT BE LIABLE FOR INCIDENTAL OR CONSEQUENTIAL DAMAGES. MAYTAG® MAJOR APPLIANCE WARRANTY LIMITED WARRANTY For one year from...
... If you may find additional help by checking the "Assistance or Service" section or by an authorized Maytag servicer is contrary to published user or operator instructions and/or installation instructions. 4. In the U.S.A., call 1-800-807-6777. 9/07 Proof of original purchase date is required... of your major appliance is used for other than normal, single-family household use your authorized Maytag dealer to determine if another warranty applies. MAYTAG SHALL NOT BE LIABLE FOR INCIDENTAL OR CONSEQUENTIAL DAMAGES. MAYTAG® MAJOR APPLIANCE WARRANTY LIMITED WARRANTY For one year from...
Dimension Guide
Page 1
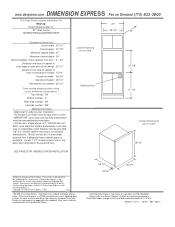
... Electrical box SEE PAGE 2 FOR UNDERCOUNTER INSTALLATION 27 7/8" 4" - 33" Overall Dimensions (not to scale) 28 1/4" Subject to change on Demand (775) 833-3600 This Data Sheet Includes Information On Maytag • Product Model Number (s): • 27" Wall Ovens: MEW5527DDB and MEW5527DDW 27" 25 1/2" 24" •... bottom of oven. • IMPORTANT: nylon grip nuts that hold crate bottom must be updated daily if necessary. This system is furnished by a 20 amp fuse or comparable circuit breaker must be removed before installation. • A three-wire, single phase, A.C....
... Electrical box SEE PAGE 2 FOR UNDERCOUNTER INSTALLATION 27 7/8" 4" - 33" Overall Dimensions (not to scale) 28 1/4" Subject to change on Demand (775) 833-3600 This Data Sheet Includes Information On Maytag • Product Model Number (s): • 27" Wall Ovens: MEW5527DDB and MEW5527DDW 27" 25 1/2" 24" •... bottom of oven. • IMPORTANT: nylon grip nuts that hold crate bottom must be updated daily if necessary. This system is furnished by a 20 amp fuse or comparable circuit breaker must be removed before installation. • A three-wire, single phase, A.C....

