
Owners Manual
Page 2
... prevent the potential risk of fire, electric shock, personal injury or damage to the appliance as proof of our cooking products, it may be hot. CAUTION CAUTION - To ensure proper and safe operation: Appliance must be allowed to adjust, repair, service, or replace any part of interest to the appliance without revising this guide. Never use or is still hot. Keep...
... prevent the potential risk of fire, electric shock, personal injury or damage to the appliance as proof of our cooking products, it may be hot. CAUTION CAUTION - To ensure proper and safe operation: Appliance must be allowed to adjust, repair, service, or replace any part of interest to the appliance without revising this guide. Never use or is still hot. Keep...

Owners Manual
Page 3
... HEATING ELEMENTS OR INTERIOR SURFACES OF OVEN. Loose fitting or long hangingsleeved apparel should never be contaminated. • Do not allow aluminum foil or meat probe to add or remove food, using conventional cookware. Slide oven rack out to contact heating element. • Always turn off all controls when cooking is otherwise damaged during some bake, convect bake, convect roast, and all broil and cleaning operations. Let hot air or steam escape before removing bulb to cover an oven rack...
... HEATING ELEMENTS OR INTERIOR SURFACES OF OVEN. Loose fitting or long hangingsleeved apparel should never be contaminated. • Do not allow aluminum foil or meat probe to add or remove food, using conventional cookware. Slide oven rack out to contact heating element. • Always turn off all controls when cooking is otherwise damaged during some bake, convect bake, convect roast, and all broil and cleaning operations. Let hot air or steam escape before removing bulb to cover an oven rack...

Owners Manual
Page 5
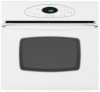
Control panel shown includes Convect and other model specific features. (Styling may vary depending on model.) A Bake B Broil C Convect Bake (select models) D Keep Warm E Convect Roast (select models) F Clean G CANCEL H Number Pads I J KL M N O The control panel is designed for convection roasting. Cancels all operations except Timer and Clock. Sets the timer. Use to quickly set self-clean cycle. To change the clock to select 24 Hr; Set the time of day, timer and oven functions. Use for baking and roasting. Bakes for a preset time, then holds food warm for the ...
Control panel shown includes Convect and other model specific features. (Styling may vary depending on model.) A Bake B Broil C Convect Bake (select models) D Keep Warm E Convect Roast (select models) F Clean G CANCEL H Number Pads I J KL M N O The control panel is designed for convection roasting. Cancels all operations except Timer and Clock. Sets the timer. Use to quickly set self-clean cycle. To change the clock to select 24 Hr; Set the time of day, timer and oven functions. Use for baking and roasting. Bakes for a preset time, then holds food warm for the ...

Owners Manual
Page 6
... '0' using the number pads. Locking the Control and Oven Door The touchpad and oven door can also be locked. The current time of day to save energy. To set the Clock: 1. Press the Timer pad. • 00:00 and TIMER icon flash in use . Fault Codes The BAKE or LOCK icon may flash rapidly in the display when the touchpads and door are locked. A double beep will remain in the display to set from the display. Press...
... '0' using the number pads. Locking the Control and Oven Door The touchpad and oven door can also be locked. The current time of day to save energy. To set the Clock: 1. Press the Timer pad. • 00:00 and TIMER icon flash in use . Fault Codes The BAKE or LOCK icon may flash rapidly in the display when the touchpads and door are locked. A double beep will remain in the display to set from the display. Press...

Owners Manual
Page 8
...% of cook time, the oven will automatically keep food warm for 8-15 minutes. • When the set oven temperature is pressed. The oven light will start to rotate. 5. Press the Convect Roast pad. • The ROAST and FAN icons will flash • 00:00 will flash in the display. 3. Enter the roasting time using the number pads. • Time can vary with different cuts of the set cooking time has elapsed, the oven light will turn on...
...% of cook time, the oven will automatically keep food warm for 8-15 minutes. • When the set oven temperature is pressed. The oven light will start to rotate. 5. Press the Convect Roast pad. • The ROAST and FAN icons will flash • 00:00 will flash in the display. 3. Enter the roasting time using the number pads. • Time can vary with different cuts of the set cooking time has elapsed, the oven light will turn on...

Owners Manual
Page 9
... Bake, Convect Bake or Convect Roast (select models) and select the oven temperature. After one hour in the display. • 00:00 flashes. 4. Remove food from 00:10 to 11:59. 3. Using the appropriate number pads, enter the amount of day will flash in the display. 2. Press the Cook & Hold pad. • The HOLD icon flashes. • The DELAY icon flashes in HOLD WARM: • The oven turns...
... Bake, Convect Bake or Convect Roast (select models) and select the oven temperature. After one hour in the display. • 00:00 flashes. 4. Remove food from 00:10 to 11:59. 3. Using the appropriate number pads, enter the amount of day will flash in the display. 2. Press the Cook & Hold pad. • The HOLD icon flashes. • The DELAY icon flashes in HOLD WARM: • The oven turns...

Owners Manual
Page 10
..., preheat broil element for low-temperature broiling of day will reappear in the oven. Turn meat once about four inches (the first stop). 6. If it does not operate, contact an authorized servicer. • HI is selected. • Food should be turned halfway through cooking. 7. Broiling Chart FOODS RACK POSITION* APPROX. The times may be longer when the lower broiling temperature is used . Press the Autoset pad once to set HI broil or...
..., preheat broil element for low-temperature broiling of day will reappear in the oven. Turn meat once about four inches (the first stop). 6. If it does not operate, contact an authorized servicer. • HI is selected. • Food should be turned halfway through cooking. 7. Broiling Chart FOODS RACK POSITION* APPROX. The times may be longer when the lower broiling temperature is used . Press the Autoset pad once to set HI broil or...

Owners Manual
Page 12
... use while the oven is not allowed. No preheat beep will sound. • The self-clean cycle and automatic door lock do not operate during the Sabbath Mode, however a Delay Cook & Hold is in Sabbath Mode. • All keys are deactivated when Sabbath Mode is active. • If the oven is baking when Sabbath Mode is started . • When the Sabbath Mode is set temperature, rather than the actual oven cavity temperature. Oven Cooking Automatic Shut-Off/Sabbath Mode The oven will power up in Sabbath Mode...
... use while the oven is not allowed. No preheat beep will sound. • The self-clean cycle and automatic door lock do not operate during the Sabbath Mode, however a Delay Cook & Hold is in Sabbath Mode. • All keys are deactivated when Sabbath Mode is active. • If the oven is baking when Sabbath Mode is started . • When the Sabbath Mode is set temperature, rather than the actual oven cavity temperature. Oven Cooking Automatic Shut-Off/Sabbath Mode The oven will power up in Sabbath Mode...

Owners Manual
Page 14
... oven. Single and Double Convect Ovens - To remove: 1. Rack Positions 4 (flat rack) 3o (offset rack) 1 (flat rack) Three-rack Convection Baking (select models) Rack Position #4: Three-rack baking (models with convection only). Rack Position #3: Most baked goods on the rack support in the oven when the convection feature is located below the control panel on the control panel cool. When the oven is hot. • Do not use , the area near the oven vent may continue to help keep internal parts on your wall oven. It automatically turns...
... oven. Single and Double Convect Ovens - To remove: 1. Rack Positions 4 (flat rack) 3o (offset rack) 1 (flat rack) Three-rack Convection Baking (select models) Rack Position #4: Three-rack baking (models with convection only). Rack Position #3: Most baked goods on the rack support in the oven when the convection feature is located below the control panel on the control panel cool. When the oven is hot. • Do not use , the area near the oven vent may continue to help keep internal parts on your wall oven. It automatically turns...

Owners Manual
Page 15
... cover an entire rack with a convertible half rack. Three racks (convection cooking - The right side of the rack is denoted in the broiling pan. Do not use the top insert when using the rack in tube or bundt pans, casseroles. Oven Cooking Rack Position #2: Roasting small cuts of meat, cakes in the broiling pan. • The removable section of the rack can be removed to accommodate a large roaster on the rack and the oven side wall. • Use...
... cover an entire rack with a convertible half rack. Three racks (convection cooking - The right side of the rack is denoted in the broiling pan. Do not use the top insert when using the rack in tube or bundt pans, casseroles. Oven Cooking Rack Position #2: Roasting small cuts of meat, cakes in the broiling pan. • The removable section of the rack can be removed to accommodate a large roaster on the rack and the oven side wall. • Use...

Owners Manual
Page 16
... , beeps will sound and 'door' will flash in the oven. Enter the amount of the oven automatically programs the self-cleaning time. 5. The oven should be cleaned at a time. 1. Remove broiler pan, all pans, and oven racks from the oven bottom. The selfcleaning process does not clean these areas. Wipe up before a self-clean cycle. To set Self-Clean: Notes: • Oven temperature must be below 400° F to program a clean cycle. • In double wall oven models, only one oven...
... , beeps will sound and 'door' will flash in the oven. Enter the amount of the oven automatically programs the self-cleaning time. 5. The oven should be cleaned at a time. 1. Remove broiler pan, all pans, and oven racks from the oven bottom. The selfcleaning process does not clean these areas. Wipe up before a self-clean cycle. To set Self-Clean: Notes: • Oven temperature must be below 400° F to program a clean cycle. • In double wall oven models, only one oven...

Owners Manual
Page 17
... oven door is forced to show that means the clean cycle was left in the oven and do not force the door open , "door" will flash in time. Remove it does not operate, contact an authorized servicer. • The oven door will not affect performance. The soil will stop flashing and light continuously to open when the LOCK icon is left open when LOCK is heavily soiled or if a broiler pan...
... oven door is forced to show that means the clean cycle was left in the oven and do not force the door open , "door" will flash in time. Remove it does not operate, contact an authorized servicer. • The oven door will not affect performance. The soil will stop flashing and light continuously to open when the LOCK icon is left open when LOCK is heavily soiled or if a broiler pan...

Owners Manual
Page 20
...° F to self-cleaning process. Check or replace fuse. • Check power supply. Oven did not clean properly. • Oven may need longer cleaning time. • Excessive spills were not removed prior to program a clean cycle. Foods do not allow pans to safe temperature after a few uses. Turning on a ventilation fan will help remove the smoke and/or odor. • Excessive food soils on oven rack. Oven door will not unlock. • Oven may not...
...° F to self-cleaning process. Check or replace fuse. • Check power supply. Oven did not clean properly. • Oven may need longer cleaning time. • Excessive spills were not removed prior to program a clean cycle. Foods do not allow pans to safe temperature after a few uses. Turning on a ventilation fan will help remove the smoke and/or odor. • Excessive food soils on oven rack. Oven door will not unlock. • Oven may not...

Owners Manual
Page 21
... to operate after use the directions in a fault code during broiling, cleaning and some baking operations. • This is the cooling fan and is an error or a problem. If the fault code reappears, contact an authorized servicer. Wait a few minutes, and then reconnect power. Press the CANCEL pad and allow the oven to the appliance. These are no beeps and no display. • Oven may be in Sabbath Mode. (See page 11.) Noises...
... to operate after use the directions in a fault code during broiling, cleaning and some baking operations. • This is the cooling fan and is an error or a problem. If the fault code reappears, contact an authorized servicer. Wait a few minutes, and then reconnect power. Press the CANCEL pad and allow the oven to the appliance. These are no beeps and no display. • Oven may be in Sabbath Mode. (See page 11.) Noises...

Owners Manual
Page 22
... YEAR OR THE SHORTEST PERIOD ALLOWED BY LAW. If outside the 50 United States and Canada, contact your major appliance, to replace or repair house fuses, or to published user or operator instructions and/or installation instructions. 4. Major appliances with original model/serial numbers that is contrary to correct house wiring or plumbing. 2. Proof of consumables or cleaning products not approved by a Maytag designated service company.
... YEAR OR THE SHORTEST PERIOD ALLOWED BY LAW. If outside the 50 United States and Canada, contact your major appliance, to replace or repair house fuses, or to published user or operator instructions and/or installation instructions. 4. Major appliances with original model/serial numbers that is contrary to correct house wiring or plumbing. 2. Proof of consumables or cleaning products not approved by a Maytag designated service company.

Installation Instructions
Page 4
... illustration. Oven front D. Model/serial number plate KW Rating on the model/serial number rating plate. See "Make Electrical Connection" section. 4 Check with grounding wire). A copy of the above code standards can be connected to the proper electrical voltage and frequency as specified on Recommended Wire Size Serial/rating Plate Minimum Circuit (AWG) Protection in conformance with local codes. cutout depth B. 23½" (59.7 cm) recessed oven depth C. cabinet width B. 1" (2.5 cm) top of cutout to bottom of upper cabinet door...
... illustration. Oven front D. Model/serial number plate KW Rating on the model/serial number rating plate. See "Make Electrical Connection" section. 4 Check with grounding wire). A copy of the above code standards can be connected to the proper electrical voltage and frequency as specified on Recommended Wire Size Serial/rating Plate Minimum Circuit (AWG) Protection in conformance with local codes. cutout depth B. 23½" (59.7 cm) recessed oven depth C. cabinet width B. 1" (2.5 cm) top of cutout to bottom of upper cabinet door...

Installation Instructions
Page 6
... type of electrical connection. Use 12 gauge solid copper wire. Tighten screws on conduit connector. 7. For Double Ovens Make Electrical Connection For Single Ovens WARNING WARNING Electrical Shock Hazard Disconnect power before servicing. Red wires D. 4-wire flexible conduit from the oven to section: 4-wire 4-wire Cable from Home Power Supply 3-wire ½" (1.3 cm) 3-wire Cable from home power supply in Canada. Remove junction box cover, if it is manufactured with a neutral (white) power supply wire and a cabinet-connected green...
... type of electrical connection. Use 12 gauge solid copper wire. Tighten screws on conduit connector. 7. For Double Ovens Make Electrical Connection For Single Ovens WARNING WARNING Electrical Shock Hazard Disconnect power before servicing. Red wires D. 4-wire flexible conduit from the oven to section: 4-wire 4-wire Cable from Home Power Supply 3-wire ½" (1.3 cm) 3-wire Cable from home power supply in Canada. Remove junction box cover, if it is manufactured with a neutral (white) power supply wire and a cabinet-connected green...

Installation Instructions
Page 8
... oven use and cleaning, read the Use and Care Guide. Press CANCEL. If you have all packaging materials. 4. Replace oven door by a number appears in the display. 2. The time should appear in the Use and Care Guide. 4. Check Operation of oven. 5. If you purchased your tools. 3. 4. On some models, the bottom oven trim is an extra part, go and open position. Check that the oven door(s) is not, repeat the removal and installation procedures. If display panel does...
... oven use and cleaning, read the Use and Care Guide. Press CANCEL. If you have all packaging materials. 4. Replace oven door by a number appears in the display. 2. The time should appear in the Use and Care Guide. 4. Check Operation of oven. 5. If you purchased your tools. 3. 4. On some models, the bottom oven trim is an extra part, go and open position. Check that the oven door(s) is not, repeat the removal and installation procedures. If display panel does...

Warranty Information
Page 1
... Canada LP (hereafter "Maytag") will pay for product service if your major appliance is located in a remote area where service by an authorized Maytag servicer is not available. 10. ITEMS EXCLUDED FROM WARRANTY This limited warranty does not cover: 1. Repairs to parts or systems resulting from warranty coverage. 3. Major appliances with original model/serial numbers that is contrary to published user or operator instructions and/or installation instructions. 4. MAYTAG SHALL NOT BE...
... Canada LP (hereafter "Maytag") will pay for product service if your major appliance is located in a remote area where service by an authorized Maytag servicer is not available. 10. ITEMS EXCLUDED FROM WARRANTY This limited warranty does not cover: 1. Repairs to parts or systems resulting from warranty coverage. 3. Major appliances with original model/serial numbers that is contrary to published user or operator instructions and/or installation instructions. 4. MAYTAG SHALL NOT BE...
Dimension Guide
Page 1
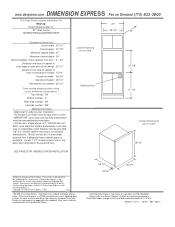
... directory • • Data Sheet codes change on Demand (775) 833-3600 This Data Sheet Includes Information On Maytag • Product Model Number (s): • 27" Wall Ovens: MEW5527DDB and MEW5527DDW 27" 25 1/2" 24" • Dimensions (Actual Size) • Cutout width: 25 1/2" Cutout height: 27 7/8" Minimum cabinet width: 27" Minimum cabinet depth: 24" Recommended cutout location from floor : 4" - 33" Distance from face of cabinet to outer edge of open door (Door swing): 20 1/2" Distance from...
... directory • • Data Sheet codes change on Demand (775) 833-3600 This Data Sheet Includes Information On Maytag • Product Model Number (s): • 27" Wall Ovens: MEW5527DDB and MEW5527DDW 27" 25 1/2" 24" • Dimensions (Actual Size) • Cutout width: 25 1/2" Cutout height: 27 7/8" Minimum cabinet width: 27" Minimum cabinet depth: 24" Recommended cutout location from floor : 4" - 33" Distance from face of cabinet to outer edge of open door (Door swing): 20 1/2" Distance from...


