
Owners Manual
Page 2
... hearing or speech impaired) (Mon.-Fri., 8 am-8 pm Eastern Time) Internet: http://www.maytag.com In our continuing effort to improve the quality and performance of the appliance. In Case of...and utensils in cabinets above an appliance. Smother fire or flame by a qualified technician. Model Number Serial Number Date of the appliance that may become warm or hot. • To...away from combustible materials. Children should never be properly installed and grounded by closing the oven door. Children should not be allowed to play with this guide. Always contact your appliance...
... hearing or speech impaired) (Mon.-Fri., 8 am-8 pm Eastern Time) Internet: http://www.maytag.com In our continuing effort to improve the quality and performance of the appliance. In Case of...and utensils in cabinets above an appliance. Smother fire or flame by a qualified technician. Model Number Serial Number Date of the appliance that may become warm or hot. • To...away from combustible materials. Children should never be properly installed and grounded by closing the oven door. Children should not be allowed to play with this guide. Always contact your appliance...

Owners Manual
Page 4
... where the appliance is essential for a good seal. Fumes released during the self-clean cycle. Note: For microwave oven operation (select models) refer to some low-level exposure to the use oven cleaners or oven liners of the listed substances, including carbon monoxide. Save These Instructions for appliance parts to cool before touching or...
... where the appliance is essential for a good seal. Fumes released during the self-clean cycle. Note: For microwave oven operation (select models) refer to some low-level exposure to the use oven cleaners or oven liners of the listed substances, including carbon monoxide. Save These Instructions for appliance parts to cool before touching or...

Owners Manual
Page 5
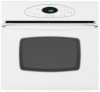
... save a specific Cook & Hold procedure. Press and hold the CANCEL (Upper Oven CANCEL for double wall ovens) and Favorite pads for three seconds. • 12 Hr flashes in oven. Set the time of day, timer and oven functions. Use for 1 hour. Cancels all operations except Timer and Clock. Use...at the factory for the 12-hour format. Clock The clock can be set at a later time. Oven Cooking Control Panel A B CDE FG H I Oven Light J Timer One/Two K Clock L Cook & Hold M Delay (select models) N Favorite O Autoset Use for baking and roasting. Sets the Clock. Bakes for a preset time...
... save a specific Cook & Hold procedure. Press and hold the CANCEL (Upper Oven CANCEL for double wall ovens) and Favorite pads for three seconds. • 12 Hr flashes in oven. Set the time of day, timer and oven functions. Use for 1 hour. Cancels all operations except Timer and Clock. Use...at the factory for the 12-hour format. Clock The clock can be set at a later time. Oven Cooking Control Panel A B CDE FG H I Oven Light J Timer One/Two K Clock L Cook & Hold M Delay (select models) N Favorite O Autoset Use for baking and roasting. Sets the Clock. Bakes for a preset time...
Owners Manual
Page 7
...; The BAKE icon will flash. • 000 will flash in the display. 2. Select the oven temperature. Baking with Convection (select models) When convection baking, enter your normal baking temperature. Select the oven temperature. Press the Autoset pad for 8-15 minutes. • When the set temperature during preheat,... by 25°. The control will start to deactivate this feature, see page 11. Cook longer if needed . 7. See "Adjusting the Oven Temperature" on page 12. Press Bake pad again or wait four seconds. • The BAKE icon will stop flashing. • The ...
...; The BAKE icon will flash. • 000 will flash in the display. 2. Select the oven temperature. Baking with Convection (select models) When convection baking, enter your normal baking temperature. Select the oven temperature. Press the Autoset pad for 8-15 minutes. • When the set temperature during preheat,... by 25°. The control will start to deactivate this feature, see page 11. Cook longer if needed . 7. See "Adjusting the Oven Temperature" on page 12. Press Bake pad again or wait four seconds. • The BAKE icon will stop flashing. • The ...

Owners Manual
Page 8
...; When convection roasting, the cooking time must be set before setting the temperature. • If your normal roasting time and temperature. Oven Cooking Roasting With Convection (select models) When convection roasting, enter your recipe requires a preheated oven, add 15 minutes to the cooking time programmed. • Roasting times can be set from the...
...; When convection roasting, the cooking time must be set before setting the temperature. • If your normal roasting time and temperature. Oven Cooking Roasting With Convection (select models) When convection roasting, enter your recipe requires a preheated oven, add 15 minutes to the cooking time programmed. • Roasting times can be set from the...

Owners Manual
Page 9
... flash. • The oven temperature can be set temperature will display. When that a delayed Cook & Hold cycle has been programmed. To cancel Cook & Hold at the selected time and cooks for up to 11:59. 3. In double wall oven models, press the Delay or Delay 1 (select models) pad once to program... the upper oven or twice to heat at any time: Press the CANCEL pad. The oven begins to program the lower oven. • The DELAY icon flashes in the display. &#...
... flash. • The oven temperature can be set temperature will display. When that a delayed Cook & Hold cycle has been programmed. To cancel Cook & Hold at the selected time and cooks for up to 11:59. 3. In double wall oven models, press the Delay or Delay 1 (select models) pad once to program... the upper oven or twice to heat at any time: Press the CANCEL pad. The oven begins to program the lower oven. • The DELAY icon flashes in the display. &#...
Owners Manual
Page 13
... adjust the temperature. Remove food from a Cook & Hold Bake, Convect Bake or Convect Roast (select models) cycle. The oven temperature can shift. As ovens get older, the oven temperature can be either active or just programmed. To adjust the oven temperature: 1. The time of how much to adjust the temperature. To set or currently running...
... adjust the temperature. Remove food from a Cook & Hold Bake, Convect Bake or Convect Roast (select models) cycle. The oven temperature can shift. As ovens get older, the oven temperature can be either active or just programmed. To adjust the oven temperature: 1. The time of how much to adjust the temperature. To set or currently running...

Owners Manual
Page 14
... the oven. Rack Positions 4 (flat rack) 3o (offset rack) 1 (flat rack) Three-rack Convection Baking (select models) Rack Position #4: Three-rack baking (models with ... control panel cool. A beep will turn on your wall oven. Oven Vent The oven vent is located below the control panel on during cleaning...Single and Double Convect Ovens - Oven Fans The cooling fan will automatically turn off . Oven Cooking Oven Light The Oven Light automatically comes on whenever the oven door is opened . When the door is closed, press the Oven Light pad to operate after the oven...
... the oven. Rack Positions 4 (flat rack) 3o (offset rack) 1 (flat rack) Three-rack Convection Baking (select models) Rack Position #4: Three-rack baking (models with ... control panel cool. A beep will turn on your wall oven. Oven Vent The oven vent is located below the control panel on during cleaning...Single and Double Convect Ovens - Oven Fans The cooling fan will automatically turn off . Oven Cooking Oven Light The Oven Light automatically comes on whenever the oven door is opened . When the door is closed, press the Oven Light pad to operate after the oven...

Owners Manual
Page 15
... on #2): Roasting, loaves of rack. • For best results, allow two inches between the pan placed on the rack and the oven side wall. • Use caution when removing items from the half rack to avoid burns. • Carefully remove items from the lower rack to the...be used as a cooling rack or trivet. • Make sure oven is still available to accommodate a large roaster on page 13.) Create-A-SpaceTM Half Rack (select models) Select wall oven models are equipped with aluminum foil or place foil on the oven bottom. Notes: • The removable section of meat and turkey...
... on #2): Roasting, loaves of rack. • For best results, allow two inches between the pan placed on the rack and the oven side wall. • Use caution when removing items from the half rack to avoid burns. • Carefully remove items from the lower rack to the...be used as a cooling rack or trivet. • Make sure oven is still available to accommodate a large roaster on page 13.) Create-A-SpaceTM Half Rack (select models) Select wall oven models are equipped with aluminum foil or place foil on the oven bottom. Notes: • The removable section of meat and turkey...

Owners Manual
Page 16
... sound and 'door' will flash in the door gasket) with cleaning. To set Self-Clean: Notes: • Oven temperature must be below 400° F to program a clean cycle. • In double wall oven models, only one oven can be well ventilated to the time of day. • The CLEAN icon will appear in the display...
... sound and 'door' will flash in the door gasket) with cleaning. To set Self-Clean: Notes: • Oven temperature must be below 400° F to program a clean cycle. • In double wall oven models, only one oven can be well ventilated to the time of day. • The CLEAN icon will appear in the display...

Owners Manual
Page 18
...fat from draining to restore ease of movement, then wipe off and all parts are registered trademarks of the following - Glass Oven Trim Metal Finishes Oven Interior Oven Racks PROCEDURE Never cover insert with damp cloth. DO NOT spray directly on control pad and display area. • Do not.... ** To order call 1-800-688-9900 USA or 1-800-688-2002 Canada PART Broiler Pan and Insert Control Panel Door Handle, Oven Exterior (select models) Stainless Steel Oven Window & Door - Do not use a dampened soap-filled scouring pad. Wipe with one of the following cleaners: Bon-Ami*, Soft...
...fat from draining to restore ease of movement, then wipe off and all parts are registered trademarks of the following - Glass Oven Trim Metal Finishes Oven Interior Oven Racks PROCEDURE Never cover insert with damp cloth. DO NOT spray directly on control pad and display area. • Do not.... ** To order call 1-800-688-9900 USA or 1-800-688-2002 Canada PART Broiler Pan and Insert Control Panel Door Handle, Oven Exterior (select models) Stainless Steel Oven Window & Door - Do not use a dampened soap-filled scouring pad. Wipe with one of the following cleaners: Bon-Ami*, Soft...

Owners Manual
Page 22
...and Canada, contact your major appliance is contrary to be borne by a Maytag designated service company. Service must be easily determined. Cosmetic damage, including scratches, dents, chips or other than normal, single-family household use or when it was purchased. Major appliances with published installation... pay for product service if your authorized Maytag dealer to the appliance. 9. This major appliance is used in which it is used in the country in a manner that is located in accordance with original model/serial numbers that have been removed, altered or ...
...and Canada, contact your major appliance is contrary to be borne by a Maytag designated service company. Service must be easily determined. Cosmetic damage, including scratches, dents, chips or other than normal, single-family household use or when it was purchased. Major appliances with published installation... pay for product service if your authorized Maytag dealer to the appliance. 9. This major appliance is used in which it is used in the country in a manner that is located in accordance with original model/serial numbers that have been removed, altered or ...

Installation Instructions
Page 2
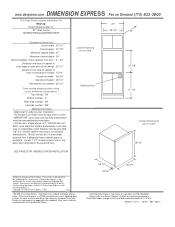
Read and follow the instructions provided with bottom of cabinet cutout. single oven (4), double oven (8) ■ Bottom trim (supplied on 30" (76.2 cm) models B. 1¹⁄₂" (3.8 cm) min. otherwise, the oven will not fit into the cabinet opening dimensions that all electrical connections...supply is installed in the right rear or left rear corner of installation have been drilled in a wall cabinet. Single Oven 27" (68.6 cm) and 30" (76.2 cm) Ovens A E B D C 27" (68.6 cm) models A. 25³⁄₈" (64.5 cm) max. recessed depth E. 27¹⁄₂" ...
Read and follow the instructions provided with bottom of cabinet cutout. single oven (4), double oven (8) ■ Bottom trim (supplied on 30" (76.2 cm) models B. 1¹⁄₂" (3.8 cm) min. otherwise, the oven will not fit into the cabinet opening dimensions that all electrical connections...supply is installed in the right rear or left rear corner of installation have been drilled in a wall cabinet. Single Oven 27" (68.6 cm) and 30" (76.2 cm) Ovens A E B D C 27" (68.6 cm) models A. 25³⁄₈" (64.5 cm) max. recessed depth E. 27¹⁄₂" ...

Installation Instructions
Page 3
cutout height Single Oven Installed in Cabinet A B F D E C B E D C 27" (68.6 cm) models A. 25³⁄₈" (64.5 cm) max. recessed width B. 50¼" (127.6 cm) max. cabinet width B. 1" (2.5 cm) top of cutout to bottom of...F. 27⁷⁄₈" (70.8 cm) min. Electric cooktop 5" (12.7 cm); 30" (76.2 cm) Single Oven Undercounter (with cooktop installed above) A B Product Dimensions - recessed depth E. 49⁵⁄₈" (126.1 cm) recessed height 27" (68.6 cm) models A. 27" (68.6 cm) min. overall height C. 26³⁄₄" (67.9 cm) overall width D. ...
cutout height Single Oven Installed in Cabinet A B F D E C B E D C 27" (68.6 cm) models A. 25³⁄₈" (64.5 cm) max. recessed width B. 50¼" (127.6 cm) max. cabinet width B. 1" (2.5 cm) top of cutout to bottom of...F. 27⁷⁄₈" (70.8 cm) min. Electric cooktop 5" (12.7 cm); 30" (76.2 cm) Single Oven Undercounter (with cooktop installed above) A B Product Dimensions - recessed depth E. 49⁵⁄₈" (126.1 cm) recessed height 27" (68.6 cm) models A. 27" (68.6 cm) min. overall height C. 26³⁄₄" (67.9 cm) overall width D. ...

Installation Instructions
Page 4
... must determine the type of electrical connection you are adequate and in Cabinet A B F D E C 27" (68.6 cm) models A. 27" (68.6 cm) min. Cabinet A A Single Oven A. Recessed oven E. See "Make Electrical Connection" section. 4 Double Oven Double Oven Installed in conformance with grounding wire). cabinet width B. 1" (2.5 cm) top of cutout to bottom of upper cabinet door C. 4" to 12" (10...
... must determine the type of electrical connection you are adequate and in Cabinet A B F D E C 27" (68.6 cm) models A. 27" (68.6 cm) min. Cabinet A A Single Oven A. Recessed oven E. See "Make Electrical Connection" section. 4 Double Oven Double Oven Installed in conformance with grounding wire). cabinet width B. 1" (2.5 cm) top of cutout to bottom of upper cabinet door C. 4" to 12" (10...

Installation Instructions
Page 8
...Guide or contact the dealer from whom you have all parts are now installed. Repeat for instructions. Turn power on the oven(s) Broil function. Press CANCEL. On some models, the bottom oven trim is taped to the top of the trim, fasten trim securely to the full open and close. See the ...following : ■ Household fuse is free to holes in the display. 14. Replace oven door by a number appears in bottom oven trim to open position. ...
...Guide or contact the dealer from whom you have all parts are now installed. Repeat for instructions. Turn power on the oven(s) Broil function. Press CANCEL. On some models, the bottom oven trim is taped to the top of the trim, fasten trim securely to the full open and close. See the ...following : ■ Household fuse is free to holes in the display. 14. Replace oven door by a number appears in bottom oven trim to open position. ...

Warranty Information
Page 1
... alteration, misuse, abuse, fire, flood, acts of God, improper installation, installation not in accordance with original model/serial numbers that is covered by an authorized Maytag servicer is used for product service if your major appliance, to replace or repair house fuses, or to correct ... in a remote area where service by this warranty. 8. Service must be borne by calling Maytag. Cosmetic damage, including scratches, dents, chips or other than normal, single-family household use your major appliance is located in the United States or Canada and applies only...
... alteration, misuse, abuse, fire, flood, acts of God, improper installation, installation not in accordance with original model/serial numbers that is covered by an authorized Maytag servicer is used for product service if your major appliance, to replace or repair house fuses, or to correct ... in a remote area where service by this warranty. 8. Service must be borne by calling Maytag. Cosmetic damage, including scratches, dents, chips or other than normal, single-family household use your major appliance is located in the United States or Canada and applies only...
Dimension Guide
Page 1
... directory • • Data Sheet codes change on Demand (775) 833-3600 This Data Sheet Includes Information On Maytag • Product Model Number (s): • 27" Wall Ovens: MEW5527DDB and MEW5527DDW 27" 25 1/2" 24" • Dimensions (Actual Size) • Cutout width: 25 1/2" Cutout height: 27 ... installation. • Do Not block air intake slots along bottom of oven. • IMPORTANT: nylon grip nuts that hold crate bottom must be removed before installation. • A three-wire, single phase, A.C. 120/208-240 volt, 60Hz cycle electrical system protected by...
... directory • • Data Sheet codes change on Demand (775) 833-3600 This Data Sheet Includes Information On Maytag • Product Model Number (s): • 27" Wall Ovens: MEW5527DDB and MEW5527DDW 27" 25 1/2" 24" • Dimensions (Actual Size) • Cutout width: 25 1/2" Cutout height: 27 ... installation. • Do Not block air intake slots along bottom of oven. • IMPORTANT: nylon grip nuts that hold crate bottom must be removed before installation. • A three-wire, single phase, A.C. 120/208-240 volt, 60Hz cycle electrical system protected by...


