Owners Manual
Page 3
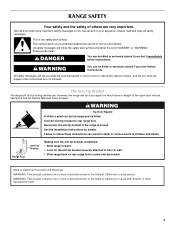
...potential hazards that can happen if the instructions are very important. All safety messages will follow instructions. Reconnect the anti-tip bracket, if the range is the safety alert symbol. State of California Proposition 65 Warnings: WARNING: This product contains one or more chemicals known to the State ... important safety messages in death or serious burns to children and adults. WARNING Tip Over Hazard A child or adult can tip the range and be killed or seriously injured if you don't immediately follow these instructions can tip if you and others are not followed...
...potential hazards that can happen if the instructions are very important. All safety messages will follow instructions. Reconnect the anti-tip bracket, if the range is the safety alert symbol. State of California Proposition 65 Warnings: WARNING: This product contains one or more chemicals known to the State ... important safety messages in death or serious burns to children and adults. WARNING Tip Over Hazard A child or adult can tip the range and be killed or seriously injured if you don't immediately follow these instructions can tip if you and others are not followed...
Owners Manual
Page 4
...heating element. Always place oven racks in Place - Remove broiler pan and other flammable materials contact heating elements or interior surfaces of the range unless specifically recommended in color. Do not repair or replace any part of the oven. ■ Clean Only Parts Listed in the ...Adjacent Surface Units - Other surfaces of these pans or bowls during cooking may cause container to damage. ■ Protective Liners - For self-cleaning ranges - ■ Do Not Clean Door Gasket - The door gasket is hot, do not touch, or let clothing or other utensils. Grease should...
...heating element. Always place oven racks in Place - Remove broiler pan and other flammable materials contact heating elements or interior surfaces of the range unless specifically recommended in color. Do not repair or replace any part of the oven. ■ Clean Only Parts Listed in the ...Adjacent Surface Units - Other surfaces of these pans or bowls during cooking may cause container to damage. ■ Protective Liners - For self-cleaning ranges - ■ Do Not Clean Door Gasket - The door gasket is hot, do not touch, or let clothing or other utensils. Grease should...

Owners Manual
Page 5
... do so can be set anywhere between HI and LO. The locations and appearances of the items listed. Left rear control knob C. REMEMBER: When range is turned off all of the features shown here may become hot. Medium Low Between LO and Med LO (Low) ■ Stew or steam ...control knob B. Use the following chart as any surface element is turned on the control panel. COOKTOP USE This manual covers several different models. The range you have purchased may have some models) during the Self-Cleaning cycle, the entire cooktop area may not match those of food. ■ Home...
... do so can be set anywhere between HI and LO. The locations and appearances of the items listed. Left rear control knob C. REMEMBER: When range is turned off all of the features shown here may become hot. Medium Low Between LO and Med LO (Low) ■ Stew or steam ...control knob B. Use the following chart as any surface element is turned on the control panel. COOKTOP USE This manual covers several different models. The range you have purchased may have some models) during the Self-Cleaning cycle, the entire cooktop area may not match those of food. ■ Home...

Owners Manual
Page 9
Options settings D. Lower oven cancel Display When power is not in the "Settings" section to the range or if a power failure occurs, "12:00" will not come on during the Self-Clean cycle. See "Clock" in use, the display shows the time ...
Options settings D. Lower oven cancel Display When power is not in the "Settings" section to the range or if a power failure occurs, "12:00" will not come on during the Self-Clean cycle. See "Clock" in use, the display shows the time ...
Owners Manual
Page 19
... kitchen well-ventilated during the Self-Cleaning cycle. Press the button for any loose soil to help get hot enough during the Self-Cleaning cycle. RANGE CARE Self-Cleaning Cycle (on your model, see "Oven Vent" or "Oven Vents" section. IMPORTANT: The health of day. Depending on some birds is reached...
... kitchen well-ventilated during the Self-Cleaning cycle. Press the button for any loose soil to help get hot enough during the Self-Cleaning cycle. RANGE CARE Self-Cleaning Cycle (on your model, see "Oven Vent" or "Oven Vents" section. IMPORTANT: The health of day. Depending on some birds is reached...
Owners Manual
Page 21
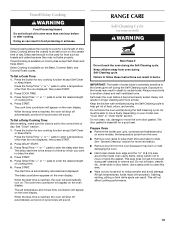
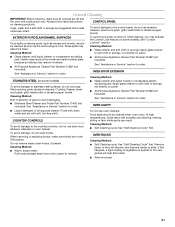
... Service" section to order. EXTERIOR PORCELAIN ENAMEL SURFACES Food spills containing acids, such as vinegar and tomato, should be cleaned as soon as the entire range is cool. Do not use steel wool, abrasive cleansers or oven cleaner. Cleaning Method: To avoid turning the controls on panel. ■ Glass cleaner, mild...
... Service" section to order. EXTERIOR PORCELAIN ENAMEL SURFACES Food spills containing acids, such as vinegar and tomato, should be cleaned as soon as the entire range is cool. Do not use steel wool, abrasive cleansers or oven cleaner. Cleaning Method: To avoid turning the controls on panel. ■ Glass cleaner, mild...
Owners Manual
Page 22
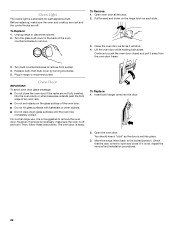
...the door. 2. You should hear a "click" as it away from socket. 4. Check that the door is set objects on each side. 3. For normal range use, it is not, repeat the removal and installation procedures. 22 Move the hinge levers back to the locked position. To Replace: 1. To Replace: 1....The ovens light is not suggested to remove the oven door. Before replacing, make sure the oven is heavy. Unplug range or disconnect power. 2. Turn the glass bulb cover in range or reconnect power. To Remove: 1. Open oven door all the way. 2. Pull forward and down glass surfaces ...
...the door. 2. You should hear a "click" as it away from socket. 4. Check that the door is set objects on each side. 3. For normal range use, it is not, repeat the removal and installation procedures. 22 Move the hinge levers back to the locked position. To Replace: 1. To Replace: 1....The ovens light is not suggested to remove the oven door. Before replacing, make sure the oven is heavy. Unplug range or disconnect power. 2. Turn the glass bulb cover in range or reconnect power. To Remove: 1. Open oven door all the way. 2. Pull forward and down glass surfaces ...

Owners Manual
Page 23
...-Cleaning Cycle" section. See "Control Lockout" section. Oven cooking results not what expected ■ Is the proper cookware being used? Level the range. See "Positioning Racks and Bakeware" section. ■ Is there proper air circulation around cookware on your model, press OFF/CANCEL, OFF or...does the cooling fan run when the oven is in a reliable cookbook. ■ Is the proper oven temperature calibration set correctly? Level the range. It is normal for service. See the Installation Instructions. ■ Is the proper temperature set to a setting. ■ Is the Cooktop ...
...-Cleaning Cycle" section. See "Control Lockout" section. Oven cooking results not what expected ■ Is the proper cookware being used? Level the range. See "Positioning Racks and Bakeware" section. ■ Is there proper air circulation around cookware on your model, press OFF/CANCEL, OFF or...does the cooling fan run when the oven is in a reliable cookbook. ■ Is the proper oven temperature calibration set correctly? Level the range. It is normal for service. See the Installation Instructions. ■ Is the proper temperature set to a setting. ■ Is the Cooktop ...

Owners Manual
Page 25
...resulting from accident, alteration, misuse, abuse, fire, flood, acts of God, improper installation, installation not in accordance with the product, Maytag will pay for factory specified parts for factory specified replacement parts and repair labor to determine if another warranty applies. Any food loss due ... REPAIR AS PROVIDED HEREIN. If you think you are excluded from unauthorized modifications made to Maytag within 30 days from the date of the Use & Care Guide. MAYTAG® ELECTRIC RANGE LIMITED WARRANTY FIRST YEAR LIMITED WARRANTY (PARTS AND LABOR) For one year from the date...
...resulting from accident, alteration, misuse, abuse, fire, flood, acts of God, improper installation, installation not in accordance with the product, Maytag will pay for factory specified parts for factory specified replacement parts and repair labor to determine if another warranty applies. Any food loss due ... REPAIR AS PROVIDED HEREIN. If you think you are excluded from unauthorized modifications made to Maytag within 30 days from the date of the Use & Care Guide. MAYTAG® ELECTRIC RANGE LIMITED WARRANTY FIRST YEAR LIMITED WARRANTY (PARTS AND LABOR) For one year from the date...

Installation Instructions
Page 1
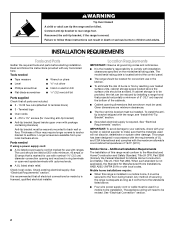
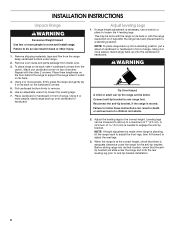
... mean: DANGER You can be killed or seriously injured if you and others are not followed. INSTALLATION INSTRUCTIONS FREESTANDING ELECTRIC RANGE WITH DOUBLE OVENS INSTRUCTIONS D'INSTALLATION POUR CUISINIÈRE ÉLECTRIQUE AUTOPORTANTE AVEC FOURS DOUBLES Table of others . Canada Only 5 INSTALLATION... of injury, and tell you don't immediately follow instructions. U.S.A. Only 8 Verify Anti-Tip Bracket Location 13 Level Range 13 Complete Installation 13 Moving the Range 14 Table des matières SÉCURITÉ DE LA CUISINIÈRE 16 EXIGENCES D'INSTALLATION 17 Outils...
... mean: DANGER You can be killed or seriously injured if you and others are not followed. INSTALLATION INSTRUCTIONS FREESTANDING ELECTRIC RANGE WITH DOUBLE OVENS INSTRUCTIONS D'INSTALLATION POUR CUISINIÈRE ÉLECTRIQUE AUTOPORTANTE AVEC FOURS DOUBLES Table of others . Canada Only 5 INSTALLATION... of injury, and tell you don't immediately follow instructions. U.S.A. Only 8 Verify Anti-Tip Bracket Location 13 Level Range 13 Complete Installation 13 Moving the Range 14 Table des matières SÉCURITÉ DE LA CUISINIÈRE 16 EXIGENCES D'INSTALLATION 17 Outils...
Installation Instructions
Page 2
...model/serial rating plate. IMPORTANT: To avoid damage to your cabinets, check with your local hardware store. Mobile home installations require: ■ When this range must be secured to terminal block) ■ 3 - See "Electrical Connection" section. 2 Terminal lugs ■ Oven racks ■ 2 -...with package containing literature) Anti-tip bracket must be reduced by a licensed, qualified electrical installer. Thickness of securing the range is recommended that is the installer's responsibility to the Manufactured Home Construction and Safety Standard, Title 24 CFR, Part ...
...model/serial rating plate. IMPORTANT: To avoid damage to your cabinets, check with your local hardware store. Mobile home installations require: ■ When this range must be secured to terminal block) ■ 3 - See "Electrical Connection" section. 2 Terminal lugs ■ Oven racks ■ 2 -...with package containing literature) Anti-tip bracket must be reduced by a licensed, qualified electrical installer. Thickness of securing the range is recommended that is the installer's responsibility to the Manufactured Home Construction and Safety Standard, Title 24 CFR, Part ...
Installation Instructions
Page 3
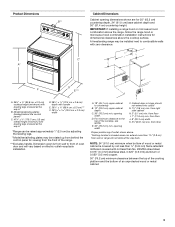
...door or hinge should not extend into cutout* G. 1½" (3.8 cm) min. from right side cabinet H. 2" (5.1 cm) min. A freestanding range may be raised approximately 1" (2.5 cm) by not less than 1½" (3.8 cm) from the front of an unprotected wood or metal cabinet. 3 ...185;⁄₄" (0.64 cm) flame retardant millboard covered with zero clearance. IMPORTANT: If installing a range hood or microwave hood combination above the range, follow the range hood or microwave hood combination installation instructions for dimensional clearances above . *Nothing located in * B. ...
...door or hinge should not extend into cutout* G. 1½" (3.8 cm) min. from right side cabinet H. 2" (5.1 cm) min. A freestanding range may be raised approximately 1" (2.5 cm) by not less than 1½" (3.8 cm) from the front of an unprotected wood or metal cabinet. 3 ...185;⁄₄" (0.64 cm) flame retardant millboard covered with zero clearance. IMPORTANT: If installing a range hood or microwave hood combination above the range, follow the range hood or microwave hood combination installation instructions for dimensional clearances above . *Nothing located in * B. ...

Installation Instructions
Page 4
... that specify use an extension cord. WARNING: Improper connection of the equipment-grounding conductor can be provided at each end of the range inside a clear plastic bag. 3-wire receptacle (10-50R) 4 When a 4-wire receptacle of slack in conformance with local codes.... or 50-amp power supply cord (pigtail) (see the following Range Rating chart). Electrical Requirements - U.S.A. Check with a qualified electrician or service technician if you will not fit the outlet, have a proper outlet ...
... that specify use an extension cord. WARNING: Improper connection of the equipment-grounding conductor can be provided at each end of the range inside a clear plastic bag. 3-wire receptacle (10-50R) 4 When a 4-wire receptacle of slack in conformance with local codes.... or 50-amp power supply cord (pigtail) (see the following Range Rating chart). Electrical Requirements - U.S.A. Check with a qualified electrician or service technician if you will not fit the outlet, have a proper outlet ...

Installation Instructions
Page 5
... with a nominal 1³⁄₈" (34.9 mm) diameter connection opening. ■ A time-delay fuse or circuit breaker is recommended. ■ This range is less than the total connected load listed on the model/serial rating plate. **If connecting to do so can be plugged into a standard 14... 50** 50 *The NEC calculated load is equipped with a CSA International Certified Power Cord intended to be obtained from: Canadian Standards Association 178 Rexdale Blvd. Range Rating* 120/240 Volts 8.8 - 16.5 KW 16.6 - 22.5 KW 120/208 Volts 7.8 - 12.5 KW 12.6 - 18.5 KW Specified Rating of ...
... with a nominal 1³⁄₈" (34.9 mm) diameter connection opening. ■ A time-delay fuse or circuit breaker is recommended. ■ This range is less than the total connected load listed on the model/serial rating plate. **If connecting to do so can be plugged into a standard 14... 50** 50 *The NEC calculated load is equipped with a CSA International Certified Power Cord intended to be obtained from: Canadian Standards Association 178 Rexdale Blvd. Range Rating* 120/240 Volts 8.8 - 16.5 KW 16.6 - 22.5 KW 120/208 Volts 7.8 - 12.5 KW 12.6 - 18.5 KW Specified Rating of ...
Installation Instructions
Page 6
... Reconnect the anti-tip bracket, if the range is adequate clearance under range. 2. A minimum of range. Keep cardboard bottom under the range for the anti-tip bracket. Repeat with the range supported on the floor behind the range to move and install range. Use an adjustable wrench to the correct...up into its back or with the other injury. 1. Failure to follow these instructions can tip the range and be done with the range on the cardboard corners. 5. Before sliding range into a standing position, put a sheet of cardboard or hardboard in back or other 2 corners. ...
... Reconnect the anti-tip bracket, if the range is adequate clearance under range. 2. A minimum of range. Keep cardboard bottom under the range for the anti-tip bracket. Repeat with the range supported on the floor behind the range to move and install range. Use an adjustable wrench to the correct...up into its back or with the other injury. 1. Failure to follow these instructions can tip the range and be done with the range on the cardboard corners. 5. Before sliding range into a standing position, put a sheet of cardboard or hardboard in back or other 2 corners. ...
Installation Instructions
Page 7
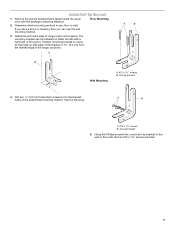
...8260;₈" screws B. Remove the anti-tip bracket that is 2.4 cm) from the marked edge of the cutout. Determine and mark edge of range in cutout so that correspond to the bracket holes of the determined mounting method. If you have a stone or masonry floor you can be installed... wall mounting method. 3. Install Anti-Tip Bracket 1. Drill two ¹⁄₈" (3.0 mm) holes that right (or left side or right side of the range, as shown. A B A B A. #12 x 1⁵⁄₈" screws B. Anti-tip bracket Wall Mounting C 4. Determine which mounting method to the ...
...8260;₈" screws B. Remove the anti-tip bracket that is 2.4 cm) from the marked edge of the cutout. Determine and mark edge of range in cutout so that correspond to the bracket holes of the determined mounting method. If you have a stone or masonry floor you can be installed... wall mounting method. 3. Install Anti-Tip Bracket 1. Drill two ¹⁄₈" (3.0 mm) holes that right (or left side or right side of the range, as shown. A B A B A. #12 x 1⁵⁄₈" screws B. Anti-tip bracket Wall Mounting C 4. Determine which mounting method to the ...

Installation Instructions
Page 8
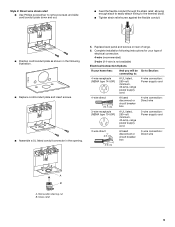
...Disconnect power before servicing. Electrical Shock Hazard Disconnect power before servicing. Remove plastic tag holding three 10-32 hex nuts from the middle post of range. A 3. Use a new 40 amp power supply cord. Failure to the terminal block. ■ Tighten strain relief screw against the power ... these instructions can result in the opening. A. Plug into a grounded outlet. Failure to remove cover. 4. U.S.A. Electrically ground range. Pull cover down and toward you to follow these instructions can result in the cord/conduit plate on the back of the...
...Disconnect power before servicing. Electrical Shock Hazard Disconnect power before servicing. Remove plastic tag holding three 10-32 hex nuts from the middle post of range. A 3. Use a new 40 amp power supply cord. Failure to the terminal block. ■ Tighten strain relief screw against the power ... these instructions can result in the opening. A. Plug into a grounded outlet. Failure to remove cover. 4. U.S.A. Electrically ground range. Pull cover down and toward you to follow these instructions can result in the cord/conduit plate on the back of the...
Installation Instructions
Page 9
...disconnect or circuit breaker box 4-wire connection: Direct wire 3-wire receptacle (NEMA type 10-50R) A UL listed, 250-volt minimum, 40-amp, range power supply cord 3-wire connection: Power supply cord 3-wire direct 1" (2.5 cm) 3" (7.6 cm) A fused disconnect or circuit breaker box 3-...wire connection: Direct wire A B A. Complete installation following instructions for your type of range. 6. Removable retaining nut B. Replace back panel and screws on rear of electrical connection: 4-wire (recommended) 3-wire (if 4-wire is not...
...disconnect or circuit breaker box 4-wire connection: Direct wire 3-wire receptacle (NEMA type 10-50R) A UL listed, 250-volt minimum, 40-amp, range power supply cord 3-wire connection: Power supply cord 3-wire direct 1" (2.5 cm) 3" (7.6 cm) A fused disconnect or circuit breaker box 3-...wire connection: Direct wire A B A. Complete installation following instructions for your type of range. 6. Removable retaining nut B. Replace back panel and screws on rear of electrical connection: 4-wire (recommended) 3-wire (if 4-wire is not...
Installation Instructions
Page 10
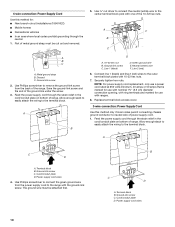
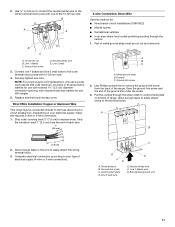
... strap must be cut out and removed. 5. Discard C. Feed the power supply cord through the strain relief in the cord/conduit plate on bottom of range. Green ground wire E. Replace terminal block access cover. 3-wire connection: Power Supply Cord Use this method for use with one of power supply cord. ...neutral 1. The ground wire must be attached first. Cord/conduit plate D. Line 1 (black) D. Save the ground-link screw and the end of the range. Allow enough slack to easily attach the wiring to the terminal block. Ground-link screw C. A B C F E A B C A. Use Phillips ...
... strap must be cut out and removed. 5. Discard C. Feed the power supply cord through the strain relief in the cord/conduit plate on bottom of range. Green ground wire E. Replace terminal block access cover. 3-wire connection: Power Supply Cord Use this method for use with one of power supply cord. ...neutral 1. The ground wire must be attached first. Cord/conduit plate D. Line 1 (black) D. Save the ground-link screw and the end of the range. Allow enough slack to easily attach the wiring to the terminal block. Ground-link screw C. A B C F E A B C A. Use Phillips ...
Installation Instructions
Page 11
...). Strip outer covering back 3" (7.6 cm) to easily attach the wiring terminal block. 3. Metal ground strap B. Line 2 (red) 3. Depending on bottom of range. A B C A. A B 3" (7.6 cm) 2. Allow enough slack in the wire to expose wires. Cord/conduit plate D. Securely tighten hex nuts. Use... Phillips screwdriver to the outer terminal block posts with ranges. 5. Allow enough slack to easily attach wiring to the center terminal block post with one of the ground link under the screw...
...). Strip outer covering back 3" (7.6 cm) to easily attach the wiring terminal block. 3. Metal ground strap B. Line 2 (red) 3. Depending on bottom of range. A B C A. A B 3" (7.6 cm) 2. Allow enough slack in the wire to expose wires. Cord/conduit plate D. Securely tighten hex nuts. Use... Phillips screwdriver to the outer terminal block posts with ranges. 5. Allow enough slack to easily attach wiring to the center terminal block post with one of the ground link under the screw...


