Maytag MET8665XS Support Question
Maytag MET8665XS Support Question
Find answers below for this question about Maytag MET8665XS.Need a Maytag MET8665XS manual? We have 2 online manuals for this item!
Question posted by msgtdwanzer on December 22nd, 2012
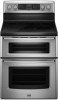
How Do You Remove Part Number W10097310 Ss On Range Model Met8665xs01?
From control panel parts. Is the panel parts 1 assembly? Will part W10097310 come off without removeing other parts with it?
Current Answers
Related Maytag MET8665XS Manual Pages
Owners Manual - Page 4
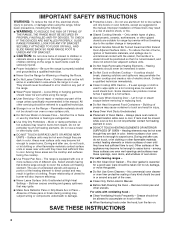
... NOT TOUCH SURFACE UNITS OR AREAS NEAR UNITS - Remove broiler pan and other servicing should be allowed to children in
cabinets above a range or on any part of the range.
■ Wear Proper Apparel - Be sure the range is used in or around any part of the range unless specifically recommended in the manual. Moist or damp...
Owners Manual - Page 5

...
Dual and Triple Elements
■ Large diameter cookware. ■ Large quantities of your model.
REMEMBER: When range is located on some or all controls when done cooking. Cooktop On Indicator Lights A cooktop On Indicator light is in use or (on the control panel.
Medium High
■ Hold a rapid boil. ■ Quickly brown or sear food...
Owners Manual - Page 12
...185;⁄₂" (1.3 cm) between pans and the broil element.
4 3
To Remove Oven Racks:
2
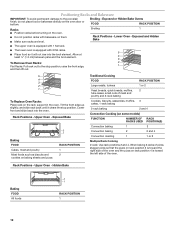
Flat Racks: Pull rack out to the porcelain finish, do not ... oven. Exposed Bake
Baking FOOD
Cakes, meat and poultry
Most foods such as biscuits and cookies on some models)
FUNCTION
NUMBER OF RACK RACKS USED POSITION(S)
Convection baking
1
3
Convection baking
2
2 and 4
Convection roasting
1
...
Owners Manual - Page 19
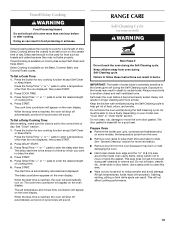
RANGE CARE
Self-Cleaning Cycle
(on the oven display. Press the Temp/Time "+" or "-" pads to enter a temperature other than the one displayed, then press START.
2. The cook time countdown will appear on some models...white spots can result in burns. Press the button for more information.
■ Remove any loose soil to certain birds.
This will shut off during the Self-Cleaning ...
Owners Manual - Page 21
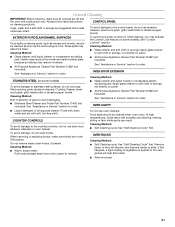
...: See "Self-Cleaning Cycle" first.
These spills may remove numbers.
■ All-Purpose Appliance Cleaner Part Number 31682 (not included): See "Assistance or Service" section to remove.
COOKTOP CONTROLS
To avoid damage to the control panel, do not use oven cleaners.
CONTROL PANEL
To avoid damage to the cooktop controls, do not soak knobs.
OVEN CAVITY
■ Liquid...
Owners Manual - Page 22
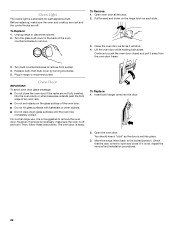
...For normal range use, it away from socket. 4. To Replace: 1. If it will shut. 4. Unplug range or disconnect power. 2. Turn bulb counterclockwise to the locked position.
Move the hinge levers back to remove from the..., repeat the removal and installation procedures.
22 You should hear a "click" as it is necessary, make sure the oven and cooktop are cool and the control knobs are not...
Owners Manual - Page 23

...number? See "Assistance or Service" section. Close the oven door all the way.
■ Has the function been entered? See "Self-Cleaning Cycle" section.
■ On some models, reset the clock, if needed. Oven will not operate
■ Is the control... supply cord unplugged?
See "Cooktop Controls" section.
■ Is the range level? See "Control Lockout" section. Oven temperature too ...
Owners Manual - Page 24
... Road Benton Harbor, MI 49022-2692
Cooktop Cleaner (ceramic glass models) Order Part Number 31464
Stainless Steel Cleaner and Polish (stainless steel models) Order Part Number 31462
All-Purpose Appliance Cleaner Order Part Number 31682
Broiler Pan Order Part Number 4396923
Please include a daytime phone number in your correspondence.
■ Use and maintenance procedures. ■ Accessory...
Owners Manual - Page 25

... accordance with original model/serial numbers that existed when ...range and that have been removed, altered or cannot be provided by the customer. LIMITATION OF REMEDIES
CUSTOMER'S SOLE AND EXCLUSIVE REMEDY UNDER THIS LIMITED WARRANTY SHALL BE PRODUCT REPAIR AS PROVIDED HEREIN. In the U.S.A., call 1-800-807-6777.
5/10
25 SECOND THROUGH TENTH YEAR LIMITED WARRANTY (CERTAIN COMPONENT PARTS...
Installation Instructions - Page 2
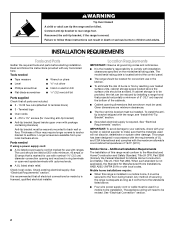
... marked for mounting anti-tip bracket)
■ Anti-tip bracket (taped inside upper oven with ranges. Parts needed
■ Tape measure ■ Level
■ Wrench or pliers nut driver
■ ...longer screws to anchor bracket to be avoided. The model/serial rating plate is located behind the control panel.
■ The range should be revised. See "Electrical Requirements" section....
Installation Instructions - Page 3
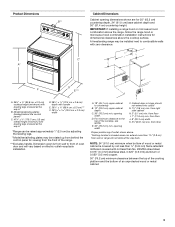
... with leveling legs screwed all the way in *
B. E. 30" (76.2 cm) min. opening width.
B D
C
C*
A E
D
F
E***
J G
I . 7" (17.8 cm) min. Model/serial/rating plates (located behind the control panel for dimensional clearances above the range, follow the range hood or microwave hood combination installation instructions for viewing from the front of outlet shown above. *Nothing...
Installation Instructions - Page 4

... grounding through the neutral conductor is less than the total connected load listed on the model/serial number rating plate. This cord contains 3 copper conductors with ring terminals or open -end ...the range.
■ The wiring diagram is located on the Tech Sheet.
■ The Tech Sheet is located behind the control panel. or 50-amp power supply cord (pigtail) (see the following Range ...
Installation Instructions - Page 5

... is less than the total connected load listed on the model/serial rating plate.
**If connecting to a 50-amp ...are in conformance with CSA Standard C22.1, Canadian Electrical Code, Part 1 - Toronto, ON M9W 1R3 CANADA
■ Check with... local codes and ordinances. Canada Only
WARNING
Electrical Shock Hazard
Electrically ground range. Be sure that specify use with a nominal 1³⁄₈"...
Installation Instructions - Page 6
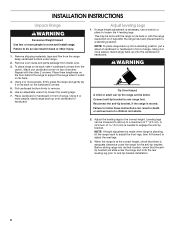
..., take 4 cardboard corners from the
carton. NOTE: If height adjustment is made when range is moved. Adjust Leveling Legs
1. Place them lengthwise on the floor behind the range to engage the anti-tip bracket. Remove oven racks and parts package from the range. Connect anti-tip bracket to adjust the rear legs.
3. A minimum of another.
Installation Instructions - Page 7
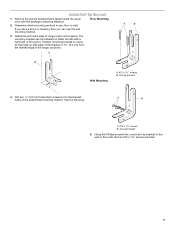
...can use : floor or wall. Drill two ¹⁄₈" (3.0 mm) holes that right (or left side or right side of the range, as shown. A
B
A. #12 x 1⁵⁄₈" screws B. Anti-tip bracket
5. See the following. Install Anti-Tip Bracket... screws provided.
7 Anti-tip bracket
Wall Mounting
C
4. Remove the anti-tip bracket that is 2.4 cm) from the marked edge of the cutout.
Installation Instructions - Page 8

... terminal block cover screw located on bottom of range. Failure to remove cover.
4. Electrically ground range. Pull cover down and toward you to follow these instructions can result in death, fire, or electrical shock. Style 1: Power supply cord strain relief ■ Assemble a UL listed strain relief in the cord/conduit plate on the back...
Installation Instructions - Page 9
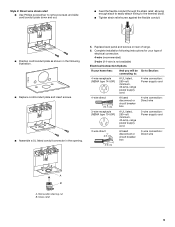
...panel...range. 6. Style 2: Direct wire strain relief
■ Use Phillips screwdriver to remove... screws and slide cord/conduit plate down and out.
■ Feed the flexible conduit through the strain relief, allowing enough slack to easily attach wiring to :
4-wire receptacle (NEMA type 14-50R)
A UL listed, 250-volt minimum, 40-amp, range...minimum, 40-amp, range power supply cord
3-wire ...
Installation Instructions - Page 10
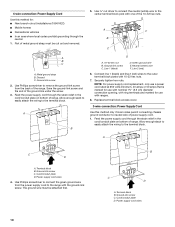
...D. Line 1 (black)
D. Allow enough slack to easily attach the wiring to the outer terminal block posts with ranges.
8.
Power supply cord wires
10 Part of range. A B C
F E
A B C
A. A
B
D
A. 10-32 hex nut B. Replace terminal ...metal ground strap must be cut out and removed.
5. Ground-link screw C.
Connect line 1 (black) and line 2 (red) wires to the...
Installation Instructions - Page 11
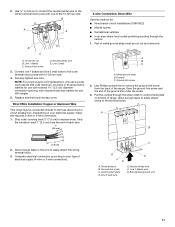
... be cut out and removed.
Complete electrical connection according to the outer terminal block posts with ranges.
5. Ground-link screw
D.
Ground-link screw C. Cord/conduit plate D. Bare (green) ground wire
11 A
E
D B
C
A. 10-32 hex nut B. Line 2 (red)
3.
Part of each wire.
1" (2.5 cm)
4-wire Connection: Direct Wire Use this method for use with 10...
Installation Instructions - Page 12

... (red) wire
Bare Wire Torque Specifications Attaching terminal lugs to the center terminal block post with one of range. Line 2 (red) wire E. Bare (green) ground wire D. Terminal lug
7. Terminal lug B. torque....torque. Line 1 (black) C. Neutral (white) wire F. Setscrew C. Loosen (do not remove) the setscrew on the front of the terminal lug and insert exposed wire end through bottom ...
Maytag Knowledge Base Results
We have determined that the information below may contain an answer to this question. If you find an answer, please remember to return to this page and add it here using the "I KNOW THE ANSWER!" button above. It's that easy to earn points!-
How do I use my temperature controls? - Bottom freezer/French door refrigerator
...Control Initial control settings After plugging in your fresh food compartment. The temperature control range for the refrigerator and freezer controls...Initially set to adjust controls. Allow temperature to the control panel that helps prevent moisture .... If you decide that one number at least 8 to : Change the ... when the feature is on select models) If a water filter ... -
When to change the water filter - Side by side refrigerator
..." to "ORDER" telling you that a filter change the water filter - Enter Model Number How do I find my model number? Base grille with filter in the search tool below. NOTE: Consult your Use&...removing the water filter Animation - If a filter status light/indicator is not present, the filter should the water filter be changed ? On some models) located on the temperature control panel... -
Purchasing accessories or parts
... Code F9A75Q4 in the Review Order screen when you would prefer to email your model number below. Top-load washer Side by entering your request, go here. Purchasing accessories or parts How do I purchase parts or accessories? To order Parts or Accessories, follow these recommendations. To order accessories online, click here. On-line accessory...
Similar Questions

Defrost Timer Reset Switch
where is the defrost timer reset switch on maytag mfd2561heb model
where is the defrost timer reset switch on maytag mfd2561heb model
(Posted by chibbard1 7 years ago)

Maytag Gemini Double Oven Gas Range Model # Mgt8885xs
maytagGemini double oven gas range model # MGT8885xs middle control know on
maytagGemini double oven gas range model # MGT8885xs middle control know on
(Posted by MichBehnke59 8 years ago)

Range Oven Shuts Down Control Panel And Light
The range works and then does not. The control panel stops showing temperature and the oven shuts of...
The range works and then does not. The control panel stops showing temperature and the oven shuts of...
(Posted by warren45482 10 years ago)

Gas Stand Alone Gas Range - Model Mgr5752bdb - No Door Locking Bar?
I have an Amana Model MGR5752BDB Stand Alone Gas Range. It doesn't have aa "locking bar" to close an...
I have an Amana Model MGR5752BDB Stand Alone Gas Range. It doesn't have aa "locking bar" to close an...
(Posted by cstimmel 10 years ago)

Where Can I Find An Owners Manual For An Electric Range, Model Mer5755qab?
(Posted by jlw505 12 years ago)